A/R & Collections
Failed Payment Queue
Support Guide
-
Overview
The Failed Payment Queue enables users to review and resolve payments that were unsuccessful through a third party payment processing integration. Detailed information provides clear insights into the reasons for payment failure and offers straightforward steps for resolving the issue.
Read this guide if you are trying to:
✔ Review why a Customer’s Payment failed with a third party payment processor.
✔ Take action on a specific Failed Payment, such as reprocessing or changing the Payment Method on file.
✔ Take bulk action on Failed Payments to easily notify Customers or remove unnecessary Failed Payments from the list.
-
Intro to the Failed Payment Queue
Failed Payments in Striven are a result of a Payment not being processed correctly through a third party payment processing integration with Striven, such as Authorize.net or Stripe. The Failed Payment Queue is a centralized location where Payments that have failed can be reviewed and managed.
- Note: If you’d like to learn more about setting up a third party payment processing integration with Striven, visit our Integration Guides page to explore details related to our integrations with Authorize.net and/or Stripe.
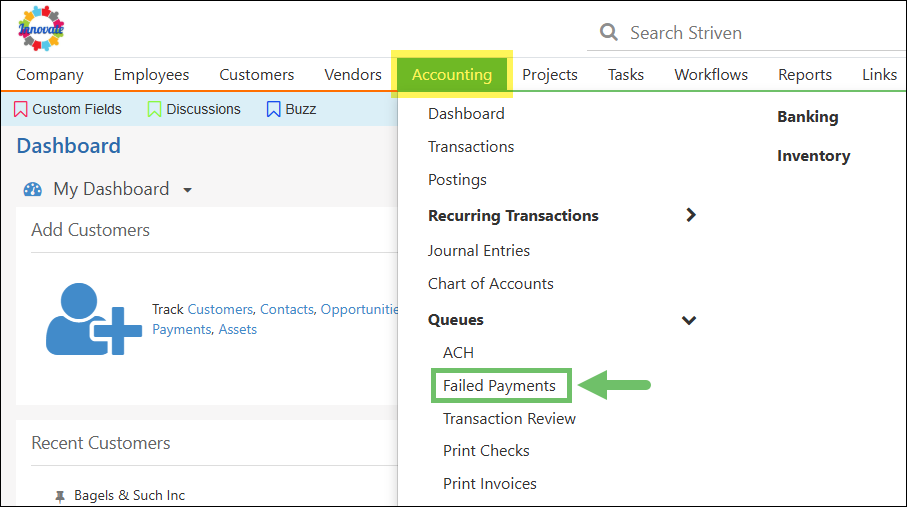
To utilize the Failed Payment Queue, navigate to Accounting → Queues → Failed Payments.

Example of the Failed Payment Queue Option Under the Accounting Menu

-
Permissions
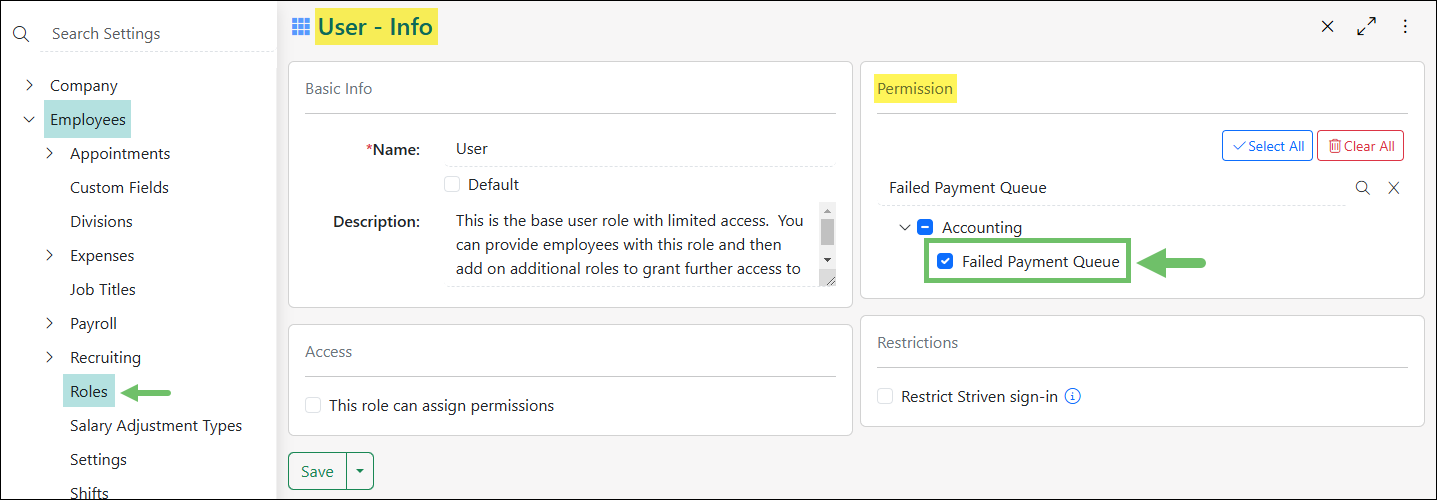
The following permissions will need to be configured for the Employee’s User Role if they will be managing the Failed Payment Queue in Striven:
- “Failed Payment Queue”
To edit or create a User Role, navigate to Company → Settings → Employees → Roles.

Example of a User Role with the Failed Payment Queue Permission

-
Search Options
Striven provides the ability to refine your Failed Payment Queue results by applying search filters to the list of Failed Payments. Available search filters for the Failed Payment Queue include:
- Customer: Filters Failed Payments by Customer to view only those related to a specific Customer.
- Txn #: Searches the Failed Payments Queue for a specific Invoice using the Invoice Number as entered in the Txn # search field.
- Payment Date Range: Enables you to narrow down the list based on the date of the Failed Payment.

Example of Available Search Filters on the Failed Payment Queue

-
Failed Payment Queue Page Info
The Failed Payment Queue provides a comprehensive list of information pertaining to each Failed Payment, enabling you to take appropriate action. Details available on this page include:
- Payment #: Lists the unique identifier assigned to each Payment upon successful creation or reprocessing.
- Payment Date: Displays the original creation date of the Payment as recorded in Striven.
- Customer: Displays the Customer associated with the Failed Payment. The Customer name is hyperlinked to quickly access the related Customer’s Striven record. Below the Customer name is an option to View on Authorize.Net or Stripe to easily access the associated profile in the third party payment processor.
- Payment Method/Integration Type: Notes the Payment Method and the Integration Type that was used for the Failed Payment.
- Sales Order #: Displays the Sales Order associated with the Failed Payment. This link is established through the Invoice that the Failed Payment is intended to settle. This column is hyperlinked, enabling easy access to the Sales Order for further details.
- Txn #: Lists the Invoice Number related to the Failed Payment. This column is hyperlinked to easily access the related Invoice to view more information.
- Failure Reason: Explains why the Payment could not be processed. The reason listed comes directly from your payment processor.
- Amount: Displays the total dollar amount listed on the Failed Payment.

Example of the Information Listed in the Failed Payment Queue

-
Available Queue Actions
You can address Failed Payments individually or by selecting multiple Payments at a time to take actions in bulk, making the process efficient and straightforward.
Single Payment Actions
The following actions can be completed per Failed Payment listed:
- Change Payment Method: Allows users to select a different Payment Method that the Customer has on file to easily reprocess the Failed Payment.
- Reprocess: Attempts to create the Payment in your third party payment system again based on the previously Failed Payment.
- Ignore: Removes the Failed Payment from the list.
- Note: If you Ignore a Failed Payment by accident, you can try to reprocess the Payment by navigating to the related Invoice and either selecting Receive Payment from the Actions menu or by clicking the Receive Payment button on the top-right corner of the Invoice page.

Example of the Single Action Options Available on the Failed Payment Queue

Bulk Payment Actions
The following actions can be completed for multiple selected Failed Payments:
- Send Notification: Once one or multiple Failed Payments are selected from the list you can choose to Send Notification in order to quickly and easily notify the appropriate parties regarding the Failed Payment.
- Ignore All Selected: Once one or multiple Failed Payments are selected from the list you can choose to Ignore All Selected in order to remove the Failed Payments from the list.

Example of the Bulk Action Options Available on the Failed Payment Queue

-
Recap
With this guide, we’ve outlined the process of managing Failed Payments using the Failed Payment Queue. We’ve explored available actions for addressing Failed Payments, both individually and in bulk. We’ve also reviewed methods for filtering the list of Failed Payments based on specific search criteria.
FAQs
-
What if the Payment Profile I have on file for the Customer is no longer valid? How can I easily add a new one?
From the Failed Payments Queue, you can click on the Customer’s Name to easily access their Customer record. From there, you can use the waffle menu to select Financial and then click on the Payment Profiles option from the left-side menu. Then you can click the Add New Payment Method button and follow the prompts to add the new profile.
