
Financials
Banking
Support Guide
-
Overview
Utilizing banking in Striven will enable your Company to manage your Bank and Credit Card Accounts using many tools, including Reconciliations, Deposits, and more. This guide will also help provide information for creating and managing transactions such as Checks, Credit Card Charges, Deposits, and much more. We’ll also discuss Online Banking and how to manage transactions that are linked to Striven from your Account(s).
Read this guide if you are trying to:
✔ Create Credit Card Charges, Checks, and Print Checks using the Print Checks Queue.
✔ Create Deposits and Reconciliations to ensure your Accounts are accurate.
✔ Manage Online Banking to link your Bank or Credit Card Accounts to Striven.
-
Credit Card Charges
Credit Card Charges are transactions that charge a Credit Card Account to pay a Customer/Vendor for goods or services that have been purchased. These transactions can be viewed on the Credit Card Charges List. You can also add new Checks using the Add button. Below is a screenshot displaying how adding a Credit Card Charge appears along with a list describing what can be accomplished there.
The following navigation path will allow you to view the Credit Card Charges List:
Accounting → Banking → Credit Card Charges
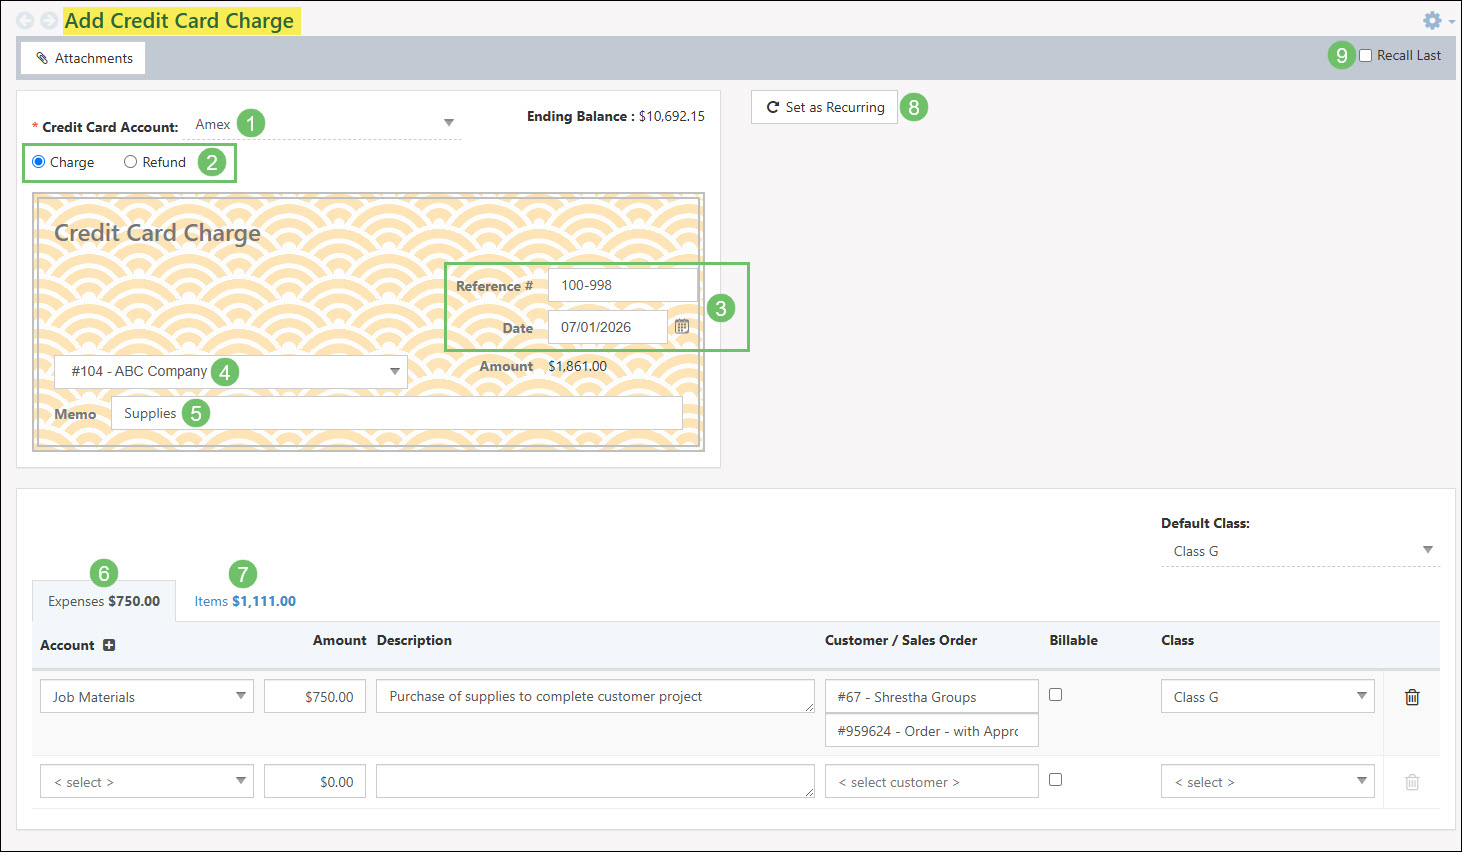
Example of the Add Credit Card Charge Page

- Credit Card Account: Allows you to select a Credit Card Account to use when creating a new Credit Card Charge. The ending balance will appear on the right once an Account is chosen.
- Charge/Refund: There are two options when creating a Credit Card Charge including:
- Charge: To purchase goods or services from Vendors which will credit the Credit Card Account.
- Refund: To debit the Credit Card Account for refunds received from Vendors.
- Reference # & Date: The following fields are available for a reference number and date:
- Reference #: Allows you to write a reference number in this field.
- Date: Allows you to choose a date the Check is to be issued.
- Purchased From: You can choose Vendors you have purchased goods or services from. You can also select Customers using this field when issuing refunds.
- Memo: Allows you to write in a memo for the Credit Card Charge.
- Expenses: Allows you to select GL Accounts to attribute funds to your Credit Card Account. You can also associate a Customer and Sales Order to be billed for the expenses if desired. If billable, you can toggle the checkbox on the Line Item marked Billable.
- Items: Allows you to select what Items are being purchased. You can also associate a Customer and Sales Order to be billed for the Items.
- Set as Recurring: Allows you to set either a daily, weekly, or monthly recurrence for the Credit Card Charge.
- Recall Last: Populates information from the last Check created for the Payee chosen in the Purchased From field on the Check.
-
Checks
Checks are transactions that extract funds from a Bank Account to pay an individual Customer/Vendor for goods or services that have been purchased. You can view Checks on the Checks List, as well as add new Checks using the Add button. Below is an example of how adding a Check appears and a list describing what options are available there.
Use the following steps below to view the Checks List:
Accounting → Banking → Checks
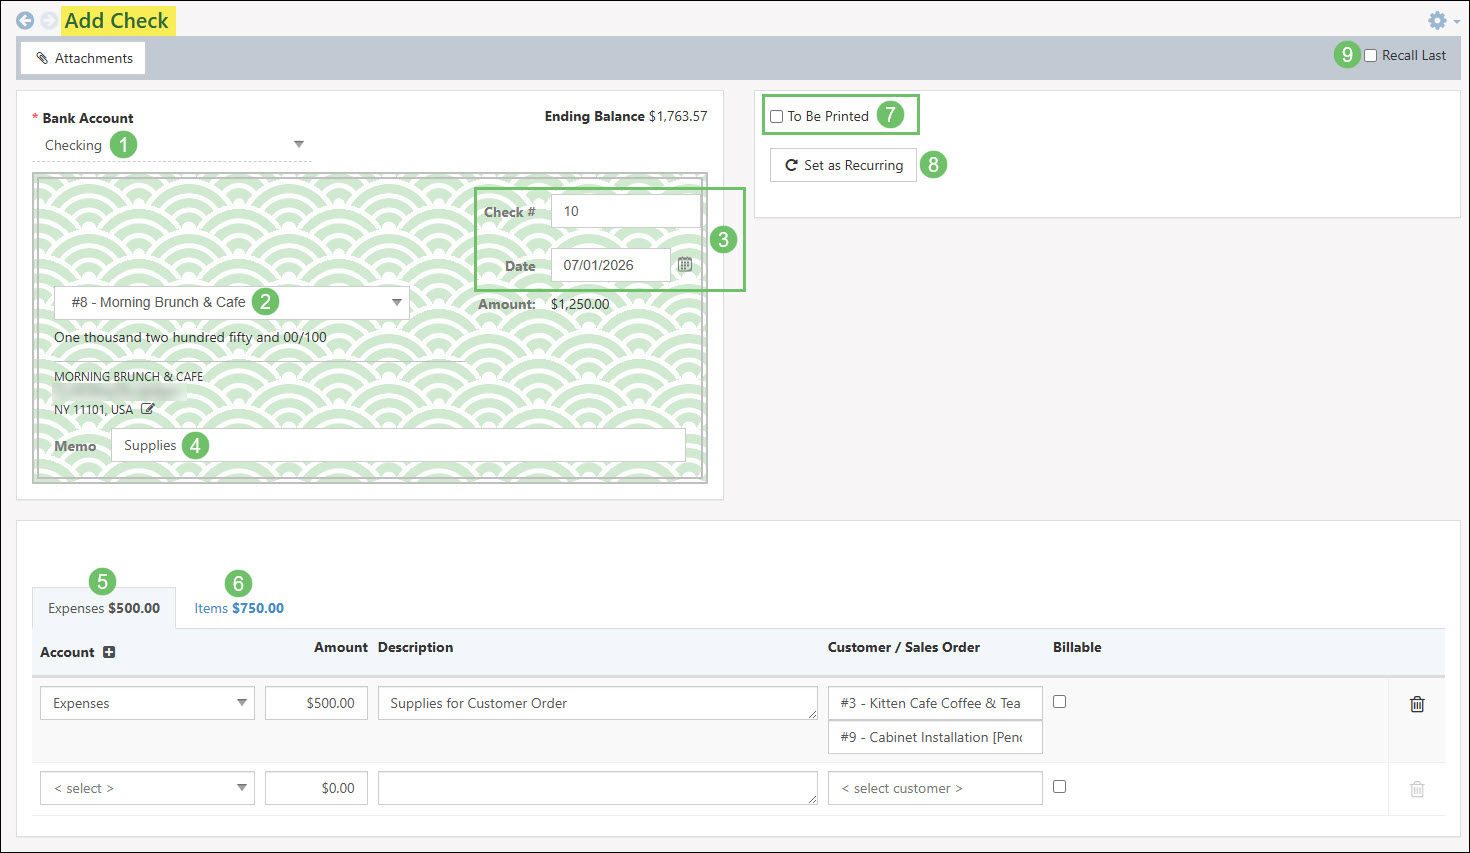
Example of Adding a Check
- Bank: Allows you to select which Bank Account you would like to use when creating a Check. The Account’s ending balance will appear to the right of the Account name once a Bank Account is selected.
- Payable to: Allows you to select who the Check is payable to including Employees, Customers, or Vendors.
- Check # & Date: Fields available with regard to the Check number and date:
- Check #: If To Be Printed has not been toggled on, you can write Checks numbers or things like Wire or ACH in this field.
- Date: Allows you to choose a date on which the Check is issued.
- Memo: Allows you to write in a memo for the Check if desired.
- Expenses: Allows you to select GL Accounts to attribute funds to your Bank Account. You can also associate a Customer and Sales Order to be billed for the expenses.
- Items: Allows you to select the Items being purchased. You can also associate a Customer and Sales Order to be billed for the Items.
- To Be Printed: Determines whether or not the Check should be printed. If toggled on, the Check Number option will state [To be Printed].
- Set as Recurring: Allows you to set either a daily, weekly, or monthly recurrence for the Check.
- Recall Last: Populates information from the last Check created for the Payee chosen in the Payable to field on the Check.
-
Print Checks Queue
Once you have created Checks in Striven, you can use the Print Checks Queue to print them. The Print Checks Queue allows you to print Checks one at a time or en masse simply by selecting Checks you would like to print and clicking the Print button at the bottom of the page. This initiates a popup from which you can choose to print Checks in either a Voucher or Standard format. Standard formats allow you to print multiple Checks per page and the Voucher format will allow you to print one Check per page that also includes the Check details. Below is a screenshot demonstrating how the Printing Settings appear and a list describing what can be accomplished there.
To navigate to the Print Checks Queue :
Accounting → Queues → Print Checks
- Voucher: Provides a two-part combination of a Check and vouchers which includes Check and payee details.
- Note: When using the Voucher format with Striven, please use Check Vouchers with the Check on the top of the page with the Voucher section below.
- Standard: Provides you with the ability to print Check(s) to your local printer. Standard Checks do not contain vouchers as there are generally 3 checks per page.
- Starting Number: You can note the starting number for the Checks being printed. Checks that follow will contain consecutive Check numbers.
- Alignment: Allows you to adjust the Check alignment. The Alignment Offset controls the entire Check layout, while there are individual alignment controls as well. Each point (pt) is equivalent to 1 millimeter to ensure minute adjustments are possible to correctly align your Check information.
- To align horizontally, edit the point numbers in the X column with positive numbers to move right or negative numbers to move left.
- To align vertically, edit the point numbers in the Y column with positive numbers to move up and negative numbers to move down.
- Note: Once the alignment is set, your changes will be saved for the future.
- Add Signature: Allows you to sign your screen to add a signature to Checks printed here.
- Used Saved Signature: If you have a signature saved on your computer, you can upload it here by using the Click to upload instead hyperlink.
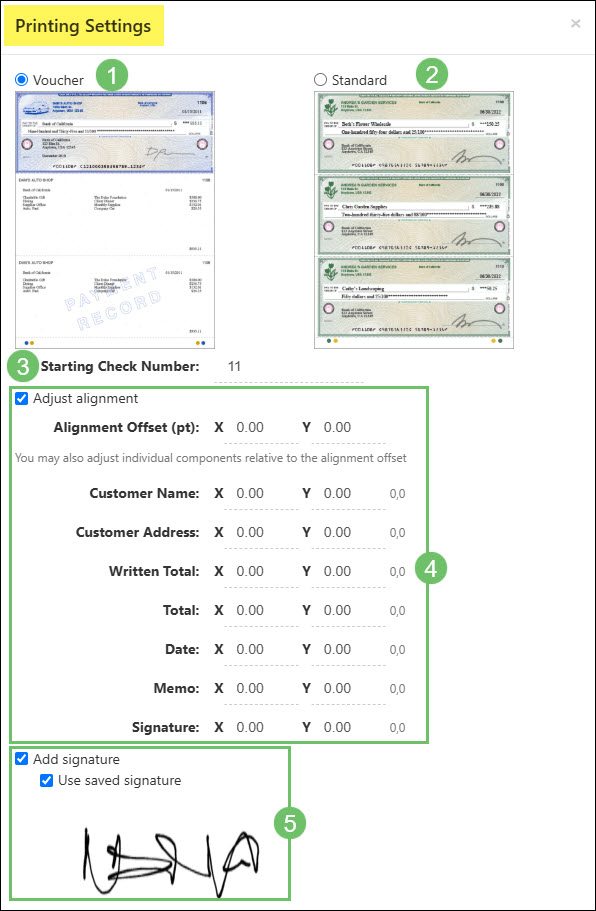
Example of the Check Printing Settings
Printing Checks using a Check/Voucher page setup will list all Voucher line items, even if they extend beyond the initial Check/Voucher page. When the line items exceed the space on the first page, the Check and Voucher will print accordingly with the fitting line items. The remaining items will continue onto the subsequent Check/Voucher page(s). Although the Check on the overflow page will be voided, the Check numbering will remain consistent.
- Voucher: Provides a two-part combination of a Check and vouchers which includes Check and payee details.
-
Adjusting Alignment in Striven for Printing Checks
To print a check, navigate to Accounting → Queues → Print Checks, select the check you want to print, and click Print. A popup window will appear with the Printing Settings.
These settings allow you to adjust the alignment of the checks using the X and Y values. While it may initially seem like the alignment is based on a traditional coordinate plane, Striven uses a slightly different system.
- The X value works similarly to the X-axis on a coordinate plane: a positive value moves the content to the right, and a negative value moves it to the left.
- The Y value, however, behaves differently in Striven. A positive Y value moves the content down, while a negative value moves it up. This is the opposite of a traditional coordinate plane, where positive Y values usually move content upward.
In Striven, the alignment settings are managed within a container, which differs from a coordinate plane’s Y-axis. The X and Y values adjust the content’s positioning accordingly. Be mindful of this distinction when entering your values to ensure accurate alignment.

Example of Adjusting the Y Axis with Check Alignment Option Enabled
Printing Checks using a Check/Voucher page setup will list all Voucher line items, even if they extend beyond the initial Check/Voucher page. When the line items exceed the space on the first page, the Check and Voucher will print accordingly with the fitting line items. The remaining items will continue onto the subsequent Check/Voucher page(s). Although the Check on the overflow page will be voided, the Check numbering will remain consistent.
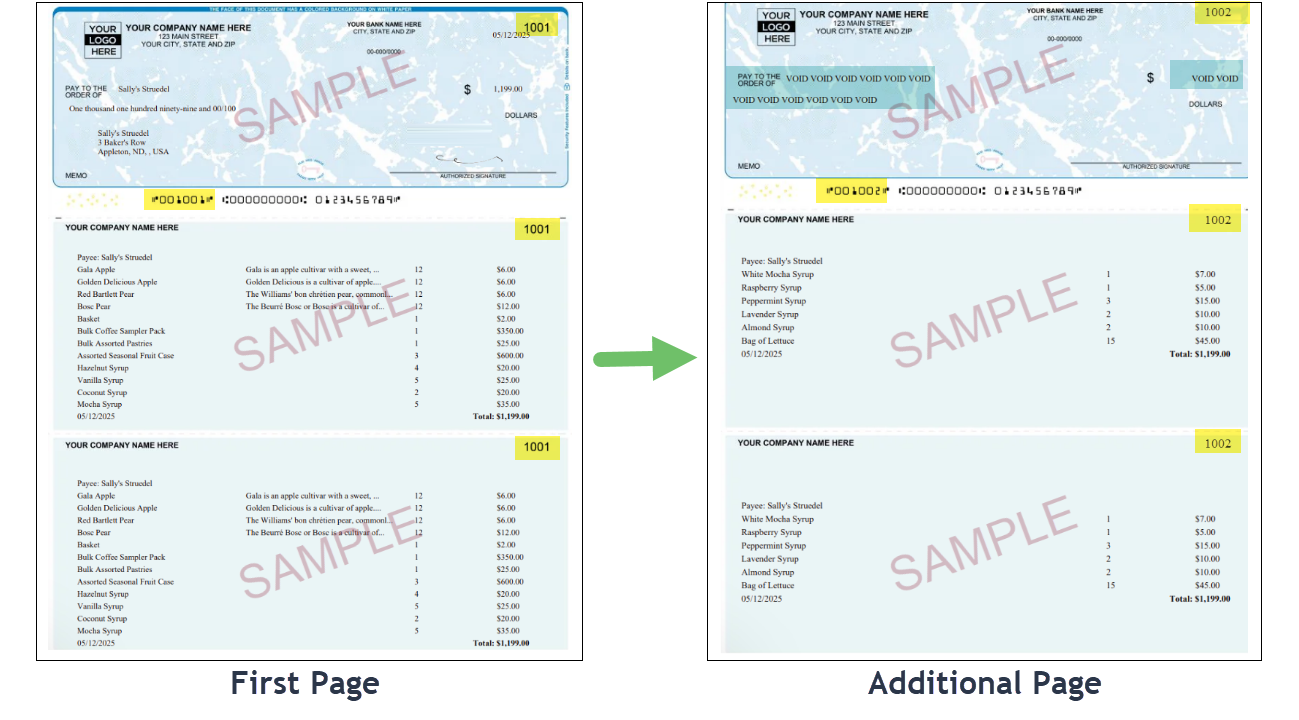
Example of a Check/Voucher Page Printing Overflow Line Items on the Next Page
-
Print Checks Queue Search Filters
There are a variety of search filters that can be used to narrow the results listed in the Print Checks Queue. Below is a screenshot illustrating how the search filters on the Print Checks Queue appear and a description of what can be accomplished there.
- Bank Account: Filters the Print Checks Queue results according to the specific Bank Account chosen for the Check set for printing. The Bank Account that will be preselected will be the last bank account that was chosen on a check that was set to be printed.
- Check Date Range: Locates Checks according to the transaction date specified on the Check scheduled for printing.
- Payee: Displays entries within the Print Checks Queue according to the designated recipient of the Check.
- Include Previously Printed Checks: Adjusts the queue display to incorporate checks that were previously printed, allowing them to be reprinted at any time if required.

Example of the Search Filters on the Print Checks Queue
-
Deposits
One important banking function you can accomplish in Striven is adding bank Deposits. You can view and add new Deposits from the Deposits List. When creating a Deposit, you can allocate funds into a Bank Account by using two functions, including Adding Undeposited Funds and Adding Manual Items. Adding Undeposited Funds allows you to deposit Payments received from Customers that have yet to be deposited. This can be accomplished using the popup which displays undeposited Payments that are available to deposit after clicking the Add Undeposited Funds button. You can also add Manual Items to Deposits which will allocate funds from a GL Account of your choosing into the chosen Bank Account. Below are examples displaying how to adding Manual Items and Undeposited Funds to a Deposit appears and a list describing what can be accomplished there.
Use the following steps below to view the Deposits List:
Accounting → Banking → Deposits
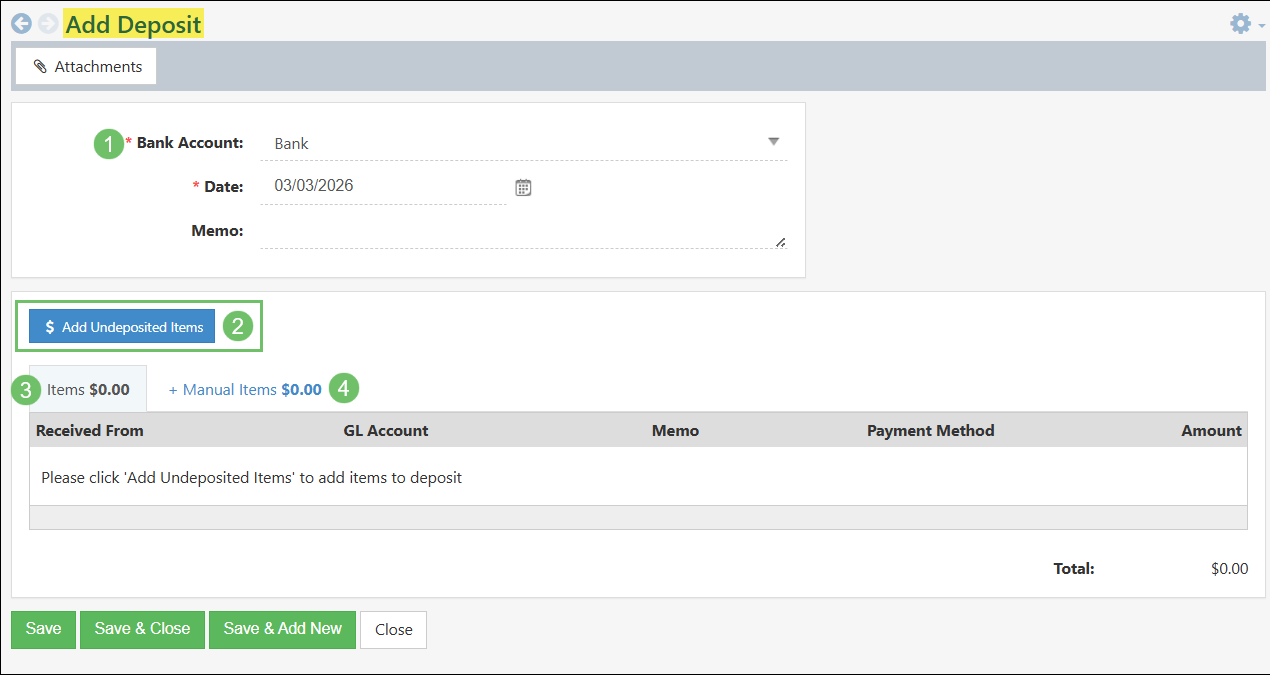
Example of Adding a Deposit
- Bank Account: Allows you to select the Bank Account you would like to deposit funds into.
- Add Undeposited Items: Initiates a popup (as shown in the screenshot below) from which you can add Undeposited Items to the deposit by selecting Payments/Sales Receipts and clicking the Add to Deposit button at the bottom of the popup. Once added, these will appear in the Deposit Items section.
- Items: Displays all Undeposited Items that have been added to the Deposit.
- Manual Items: Allows you to select a GL Account to extract funds from to deposit. You can also associate a Customer, Payment Method, and GL Class (if being tracked).
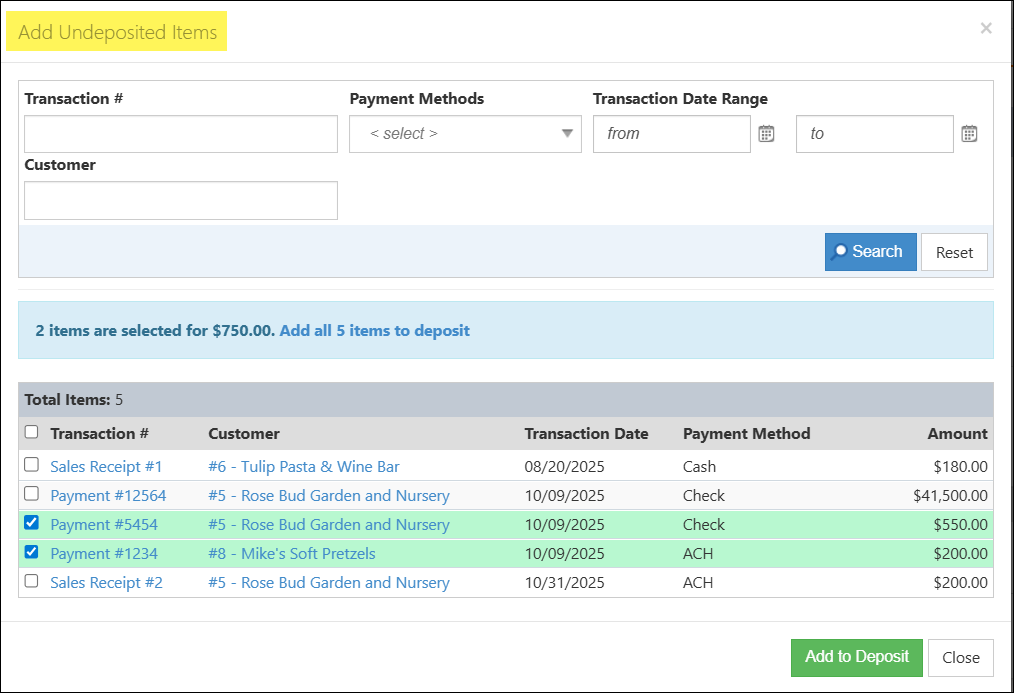
Example of Adding Undeposited Items to a Deposit
-
Journal Entries
Journal Entries are Transactions in which each line represents GL Accounts which are either debited or credited to create an equal amount of Debits and Credits. When selecting a GL Account on a Journal Entry, you can enter the amount in either the Debit or Credit field as needed. Debit and Credit fields will either show up or down arrows depending on the GL Account Type and how debiting or crediting affects the Account.

Example of a Journal Entry
-
Journal Entries List
To view previously created Journal Entries, the Journal Entries list can be accessed. Search filters can be utilized to narrow down results of the Journal Entries list in order to view specific entries that have been added to the system.
To view the Journal Entries list, navigate to Accounting → Journal Entries.
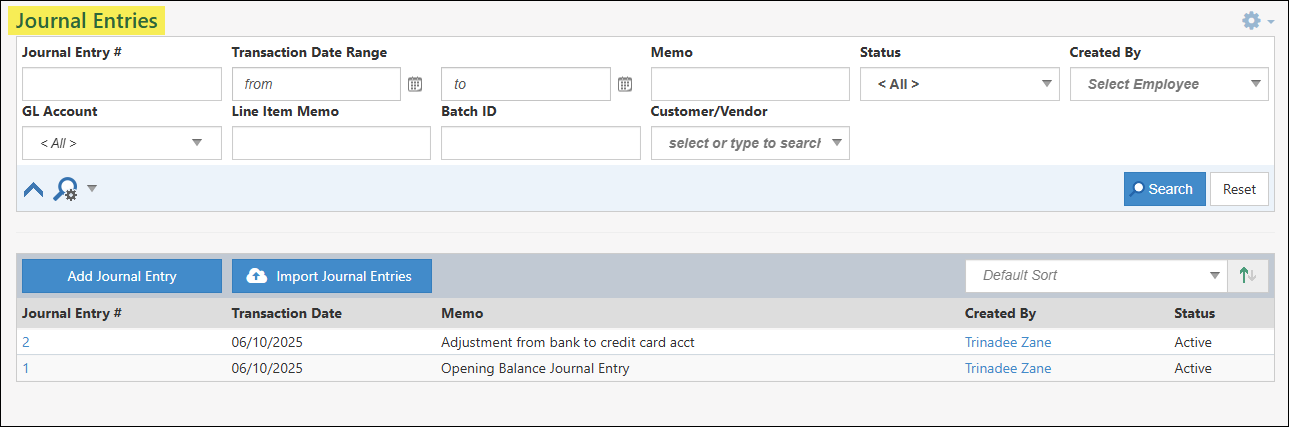
Example of the Journal Entries List
Below is a screenshot illustrating how the Journal Entries list appears and a description of what can be accomplished there.
- Search Filters: There are an array of search filters available on the Journal Entries list to help narrow down results including the following:
- Journal Entry #: Narrows down results based on the Journal Entry number.
- Transaction Date Range: Searches the list based on a beginning and ending date range.
- Memo: Looks into text that is entered into the Memo field within the header information of a Journal Entry.
- Status: Updates the list based on if the Journal Entry is set in an Active or Voided status.
- Created By: Searches the list based on the Employee that created the Journal Entry.
- GL Account: Will base results on GL Accounts that are set within the line items of the Journal Entry.
- Line Item Memo: Looks into the text that is entered into each line item’s memo field within the Journal Entry.
- Batch ID: Narrows results based on the Batch ID that is assigned if the Journal Entry was added to Striven from the Import tool.
- Customer/Vendor: If a Journal Entry has an Accounts Receivable or Accounts Payable account selected on the line items, a Customer or Vendor can be selected to associate the line item. This search filter will narrow results based on that relationship.
- Add Journal Entry: Opens the Add Journal Entry page which will allow the user to add a new Journal Entry into Striven.
- Import Journal Entries: Opens the Journal Entries Import page which will allow the user to add multiple Journal Entries at once.
- Journal Entry #: Lists the Transaction number that has been set or entered onto the Journal Entry. Clicking on the number listed here will open the Journal Entry for more details.
- Transaction Date: Displays the date that has been entered on to the Journal Entry.
- Memo: Shows the text that has been entered into the Memo field within the header information of the Journal Entry.
- Created By: Lists the Employee who created the Journal Entry. Clicking on the Employee’s name listed here will open the Employee Information card for more details about the person.
- Status: Displays whether the Journal Entry is in an Active or Voided status.
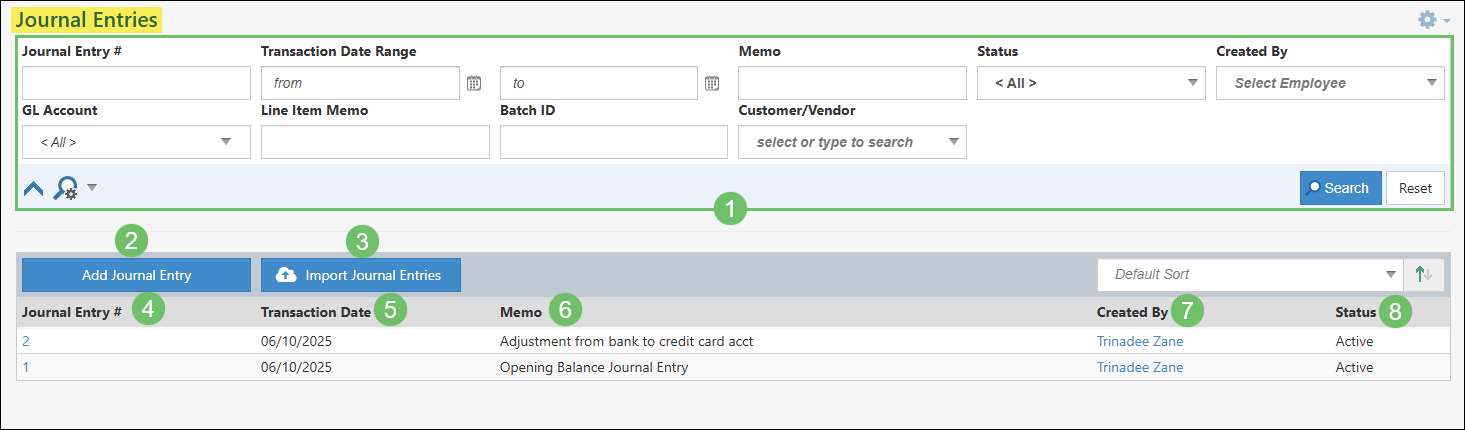
Example of Actions and Information Available from the Journal Entries List
- Search Filters: There are an array of search filters available on the Journal Entries list to help narrow down results including the following:
-
Add Journal Entry
There are a couple of ways you can begin adding a new Journal Entry. The first option is to click the Add Journal Entry button at the top of the Journal Entries list which will open the Add Journal Entry page.

Example of the Add Journal Entry Button on the Journal Entries List
Another way to access the Add Journal Entry page is by selecting Journal Entry from the Quick Add menu available in the Striven menu bar.
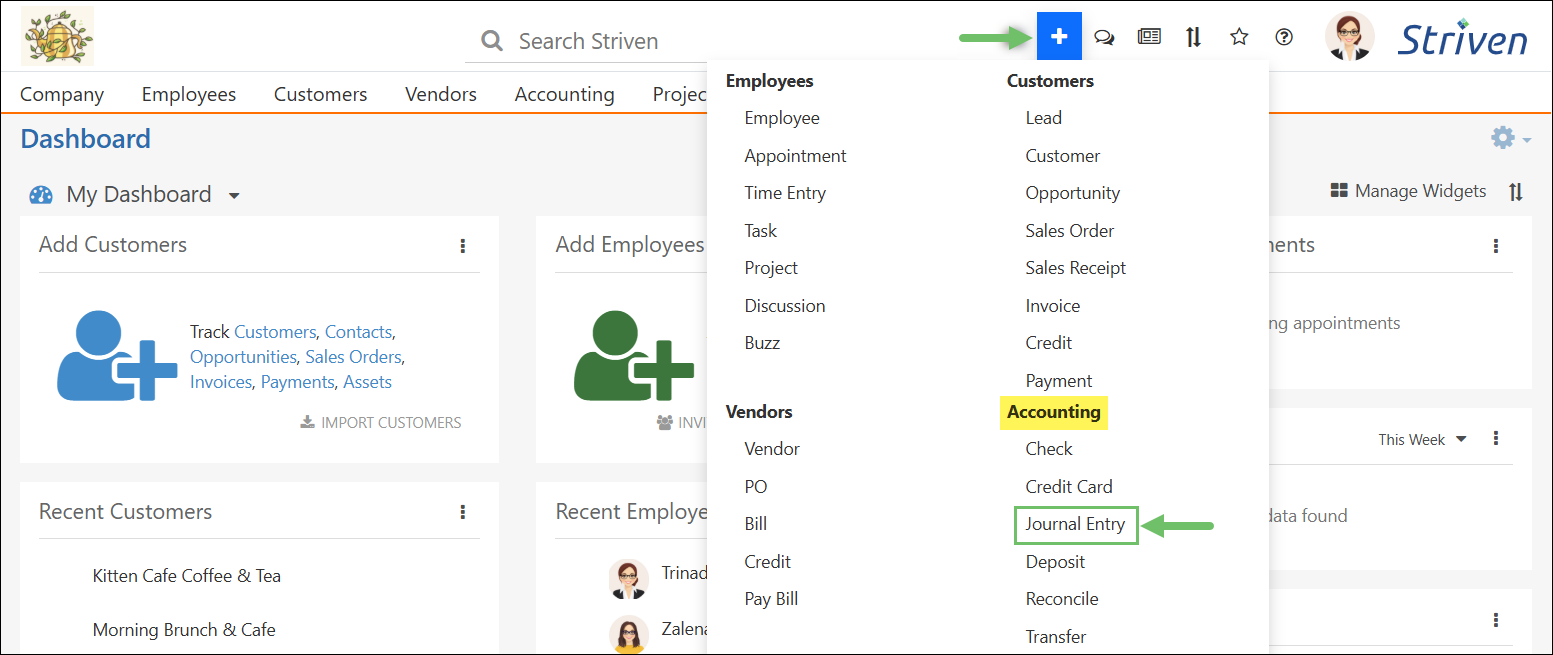
Example of the Journal Entry Option in the Quick Add Menu
Below is a screenshot illustrating how the Add Journal Entry page appears and a description of what can be accomplished there.
- Attachments: Uploads any documentation or files that should be saved and stored with the Journal Entry.
- Create from Template: Allows you to select from previously created Journal Entry Templates in order to prefill information on the Journal Entry for ease of entry.
- Journal Entry #: The Transaction number that will be associated with the Journal Entry. This number will prerefill with the next available number but can be overridden if needed.
- Transaction Date: The date entered here will be the Transaction date associated with the Journal Entry. This date will prefill with today’s date but can be overridden if needed.
- Memo: The text entered here will be set as the Memo for the whole Journal Entry as opposed to each line item on the Journal Entry.
- Set as Recurring: Allows you to set the Journal Entry being created as a recurring Transaction. Recurrence of the Transaction can be set to be created automatically or sent to the Recurring Transactions Review Queue to be created once approved.
- Import Journal Entry Line Items: If a Journal Entry will have many line items, this import tool can be used in order to easily add all the line items for a single Journal Entry at once through a .csv or .txt file.
- Account: The GL Accounts selected here will either be debited or credited the amount entered per line item.
- Debit/Credit: The Debit and Credit columns will either higher or lower the amount of the GL Accounts selected depending on the type of GL Account. Arrows will be shown to indicate if the Account will go lowered or higher. Before the Journal Entry can be saved, the columns must equal the same amount. Any difference between the columns will be shown in parentheses at the top of the columns. Clicking on the number within the parentheses will automatically be set into the last line item on the Journal Entry.
- Line Item Memo: As opposed to having a memo listed for the entire Journal Entry, each individual line item can have a memo entered to indicate the reasoning or any notable information.
- Delete Line Item: Removes the line item from the Journal Entry.
- Save This Journal Entry as a Template: Allows you to save the Journal Entry being created as a Journal Entry Template. Checking on this option will display a Template Name field in order to add a name to the template.
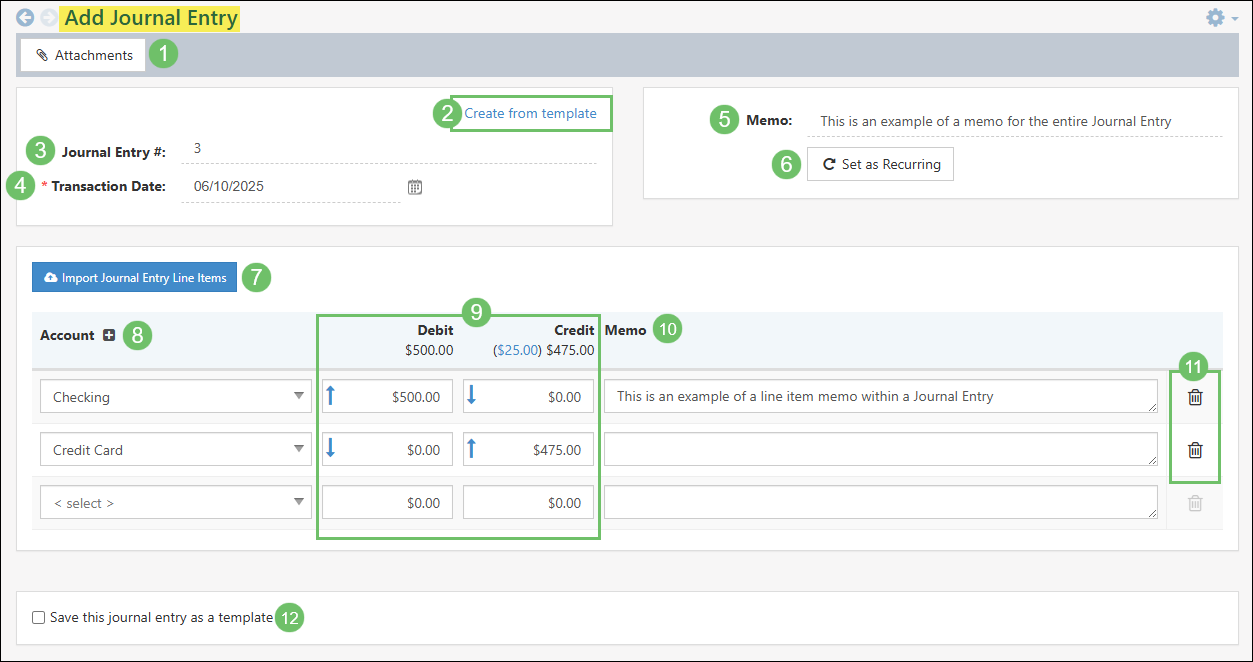
Example of the Available Information and Actions on the Add Journal Entry Page
Accounts Receivable and Accounts Payable Journal Entries
When adding a Journal Entry and an Accounts Receivable or Accounts Payable GL Account has been selected, an additional required field will be added for the line item to associate the debit or credit to a specific Customer or Vendor as shown below.
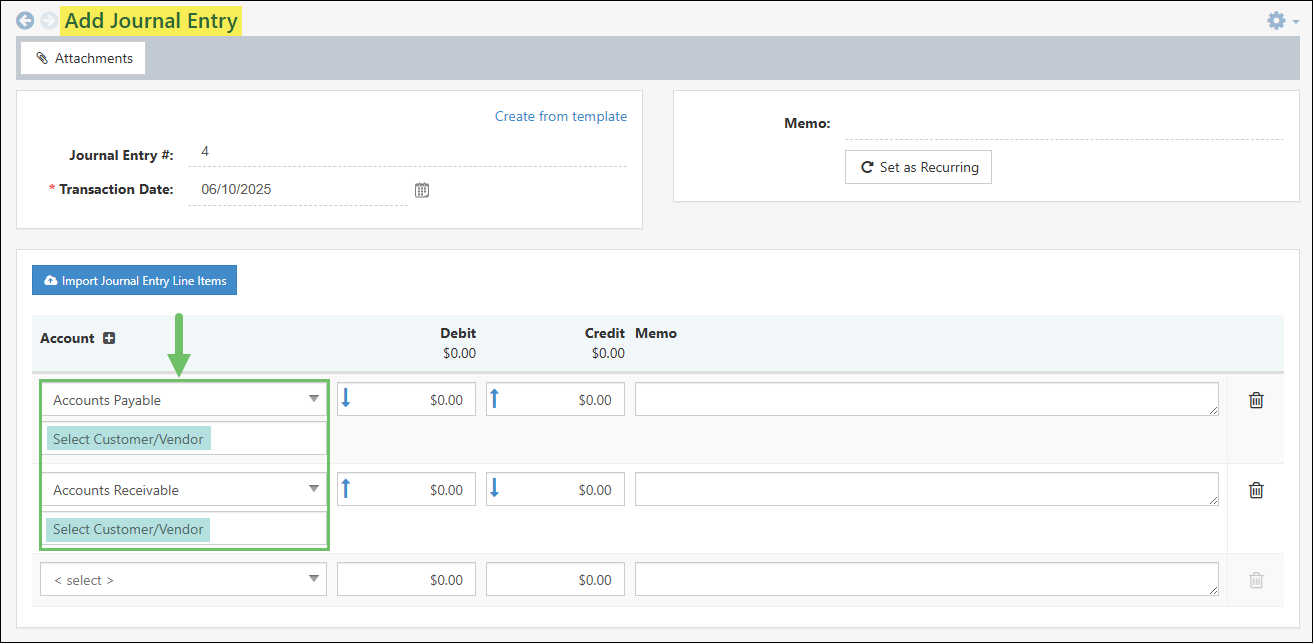
Example of Adding a Journal Entry for AR or AP Type Accounts
-
Journal Entry Templates
To access the Journal Entry Templates list, you will first need to save a Journal Entry as a template. You can save a Journal Entry as a template by checking on the option within the Add Journal Entry page labeled Save this journal entry as a template. Enabling this option will allow you to add a name for the template. Save the Journal Entry for the template to be created.

Example of the Save This Journal Entry as a Template Option on the Add Journal Entry Page
In the future, when creating a Journal Entry, the Create from template option can be selected to choose from previously created templates.

Example of the Create From Template Option on the Add Journal Entry Page
Once you have selected Create from template, a list of the previously created Journal Entry Templates can be selected from. Hovering over the field will also show a Manage option which will open the Journal Entry Templates list to manage and view all Journal Entry Templates.
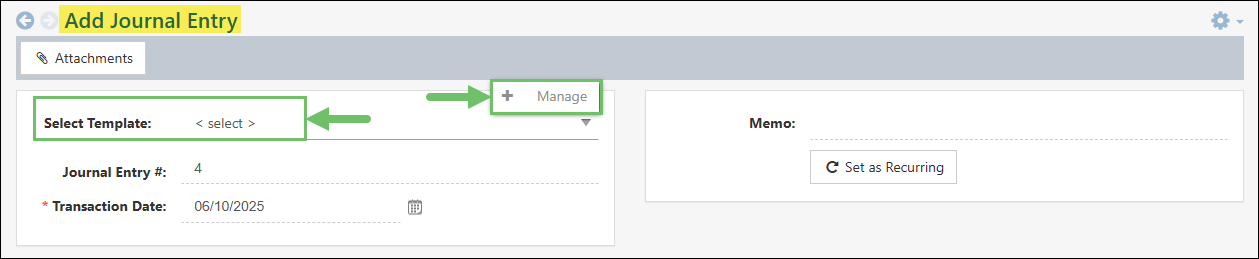
Example of Selecting a Template on the Add Journal Entry Page
Below is a screenshot illustrating how the Journal Entry Templates list appears and a description of what can be accomplished there.
- Search Filters: There are an array of search filters available on the Journal Entry Templates list which include:
- Template Name: Narrows the results listed based on the name that is associated with the Journal Entry Template.
- Memo: Allows you to search for specific text that was entered into the Memo field on the Journal Entry Templates.
- GL Account: Will base results on GL Accounts that are set within the line items of the Journal Entry Templates.
- Line Item Memo: Allows you to search based on specific text that has been entered into the Line Item Memo fields rather than the Memo field for the entire Journal Entry Template.
- Status: Narrows results based on the status of the Journal Entry Template. By default, the search filter will be set to only displaying the Active Journal Entry Templates.
- Customer/Vendor: If a Journal Entry Template has an Accounts Receivable or Accounts Payable account selected on the line items, a Customer or Vendor can be selected to associate the line item. This search filter will narrow results based on that relationship.
- Add Journal Entry Template: Allows the user to create a new Journal Entry Template.
- Template Name: Lists the name of the previously created Journal Entry Templates. Clicking on the name listed here will open the template to view or make necessary changes.
- Memo: Displays the text that has been entered into the Memo field within the header information for the Journal Entry Template.
- Deactivate: Changes the status of the Journal Entry Template to Inactive and will no longer be able to be selected when selecting a template from the Add Journal Entry page.

Example of the Information and Actions Available on the Journal Entry Templates List
- Search Filters: There are an array of search filters available on the Journal Entry Templates list which include:
-
Import Journal Entries
Another way to add Journal Entries into Striven is through the Journal Entry Import tool. This will allow you to add multiple Journal Entries at once through a .csv or .txt file. To use the Journal Entries Import tool click the Import Journal Entries button that is available at the top of the Journal Entries list.
Learn more about importing data into Striven by reviewing our Import Management Guide.
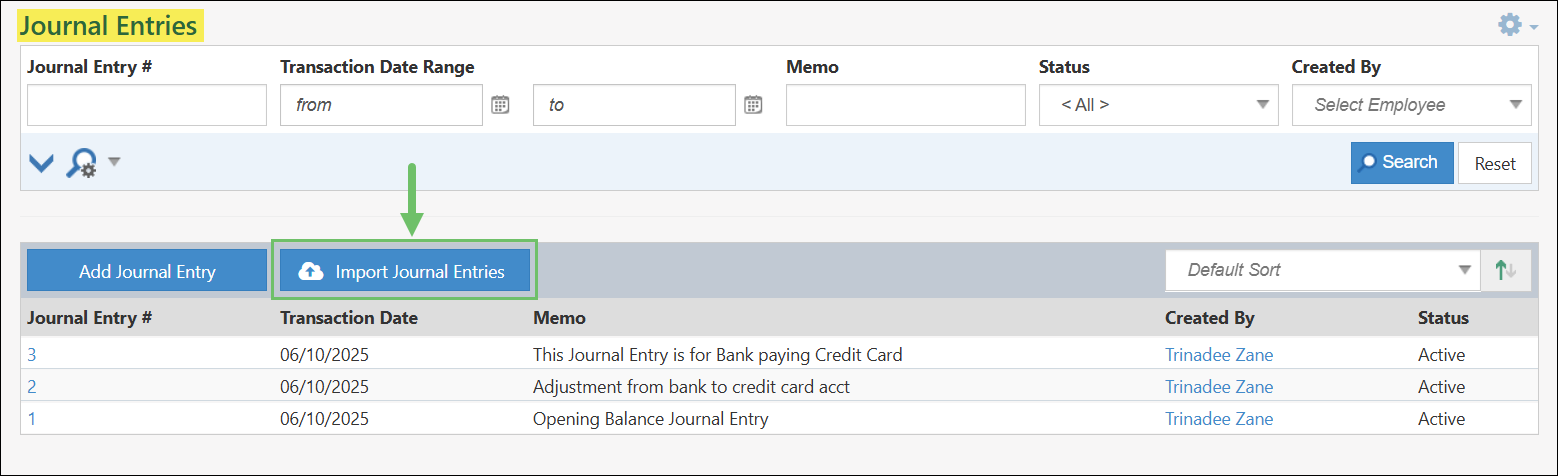
Example of the Import Journal Entries Button on the Journal Entries List
-
Reconciliations
Reconciliations are ways to check and maintain the accuracy of your GL Accounts in Striven according to your bank or credit card statements. Reconciling occurs through checking your statements and the Reconciliation screen within Striven simultaneously to ensure all transactions from your statement are in Striven and accurate both in amount and date. The Reconciliations List will allow you to view, undo, and add new Reconciliations by choosing an Account before clicking the Search button. After choosing an Account and clicking Search, a list of previous or pending Reconciliations will appear. To add a new Reconciliation, click the Reconcile button. This will populate the Statement Info screen on which you can begin the process of reconciling by entering your statement’s ending balance and date. Below is an example of how the Reconcile page appears and a list describing what can be accomplished there.
Use the following steps to view the Reconciliations List:
Accounting → Banking → Reconciliations
- GL Account: Allows you to select GL Accounts to reconcile.
- Statement Date: Allows you to choose the end date of your statement using the Calendar icon.
- Last Reconciled Date: Displays the date on which the Account was last reconciled.
- Beginning Balance: Displays the beginning balance of the Account and will either display as $0 if never reconciled or display the amount from the last Reconciliation’s ending balance.
- Ending Balance: Allows you to enter the ending balance that appears on your statement in order to reconcile in Striven accurately.
- Service Charges: Allows you to enter service charge information for the Reconciliation such as the amount, date, GL Account associated, and the Class.
- Interest Earned: Allows you to enter interest earned information for the Reconciliation such as the amount, date, GL Account associated, and the Class.
- Actions: The following actions are available:
- Next: Allows you to view transactions in Striven in order to reconcile the Account.
- Close: Closes the Reconciliation and bring you back to the Reconciliations List.
- Undo Last Reconciliation: Undoes the last Reconciliation for the selected Account.
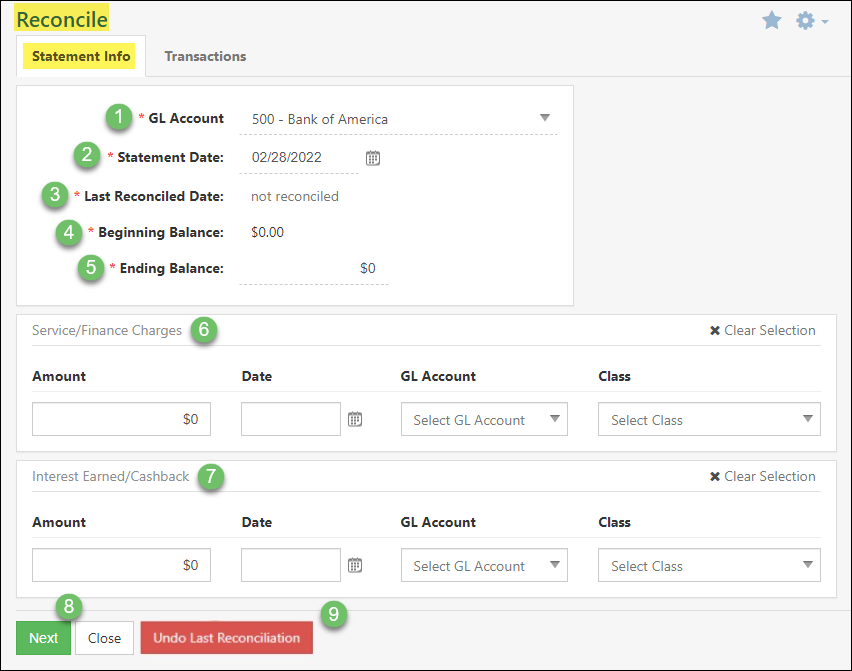
Example of the Reconcile Statement Info Page
-
Reconciliation Clearing
Clicking Next on the Reconciliation Info page will bring you to the Reconcile page which lists transactions on the right and left side of the screen. The left side notes transactions that decrease the Account’s balance. For a Bank Account, this is Checks & Payments, while this side is titled Charges on a Credit Card Account. The right side notes transactions that increase the Account’s balance. For a Bank Account, this is Deposits, while this side is titled Payments on a Credit Card Account. You can clear off transactions by selecting them, which will add up to their cleared balance. The goal of Reconciliation is that your Cleared Balance added to your Beginning Balance should equal the Ending Balance. Below is an example featuring the Reconcile screen and a list describing what can be accomplished there.
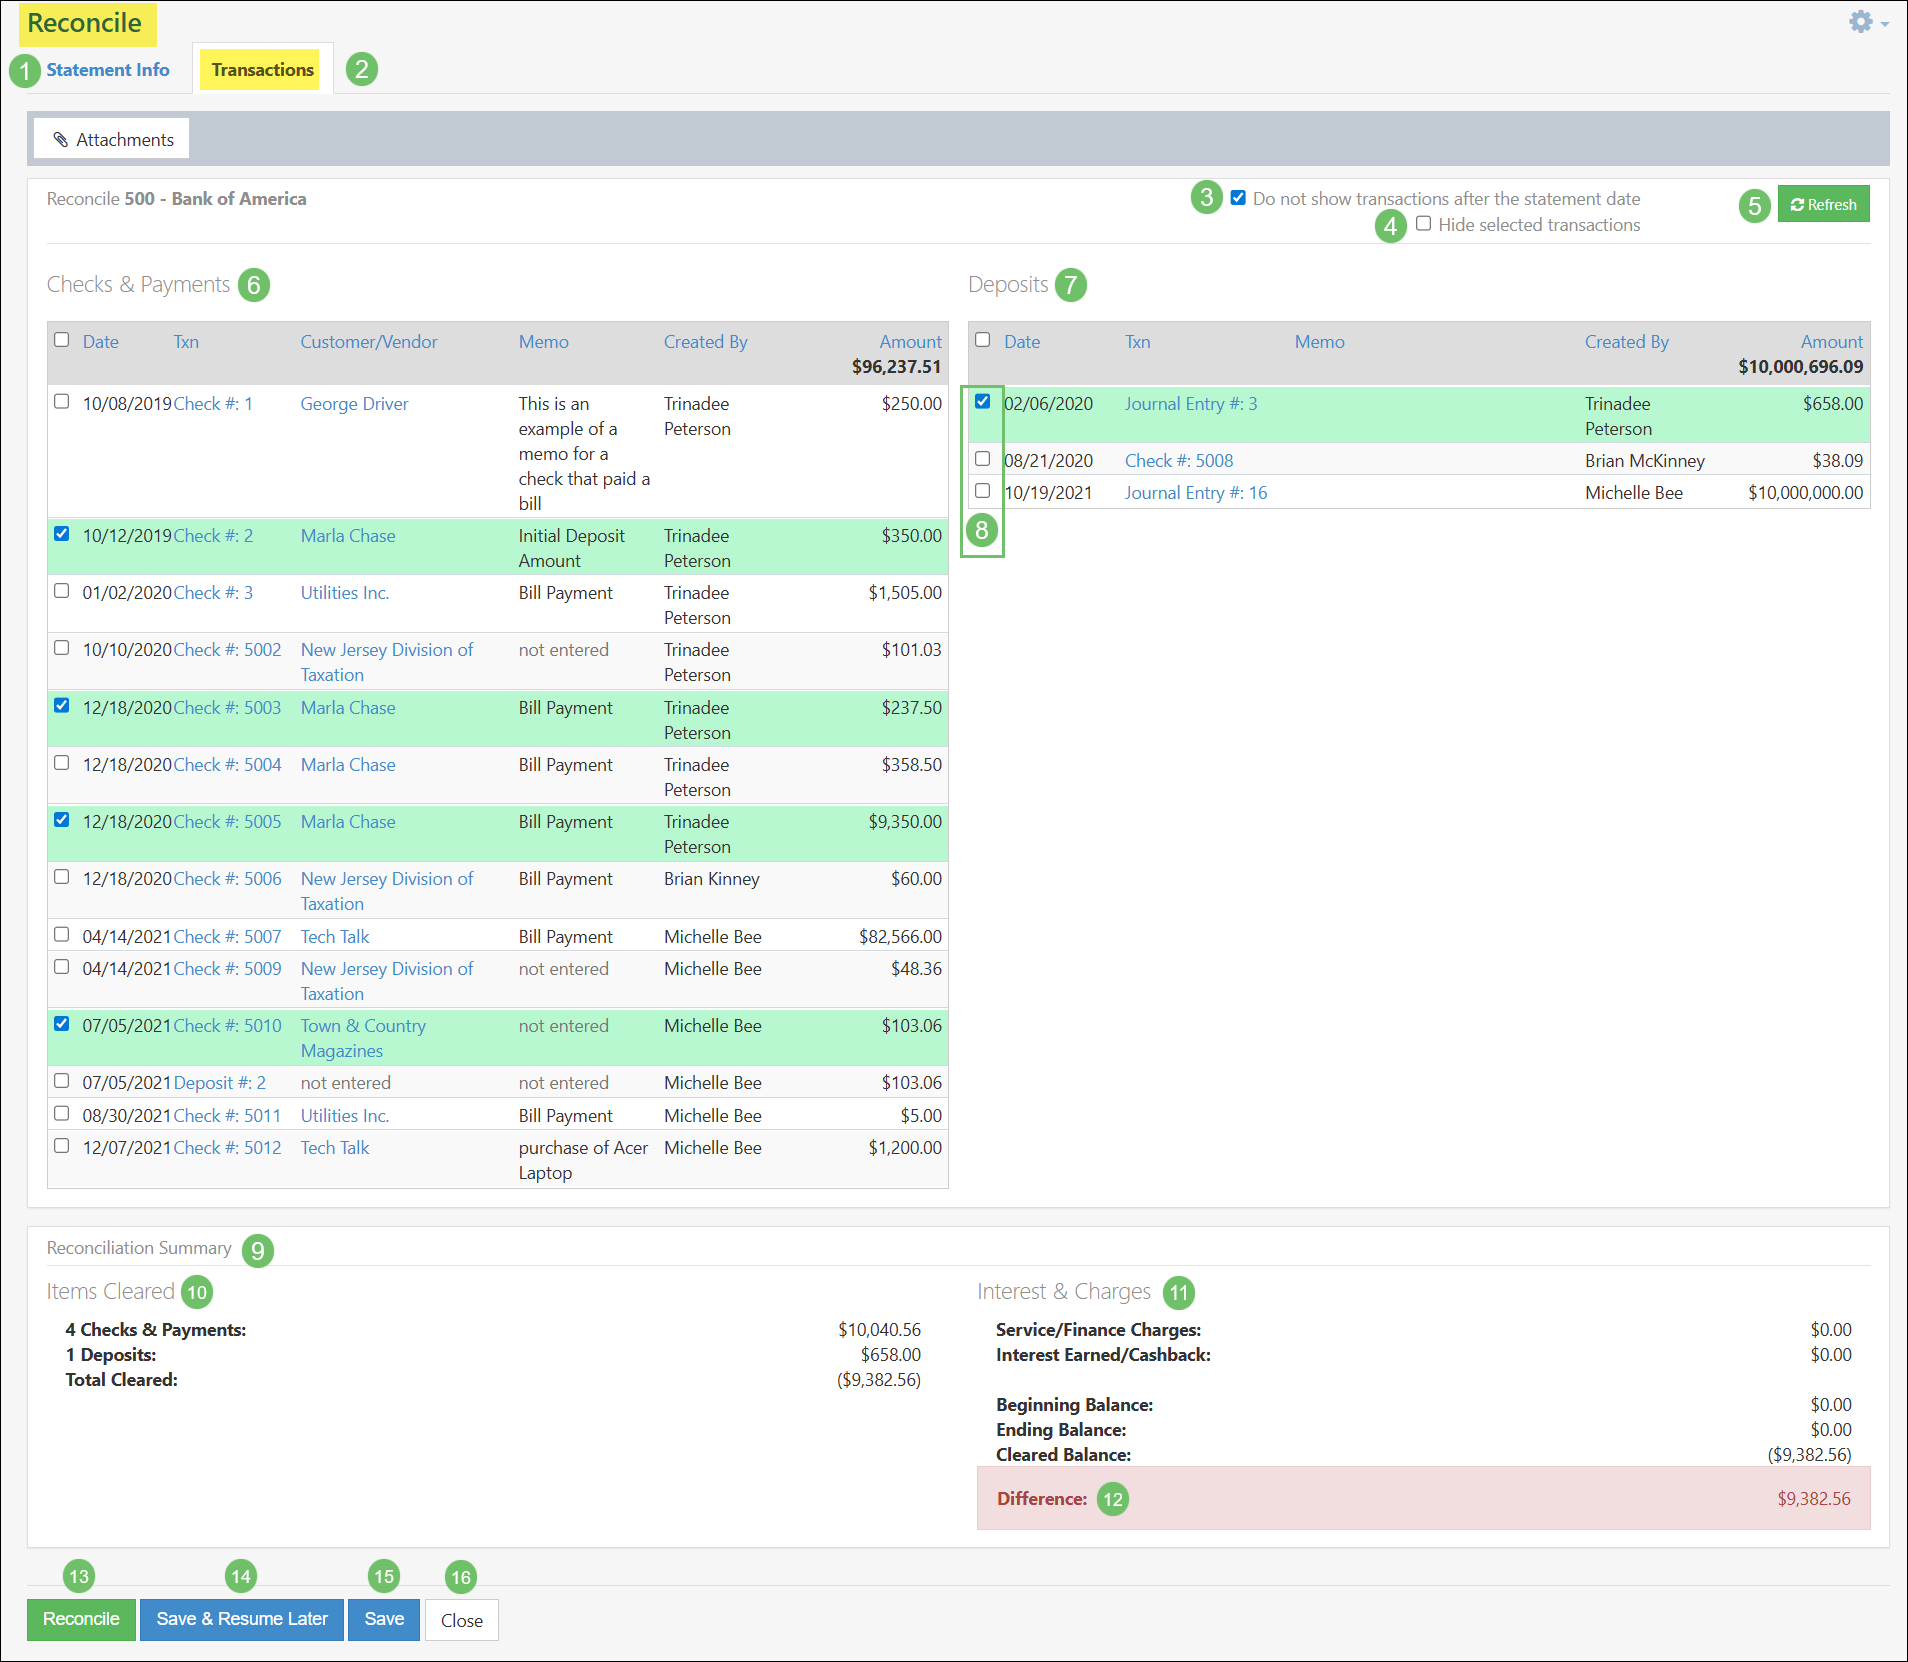
Example of the Reconcile Page
- Statement Info: Populates the Statement Info page (discussed in the above section) and will allow you to change information about their statement including Ending Balance, Date, etc.
- Transactions: Shows all transactions available for Reconciliation within the Account.
- Do not show: When toggled on, this checkbox hides transactions dated after the statement date. If toggled off, this shows transactions dated after the statement date. This will help show transactions that may have been misdated.
- Hide Selected Transactions: Hides the transactions that you have checked off as being cleared to minimize data on the page and to focus on which transactions still needs to be cleared. These hidden transactions will still be included in the Reconciliation calculation and the final saving, but will not clutter the page while working on a Pending Reconciliation. This will save time and effort when determining where you left off when you last worked on the Pending Reconciliation.
- Note: Once the box is checked, the option switches to Show already selected/saved transactions so you can see all the Reconciliation transactions displayed again.
- Refresh: Refreshes the page to show recent changes to transactions.
- Left Side: The Left Side as discussed above is for transactions that decrease the Account’s balance. This side is either titled Checks & Payments or Charges.
- Right Side: The Right Side as discussed above is for transactions that increase the Account’s balance. This side is either titled Deposits or Payments.
- Clear: Either clears or unclears transactions on the Reconciliation. Clearing a transaction indicates that the transaction is accurate and present on your statement and in Striven. Checking this box will also lock the transactions so they cannot be edited or voided while you’re working on a Pending Reconciliation they’re included in.
- Note: When viewing transactions that have been marked as cleared, they will display a Pending Reconciliation tag to alert users as to why they cannot make changes or void the transaction.
- Reconciliation Summary: Shows a summary of the Reconciliation, including Items Cleared and Interest & Charges.
- Items Cleared: Lists a summary of the transactions already cleared and their totals.
- Interest & Charges: Shows the total amount of interest and service charges that were added on the Statement Info page.
- Difference: Displays the difference between the Ending Balance and the Cleared Balance. There are two color statuses, which are described further below:
- Red: Indicates that the Reconciliation is not equal and cannot be completed. The total difference will be displayed here for you to correct the issue. Positive difference means review the value on the right side, Negative difference means review the value on the left side.
- Green: Indicates the Difference is $0.00, meaning the Reconciliation is accurate and can be completed.
- Reconcile: Allows you to reconcile the Account, initiating a popup of the Reconciliation Summary (discussed in the section Reconciliation Summary below).
- Save & Resume Later: Allows you to save the Reconciliation and put it in a Pending status. This will enable you to make changes to transactions and then come back to finish the Reconciliation later.
- Save: Saves and finalizes the Reconciliation.
- Close: Closes the Reconciliation without saving any changes.
-
Reconciliation Summary
As discussed above, once an Account is cleared to a $0.00 difference, you can click the Reconcile button to successfully reconcile the Account. This will initiate a pop up summarizing the Reconciliation with two available views. The Summary view shows the Reconciliation information including how many transactions have been cleared, the ending balance, and more. The Detail view shows all the transactions that have been cleared, including each transaction’s date/amount, and payee. Both the Summary and Detailviews include a Print button which will download a printable PDF version of the information. Below is a screenshot portraying how the Reconciliation Detail appears and a list describing what can be accomplished there.
- Views: There are two views available, which are discussed below:
- Summary: Shows the total amount of transactions cleared and the balances involved in the Reconciliation.
- Detail: Shows the individual transactions that were cleared and left uncleared, along with their payees and balance.
- Cleared Transactions: Shows the transactions that were cleared. Summary will show fewer details than the Detail view (as discussed in point 1).
- Uncleared Transactions: Shows the transactions that were left uncleared. Summary will show fewer details than the Detail view (as discussed in point 1).
- Undo: Undoes the Reconciliation for you to reconcile again.
- Print/Close: The following actions are available:
- Print: Downloads a printable PDF version of either the Summary or Detail (depending on which view was up when the Print button was clicked).
- Close: Closes out the Summary/Detail popup.
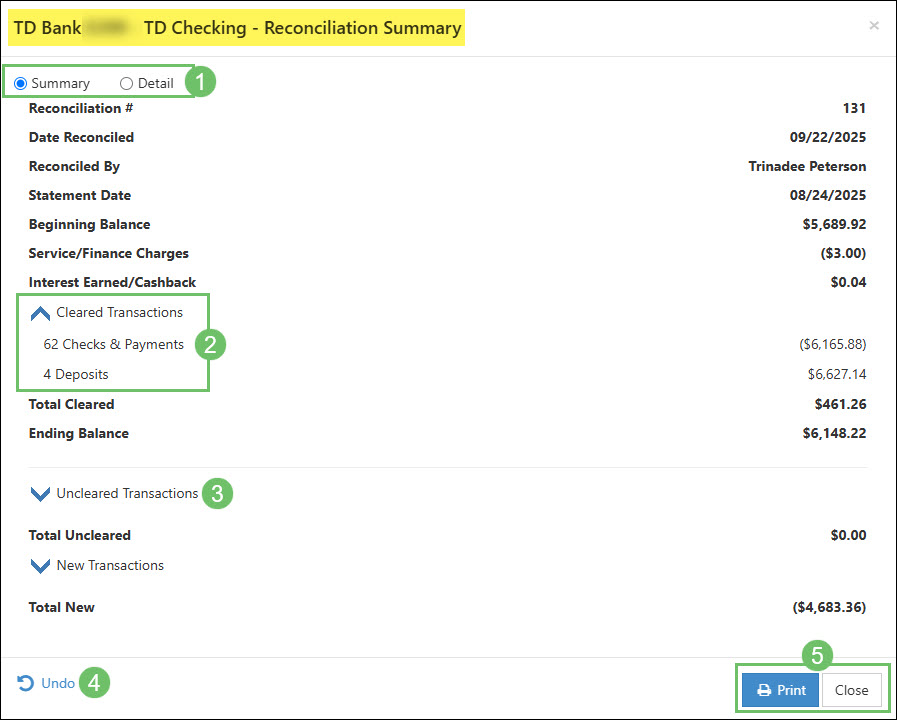
Example of the Reconciliation Summary
- Views: There are two views available, which are discussed below:
-
Fund Transfers
A Fund Transfer is a way to allocate funds from one GL Account to another in a single transaction. Fund Transfers can facilitate moving funds from one Bank Account to another or closing out Accounts at the end of the year. You can View, Edit, or Add New transfers using the Fund Transfers List. Below is an example featuring what adding a Fund Transfer looks like and a list describing what can be accomplished there.
Use the following steps to view the Fund Transfers List:
Accounting → Banking → Transfers
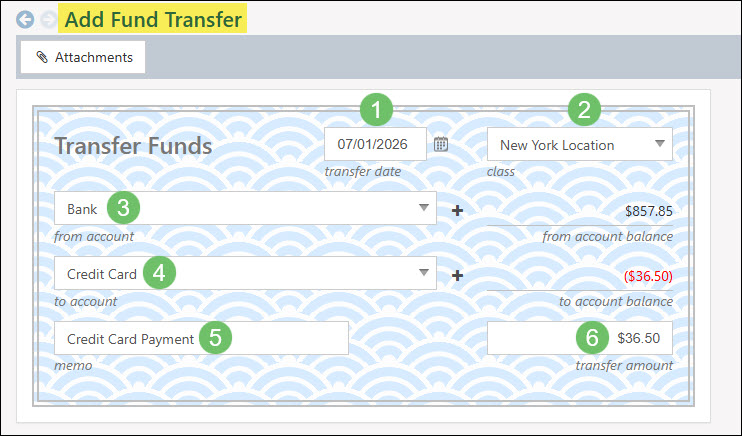
Example of the Add Fund Transfer Page
- Date: Allows you to choose a date on which the Check is issued using the Calendar icon.
- GL Classes: Allows you to associate a GL Class for the transaction if Classes are being tracked.
- From Account: Allows you to choose which Account to transfer from.
- To Account: Allows you to choose which Account to transfer to.
- Memo: Allows you to write in a memo for the fund transfer.
- Transfer Amount: Allows you to enter the amount to be transferred to and from the selected GL Accounts.
-
Online Banking
Striven uses Online Banking to allow users to connect to financial institutions such as banks, investment firms, and credit card companies. By linking accounts with Striven transactions can be brought into Striven for things like payments, expenses, and deposits. The resource used in Striven is supported by Yodlee, a financial data aggregation service. Yodlee connects with numerous institutions worldwide and continually updates security and connection requirements to be up to date per institution. This guide will demonstrate how you can set up and use online banking in Striven.
What is Online Banking?
Online Banking is a function that allows an accounting solution, like Striven, to connect to financial institutions like banks, credit card companies, and credit unions, among others. Through that connection, Online Banking brings transactions into the accounting solution to be reviewed and processed into the accounting software.
How Online Banking Works
Online Banking brings in transactions processed through the connected institution to allow Striven users to review and post those transactions in Striven. Through Online Banking, users can process both incoming and outgoing transactions while mapping them to the correct vendor and expense account(s).
Striven performs these functions using Yodlee, a third-party software company that connects to institutions directly. Yodlee helps Striven facilitate a secure connection between your trusted financial institution and Striven.
How Secure is Online Banking?
Yodlee and Striven both take security extremely seriously, taking measured and proactive steps to protect your data, privacy, and security. Yodlee and Striven each routinely pass security audits including SOC 2 Type II annually. To learn more about security standards of Striven andYodlee, reference the linked security documentation:
Important Notes for Online Banking
There are some important things to bear in mind when using Online Banking in Striven. Some of these include:
- Online Banking in Striven does not pay open AP or open AR.
- To pay open AP and AR it’s recommended to use the Pay Bills Queue and link transactions using online banking instead of creating transactions using online banking.
- Online Banking does not auto-reconcile accounts.
- To reconcile accounts, it’s recommended to reconcile each account in Striven by cross-referencing your institution’s period statement.
- Only one person can use Online Banking at a time.
- This is to help prevent duplicate entries and allows for the cleanest and most accurate data communication possible.
- If you are activating Online Banking within 60-90 days of an accounting migration it is highly recommended that no transactions are brought into Striven that are dated prior to your agreed cutover date.
- Online Banking in Striven does not pay open AP or open AR.
-
Permissions
While using online banking it’s important to understand the permissions in place to either enable or disable access to pages around the functionality. There are two permissions in place within Striven, which can be controlled either on an individual user level or the user role level, which affects all users assigned that role. The two permissions are described further below.
- Online Banking Settings – Add/Edit: This permission provides access to the Online Banking Settings page. This permission also provides the ability to turn on/off the integration as well as manage and add accounts.
- Online Banking Process Transactions: This permission provides access to the Online Banking Process Transactions page. This permission provides the ability to map and process transactions using the online banking integration.
Learn more about managing User Roles in Striven by reviewing our User Roles Guide.
-
Enable Online Banking
To enable the Yodlee Online Banking integration navigate to Company → Settings → Integrations → Online Banking. When you are ready to begin setting up Online Banking in Striven click the Enable Online Banking option.

Example of the Online Banking Settings Page Not Enabled
After Online Banking has been enabled, you will input User Information into the online banking tool. The information entered here represents the Striven user who is designated as the resource owner. This area will initiate a popup window asking for an email, first, and last name to be designated as the resource owner.
The name and email entered is not the single person who will manage online banking or as a method to sign in to your selected institutions. This information is only used to identify who is considered the one setting up Online Banking.
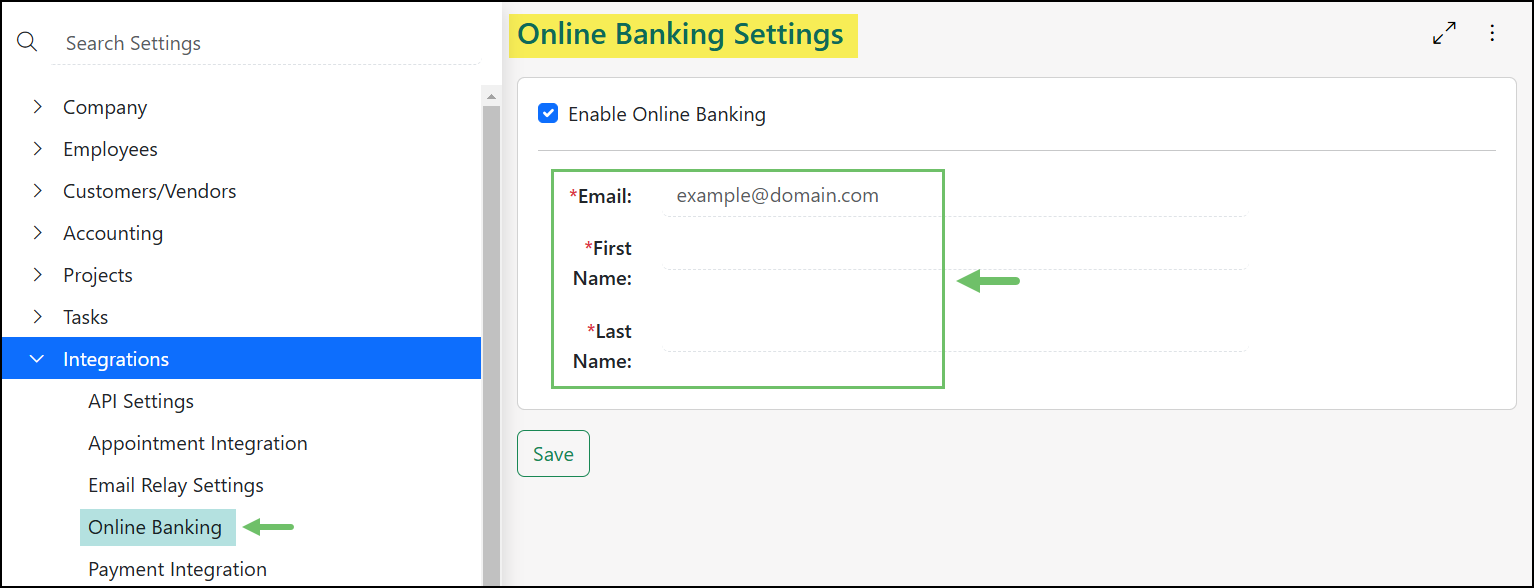
Example of the Online Banking Settings Page Enabled
After the Email, First Name, and Last Name have been entered into the appropriate fields and saved, a summary of information will be displayed with additional options to turn the Yodlee Online Banking integration off or edit the previously entered information.
To begin connecting your bank account to Striven, click the Add Accounts button.

Example of the Online Banking Settings Page Summary
The window that will appear will have common bank options that can be selected. If the bank you wish to connect to is not shown, the Search field at the top can be used to narrow down results to a specific bank.

Example of the Yodlee Popup Page
Note: The following instructions of setting up the Online Banking feature in Striven will be done using TD Bank as the example. The prompts following this step may vary depending on the bank that has been selected.
Once the bank has been selected an informational screen will be shown which is stating which types of accounts and transactions will be included with the Yodlee Online Banking integration. By clicking the Continue button, your bank is receiving permission to continue with the connection to Striven.
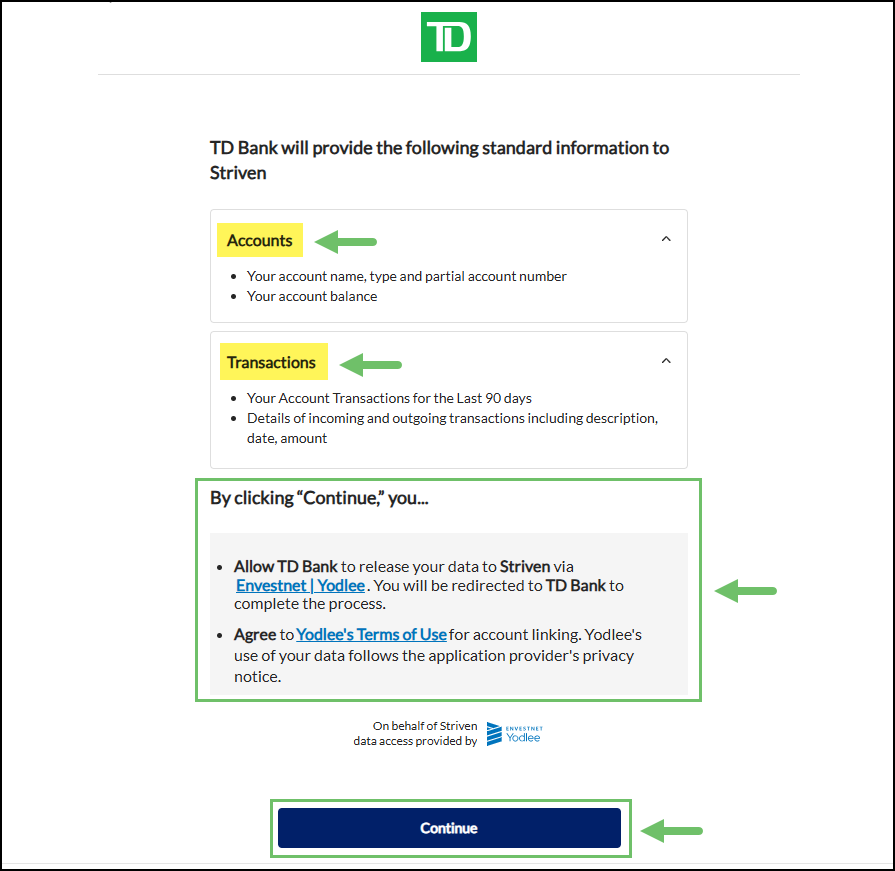
Example of the TD Bank Permission Page
You will then be prompted to enter the User Name and Password that is associated with the bank account. After this information has been entered, choose to Log In to continue with the Yodlee Online Banking integration setup with Striven.
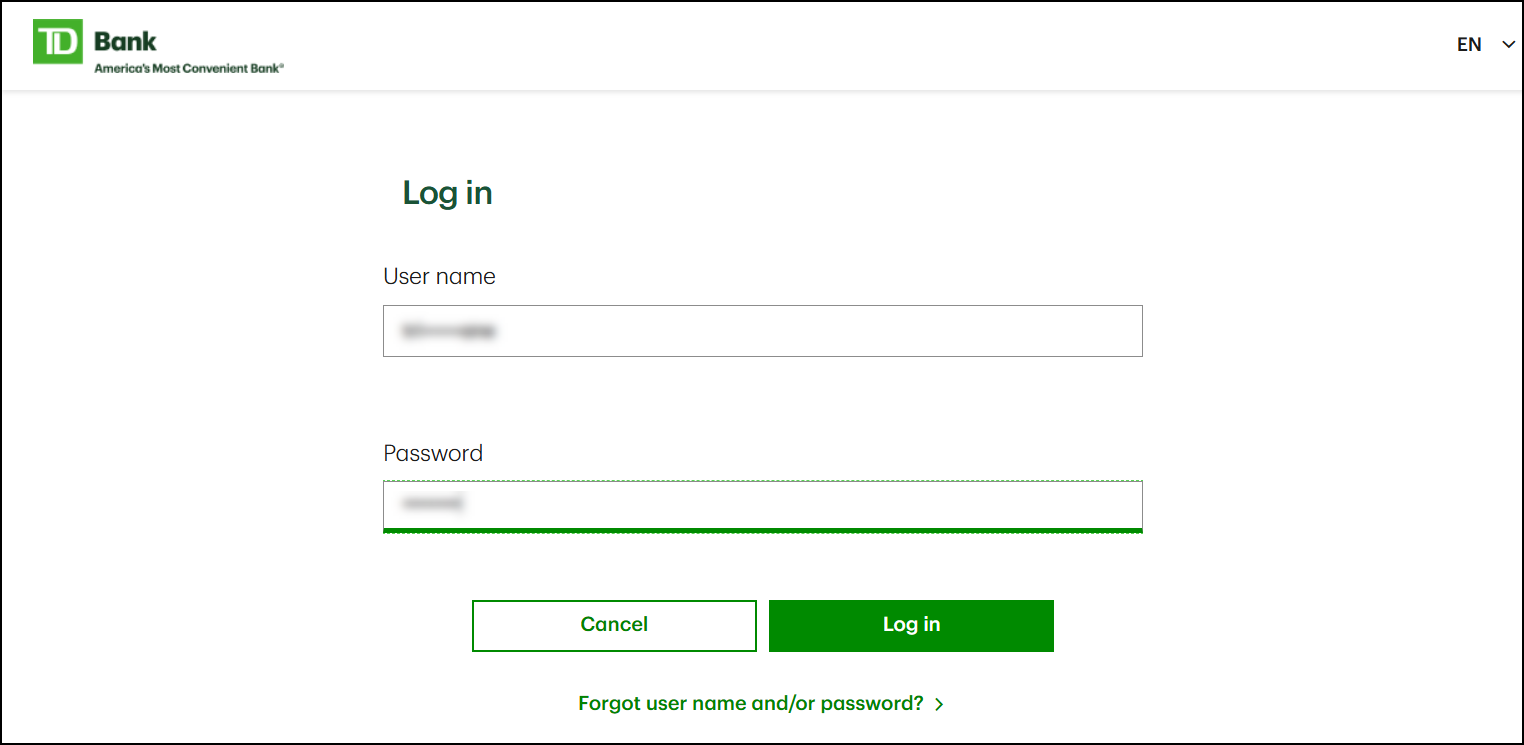
Example of the TD Bank Login Page
Depending on security settings that are set up with the bank account, completing a 2-factor authentication may be required to continue with the setup. Follow the prompts provided by your bank in order to verify the correct information.

Example of 2-Factor Authentication
Once any 2-factor authentication that is required based on your bank’s settings is completed, you may be prompted to accept terms and conditions related to data that will be shared between your bank and Striven through the Online Banking integration. Click Accept to continue to the next step of the set up process.
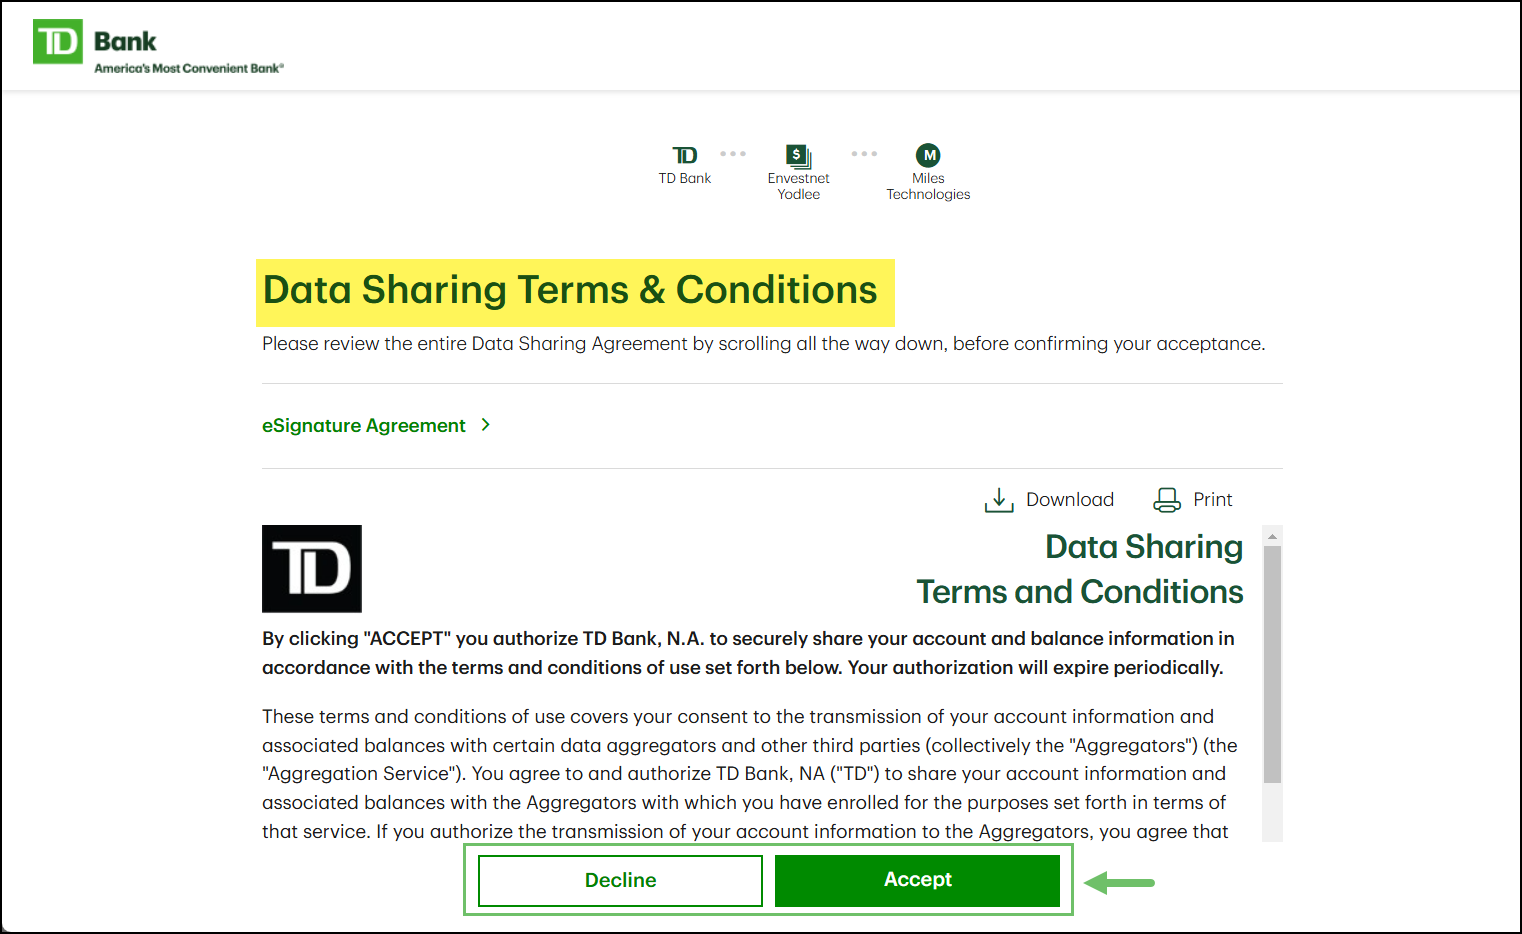
Example of Data Sharing Terms and Conditions
Now that access has been granted and terms have been accepted, a list of available accounts to connect with will be listed. Check the accounts you wish to connect with Striven and click Continue.
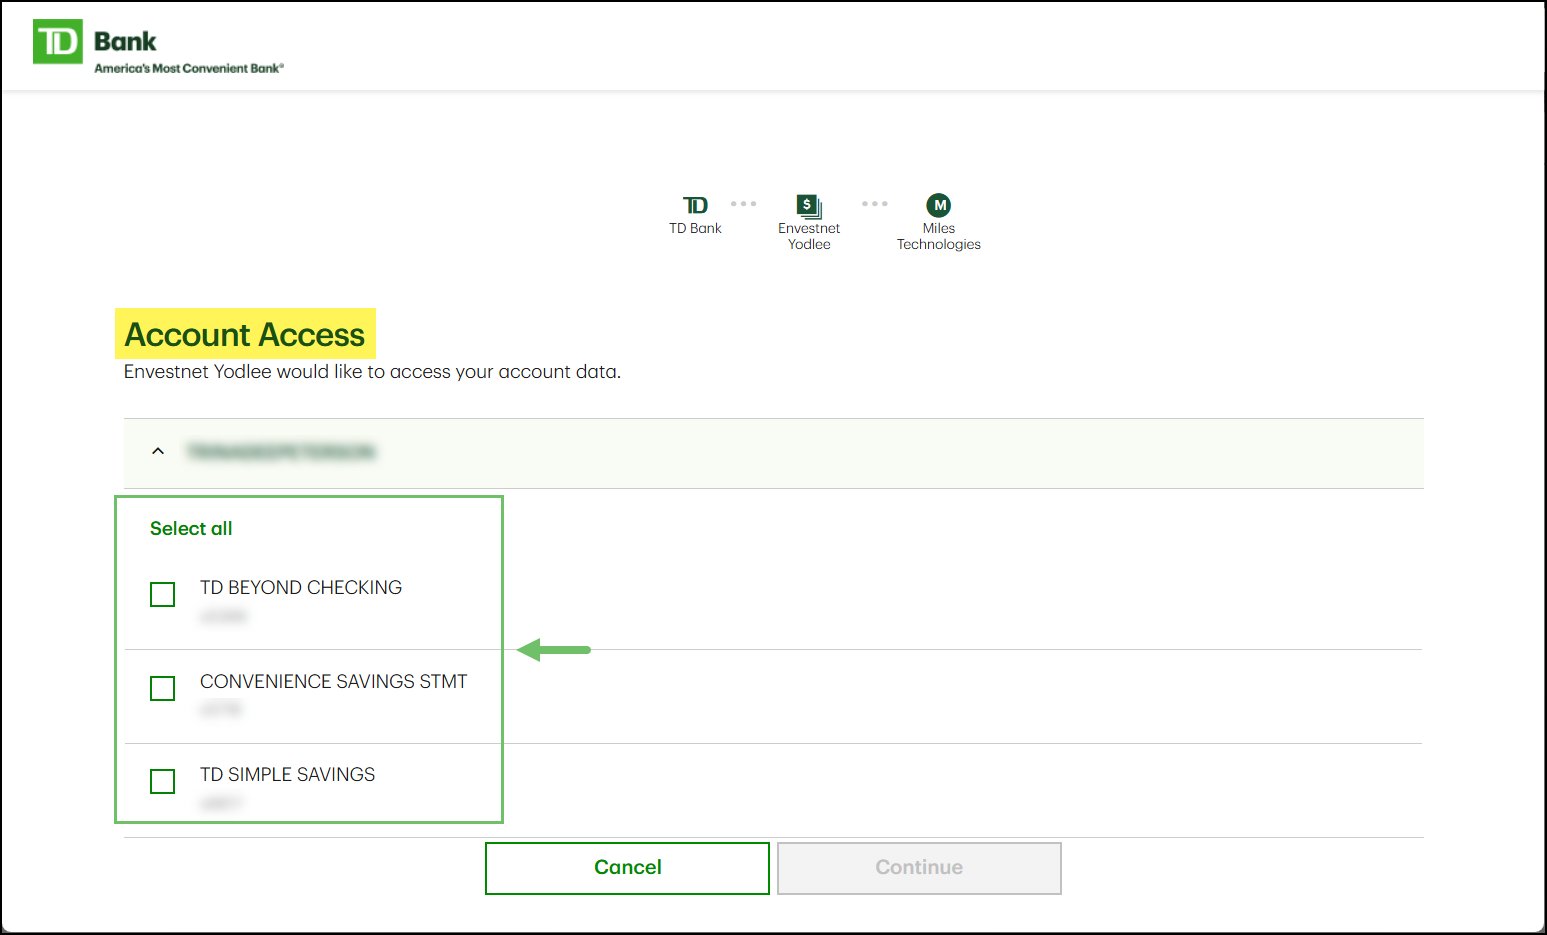
Example of the Account Access Page
A confirmation page will appear to confirm which accounts will be connected with available actions that can be taken which are described below:
- Save & Finish: Completes the set up process for connecting the selected bank accounts with Striven using the Yodlee Online Banking integration.
- Save & Link More Accounts: Completes the current set up process for the selected banks but instead of returning to the Online Banking settings page you will instead be able to add additional accounts.
- Cancel: Undoes any connection that was currently being set up. By cancelling the linkage, the set up process will need to be completed again.
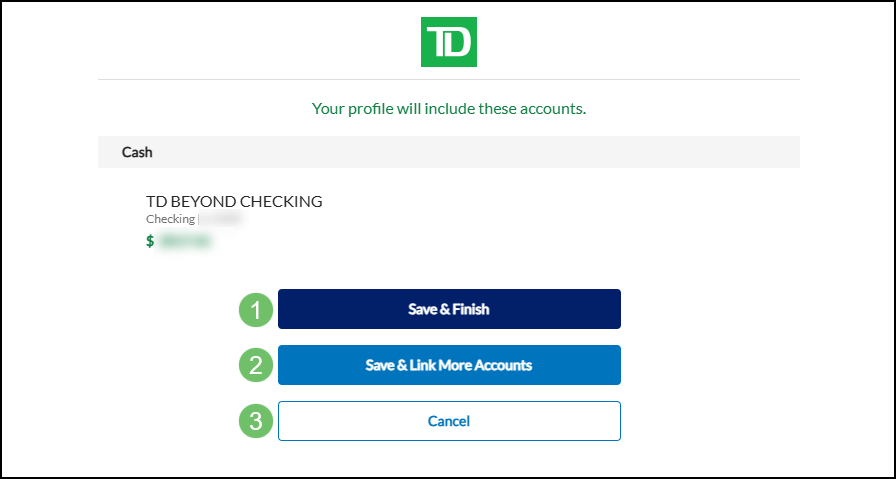
Example of Account Access Confirmation
-
Link Accounts For Online Banking
After the Account is added, you will need to link it to a GL Account in Striven to ensure transactions are posting correctly. If there is no GL Account for the Account, you can quickly add a GL Account using the Plus (+) icon. This will initiate a pop up in which you can enter the Account name, type, and more. Below is an example illustrating how linking a GL Account appears.
Use the following steps below to view Online Banking in the settings:
Company → Settings → Integrations → Online Banking

Example of Linking Online Banking to Striven Bank Account
-
Using Online Banking
Now that you have linked your accounts successfully you are now ready to begin using Online Banking to bring transactions from the account into Striven. To begin this process, navigate to Accounting → Banking → Online Banking.
Once on the Online Banking Process Transactions page click the account selection field. This field will display all of the Striven GL Accounts that have been linked to accounts using Online Banking. By selecting an account the integration will load transactions not yet matched dated from the last 60 days.
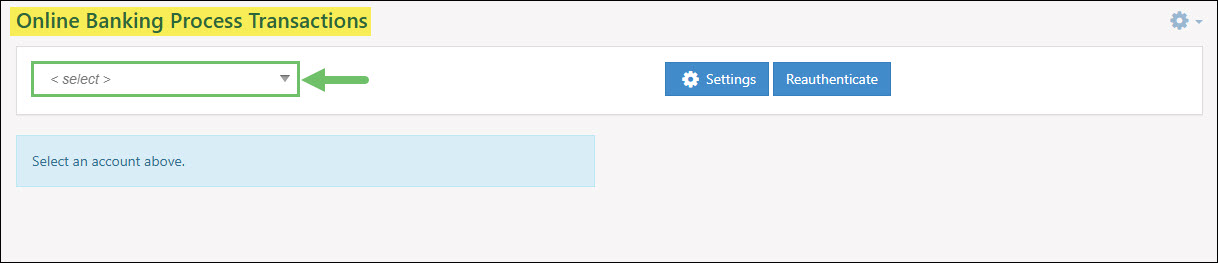
Example of the Online Banking Process Transaction Page
Online Banking will always show Outgoing transactions by default, however, users can see Incoming transactions as well. Incoming transactions in most cases represent some kind of deposit or increase in the account’s balance while outgoing transactions will encompass money leaving the account through purchases, payments, etc.
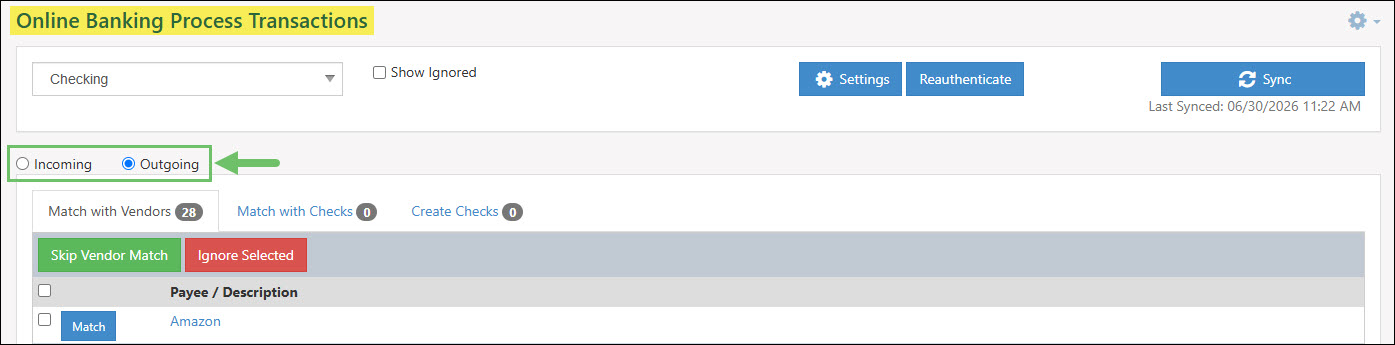
Example of the Outgoing and Incoming Toggle Options for Online Banking
-
Outgoing Transactions
There are three tabs displayed for Outgoing transactions. The first tab, Match with Vendors, allows users to match transactions with a Vendor and Expense Account from the Striven Chart of Accounts. The second tab, Match with Checks, attempts to match with existing transactions in your system. The third tab, Create Checks, will initiate the process to create the transaction from the Online Banking Queue into a Striven transaction.
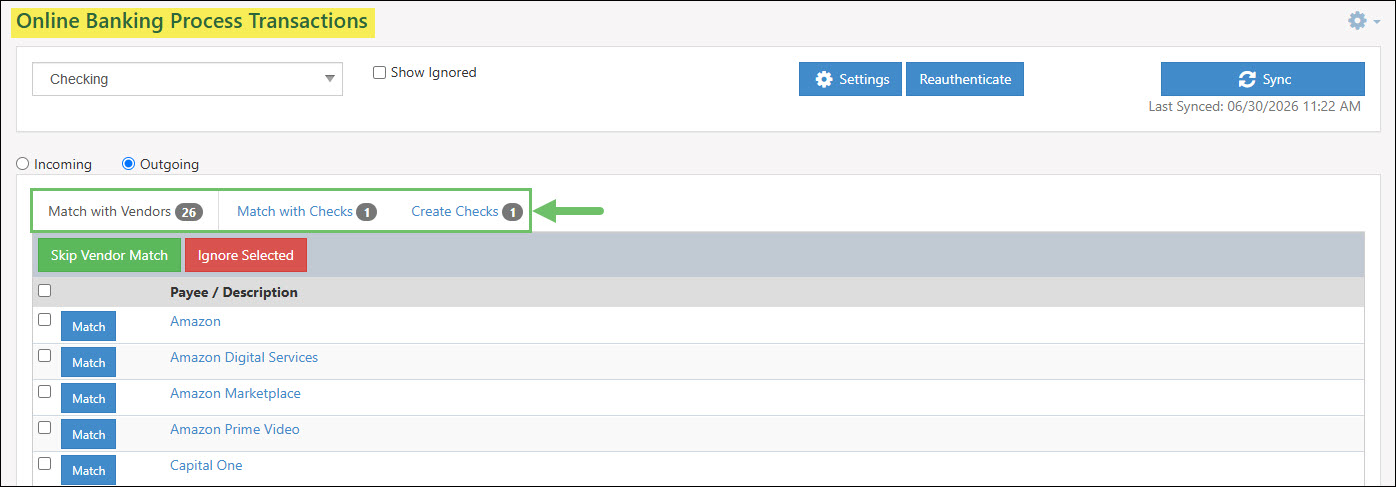
Example of the Outgoing Transaction Tab Options
Match with Vendors
The first tab for outgoing transactions is called Match with Vendors and allows users to match transactions with a Vendor and Expense Account from the Striven Chart of Accounts. This matching process also allows users to remember the mapping so that they can skip this process when purchasing from the same vendor in the future. To begin matching click on the blue Match button.
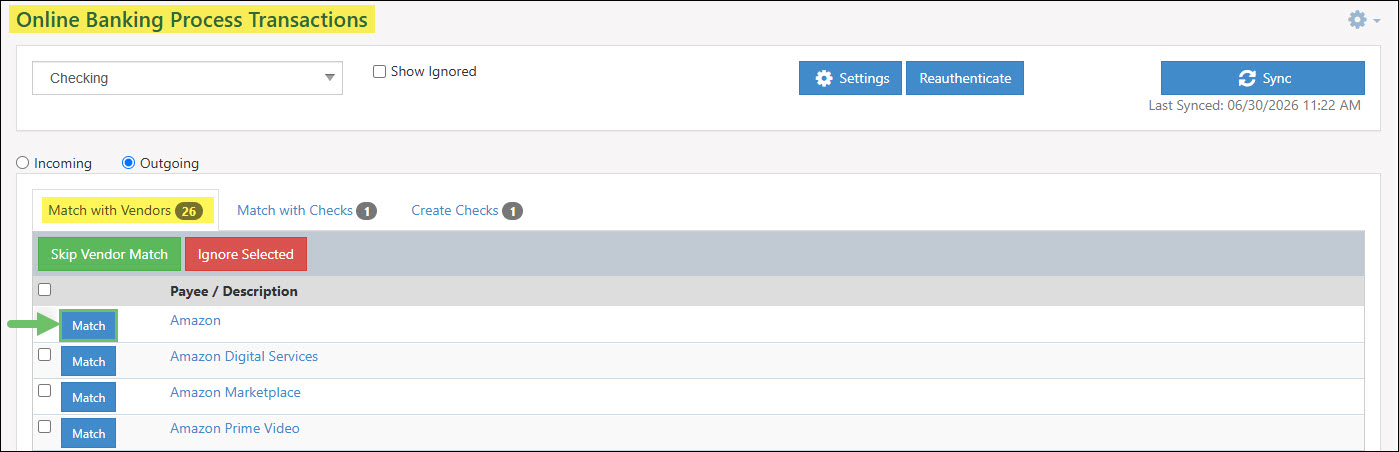
Example of the Match Button from the Match with Vendors Tab
The first step in the matching process will be to find or add the Vendor. If you want to see if the Vendor is in Striven already simply start to type the Vendor’s name in the search field. If any active Vendor matches the name typed it will populate for selection and you can move onto mapping an Expense account.
If you cannot find the vendor using the search function it is likely that you will have to add the Vendor in Striven. Adding a new Vendor is something that can be done within the popup using the quick add option.
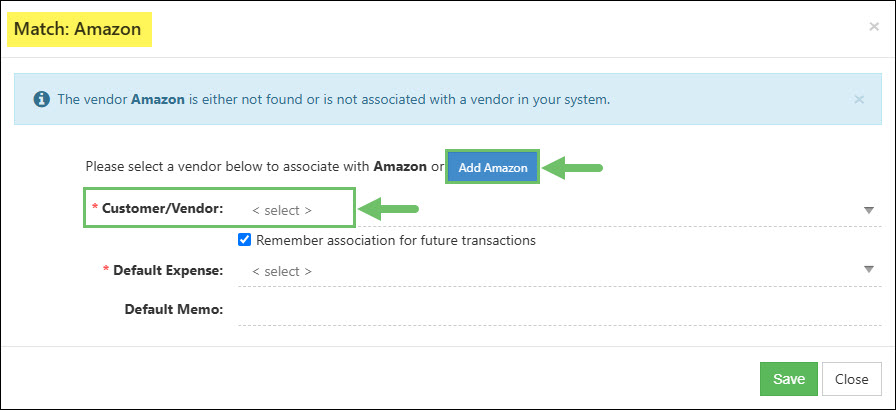
Example of Selecting or Adding the Vendor in the Match Vendor Popup
Once the Vendor is added to the match criteria you will next want to map an expense account to the Vendor. By selecting the Default Expense field users can search their Chart of Accounts and select the account they’d like to be posted to when Online Banking syncs another transaction from this Vendor now and in the future. Online Banking will only remember the chosen mapping if the Remember association for future transactions checkbox within the matching popup is toggled on.
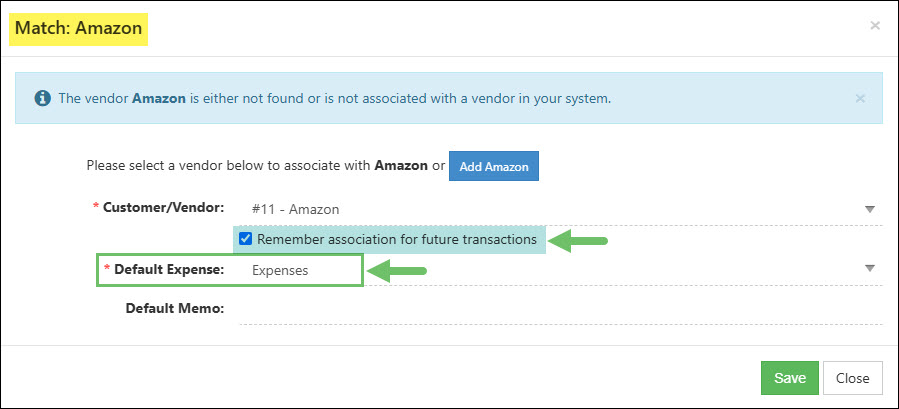
Example of Selecting the Default Expense Account in the Match Vendor Popup
An additional optional field is available for a Default Memo. Adding a default memo will automatically add the memo to any transactions created for the Vendor when using the Online Banking tool.
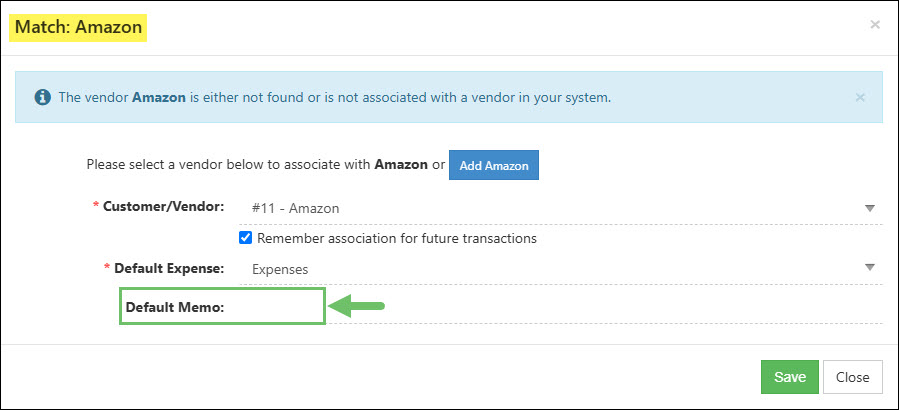
Example of the Default Memo Field in the Match Vendor Popup
Once you have matched your Vendor with a Vendor account in Striven, transactions associated with the Vendor will then be moved into the Match with Checks or Create Checks tab in order to be processed accordingly.
Match with Checks
The Match with Checks tab facilitates the identification of incoming Online Banking transactions that correspond to existing check records within Striven. To ensure accuracy, the system evaluates matches based on three possible criteria: the check number, the monetary value, and a check date that falls within a 30-day window of the transaction recorded in Striven.
Below is a screenshot illustrating how the Match with Checks tab appears and a description of what can be accomplished there.
- Date: Lists the date recorded on the transaction that was brought in through the financial institution.
- Payee / Description: Lists the Payee or Vendor that was recorded from the financial institution. Any description that was included with the Payee name will be displayed as well in this column.
- Match: Hyperlinks of the potential Striven check that the transaction was matched with. Clicking on the hyperlink will open the check to review in further detail. The associated Vendor account will also be hyperlinked below the potential matching check.
- Amount: Shows the monetary amount that is recorded on the transaction from the financial institution.
- Edit Payee Mapping: Opens the Match Vendor popup which allows you to update the matched fields for Customer/Vendor, Default Expense, and Default Memo. These are the fields that were previously set when using the Match with Vendors tab.
- Details: Opens the Transaction Details popup which will list the raw data that was sent over from the financial institution.
- Create: This option allows you to disregard the system’s suggested match and navigate to the Add Check screen to record the transaction as a fresh entry in Striven. To streamline this process, fields such as the Vendor, transaction date, default expense account, and default memo are automatically populated with available data.
- Associate: Selecting this option opens the Associate Transaction popup, which displays the potentially matched check found in Striven. To help locate the correct entry if the initial match is incorrect, you can use the available search filters for Customer/Vendor and Date Range. Once you identify and select the appropriate check, click the Select button to finalize the association.
- Ignore: Selecting this will discard the transaction instead of adding it to Striven. By utilizing the Ignore feature, you can remove items from the queue to ensure only relevant transactions that require processing remain visible.
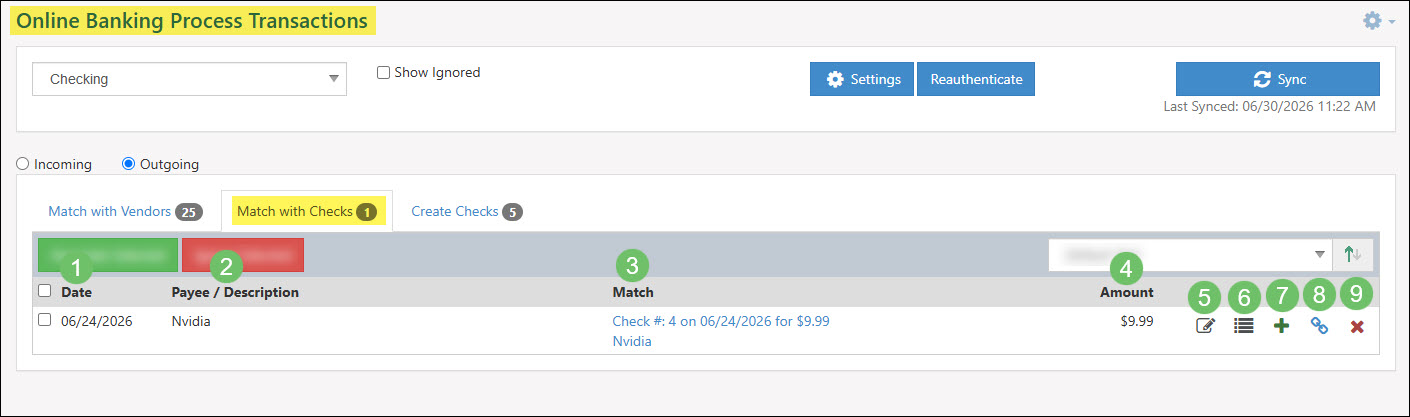
Example of the Match with Checks Tab in Online Banking
Create Checks
The Create Checks tab will list transactions that could not find a match with an existing check in Striven and will instead allow you to create a new transaction. Within this tab, users have the ability to record transactions from the Online Banking Queue directly into Striven as fresh entries.
Below is a screenshot illustrating how the Create Checks tab appears and a description of what can be accomplished there.
- Date: Displays the transaction date as it was imported from the financial institution.
- Vendor Name / Details: Displays the Payee or Vendor name as transmitted by the financial institution. This field also includes any supplemental descriptive information provided by the bank regarding the Payee.
- Match: Includes a hyperlink to the Vendor account that the transaction was mapped to. The expense account that is associated with the mapping will also be listed under the Vendor name.
- Amount: Shows the monetary amount that is recorded on the transaction from the financial institution.
- Details: Provides access to the Transaction Details popup, where the unprocessed data transmitted by the financial institution can be viewed.
- Create: Selecting this leads you to the Add Check page, where you can log the transaction as a new record in Striven. To make entry more efficient, several fields, including the transaction date, Vendor, default memo, and default expense account, are pre-filled using available information.
- Associate: This feature triggers the Associate Transaction window, presenting possible matching checks already recorded in Striven. If the initial results do not match, you can refine your search using the Customer/Vendor and Date Range filters. To complete the link, select the correct check and press the Select button.
- Edit Payee Mapping: This option triggers the Match Vendor popup, enabling you to modify the mapping for the Customer/Vendor, Default Expense, and Default Memo fields. These parameters are those initially established from the Match with Vendors tab.
- Ignore: Choosing this option removes the transaction from the queue without recording it in Striven. This Ignore capability helps maintain an organized workspace by filtering out irrelevant entries and ensuring only transactions that need processing remain in view.
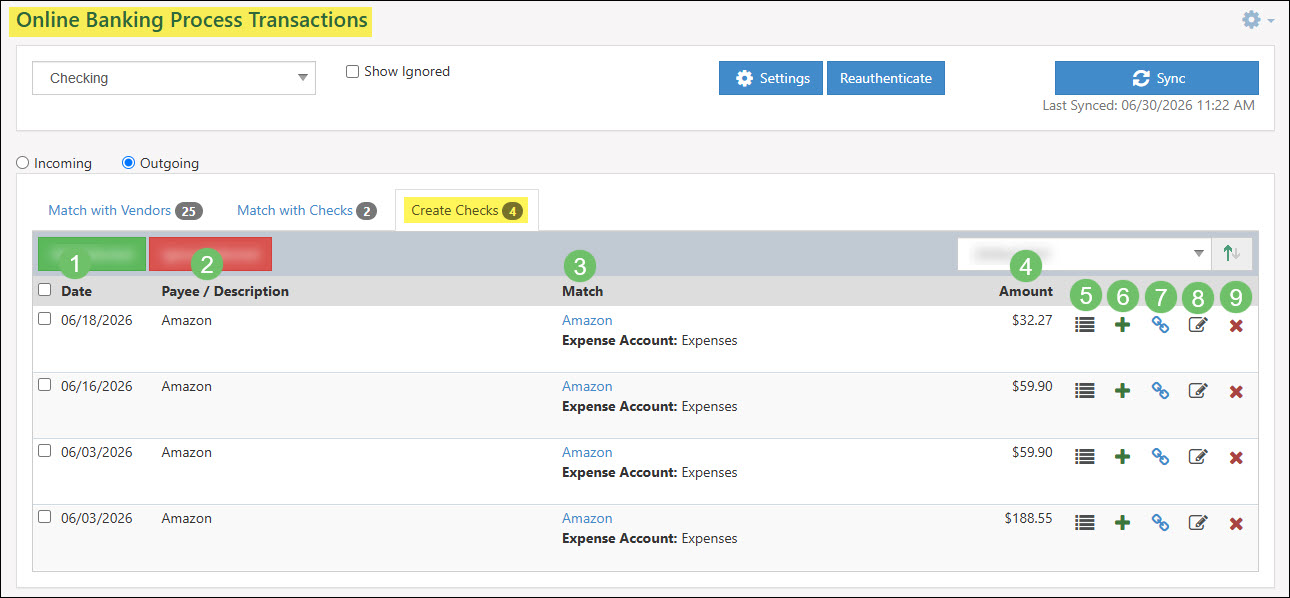
Example of the Create Checks Tab in Online Banking
-
Incoming Transactions
There are three tabs displayed for Incoming transactions. The first tab, Match with Customers, allows users to match transactions with a Customer and a GL Account from the Striven Chart of Accounts. The second tab, Match with Deposits, attempts to match with existing transactions in your system. The third tab, Create Deposits, will initiate the process to create the transaction from the Online Banking Queue into a Striven transaction.
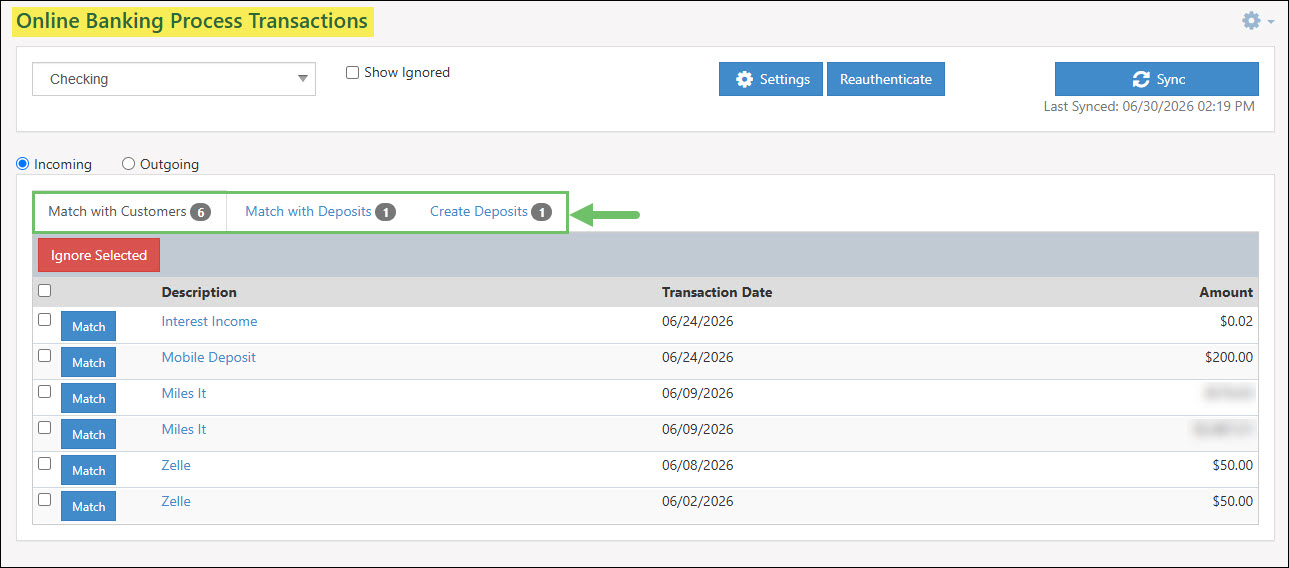
Example of the Incoming Transaction Tab Options
Match with Customers
The first tab for incoming transactions is called Match with Customers and allows users to match transactions with a Customer and a GL Account from the Striven Chart of Accounts. This matching process also allows users to remember the mapping so that they can skip this process when receiving from the same Customer in the future. To begin matching click on the blue Match button.
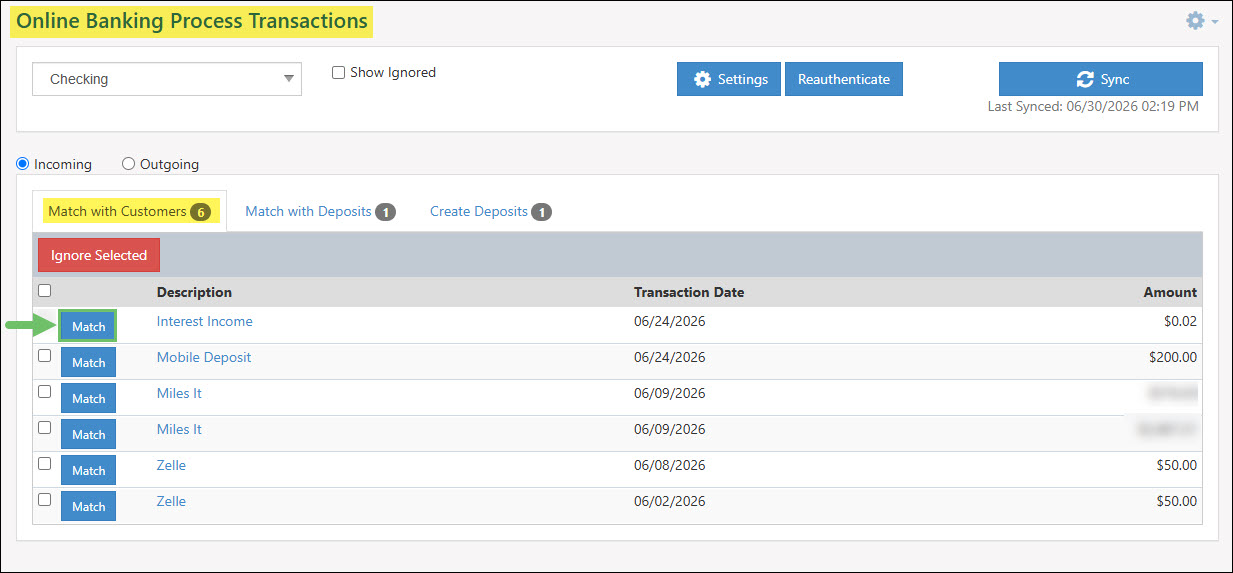
Example of the Match Button from the Match with Customers Tab
The first step in the matching process will be to find or add the Customer. If you want to see if the Customer is in Striven already simply start to type the Customer’s name in the search field. If any active Customer matches the name typed it will populate for selection and you can move onto mapping a GL Account.
If you cannot find the Customer using the search function it is likely that you will have to add the Customer in Striven. Adding a new Customer is something that can be done within the popup using the quick add option.
If the deposit should not be associated with a specific Customer, use the option Do not associate with a customer.
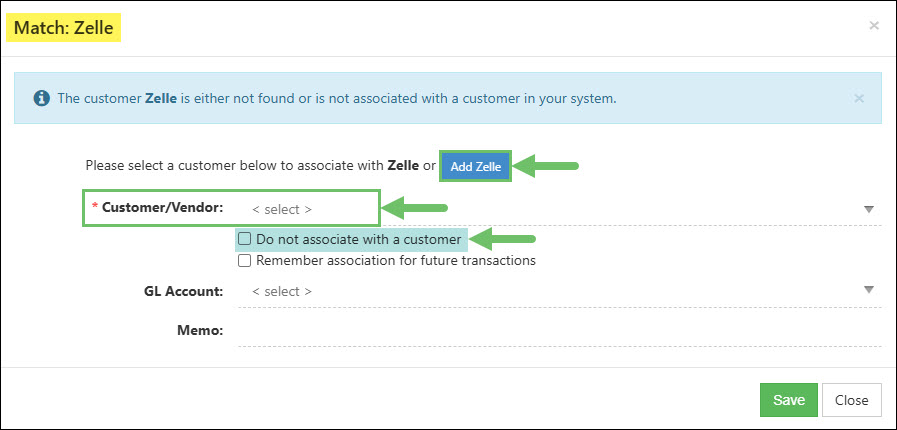
Example of Selecting or Adding the Customer in the Match Customer Popup
Once the Customer is added to the match criteria you will next want to map a GL Account to the Customer. By selecting the GL Account field users can search their Chart of Accounts and select the account they’d like to be posted to when Online Banking syncs another transaction from this Customer now and in the future. Online Banking will only remember the chosen mapping if the Remember association for future transactions checkbox within the matching popup is toggled on.
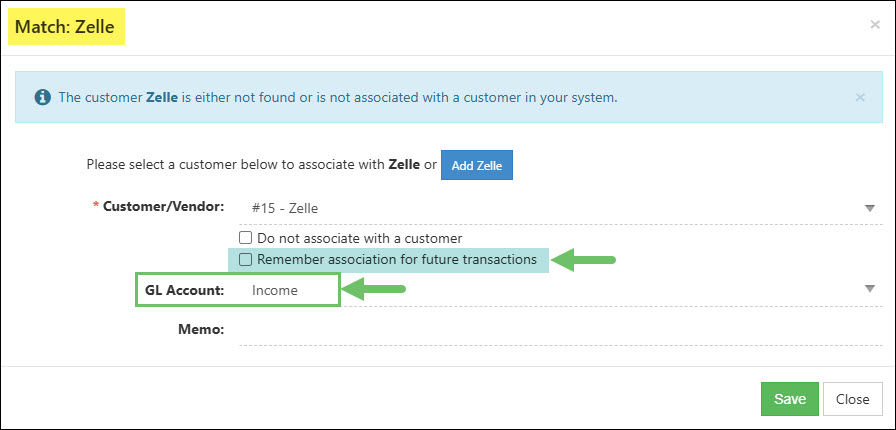
Example of Selecting the GL Account in the Match Customer Popup
An additional optional field is available for a Memo. Adding a default memo will automatically add the memo to any transactions created for the Customer when using the Online Banking tool.
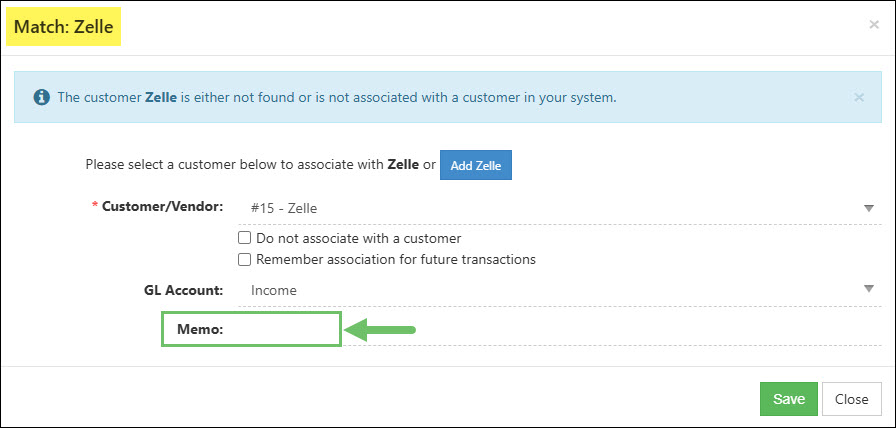
Example of the Memo Field in the Match Customer Popup
Once you have matched your Customer with a Customer account in Striven, transactions associated with the Customer will then be moved into the Match with Deposits or Create Deposits tab.
Match with Deposits
The Match with Deposits tab facilitates the identification of incoming Online Banking transactions that correspond to existing deposit records within Striven. To ensure accuracy, the system evaluates matches based on three possible criteria: the deposit number, the monetary value, and a deposit date that falls within a 30-day window of the transaction recorded in Striven.
Below is a screenshot illustrating how the Match with Deposits tab appears and a description of what can be accomplished there.
- Date: Displays the transaction date as it was imported from the financial institution.
- Description: Displays the Customer name as transmitted by the financial institution. This field also includes any supplemental descriptive information provided by the bank regarding the deposit.
- Match: Hyperlinks of the potential Striven deposit that the transaction was matched with. Clicking on the hyperlink will open the deposit to review in further detail. The associated Customer account will also be hyperlinked below the potential matching deposit.
- Amount: Shows the monetary amount that is recorded on the transaction from the financial institution.
- Details: Provides access to the Transaction Details popup, where the unprocessed data transmitted by the financial institution can be viewed.
- Create: Selecting this leads you to the Add Deposit page, where you can log the transaction as a new record in Striven. To make entry more efficient, several fields, including the transaction date, Customer, memo, and GL Account, are pre-filled using available information.
- Associate: Selecting this option opens the Associate Transaction popup, which displays the potentially matched deposit found in Striven. To help locate the correct entry if the initial match is incorrect, you can use the available search filters for Customer/Vendor and Date Range. Once you identify and select the appropriate deposit, click the Select button to finalize the association.
- Edit Customer Mapping: This option triggers the Match Customer popup, enabling you to modify the mapping for the Customer/Vendor, GL Account, and Memo fields. These parameters are those initially established during the Match with Customers tab.
- Ignore: Choosing this option removes the transaction from the queue without recording it in Striven. This Ignore capability helps maintain an organized workspace by filtering out irrelevant entries and ensuring only transactions that need processing remain in view.
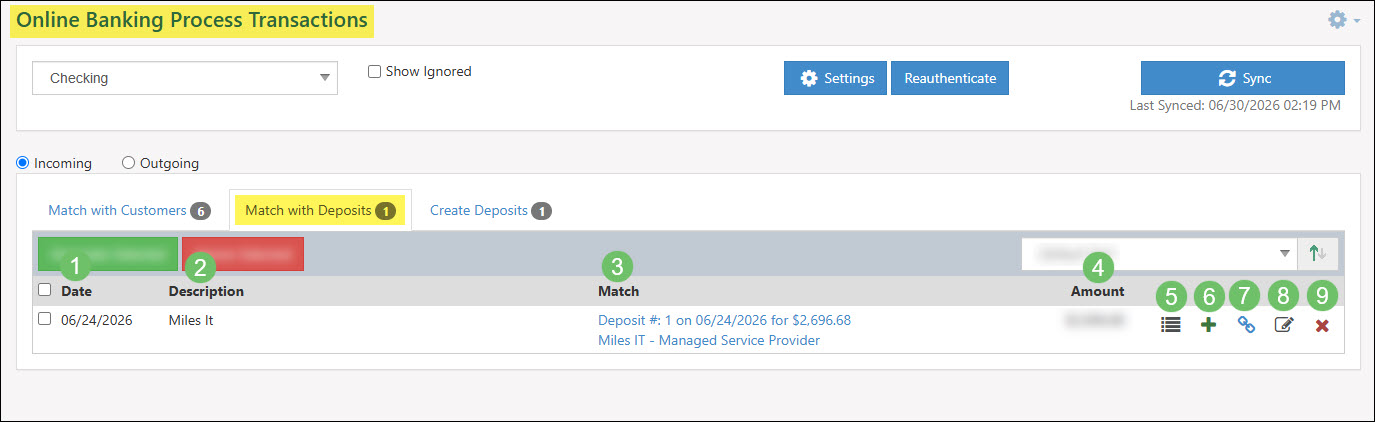
Example of the Match with Deposits Tab in Online Banking
Create Deposits
The Create Deposits tab will list transactions that could not find a match with an existing deposit in Striven and will instead allow you to create a new transaction. Within this tab, users have the ability to record transactions from the Online Banking Queue directly into Striven as fresh entries.
Below is a screenshot illustrating how the Create Deposits tab appears and a description of what can be accomplished there.
- Date: Displays the transaction date as it was imported from the financial institution.
- Description: Displays the Customer name as transmitted by the financial institution. This field also includes any supplemental descriptive information provided by the bank regarding the deposit.
- Match: Includes a hyperlink to the Customer account that the transaction was mapped to. The GL Account that is associated with the mapping will also be listed under the Customer name.
- Amount: Shows the monetary amount that is recorded on the transaction from the financial institution.
- Details: Provides access to the Transaction Details popup, where the unprocessed data transmitted by the financial institution can be viewed.
- Create: Selecting this leads you to the Add Deposit page, where you can log the transaction as a new record in Striven. To make entry more efficient, several fields, including the transaction date, Customer, memo, and GL Account, are pre-filled using available information.
- Associate: This feature triggers the Associate Transaction window, presenting possible matching deposits already recorded in Striven. If the initial results do not match, you can refine your search using the Customer/Vendor and Date Range filters. To complete the link, select the correct check and press the Select button.
- Edit Customer Mapping: This option triggers the Match Customer popup, enabling you to modify the mapping for the Customer/Vendor, GL Account, and Memo fields. These parameters are those initially established during the Match with Customers tab.
- Ignore: Choosing this option removes the transaction from the queue without recording it in Striven. This Ignore capability helps maintain an organized workspace by filtering out irrelevant entries and ensuring only transactions that need processing remain in view.
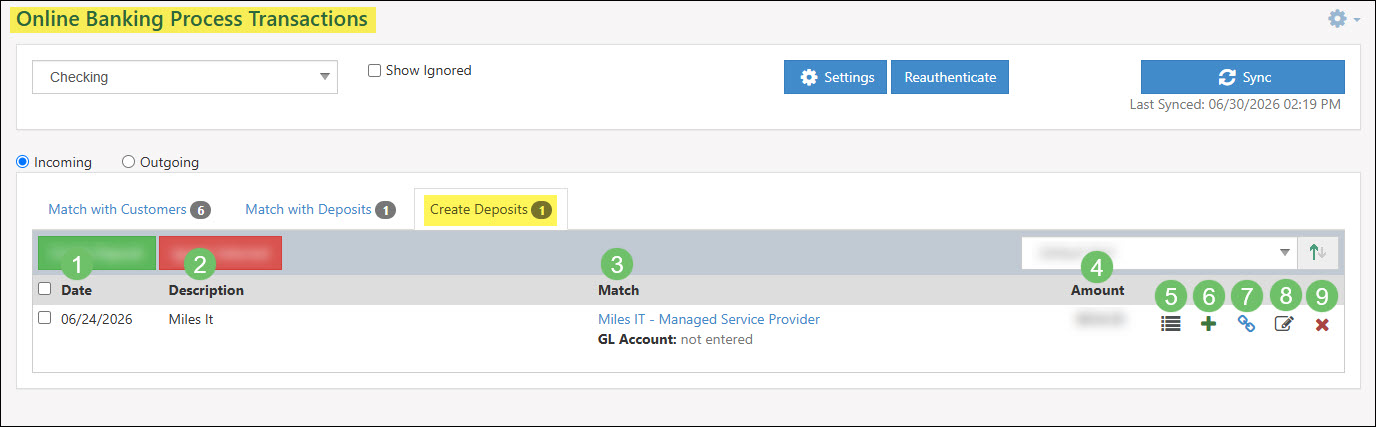
Example of the Create Deposits Tab in Online Banking
-
Bulk Actions
In Online Banking, both the Incoming and Outgoing transaction tabs provide robust bulk action capabilities for associating, creating, ignoring, or skipping entries. These features are specifically designed to optimize the Online Banking workflow by allowing users to process multiple entries simultaneously, thereby reducing the time spent on manual reconciliations. Action buttons located prominently at the top of each tab execute the chosen command for all transactions selected via their respective checkboxes. This efficiency is particularly useful in the Create Checks and Create Deposits tabs, where users can establish mappings for several transactions at once. By utilizing the Ignore bulk action, users can also quickly clear the queue of irrelevant entries to ensure only transactions requiring immediate processing remain visible in the workspace.
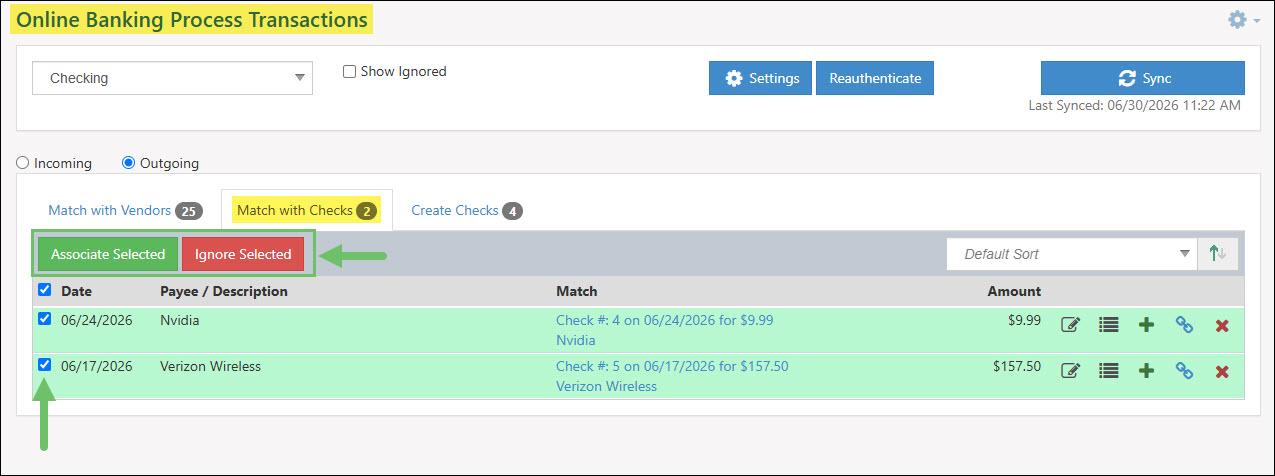
Example of the Associate and Ignore Selected Options for the Match with Checks Tab
-
View Added Online Banking Transactions
Once you have added transactions into Striven using Online Banking users can view and manage the transactions using the Transactions List. To find the Transactions List navigate to Accounting → Transactions.
The Transactions List displays all transactions whether they are posted or voided. Using the numerous search filters users can either narrow down for specific results or search for a more broad result. Online Banking transactions will also be found on this list and thanks to an icon users can tell them apart from transactions entered into Striven using other means like manual entry or an import.
Each Online Banking transaction will have a bank icon on the left hand side of the transaction number within the queue. By clicking the bank icon a popup will appear displaying the transaction details from the institution.
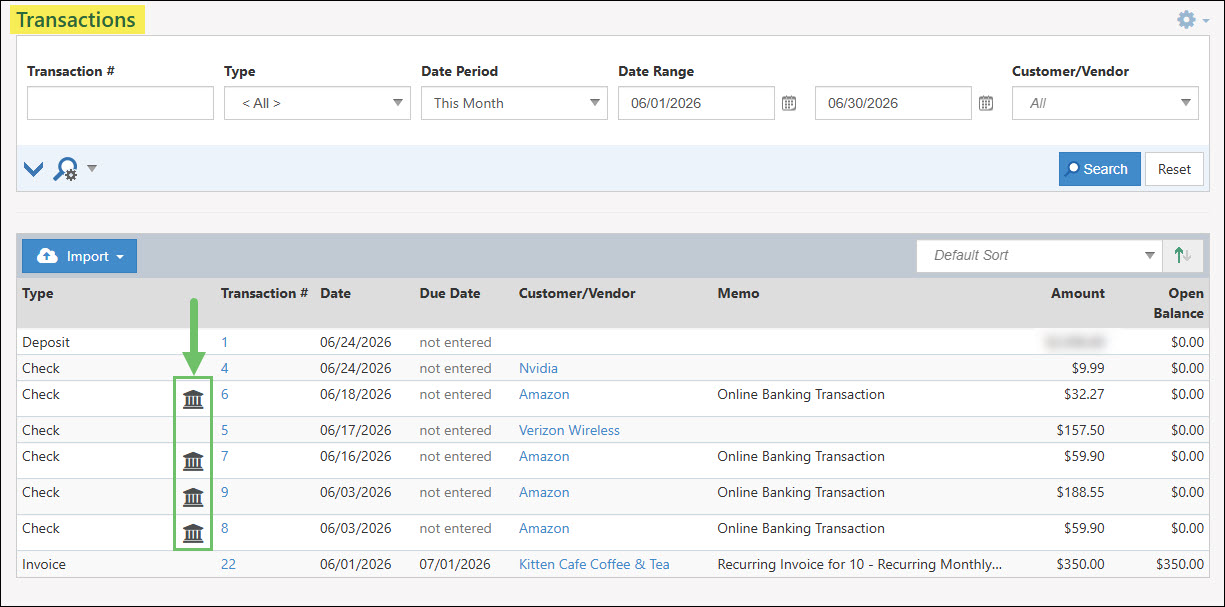
Example of the Online Banking Icon Located on the Transactions List
-
Recap
With this guide, we’ve discovered how to create and manage Checks, Credit Card Charges, and more to enable you to enter banking or credit card transactions in Striven. We’ve also discovered ways to create Deposits, Reconciliations, and how to manage Online Banking to enable connections between your Account(s) and Striven.

Have a Question?
Ask the Striven Community
User-sourced how-to’s, feedback, and more!
FAQs
-
I want to start using Online Banking. How do I link my Accounts?
You can link your Accounts by first enabling Online Banking in the Settings. You can then click the Add Accounts button to search for the bank or Credit Card Account you’d like to add, then use your existing online banking credentials to link the Account with Striven.