
AR & Collections
Collections
Support Guide
-
Overview
In this guide we’ll discuss how transactions play a part in your Collections Workflow and how to manage Collections in Striven. Having your Collections process setup is the first step in ensuring your Company is being paid for the goods and services you provide. If Payment Terms are not being met by your Customers, this guide will assist in making sure you’re able to follow-up with them accordingly.
Read this guide if you are trying to:
✔ Manage Collections within Striven.
✔ Set up and manage your Collection Workflow.
✔ Learn about tools to help you better manage Customer Payments.
-
Intro to Collections
Before managing your Collections with Striven, it is crucial to review the Collections Process within the settings and configure your system’s Collections Notices, which are automated messages sent to Customers as reminders to pay outstanding Invoices.
You can designate the Contact recipients for these notices within the Customer’s Dashboard. It’s important to note that at least one recipient must be selected for a Customer to receive Collections Notices.
To view and manage Collections in Striven, navigate to:
Customers → Financial → Collections

Example of the Collections Option on the Customers Menu

-
Permissions
The following User Role permissions are required to access the Collections Process in Striven.
- “Collections Process”: Allows you to create new and edit existing notices in the Collections Process.
- “Collections Queue”: Users can complete actions, such as sending email notices and completing reminders as part of the Collections Process.
- “Customers/Vendors – Edit Do not send collections”: A Customer/Vendor-specific setting that will prevent the Customer/Vendor from receiving collections emails.
- “Manual Reset and Resend of Collections”: Grants access to reset the collection process and resend notices.

Example of the User Role Permissions Related to Collections
-
Configuring Collections
From the Collections Workflow Queue page, you can click the Manage Process button to configure your Collections Process settings.
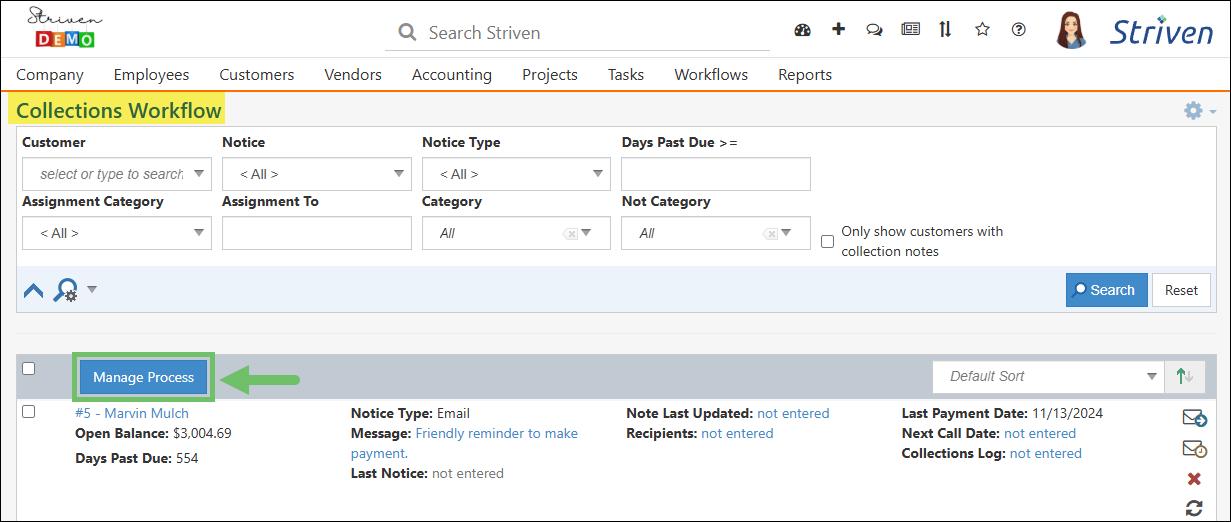
Example of the Manage Process Option on the Collections Workflow Queue Page
-
Collection Workflow Settings
Striven enables you to customize your Collections Process from the Collection Workflow page. There you can configure the settings for the Name of your Collection Process, when to trigger the process, as well as what notices you wish to send and when to send them.
To edit details within the Info panel, you will need to click on the Pencil icon in the top right corner of the panel. This will enable you to make changes to the Collection Process Name and to designate the Trigger setting for the process.
- Name: Displays the Name of the Collection Process in your Striven system.
- Trigger Process When Oldest Invoice is Overdue By: Designates when to trigger the Collections Process based on the Invoice Due Date. This number can have a minimum value of -10, which would cause the process to start (at the most) 10 days in advance of the oldest Invoice to become overdue. This provides a proactive approach to Collections and allows users to send friendly reminders to Customers before their payment becomes overdue.
- Add Notice: Loads the Add Collection Notice page allowing you to enter a Name for the notice, set the number of days to wait after the last notice was sent, and set whether it is an Email Type or Reminder Type of notice. Once the Type is selected, further settings options display for the notice Subject and Body content.
- Collections Notices: Lists the Collection notices you have saved in your Collections Process settings. Clicking on the notice’s Name allows you to view or edit the notice settings.

Example of the Collection Workflow Page
Add Collection Notice
Below is a screenshot illustrating how the Collection Notice Info page appears and a description of what can be accomplished there.
- Name: A summary name of what the email notice or reminder entails. This name will be listed in the Message field when processing collection notices from the Collections Workflow.
- Days to Wait After Last Notice Was Sent: Indicates how long the system will wait until after the last notice was processed until this email notice or reminder will be added to the Collections Workflow.
- Type: There are two different types of Collection Notices that can be added to the Collections Process which are as follows:
- Email: Sends an email notice to the recipient that is set up to receive collection notices for the specific Customer who is past due. This email can be set up to include Customer specific information with the use of merge fields so the recipient has helpful information when receiving this email notification.
- Reminder: Adds a reminder to the Collections Workflow to be marked as completed by the collections processor without sending an external email out of the system. Reminders can be used to help the collection processor remember to take an action such as placing a phone call or putting the Customer account on hold due to non-payment.
- Subject: The subject that will be listed for the email or reminder. This can be viewed by clicking on the Message field listed within the Collections Workflow.
- Body: The text and content that will be included in the email or reminder which can include next steps or useful information. This can be viewed by clicking on the Message listed within the Collections Workflow before sending the email or completing the reminder.
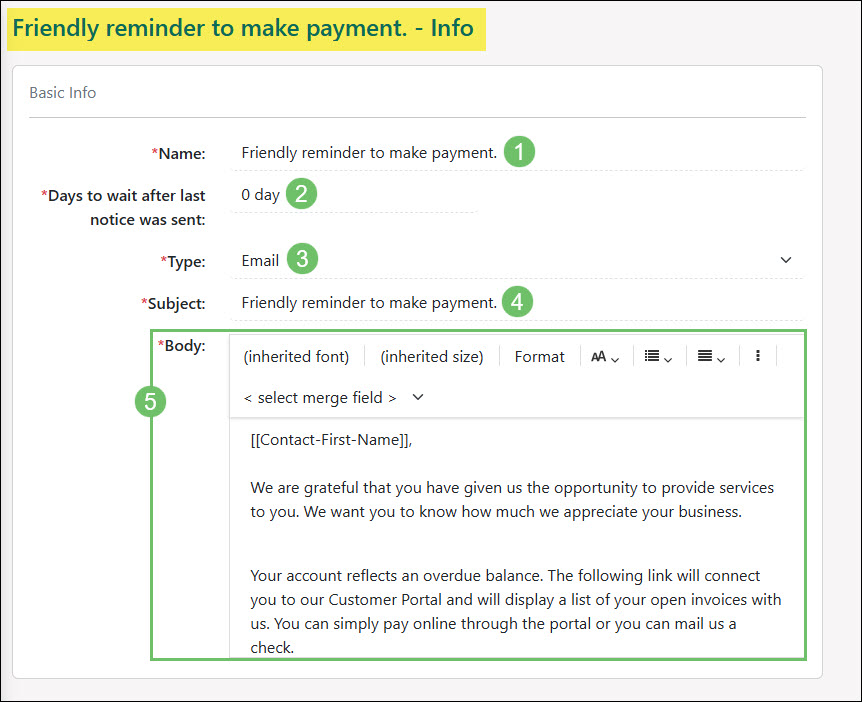
Example of the Available Actions and Information on the Collection Notice Info Page
While editing the body of the Email or Reminder it is important to add merge fields to make sharing account details like the Account Name, Open Balance, and Past Due Balance much easier as depicted below.

Example of a Collections Notice Settings
Emails sent from the Collections Workflow will be sent to the Contacts set up as Collection Notice recipients under the Customer’s AR Notifications page. If more than one person is set to receive the notification, this will be noted at the top of the email to clearly note which Contacts have received the notice. This note will not appear if only one person has been configured to receive the Collection Notice email.

Example of a Collection Notice Sent to Multiple Contacts from the Collections Workflow
-
Collections Workflow Queue
Once you’ve ensured the Collections Notices are set up the way you would like you’re ready to start managing Collections in Striven. You can manage Collections efficiently by utilizing the Collections Workflow. The Collections Workflow displays all the Customers who have open balances on one screen to easily manage notices. Once a notice is sent the following notice will be queued up to send until the Customer pays their open balance or the final Collections notice gets sent to the selected recipient. Below is a screenshot portraying how the Collections Workflow appears and details on what can be accomplished there.
To view the Collections Workflow Queue, follow these steps:
Customers → Financial → Collections
The Collections Workflow houses many tools that will help manage your Collections more easily including many helpful hyperlinks which are described below:
- Customer Name: Opens the Customer’s A/R page within their information in a new tab within your browser.
- Message: Initiates a popup to view the Notice Info that is intended to be the next notice that will be sent to the Customer.
- Recipients: Initiates a popup in order to choose which Contact is to be set as the recipient for the next notice that is to be sent for Collections.
- Next Call Date: Allows you to choose what the next follow-up date should be for this Customer with regard to Collections.
- Collections Log: Initiates a popup that allows you to enter a note about the Customer with regard to their current Collection status. Each note will be date and time stamped when created along with who has entered the note.
- Notice Tools: There are four actions that can be taken with regard to a Collection Notice within the Collection’s Workflow:
- Send/Complete: If the notice type is an email, the action will be available to Send which will send the email notice to the recipient that is set up to receive collection notices for the Customer. If the notice type is set up as a reminder, an action will be available to Complete the notice. The collection processor can view the reminder by clicking on the Message field to view the reminder in more details as to what action they need to complete before marking the notice as Complete.
- Snooze: Snoozes the notice to have it return to the queue at a later date or time.
- Skip: Skips the current notice.
- Reset Collection Process: Resets a Customer’s Collection process back to the beginning of the process.
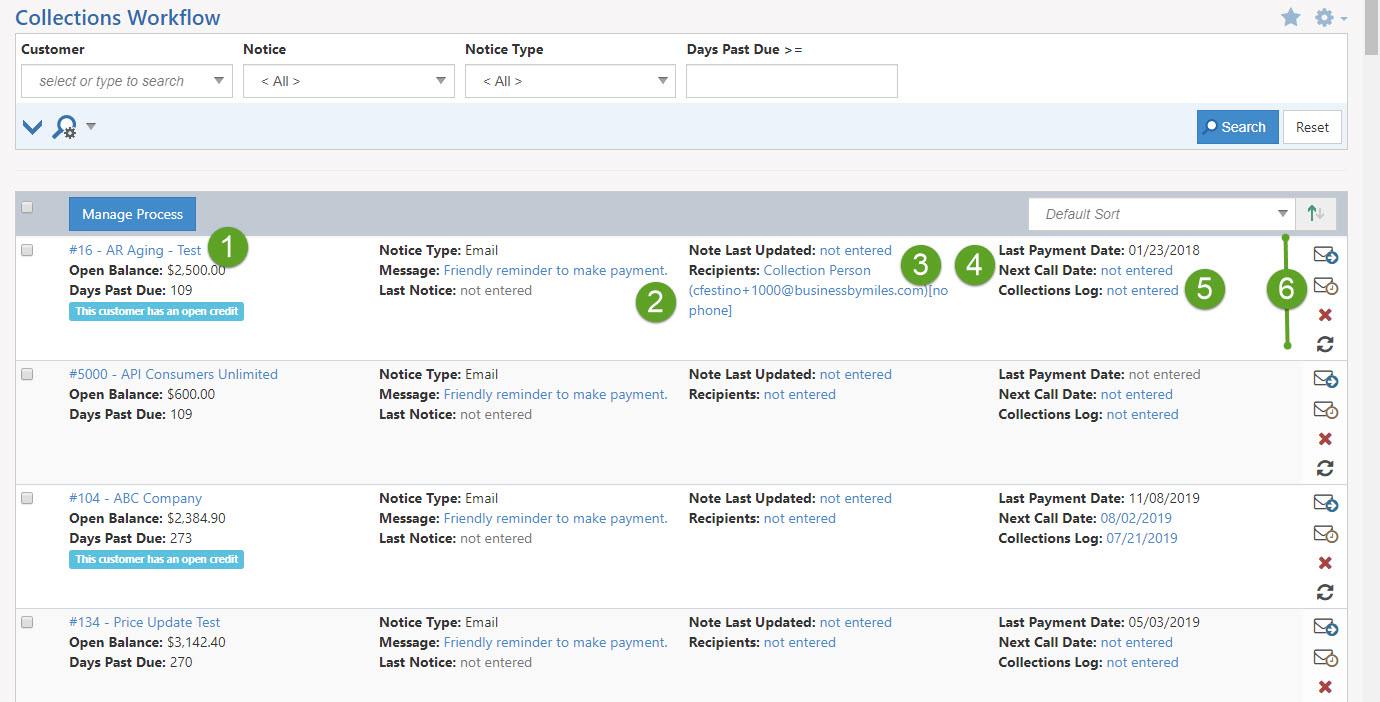
Example of Collections Workflow
-
Finance Charges
Finance Charges allow you to invoice a fee to your customer’s based on past due balances. These charges can be flat fees or percentage charges based on your configurations. Finance charges can help deter customers from allowing their invoices to become past due, and aid in your Collections Workflow by allowing you to keep track of previous late fees. Before configuring your Finance Charges, ensure that you are up to date and in compliance with any legal regulations regarding finance charges and late fees in your area.
Example of Generating Finance Charge Invoices
-
Configuring Finance Charges
To begin configuring your Finance Charge settings, navigate Company → Settings → Accounting → Sales → Settings, the scroll down the page to the Finance Charges section.

Example of the Sales Settings Page
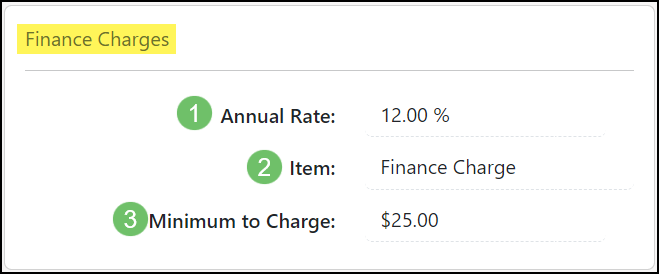
Within the Finance Charges section, you can configure the specifics of how your Finance Charges will be invoiced to your customers. The image below shows an example of the Finance Charge options. Once you have configured your Finance Charges, select the green Save button.
- Annual Rate: Allows you to choose the percentage of the Past Due Balance that will be billed when generating a Finance Charge invoice by percentage.
- Item: You may choose a configured Service type Item to act as the line item for the Finance Charge on an Invoice. It is recommended that you create a Finance Charge item for this purpose.
- Minimum to Charge: Allows you to choose the minimum amount that can be invoiced to a Customer when generating a Finance Charge or Late Fee Invoice.
Example of the Finance Charge Settings
-
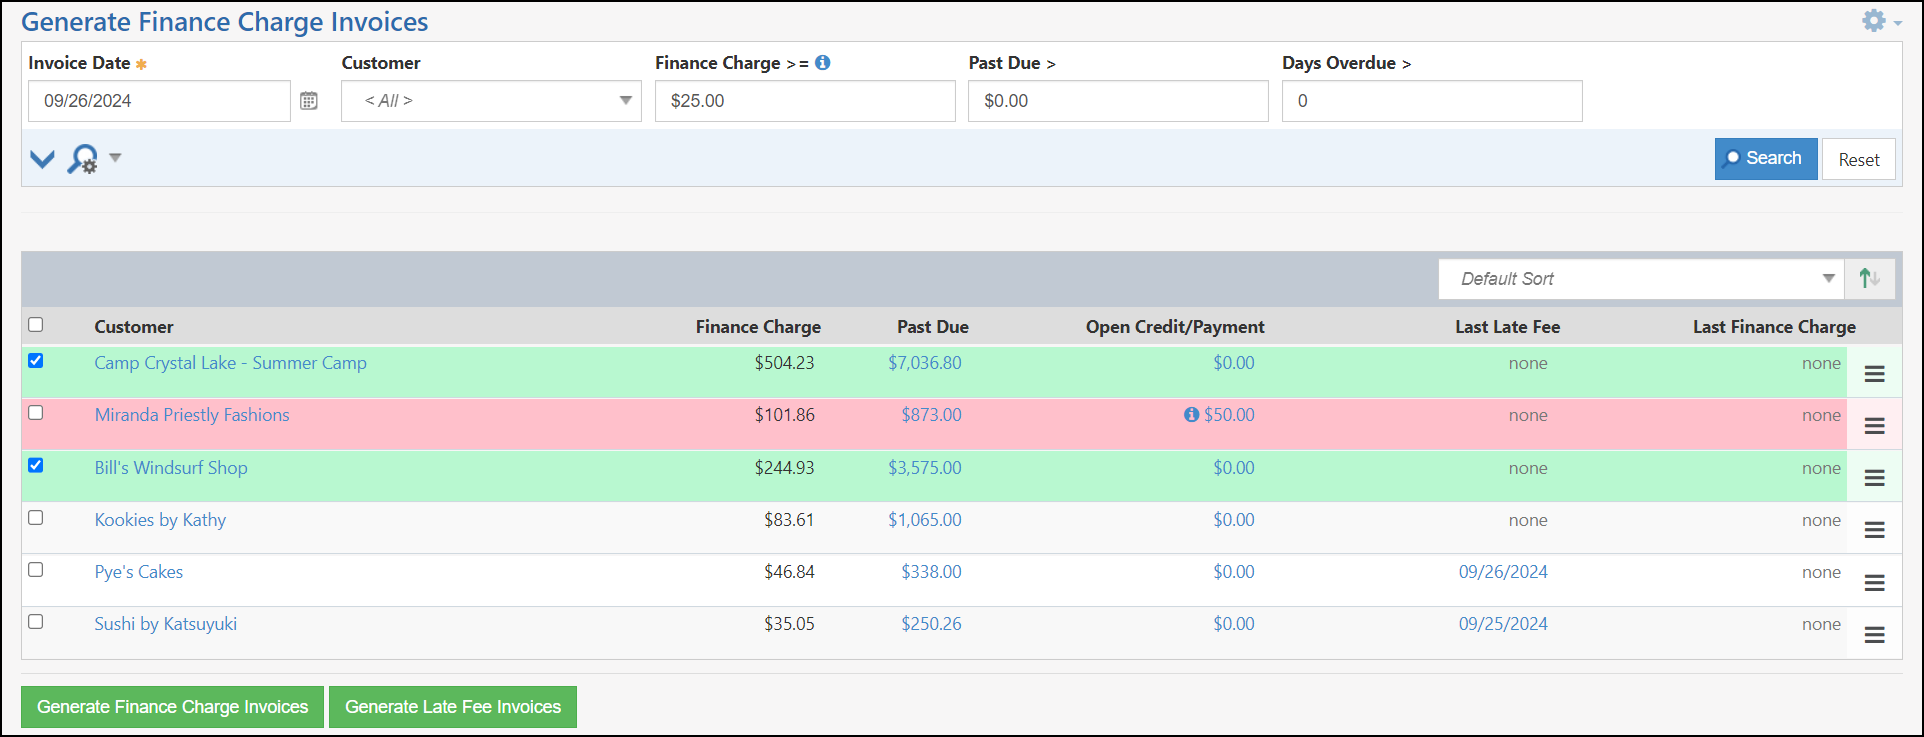
Generating Finance Charge and Late Fee Invoices
To generate a Finance Charge Invoice, navigate Customers → Financial → Finance Charges. The Generate Finance Charge Invoices page will allow you to view all Customers with past due balances or those who are eligible to receive a Finance Charge Invoice, or you can use the Search Options to narrow the results listed on the page. There are several options available on this page which assist you in generating Late Fees and Finance Charges.
- Search Filters: You may utilize these search filters to narrow the results shown and find the Customer’s you wish to generate Invoices for.
- Sorting: The results listed may be sorted by Default, Customer, Finance Charge, Past Due, Open Credit/Payment, Last Late Fee, and Last Finance Charge.
- Select Customers: These checkboxes allow you to select the Customers for whom you wish to generate Finance Charges, or Late Fees.
- Customer Information: Information such as the Customer Name, Anticipated Finance Charge, Past Due Amount, Open Credit/Payment Amount, Last Late Fee date, and Last Finance Charge Date will be listed. You may select a hyperlinked result to view more information regarding the data.
- Note: If a customer has open credits or payments, the result will be listed in red to draw your attention and avoid incorrectly charging a Late Fee or Finance Charge.
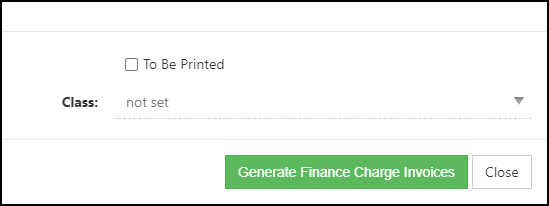
- Generate Finance Charge Invoices: Allows you to generate the Finance Charge Invoices for the Customers you have selected.
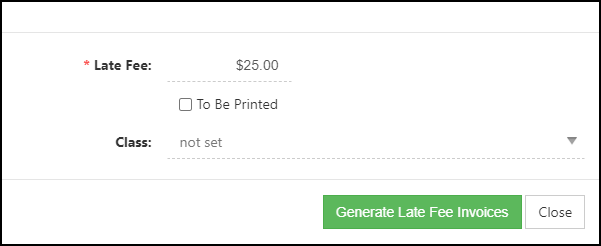
- Generate Late Fee Invoices: Allows you to generate the Late Fee Invoices for the Customers you have selected.

Example of the Generate Finance Charge Invoices Page
When selecting the option to generate a Finance Charge, a pop-up window will appear with the option to add the invoice to the Print Invoices Queue with the “To Be Printed” checkbox. You also have the option to assign a class to the transaction, then select the Generate Finance Charge Invoices button to proceed.
Example of the Generate Finance Charge Options
When selecting the option to generate a Late Fee, you will have the previous options within the pop-up window, with the addition of choosing the Late Fee amount. The amount configured within the Minimum to Charge field of the Finance Charge settings will be auto-populated within the Late Fee field. You may select the Generate Late Fee Invoices option to continue.
Example of the Generate Late Fee Options
Upon choosing to generate the Invoices, a blue Notice message will appear informing you that you will receive an email once the Invoices have been generated. It may take several minutes for this process to complete, especially if a large number of Invoices are being created.

Example of the Blue “Notice” Message
-
Recap
With this guide, we’ve discovered how to create and manage your Collections Workflow to ensure your Company is receiving Payments in a timely manner. We’ve also discovered ways to create and edit Collection Notices. Additionally, we’ve reviewed the Collections process options available within Striven to keep your Workflow’s momentum going.

Have a Question?
Ask the Striven Community
User-sourced how-to’s, feedback, and more!
FAQs
-
There are a few different people who I need to notify when Collections are past due. Can I have the Collections Notice go to more than one person?
Yes, you can have a notice delivered to multiple people. Under the settings page in the Customer Dashboard, you can add as many Contacts as you need for the Collection Notices as long as they have the correct Portal Roles.
-
How do I know if anyone else has already contacted a Customer about their Collections or is working on it?
Within the Collections Queue, you can enter Notes in the Collections Log. This is a very convenient feature since notes can be left by anyone within your Company regarding the Collections due. The log will show the note, the date the note was entered, the time it was entered, and also which Employee had entered that note. This is a great component in Striven to make sure there are no oversights. You can also add to the Collection Queue the Next Call Date. This will allow you to know when the next time to follow up with the Customer is set to.