Productivity Tools
Hub
Support Guide
-
Overview
Striven has an incredible tool to help manage Company documents, forms, links, and more. Using your Striven Hub, you can store content and links related to the various Departments of your Company, such as HR Management for example, to provide easy access for your Employees to important information like the Employee Handbook, SOPs, etc. You can configure access to your Hub contents based on Permissions and User Roles. This guide will explore how these features can be utilized in Striven.
Read this guide if you are trying to:
✔ Make Company Documents, Posts, and Links accessible to Employees.
✔ Set preferences for access to particular Documents, Posts, or Links within the Hub.
✔ Make your Hub contents visible on the Customer/Vendor Portal.
-
Hub Permissions
Access to Hub content can be managed with the use of Hub-related Permissions and User Roles. The following list will provide an explanation of how each Permission affects a user’s access to Hub content:
- “Hub – Add/Edit”: Enables the user to add and remove Sections, Content Groups, and Content from Hub.
- “Hub Content – Manage All”: Allows accessing of Hub pages, all contents regardless of access setup for the content.
- “Hub Contents – Add”: Enables the user to upload Documents, add Links, and create editable Post content within Hub.
- “Hub Contents – View All”: Allows viewing of all content, regardless of access setup for a content.
- “Hub”: Allows the user to view Hub (does not grant access to specifically restricted content).
- “Hub Content Groups Structure – Add/Edit”: Allows a user to add new or modify existing Hub Content Group Structures.
- “Hub Content Types – Add/Edit”: Enables a user to add new or modify existing Hub Content Types, including Custom Fields.
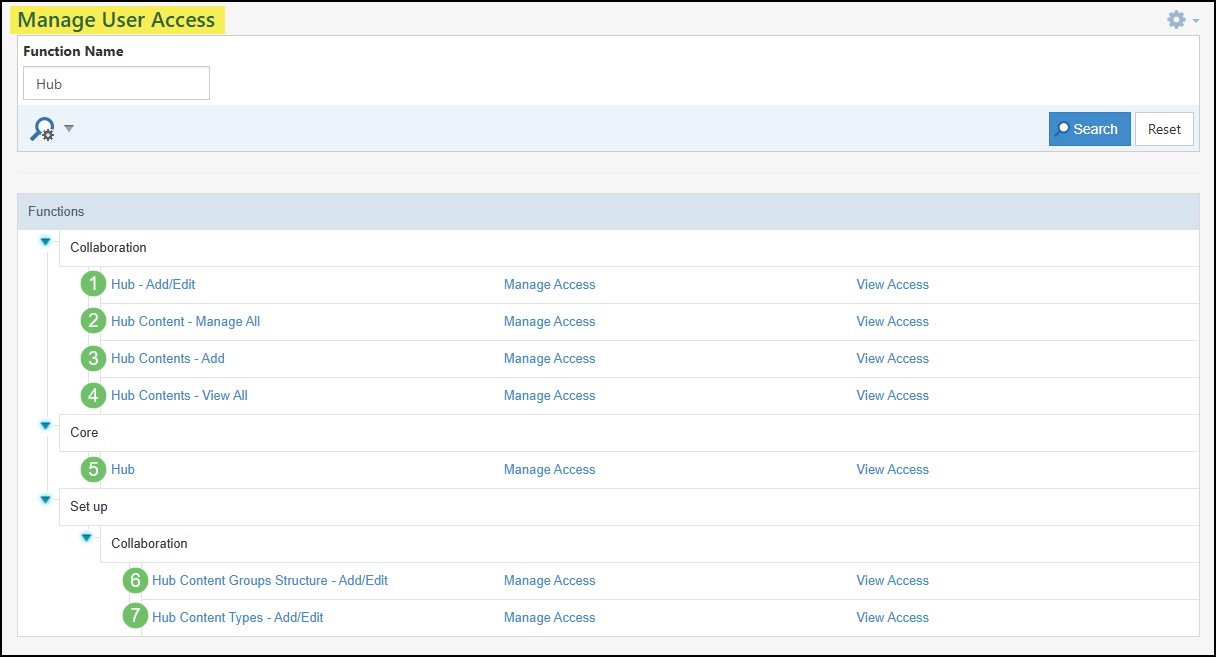
Example of the User Role Permissions Related to Hub

An additional permission will be required in order for Employees to add content to their My Profile – Hub page called “Employees – Add Documents Related To Them”.

Example of the User Role Permission Related to Adding Content to the My Profile – Hub

If you are unable to access Hub or its contents, chances are you’re missing one of the required permissions from your User Role. Should you suspect that to be the case, contact your Striven system administrator to confirm you have the appropriate access permissions.
-
Intro to Hub
Striven’s Hub is a digital filing cabinet of sorts and can store all your documentation, such as Documents, Posts, and Links. With Hub, you can save documents and folders in Content Groups, which will help differentiate and organize folder content. In addition to the Company Hub, individual Hubs can be found sprinkled throughout Striven for particular entities, such as Customers, Candidates, and Employees, to name a few. The general function of all Hubs remains the same, although with the entity-related Hubs there may be specific security settings to manage access to the content.
To view the Company Hub, navigate to Company > Hub.
In a new Striven system, the initial view of Hub will look similar to this:

Example of a New Striven System Company Hub

Uploading content to the Hub is easy once you have your Hub layout configured, including your Sections, Content Groups, and/or Folders. Once setup is complete, content can be added on an ongoing basis. Employees can easily find documents and links that are uploaded in Hub and can use the Search Content feature to find content throughout the system’s many Hubs.
-
Hub Configurations
Before using Hub, it is important to configure certain settings related to Content Types and Content Group Structure. Establishing these settings early on can help prevent future configuration issues when adding content to Hub.
Hub Content Types
Striven provides three (3) Content Types for Hub by default, and offers the option to configure others for your Company’s use. To view, add, or edit these settings, navigate to Company → Settings → Company → Collaboration → Hub Content Types.
The three (3) Content Types included in Striven are Document, Post, and Link. You can edit the settings for the default types, or create additional types to suit your organization’s specific needs.

Example of the Hub Contents Types List

To add an additional Hub Content Type, click the plus icon which is located at the top of the Hub Content Types list. This will open the Add Hub Content Type page in order to add a new Hub Content Type to your system.
Below is a screenshot illustrating how the Add Hub Content Type page appears and a description of what can be accomplished there.
- Name: Indicates what kind of information that will be contained in the Hub Content Type. When adding to Hub, the name will appear when selecting which type of Hub Content you will be adding to Striven.
- Type: There are three different types that can be chosen from when creating a Hub Content Type which includes the following:
- Document: Allows the user to upload to Striven a document or file from their computer.
- Post: Allows the user to enter formatted text into a content field which can then be viewed later within Hub.
- Link: Allows the user to add a hyperlink along with a description for the hyperlink that can be later accessed through Hub.
- Default: Content Types marked as Default will be the type used when creating Documents, Posts, or Links when using the Striven API.
- Visible on Customer/Vendor Portal: Indicates whether or not Hub Content added of this type can be viewed by the Customer or Vendor through the Customer/Vendor Portal.

Example of the Add Hub Content Type Page

Hub Content Group Structure
Striven has a configuration setting for Hub Content Group Structure that will assist in simplifying and standardizing the organization of your Hubs in Striven. With default Content Groups, you can set a sort of “template” for your Hub layouts. This feature provides the ability to configure Content Group Structure for specific entities, similarly to how the Global Custom Fields work. Once configured, these “templates” can be used to add the structure to the Hub when creating new entities.
To view/edit these settings, navigate to Company > Settings > Company > Collaboration > Hub Content Group.

Example of the Hub Content Group Structure Settings Page

You can drag/drop the Content Groups between the three columns, or even rearrange them within the column to change the order of the layout. You may also use the directional options found within the kebab menu on each group to relocate them in the layout.
-
Adding Hub Content
Once you have your system settings configured for Hub, you can organize your Sections, Content Groups, and Folders in a layout that simplifies user navigation. Details related to adding content like Documents, Posts, and Links are described below.
Hub Documents
Documents provide the ability to upload files for storage in the Hub. Multiple files can be uploaded to a Document at one time. If a file name is not provided when uploading, Striven will automatically take the uploaded file’s name as the content name.
- Note: Uploading multiple files at a time creates individual Document content, not a grouped or zipped file.
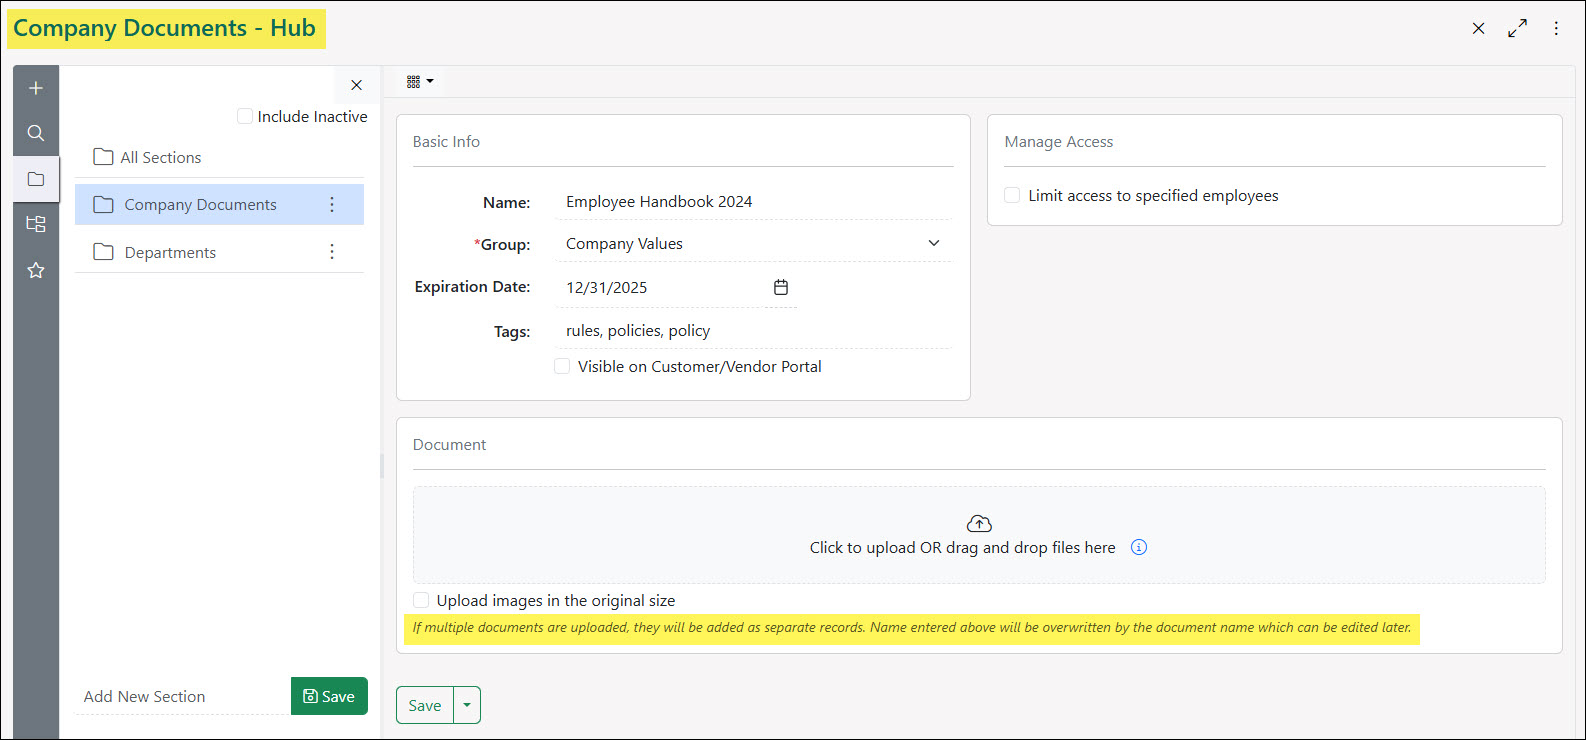
Example of Adding a Document to Hub

Striven offers a variety of accepted file extensions which can be organized in folders or in Content Groups.
- Allowed File Extensions: .doc, .docx, .xls, .xlsx, .ppt, .pptx, .pdf, .tif, .jpeg, .jpg, .gif, .bmp, .txt, .csv, .png, .msg, .wav, .mp3, .mp4, .zip, .rtf, .eps, .ai, .psd, .avi, .mov, .wmv, .cfg, .wss, .vsd, .vsdx, .tsd, .lic, .exp, .kit, .dwg, .dxf, .svg, .heic, .indd, .lsf, .asc
- Max File Size: 100 MB
Hub Posts
Posts provide the ability to save content in a sort of “note” format using a rich text editor.
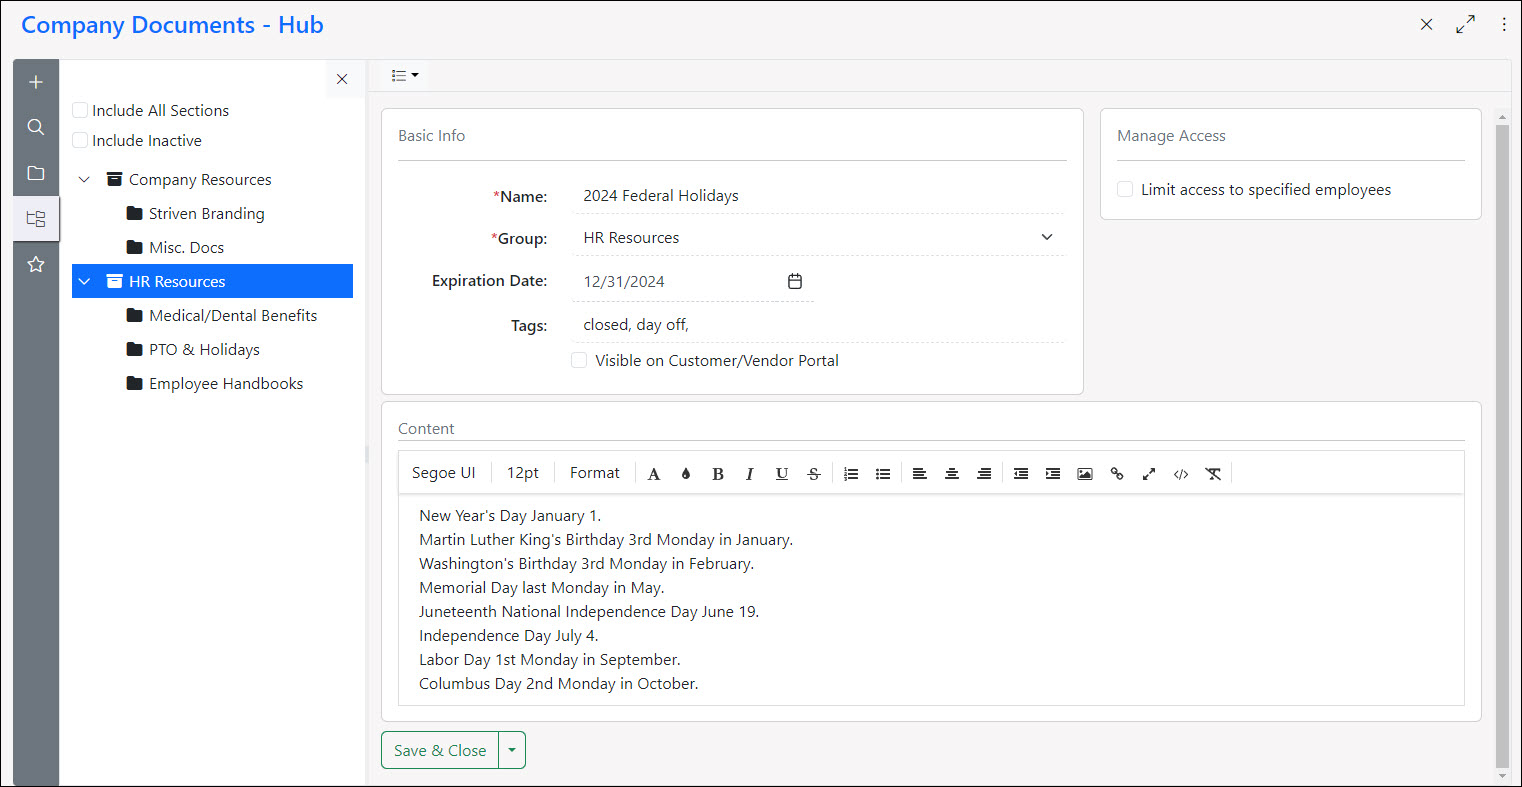
Example of Adding a Post to Hub

This Content Type can be set (at the Content Type level) to log edits made to a Post in order to keep a history of its changes. If this option is enabled, the View History link will display in the top-right corner of the content panel of the Post. Clicking the link shows the history date and the name of the user who updated the content.
- Note: The history date will link to show the previously saved content in another tab.

Example of the View History Option on a Post in Hub

Hub Links
Links provide the ability to store a URL as a link within Striven for easy access by those with access to the Hub.
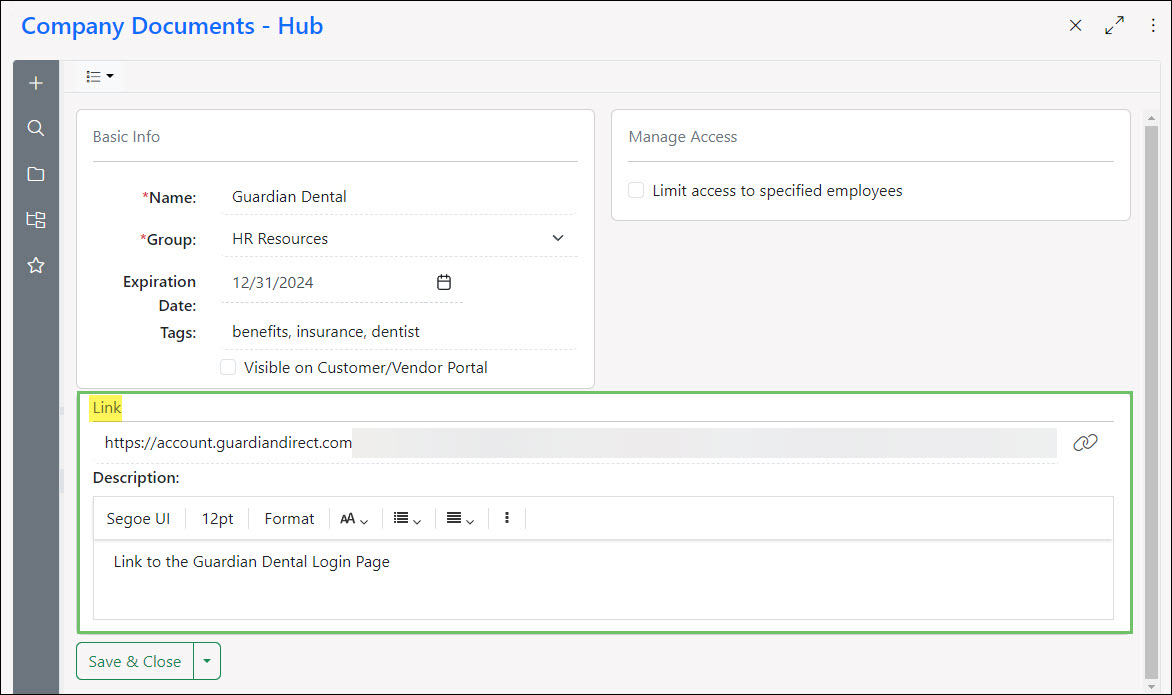
Example of Adding a Link to Hub

-
Hub Views
In order to configure a new Hub or manage an existing Hub layout, you should familiarize yourself with the different functions and views available in Hub. This guide section will review these details to help simplify the configuration of your Company Hub content.
-
Left-Side Panel
Hub is basically split into two panels. The left-side panel is the navigational panel that houses the left-side menu options for filtering and viewing your Hub contents. This menu has options to Add, Search, View by Sections, View Tree, and filter by Favorites.

Example of a Company Hub Layout

Add (+)
Clicking on the Plus (+) icon displays the available options for adding to the layout of your Hub. These options include:
- Add Section: Adds a new Section to the Hub for categorizing and organizing your content.
- Add Content Group: Adds a new Content Group to the selected Section.
- Add Default Content Groups: Allows you to select from your preset Default Content Groups created in the Content Group Structure settings.
- Document: Adds a new Document to Hub.
- Post: Adds a new Post to Hub.
- Link: Adds a new Link to Hub.

Example of the Add Menu Options in the Left-Side Panel of Hub

Search
Clicking on the Search icon pops out a search panel with the following filter options:
- Name: Searches for Hub content by content name.
- Status: Searches for Hub content by Status. Options are Active, Inactive, or All.
- Content Type: Searches for Hub content by Content Type. The default Types are Document, Post, and Link, but you will also be able to search by any custom Content Types created within your Striven system.
- Content: Uses a type-ahead field to search the Hub for content based on the Tags saved in the content settings.
- Created Date: Searches for Hub content based on the date it was created/uploaded to the Hub.
- Modified Date: Searches for Hub content based on the date it was last modified.
- Expiration Date: Searches for Hub content based on the date it was set to expire. Expired content will be noted by an Alert icon in Group view or an Expired label in the List view.
- Visible on Customer/Vendor Portal: Filters results based on whether or not the content is marked as visible in the Customer/Vendor Portal.
Include All Hubs: Enables you to search for content across all Hubs in Striven.- Note: The results will only display contents you have access to and will display which Hub the content resides in.
- Saved Search: Provides the ability to save your current search selections to use again in the future. There is a Saved Searches tab on the top of the Search popup where you can find your previously saved searches to quickly access the content you’re looking for in Hub. This also provides the ability to set a Saved Search as your default search when loading the Hub.
- Search & Reset: The Search button will run the search based on the filters you have selected. The Reset button will clear the Search popup from all selected filters to allow you to start over.
- Note: The Reset button will only clear the filter selections from the Search popup, whereas the Clear Filters option on the right-side panel will clear all filtering from the content displayed and show all content.

Example of the Search Filter Options in Hub

Sections
The Sections tab enables you to view the Hub content based on the Sections in the Hub. This includes options to view All Sections, Inactive Sections, or Add New Sections.
In the Sections kebab menu, you will be able to Share, Edit, or Activate/Deactivate the Section.
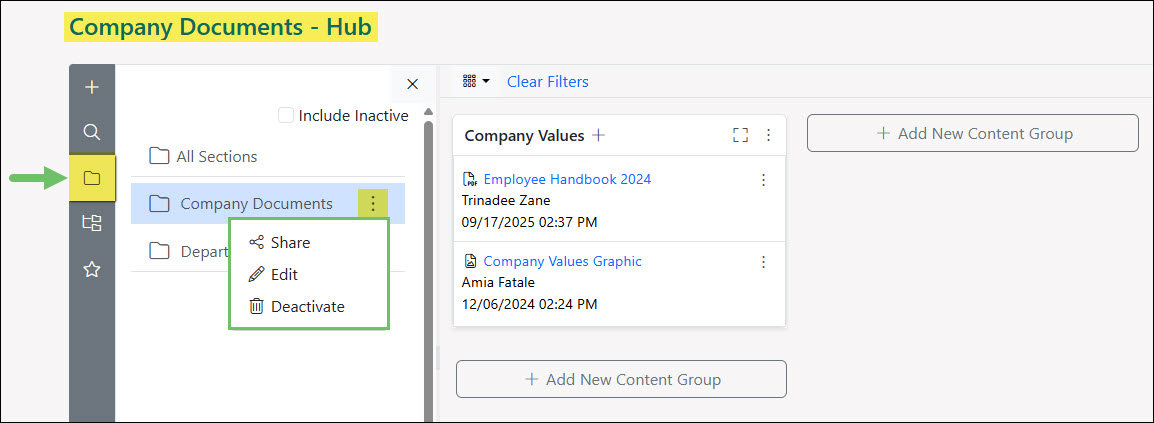
Example of the Sections Tab in the Left-Side Menu of Hub

Tree
The Tree tab enables you to view the Hub layout in a Tree view, allowing you to navigate through content through Sections, Content Groups, and Folders as they are nested within your Content Group Structure.

Example of the Tree Tab in the Left-Side Menu of Hub

Favorites
The Favorites tab filters the right-side panel to display only the content tagged as a Favorite in the List View on the right-side panel.

Example of the Favorites Filter used in Hub

-
Right-Side Panel
The right-side panel displays the results of the filtering or navigation from the left-side panel of Hub. Any of the content in Hub that meets the criteria of the selections you have made on the left-side panel will display on the right-side panel in one of two layout options:
- Content Group View: Displays the Hub content on the right-side panel of the page in a grouped view of three (3) columns, showing the Sections, Content Groups, Folders, and Hub contents. Each column has a button to add a new Content Group, and each Group has the options to add Folders, Documents, Posts, Links, and any other Content Types added to your Striven system. Content Groups can be rearranged into different positions or columns by dragging/dropping them to the desired position.
- List View: Displays the Hub content on the right-side panel of the page in a List view. The List view shows the content Name, Type, Modified By, and Last Modified Date.
- Note: This is the default view for Search and Favorite filtering.
You can switch between the Content Group View and the List View by selecting the desired view from the drop-down list.

Example of the Available Views for Hub

Content Group View
The Content Group View provides a kebab menu on each Content Group, Folder, and content item with a variety of Action options depending on your User Role settings.
Folder Options
The Action options for Content Groups and Folders may include the following:
- Rename: Allows you to change the name of the content.
- Share: Copies the URL path of the content to your clipboard for sharing.
- Sort Ascending: Sorts the contents of the Content Group or Folder from A to Z.
- Sort Descending: Sorts the contents of the Content Group or Folder from Z to A.
- Move To: Displays a popup wherein you can select the Hub Section or Folder to which you wish to move the selected content.
- Note: Additionally, you can move content between Sections and Folders by dragging/dropping them into the desired location in the left-side navigation Tree view. You cannot drag/drop content within the right-side panel to move it, although Content Groups may be rearranged this way.
- Manage Access: Allows you to restrict access to the Content Group or Folder to specific Employees, Teams, or Departments. If no one is selected, anyone with Hub access will have access to the content.
- Download Documents: Downloads any document available inside the Content Group or Folder, including all nested documents. When clicked, a confirmation message will display stating, “Documents you have access to within this folder will be downloaded as a ZIP file. Are you sure you want to continue?”. Click Yes to continue.
- Mark Favorite: Designates the Folder or content item as a Favorite for filtering purposes.
- Activate/Deactivate: Allows you to activate/deactivate the Content Group, Folder, or content item.

Example of the Kebab Menu Options for a Folder in Hub

Content Options
The Action options for content may include the following:
- Rename: Allows you to change the name of the content.
- Share: Copies the URL path of the content to your clipboard for sharing.
- View: Opens the content info page with access to the Actions options, including an Audit Log for the content.
- Note: The Audit Log notes changes to access, expiration date, and activating/deactivating content.
- Edit: Displays the content info page and allows you to make changes to the Basic Info, Content, or Manage Access panels for the content.
- Replace: Allows you to replace a document file with another. You can click to upload or drag/drop the replacement file and click the Replace button to update the content.
- Note: This will only replace the file; the content Name will remain the same.
- Move To: Displays a popup wherein you can select the Hub Section or Folder to which you wish to move the selected content.
- Manage Access: Allows you to restrict access to the Content Group or Folder to specific Employees, Teams, or Departments. If no one is selected, anyone with Hub access will have access to the content.
- Copy: Enables you to copy the content. Clicking this will display a confirmation popup asking if you are sure you wish to copy the content. Selecting Yes directs you to the content info page of the copy of that content.
- Mark Favorite: Designates the content item as a Favorite for filtering purposes. Favorites are noted by a Yellow Star icon.
- Activate/Deactivate: Allows you to activate/deactivate the content item.

Example of the Kebab Menu Options for a Document in Hub

Content Groups initially display up to 25 content items at a time, but you may use the Load More button to view additional items in sets of 25. When you add new Folders or content to Content Groups, they will automatically appear at the bottom, so you may need to rearrange things to change their display order.
List View
The List View displays all Folders and content related to the filters selected from the left-side panel. The content listed will display the content Name, Type, Modified By, and Last Modified date. Each list item will have a kebab menu with all of the Action options available.

Example of the List View in Hub

When viewing Hub in List View, there will be checkboxes to allow for selecting multiple list items to perform actions in bulk. For example, if you check the boxes for multiple listed content, an Actions menu will appear at the top of the list with the following options:

Example of Bulk Actions available in List View of Hub

- Mark as Favorite: Enables you to mark multiple items as Favorites at one time.
- Mark as Visible on Customer/Vendor Portal: Enables you to mark multiple items as Visible on the Customer/Vendor Portal at one time.
- Note: Edit access will be required to mark content as visible on the Portal.
- Download Contents: If the content selected is a Document Type, you will be able to download multiple Documents at a time. Post and Link Type content will not have the option to download them.
- Note: Choosing this option will trigger a confirmation popup to appear informing you that the selected content will be downloaded as a ZIP file and will ask if you want to continue.
- Deactivate Contents: Provides the ability to deactivate multiple items at one time.
List Sorting
The following options are available for sorting your Hub contents while in List View:
- Name
- Type
- Favorite
- Date Created
- Last Modified (default)
- Visible on Customer/Vendor Portal
- Expiration Date

Example of Sorting Options Available in List View of Hub

-
Hub Visibility in the Customer/Vendor Portal
Whether viewing Hub content in List View or Content Group View, alongside the Favorite icon you may notice the small Globe icon. This designates whether the content is set as visible in the Customer/Vendor Portal or not. If the Globe icon is gray, the content is NOT visible in the Portal. If the Globe icon is blue, the content IS marked as visible in the Portal. This option can be toggled on/off by users who have Edit access included in their User Role by clicking on the Globe icon to change the color between gray and blue.
- Note: If the content is not currently set as visible in the Portal, the gray Globe icon may not show unless you hover your cursor over the item.

Example of the Portal Visibility Globe Icon in Hub

-
Recap
With this Striven Hub Guide, we have discussed how to add, create, and manage content in the Company Hub to suit your organization’s needs. We covered the different Content Types included with Striven, as well as how to create custom Content Types. We’ve reviewed the different views available for Hub, how to configure Hub access, and how to make your Hub content visible in the Customer/Vendor Portal.
Have a Question?
Ask the Striven Community
User-sourced how-to’s, feedback, and more!
FAQs
-
Can I link my Google Documents in Hub?
Yes! Provided the Google Document sharing settings are configured for access to anyone with the link, you can create a Link in your Hub and include the share link from the Google Document there. This way, when users click this link they will always be viewing the most current version of the document available.
