
Inventory & Items
Inventory Tracking
Support Guide
-
Overview
Striven helps businesses streamline Inventory Management by providing tools such as Barcoding, Serial Number Tracking, and Lot Number Tracking. Barcoding allows for quick addition of Items to transactions through manual entry or scanning, saving time in warehouse or retail environments. Serial Number Tracking enables businesses to manage and track individual items through various transactions, providing a lifecycle view from purchase to sale. Lot Number Tracking further enhances inventory control by incorporating expiration dates and enabling sorting options to ensure timely sales and efficient handling of recalls.
Read this guide if you are trying to:
✔ Save time when adding Items to Transactions by using the Barcode feature.
✔ Effectively manage and track your inventory through Serial Number Tracking.
✔ Achieve inventory traceability by enabling Lot Number Tracking.
-
Barcodes
Striven provides a Barcode feature that makes it easy to add Items to Transactions by either manually entering a designated Barcode Number, or scanning a Barcode on a physical Item with a scanner. Tracking inventory with this feature is a fantastic way to save time when adding a large number of Items to Transactions, or adding Items to Transactions while in a store or warehouse environment.
-
Enabling Barcoding
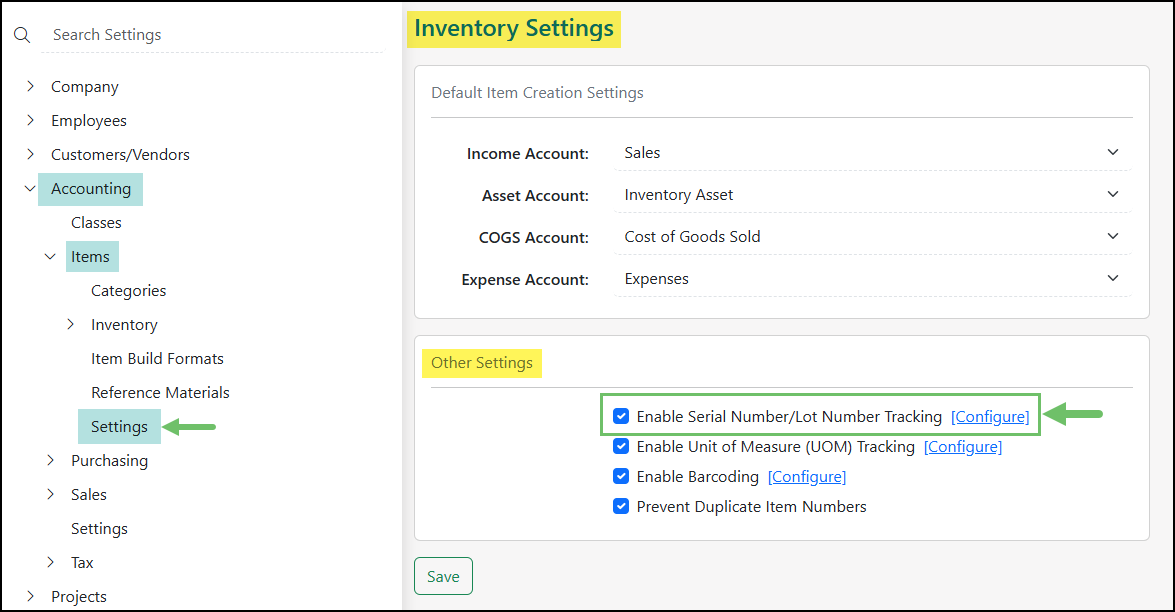
To turn the Barcoding feature on within your Striven system, you will need to first navigate to Company → Settings → Accounting → Items → Settings.
On this settings page, there will be an option in the Other Settings section to Enable Barcoding.
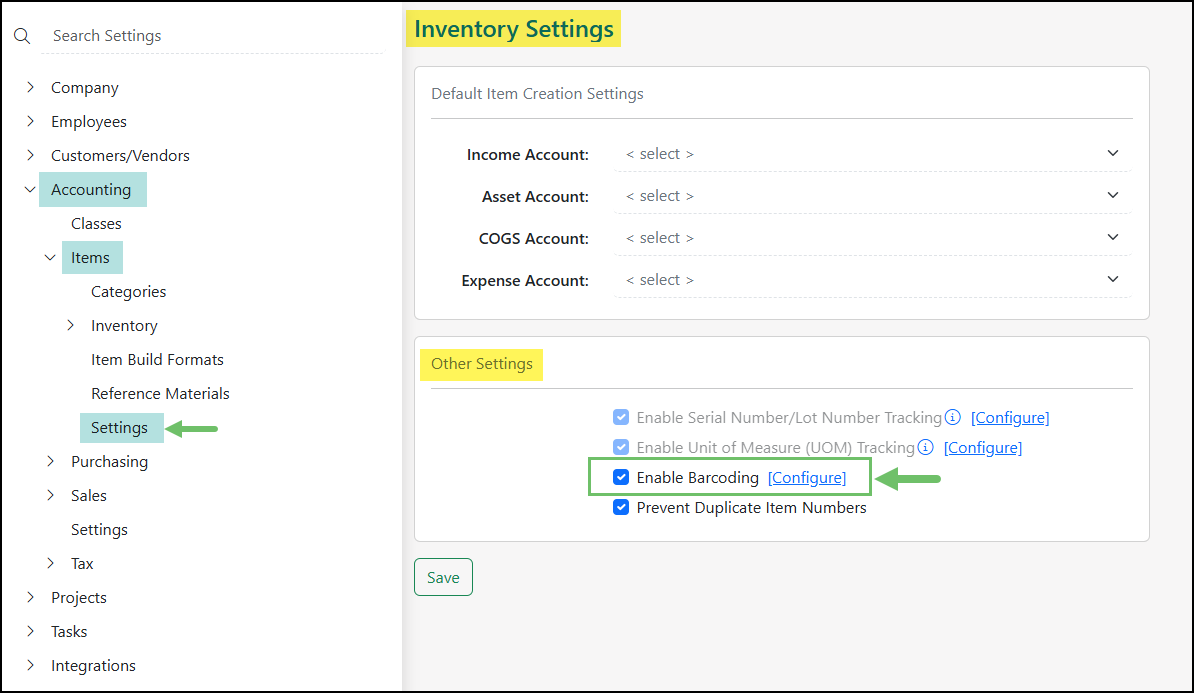
Example of Enabling Barcoding in the Items Settings Page

Once you have enabled the Barcoding option, a Configure option will appear. Clicking on this option will allow you to set the Default Barcode Type, which will automatically be set to Code 39. Other available Barcode Types include Code 128 and UPC-A.
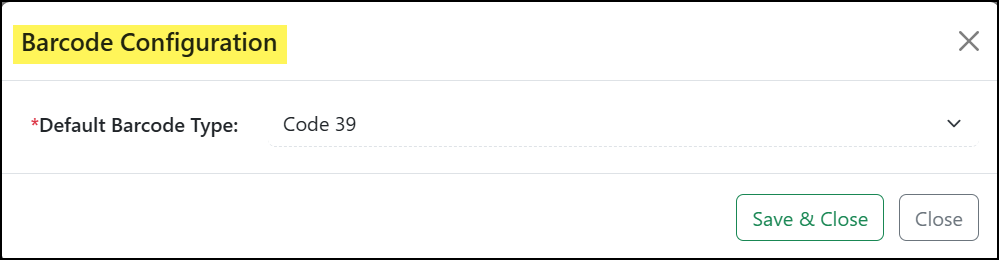
Example of the Barcode Configuration Dialog Box
Set Barcode Value on Item
Now that you have enabled Barcoding for Items in your settings, it is time to set the Barcode Value on each of your Items. You will need to navigate to your Items List by going to Accounting → Inventory → Items.
Once on the Items list, you can search for the particular Item you want to set a Barcode Value on. After searching for your Item, click on the Item name to display the Item Info.
Within the Item Info page, you will want to configure the section labeled Inventory Settings to set the Barcode Value. The Barcode Value should correspond with the Barcode that you have on your physical Item or inventory. A Barcode Value can be set for all Item types within Striven.
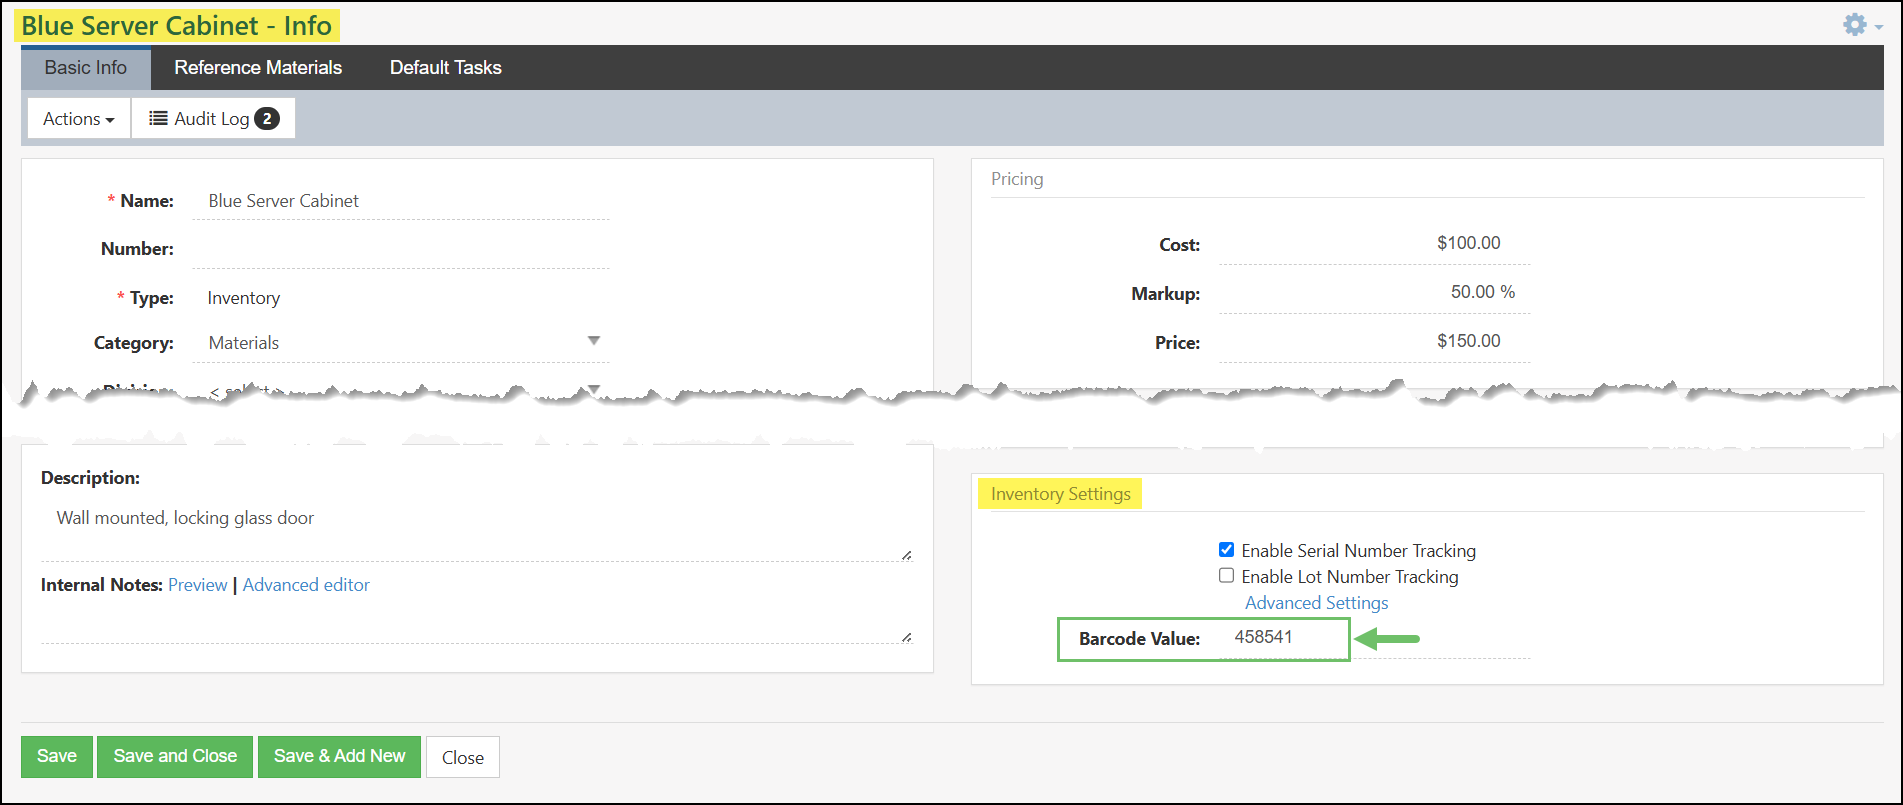
Example of a Barcode Value Setting on an Item Info Page
Set Barcode Value on Inventory Locations
Another area where you can add a Barcode Value is your Inventory Locations. Setting up Barcode Values for your Inventory Locations will allow you to quickly scan to select a Location you are pulling the Items from onto your Transactions.
To add Barcode Values to your Inventory Locations, you will need to navigate to Company → Settings → Accounting → Items → Inventory → Locations.
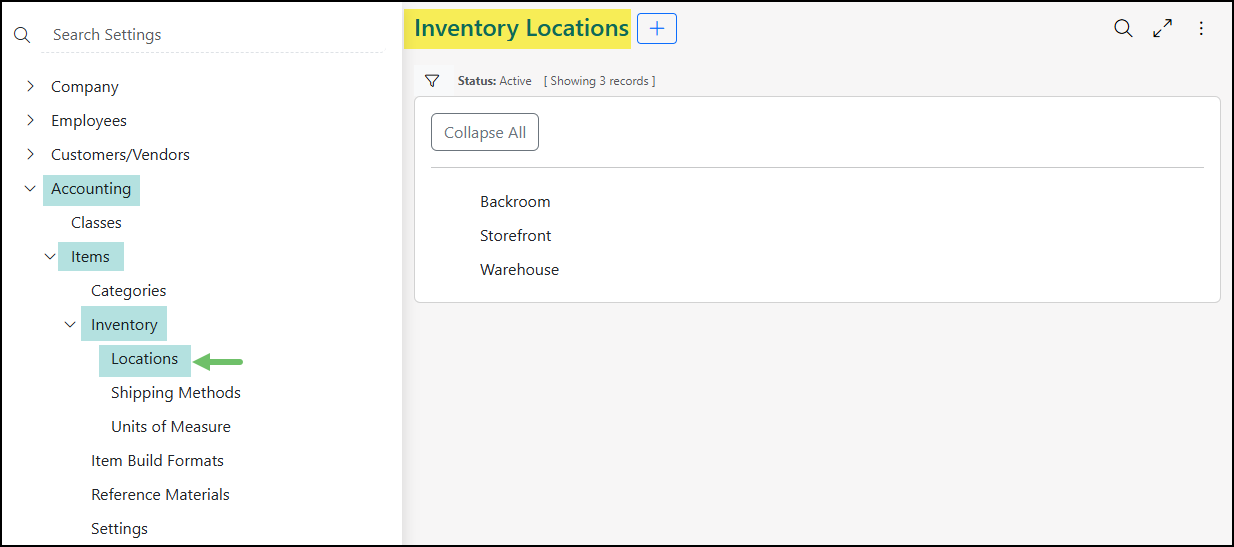
Example of the Inventory Locations Page
From the Locations list for your Items, you can add a new Location or select one from the list to edit an existing Location. When editing an Inventory Location, a field will be available for the Barcode Value to be entered.
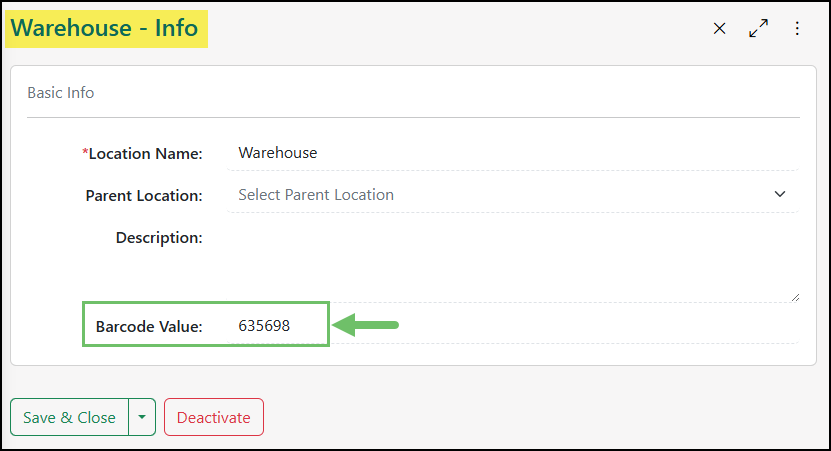
Example of Barcode Value Field on an Inventory Location Info Page
-
Using a Barcode Scanner
There’s no extra setup required to use a Barcode Scanner with Striven, unless your scanner has a Bluetooth option for a wireless connection. If that is the case, you will first need to follow the instructions available from the Barcode Scanner’s manufacturer to set the wireless connection up properly. Otherwise, you will simply need to plug in the scanner and you can begin using it to add Items to Transactions.
Barcode Scanners can range in price going as high as $5,000.00 USD. Some more affordable and recommended options are listed below for a Barcode Scanner you can use with Striven:
- Zebra Symbol LS2208 Barcode Scanner: Around $70.00 USD
- Brainydeal USB Automatic Barcode Scanner: Around $33.00 USD
Enter or Scan Item Barcode
Now that you have enabled Barcoding in Striven and have set up your Barcode Scanner, you can now begin to scan Barcodes to quickly add Items to orders or Transactions in the system.
You will begin by creating the Transaction or Order type you need and navigating to the Item section of the page.
To begin scanning Items with a Barcode, you will need to first click into the Scan Barcode field at the top of the Item section.
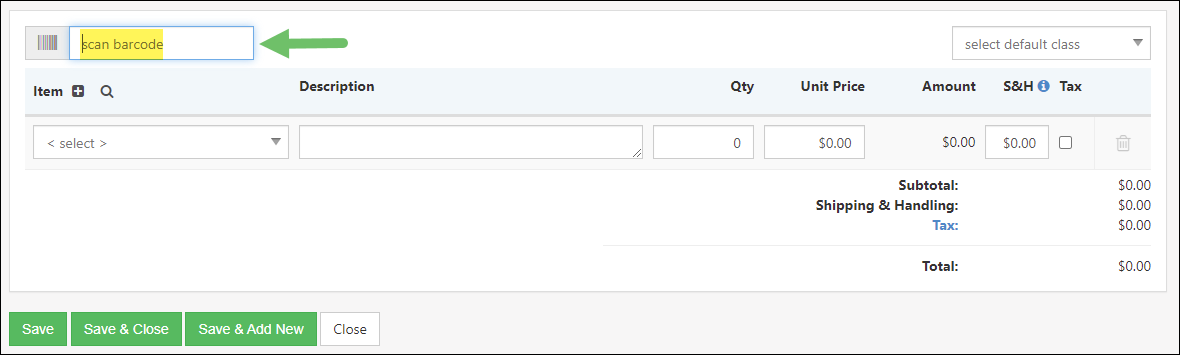
Example of the Scan Barcode Field at the Top of the Items Section
Once you have clicked into the Scan Barcode field, you can begin typing your Barcode Number and hit enter, or use your Barcode Scanner to add Items to the Items List section.
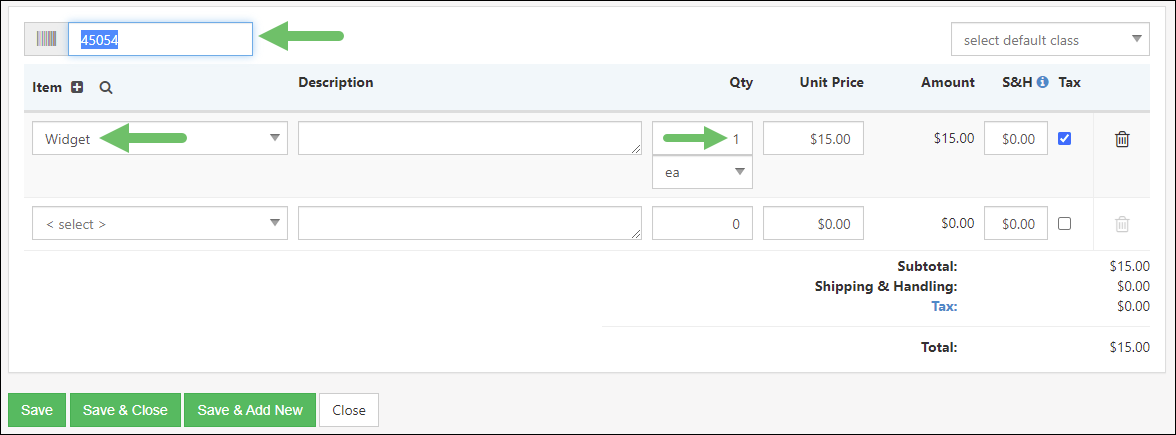
Example of Adding Items to a Transaction Using Barcodes
If you scan the same number or enter the same Barcode Number multiple times, the quantity for the already added Item will increase instead of creating a new Line Item.
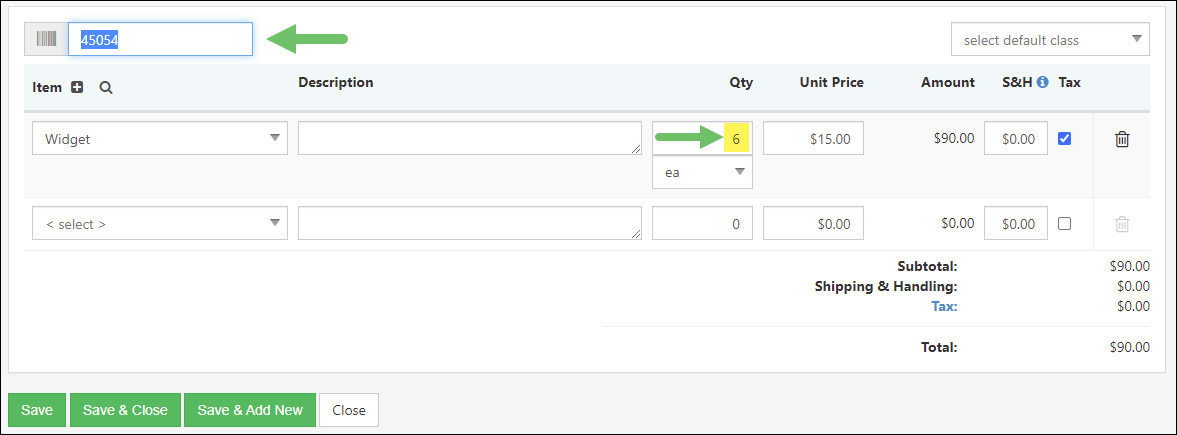
Example of an Item Quantity Increasing when a Barcode Number is Repeated
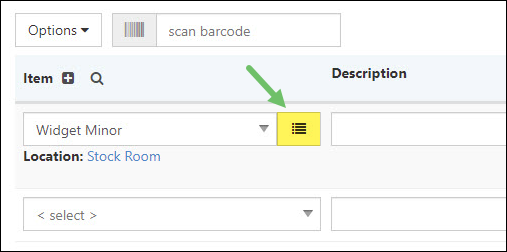
Enter or Scan Location Barcode
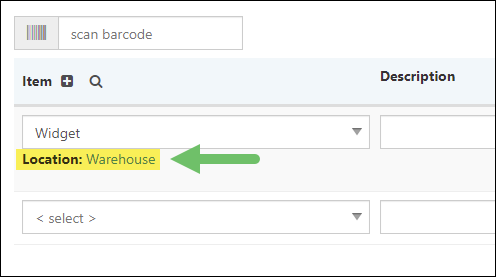
Once an Item has been selected on your Transaction, a Location needs to be selected. You can do so by clicking on the < select > link underneath the Item name to display an Inventory Locations popup that includes a Barcode input field.

Example of an Inventory Location Selection Option for an Item
On the Inventory Locations selection popup, you will see each Location listed, sorted by the quantity in each Location. Click into the Barcode field before beginning to scan your Inventory Location Barcode.
This will narrow down the results based on the Barcode Value you entered into this field. This easily saves time when dealing with multiple Inventory Locations.
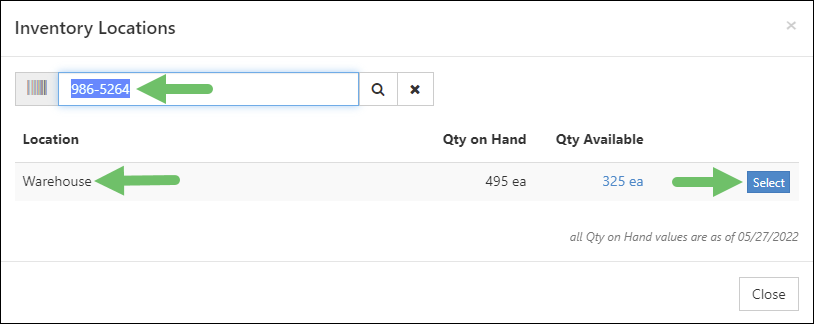
Example of the Inventory Locations Popup Using Barcode Values
Once you click Select for your Location, it will then be filled in on the Transaction.
Example of a Selected Inventory Location for an Item on a Transaction
-
Barcodes in Printable Formats
For Transaction printable formats, the Item section can be configured to select the Barcode Type as well as the addition of two columns: Item Barcode and Inventory Location Barcode, which will display the barcodes accordingly when saving the Transaction or Order as a PDF.
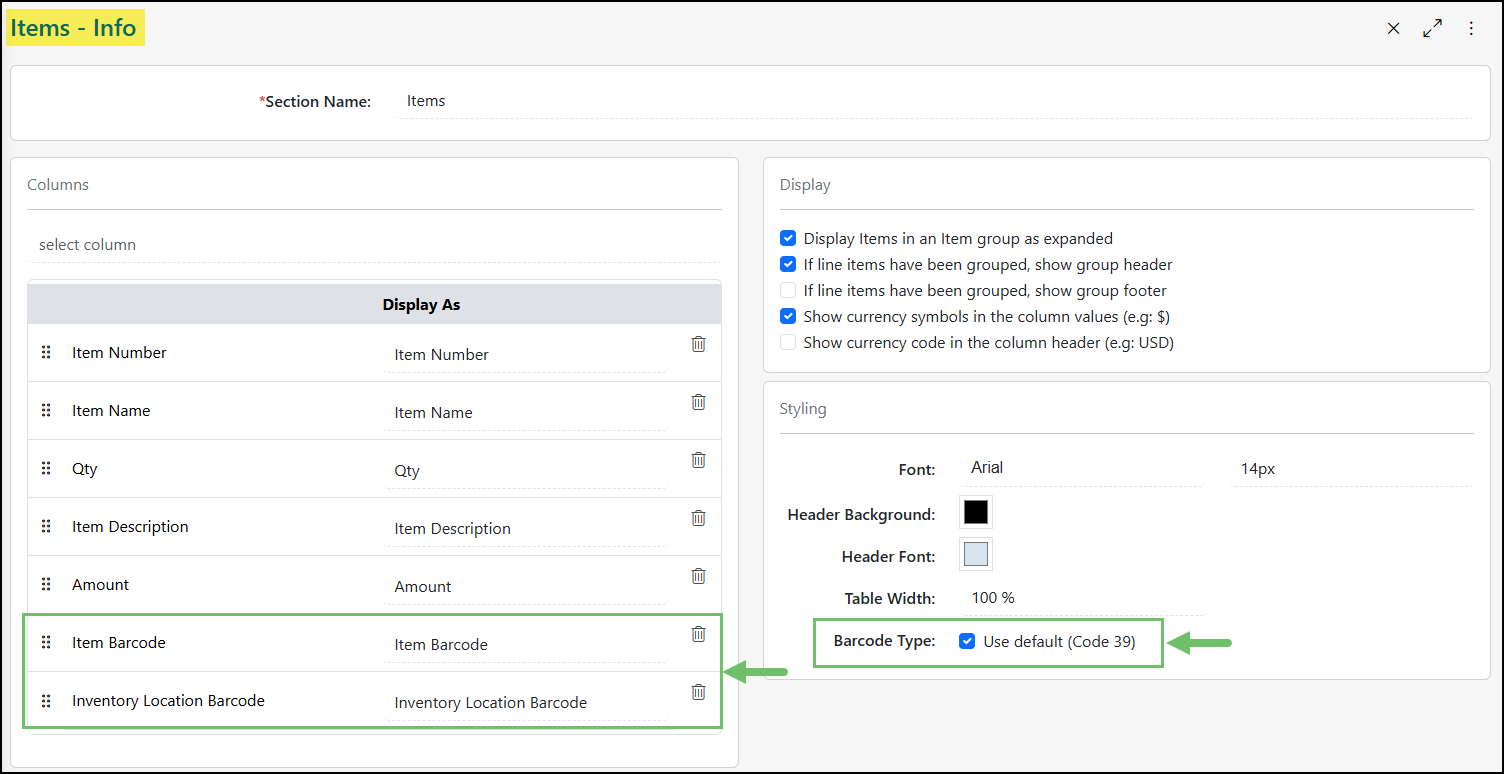
Example of Barcode Options in Printable Format
-
Serial Number Management
With Serial Numbers enabled for your system, managing Serial Numbers can be done through the addition of these items through various transactions in Striven. Depending on the type of Transaction, Serial Numbers will be added or removed from the system. For example, adding Serial Numbers through AP Transactions such as Bills will set the Serial Number entered as available to sell through other Transactions such as Invoices.
-
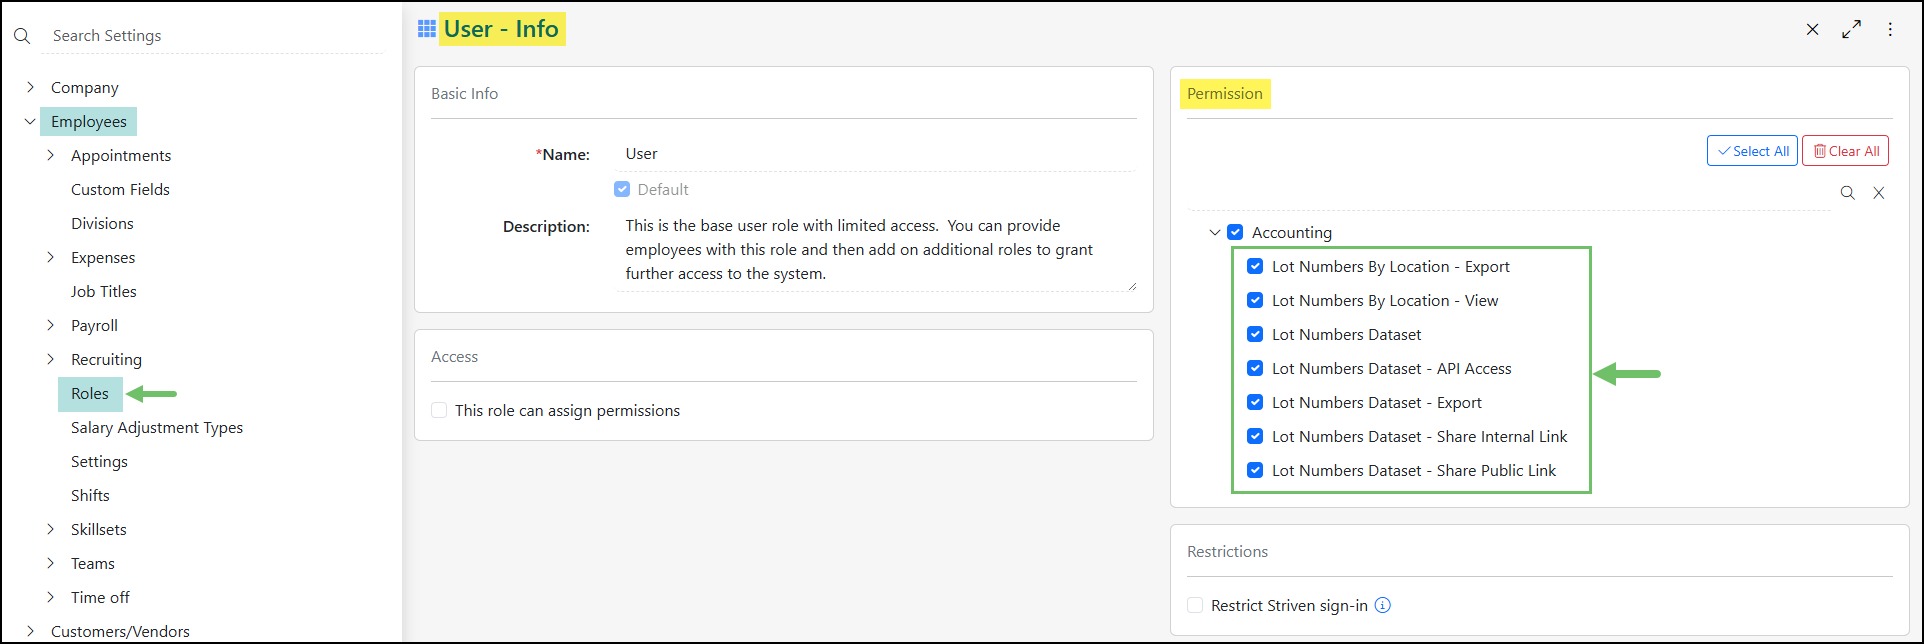
Permissions
The following permissions will need to be configured for the Employee’s User Role if they will be utilizing and managing Serial Numbers in Striven:
- “Serial Numbers by Location – Export”
- “Serial Numbers by Location – View”
- “Serial Numbers Dataset”
- “Serial Numbers Dataset – API Access”
- “Serial Numbers Dataset – Export”
- “Serial Numbers Dataset – Share Internal Link”
- “Serial Numbers Dataset – Share Public Link”
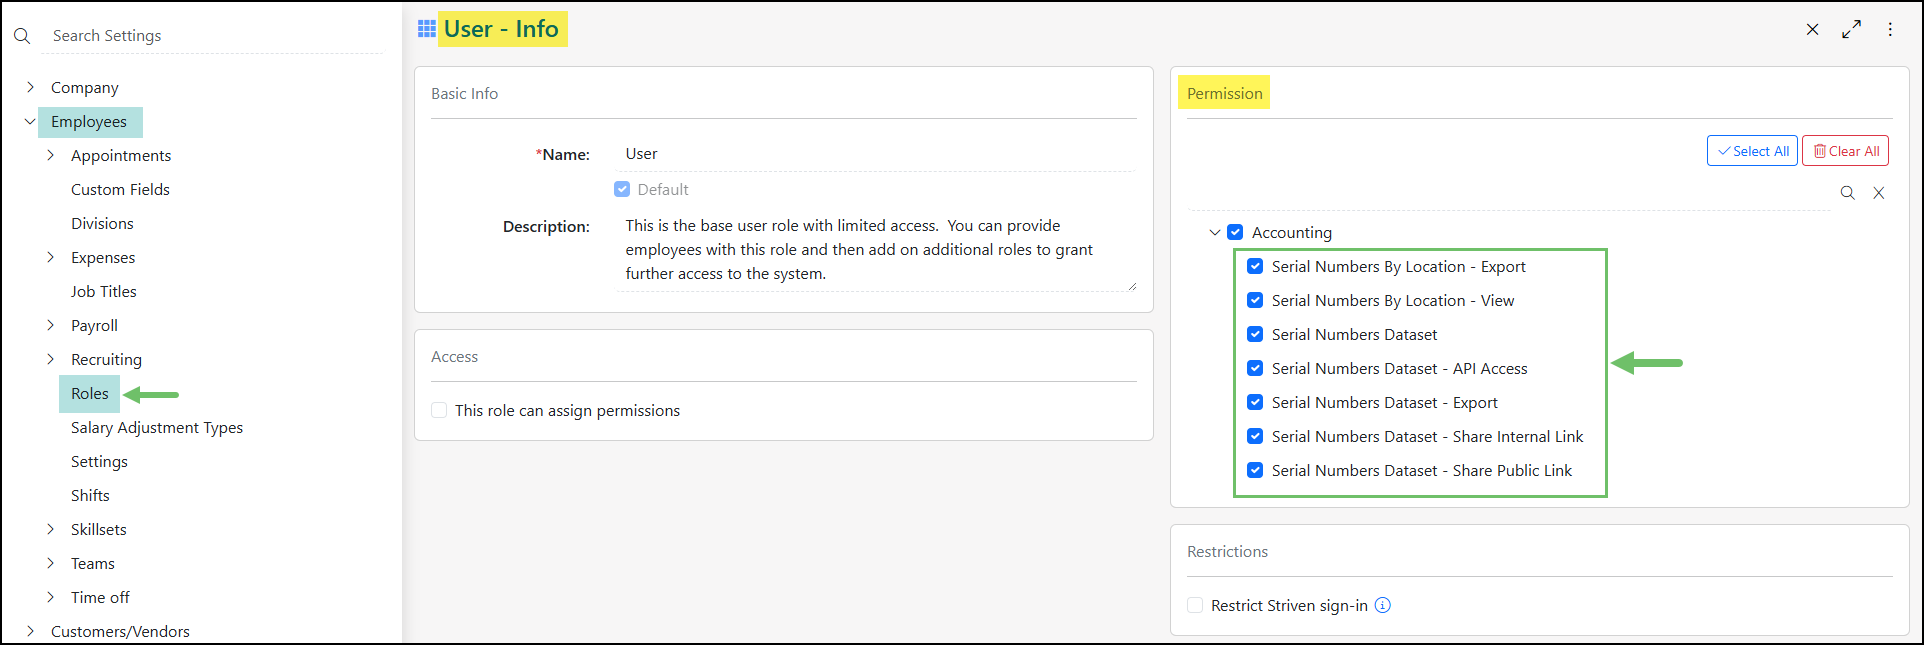
Example of Serial Numbers Related Permissions
To edit or create a User Role, navigate to Company → Settings → Employees → Roles.
-
Enable Serial Numbers
To effectively manage and track your inventory, enabling serial number tracking within your system offers a significant advantage. The following steps outline the process of initially enabling serial number functionality within the system’s settings and subsequently configuring individual items to utilize this crucial tracking capability, along with important considerations for managing these settings once transactions have occurred.
Enable Serial Numbers In Settings
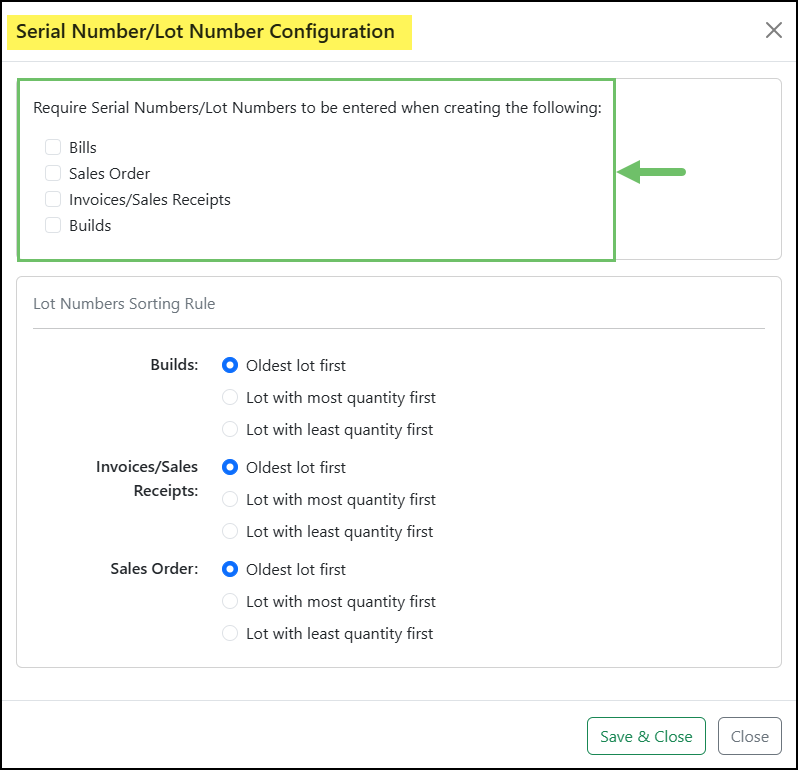
To enable Serial Numbers in your system you will first need to navigate to Company → Settings → Accounting → Items → Settings. In the Other Settings section, check on the option for Enable Serial Number/Lot Number Tracking. Clicking on the Configure option that appears will allow you to set which transaction types where Serial Numbers should be required as well as additional Lot Number settings.
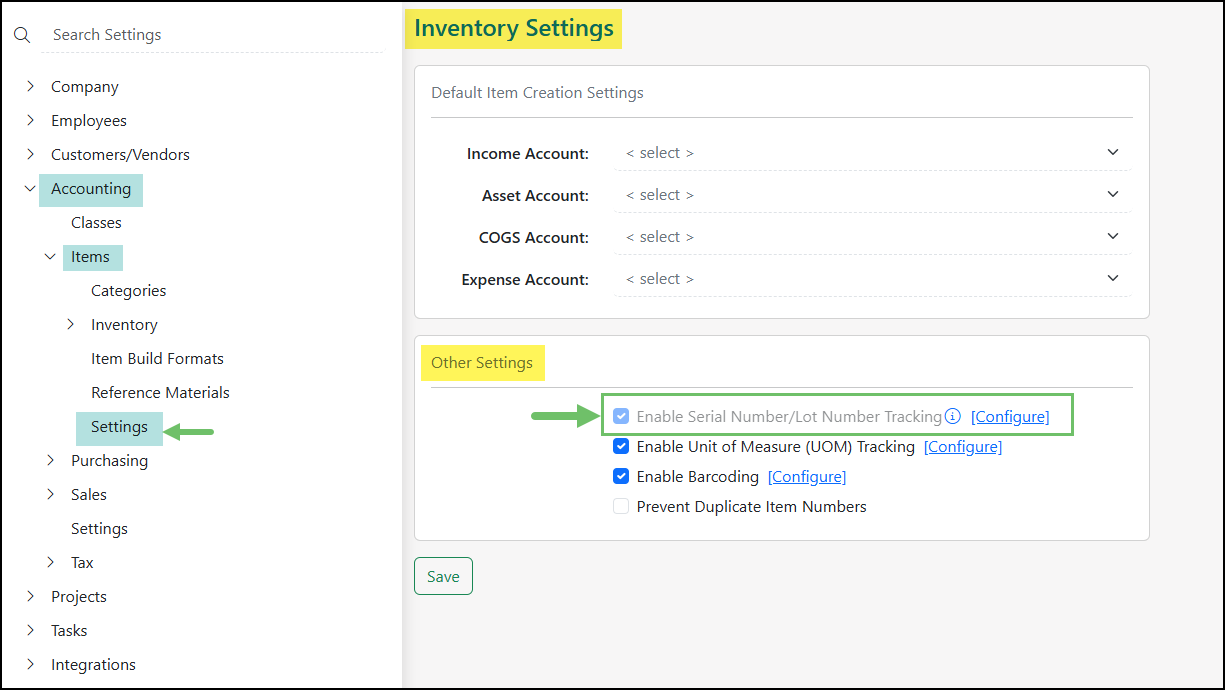
Example of the Inventory Settings Page with the Serial Number Option Enabled
Enable Serial Numbers For Items
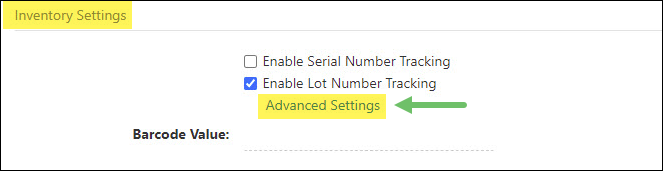
Once Serial Numbers have been enabled in the Inventory Settings, individual Items will need to be configured to enable Serial Numbers per Item that is applicable. When adding or editing an existing Item, the Inventory Settings section can be configured to Enable Serial Number Tracking. Once the Enable Serial Number Tracking option has been selected, an additional configuration option will appear labeled Advanced Settings.
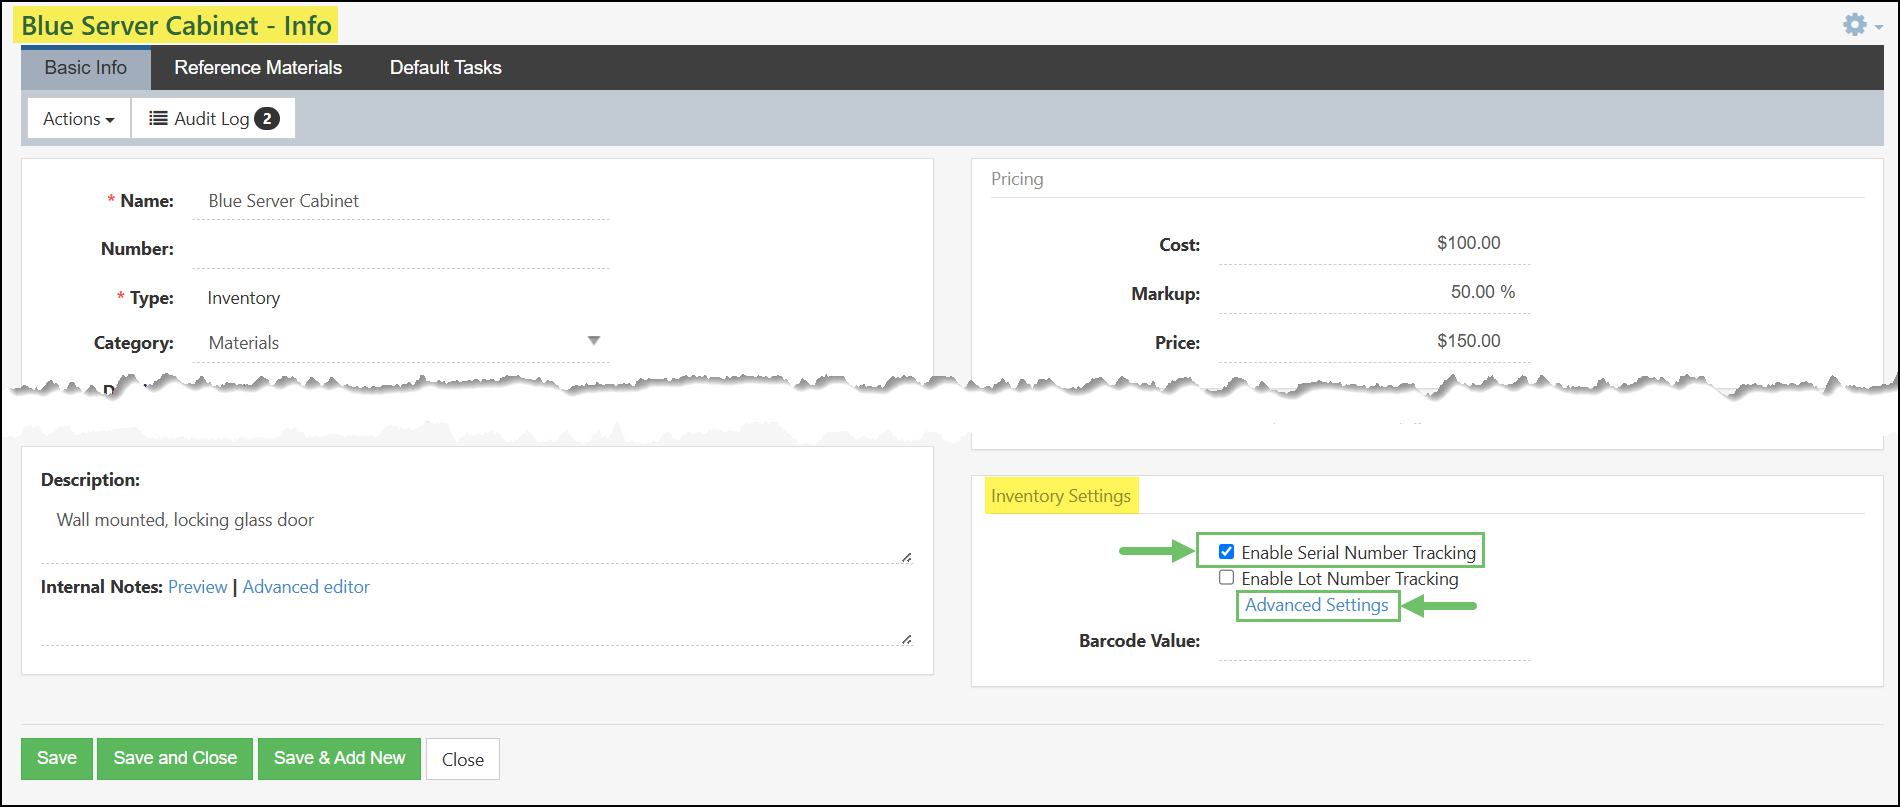
Example of an Item with the Serial Number Option Enabled
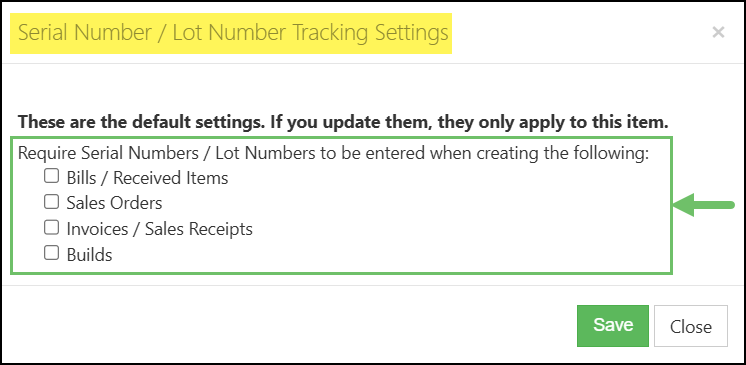
The Advanced Settings option will give configuration choices to require Serial Number entry or selection on specific types of transactions when the item is added. This will ensure Serial Numbers are not missed when purchasing and selling specific Items in Striven.
Example of the Serial Number Advanced Settings on an Item
It is important to note that once an Item has been used on Transactions in Striven, you cannot check or uncheck the Enable Serial Number Tracking option on the Item Info page. When attempting to change this configuration, a warning message will be displayed as the following:

Example of the Alert Message for Serial Numbers on the Item Info Page
-
Managing Serial Numbers
Now that Serial Numbers have been enabled in your settings and for the specific Items where applicable, you can begin adding or removing Serial Numbers through the system via adding the Item through various Transactions. The specific Transaction type determines whether Serial Numbers are added or removed from the system. For instance, when you enter Serial Numbers through AP Transactions like Bills, those numbers become available for sale through other transactions such as Invoices. Review the information below for specific Transactions and how they affect Serial Numbers in Striven.
- Note: The option for Select existing serial numbers that are available, which is detailed in the sections below, will be available on 06/22/25.
Adding Serial Numbers Through Transactions
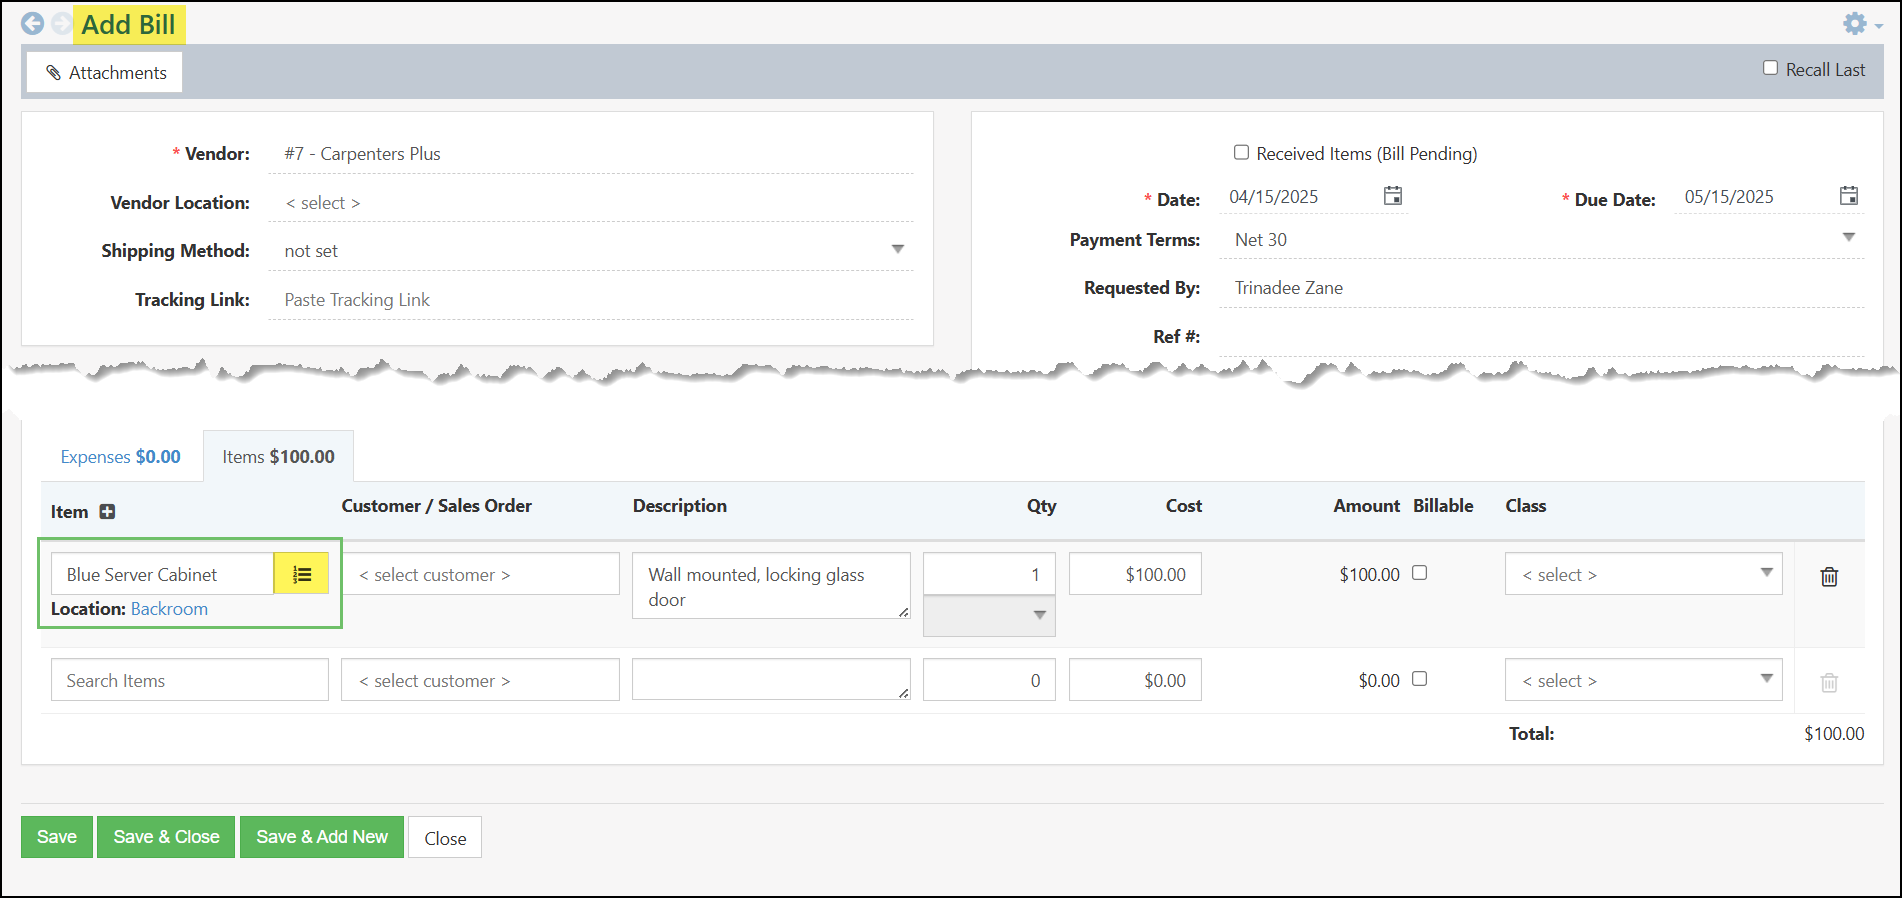
Serial Numbers will become available to sell to Customers in Striven once they have been added to the system through AP type Transactions such as Bills or Received Items. Serial Numbers can also be added to Purchase Orders but these numbers will only be considered available once the PO has been turned into a Bill or Received Item. Serial Numbers added through a Bill Credit will remove the Serial Number as available to sell to a Customer through an AR Transaction.
When creating an AP Type Transaction, once the Item has been selected in the Items section a Serial Numbers icon will appear next to the Item’s name. This icon will be accessible once a Location has been selected for the Item listed.
Note: It is important to update the quantity of your Item first before entering the Serial Numbers to ensure the accurate number of Serial Numbers are added for the line Item.
Example of the Serial Numbers Icon on a Bill
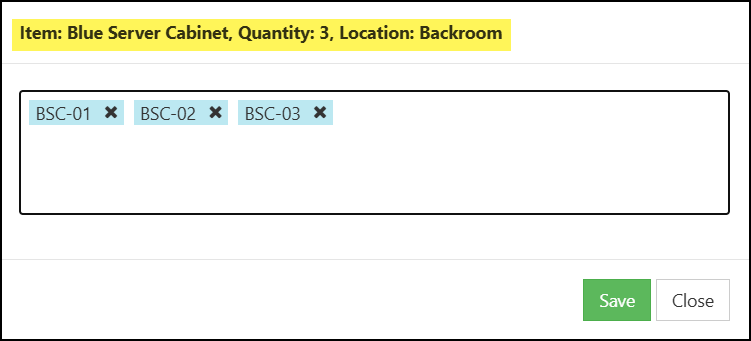
Once the Serial Number dialog box appears, users can enter the Serial Numbers that are being brought into your Inventory for the Item. The number of Serial Numbers entered here cannot be more than the quantity entered for the Item on the Transaction. Once the appropriate Serial Numbers have been entered, click save to return to the Bill.
Now that the AP Transaction has been saved, the Serial Numbers that were entered will be considered available when creating an AR Type transaction to sell to a Customer which will be detailed in the next section.
Example of the Serial Number Dialog Box for a Bill
Selling Items with Serial Numbers Through Transactions
Once Serial Numbers have been made available to sell by bringing them into the System through AP Transactions, you can now add the Item with the specific Serial Number on AR Type Transactions such as Invoices and Sales Receipts. Serial Numbers can also be added to Sales Orders for ease of entry when the Order is turned into an AR Transaction. Serial Numbers added through a Credit Memo will return the Serial Number back into the system as available again.
When adding an Invoice or Sales Receipt to Striven, Serial Numbers can be selected for the Item through the Serial Numbers icon once it has been added to the Item section on the Transaction and a Location has been selected.
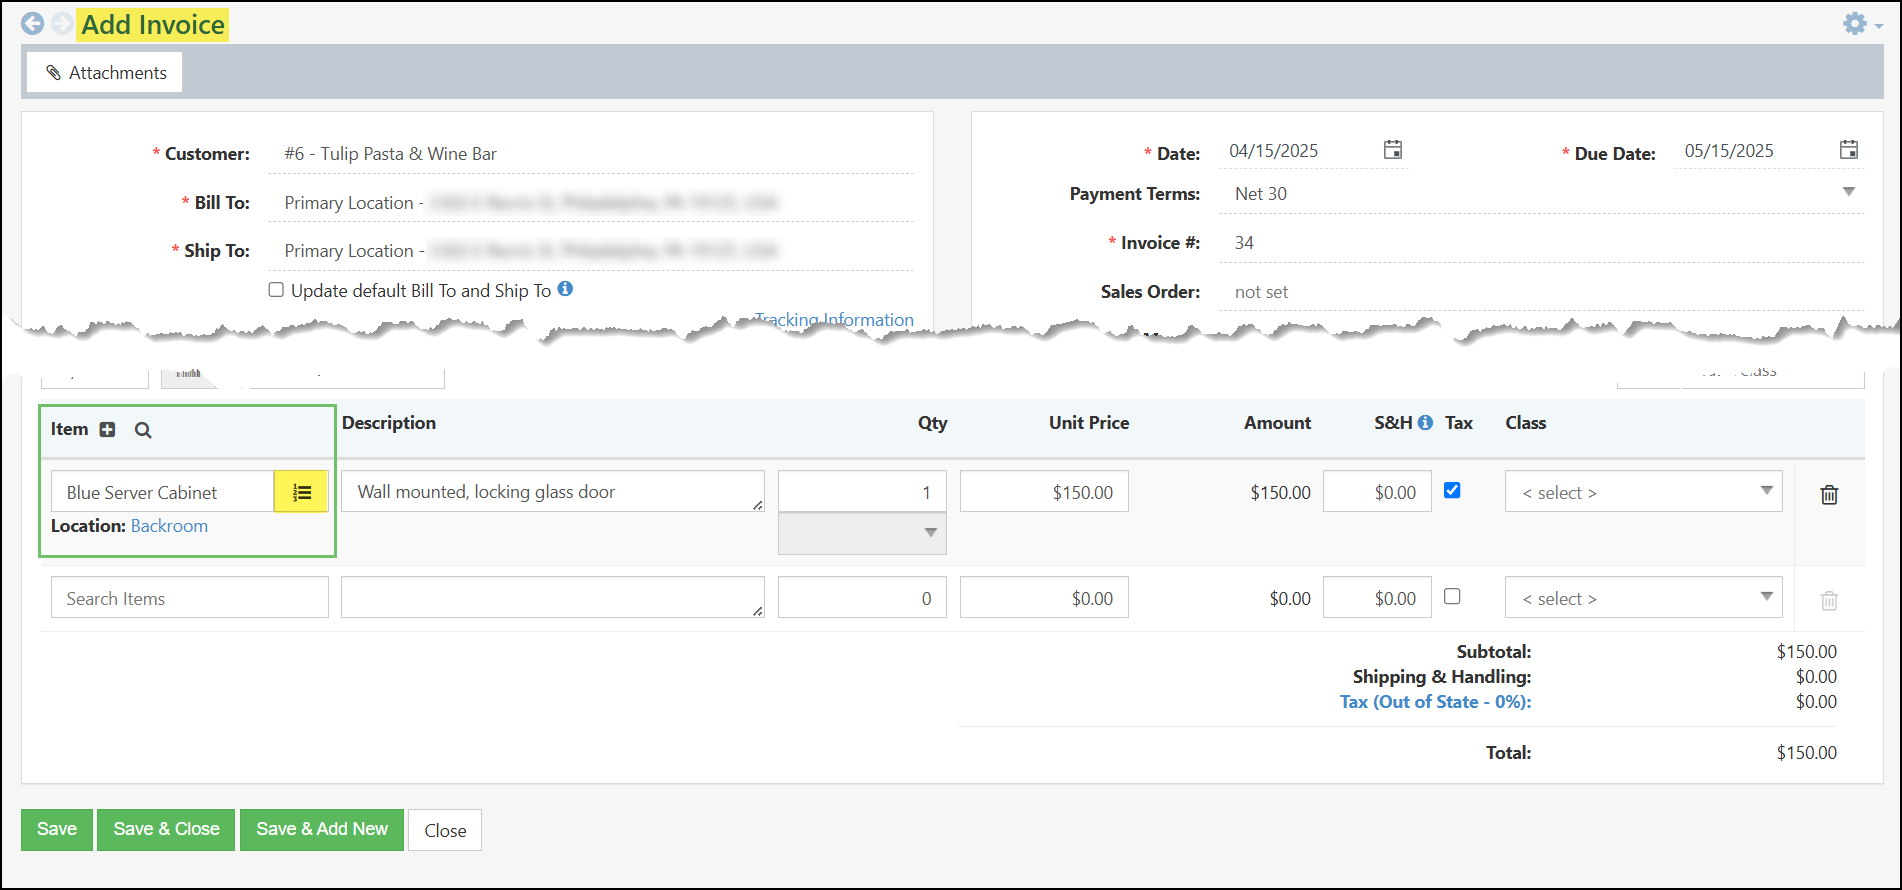
Example of the Serial Numbers Icon on the Add Invoice Page
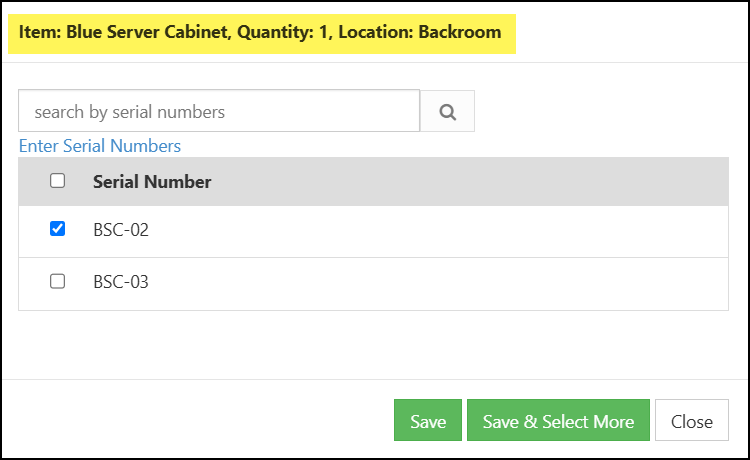
Once the Serial Numbers icon has been clicked for the Item on the Transaction, the Serial Number dialog box will appear in order to select or enter the Serial Numbers that are being sold to a Customer. By default the dialog box will have the option enabled to type in Serial Numbers. By typing in the Serial Number, the system will do a check to see if that number is available to sell. If the number is found, a warning will appear letting the user know the Existing serial number is found and will be used. An additional option is available to not use the existing serial number at the location selected.
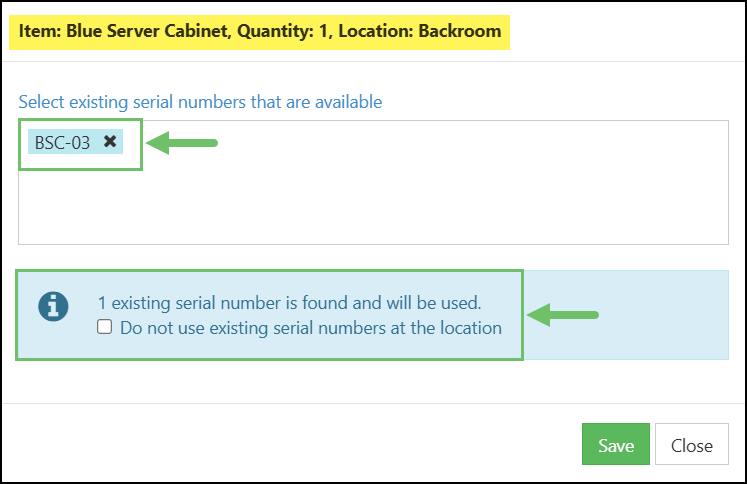
Example of the Serial Number Dialog Box with an Existing Serial Number Entered
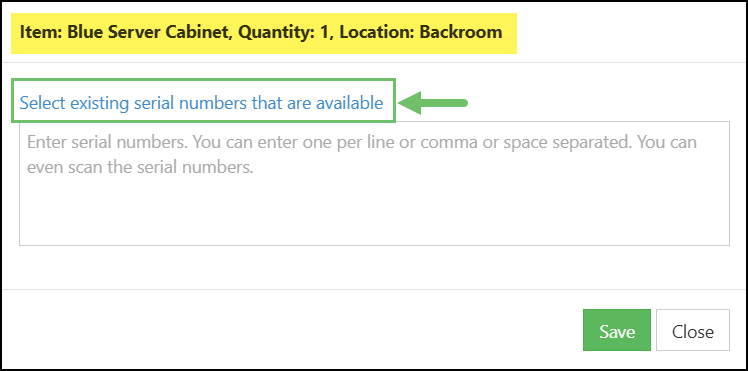
An option is available in the Serial Number dialog box to Select existing serial numbers that are available, which allows the user to select from a list of available Serial Numbers rather than typing in the exact numbers.
Example of the Serial Number Dialog Box with the Select Existing Serial Numbers Option Highlighted
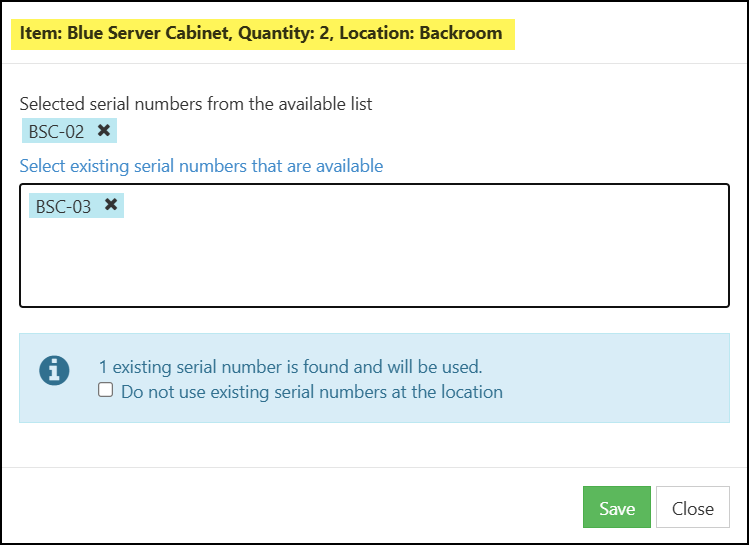
With the Select existing serial numbers that are available option enabled, users can select from an existing list of available Serial Numbers that have previously been entered into the system. Users can utilize a search option at the top in order to narrow down Serial Numbers as needed for longer lists. To return to the type-in option, click the Enter Serial Numbers option to return to the previous screen.
Example of the Serial Number Dialog Box with the Select Existing Serial Numbers Option Enabled
Users will have the ability to toggle between the Enter Serial Numbers option and the Select existing serial numbers that are available option without losing any selections added. The number of Serial Numbers entered here cannot be more than the quantity entered for the Item on the Transaction.
Example of the Serial Numbers Dialog Box with Serial Numbers Selected
Serial Numbers on Item Builds
Serial Numbers can be assigned to individual components of a manufactured item, allowing for tracking and management of each specific part. However, it’s also possible to assign a serial number to the manufactured item itself. This means that the final assembled product will have its own unique serial number, rather than relying solely on the serial numbers of its individual components.
When utilizing Item Builds in Striven to manufacture Items, Serial Numbers can also be selected for the Item components within the Build. This functionality allows you to build a manufactured Item while using Items with set Serial Numbers in the system. This process ensures that specific, identifiable components are used in the manufacturing process, enhancing traceability and quality control.
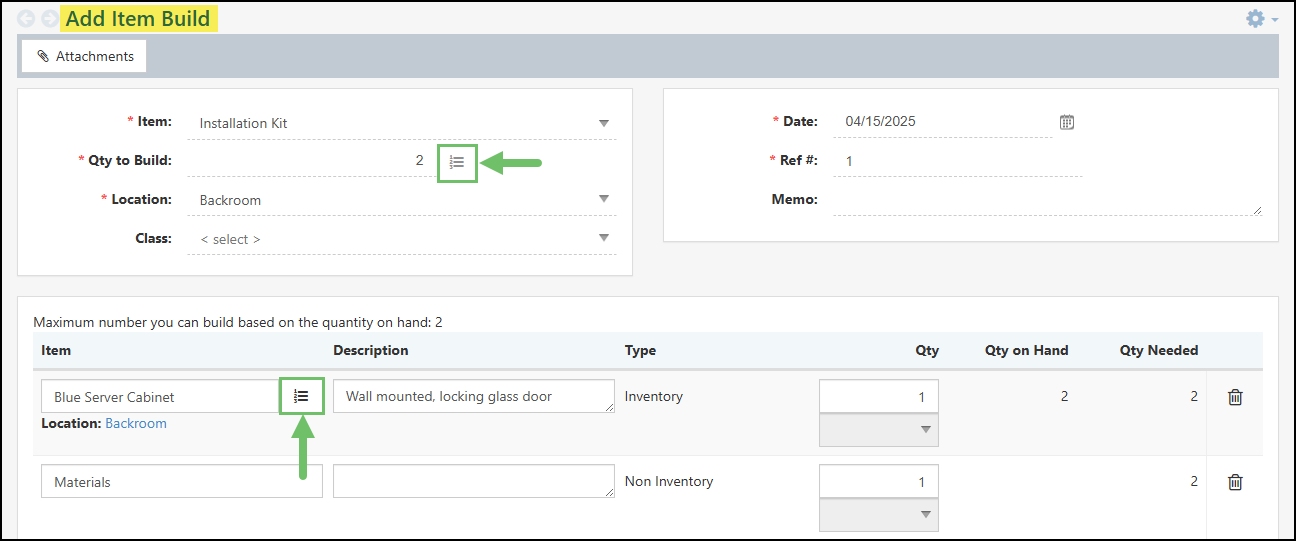
Example of the Serial Number Icon on Item Builds
Learn more about Manufacturing Items in Striven by reviewing the Manufactured Items and Item Builds section within the Item Types area of the Item Management Guide.
Serial Numbers on Inventory Adjustments
Whereas the AR and AP Transactions in Striven will determine if an Item’s Serial Number is being added or removed from Striven, both can be accomplished through the Inventory Adjustments feature. By adjusting the Qty Adjustment or the New Qty column by either a negative value or a positive value will determine if a Serial Number is being added or removed from the system accordingly. The Serial Numbers icon will appear for each Location selected for a specific Item.
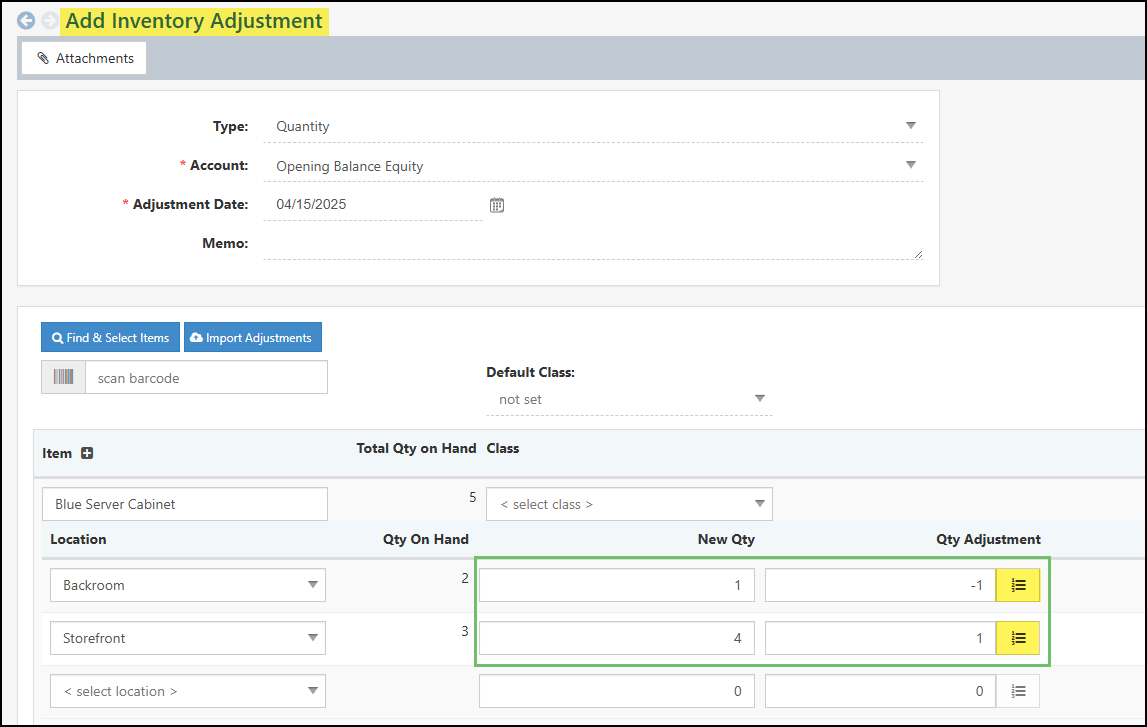
Example of Adjusting Serial Numbers Through an Inventory Adjustment
Learn more about making adjustments to Inventory in Striven by reviewing the Inventory Adjustments section within the Inventory Items area of the Item Management Guide.
Serial Numbers on Inventory Transfers
While other Transactions Types in Striven will add or remove Serial Numbers depending on the nature of the Transaction, the Inventory Transfer feature is taking the existing Serial Numbers in Striven and allowing users to move the specific Item from one location to another. Once the Qty to Transfer column has been updated to a positive number, the Serial Number icon can be utilized next to the Item’s name.
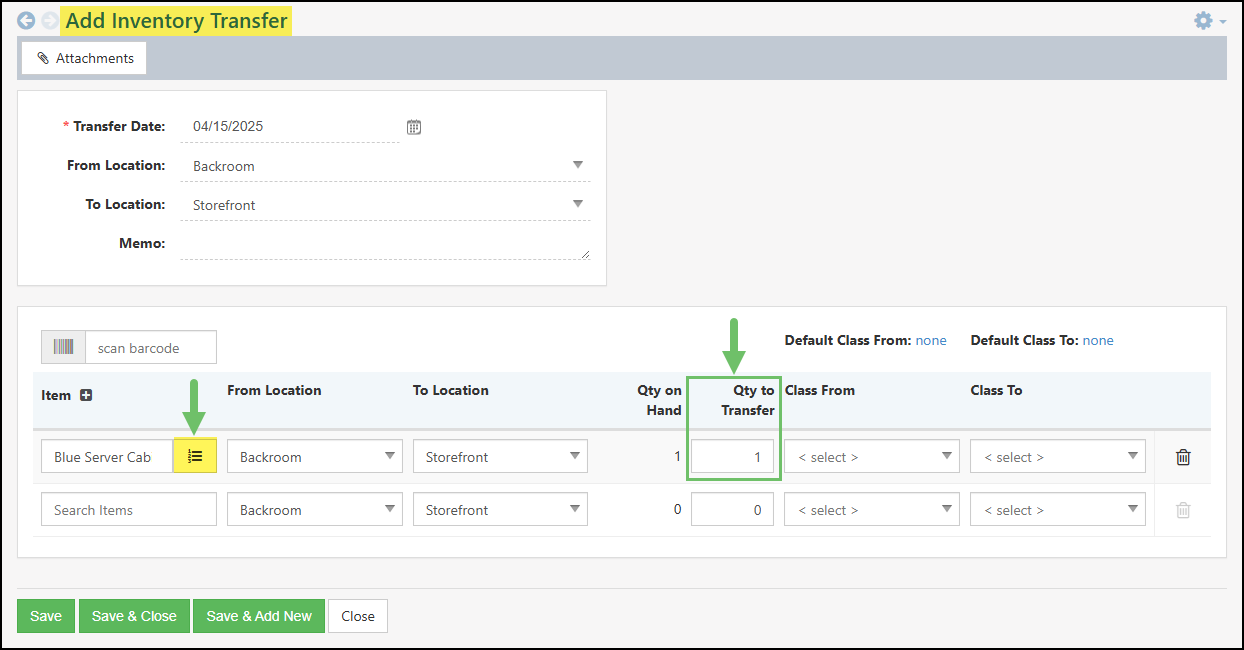
Example of the Serial Number Icon on an Inventory Transfer
Learn more about transferring Inventory in Striven by reviewing the Inventory Transfers section within the Inventory Items area of the Item Management Guide.
-
Serial Numbers by Location Report
The Serial Numbers by Location Report serves as a centralized page within Striven, offering a comprehensive overview of all Serial Numbers that have been added or removed through various transactions. This report provides a real-time snapshot of Inventory, allowing businesses to track the movement and availability of serialized Items. By default, the report is configured to display only the Serial Numbers that are currently on hand and available for sale, ensuring that businesses have accurate information about their sellable inventory. This default setting streamlines the report and focuses on the most relevant data for sales and fulfillment operations. However, the report can be customized to include all information regarding a serialized Item, providing flexibility for businesses with diverse reporting needs.
To utilize the Serial Numbers by Location Report, navigate to Reports → Purchases & Payables → Serial Numbers by Location.
Below is a screenshot illustrating how the Serial Numbers by Location Report appears and a description of what can be accomplished there.
- Search Options: Allows for the user to narrow down results listed in the Serial Numbers by Location Report based on certain criteria:
- Item: Narrows down the search results based on a specific Item selected.
- Location: Narrows down the search results based on where the Item is currently being located or the Location that was selected on the related Transaction.
- Serial Number: A type-in field which allows for the user to search for a specific Serial Number that has been assigned to an Item. For results to appear for this search option, an exact match will need to be found.
- Transaction #: Narrows down results based on a specific Transaction number that the Item was listed on with the Serial Number entered.
- Type: Narrows down results based on the type of Transaction that a Serial Number was assigned to an Item.
- Show Only On Hand: This option will be toggled on by default in order to list only Serial Numbers that are currently available to be sold in the system. By unchecking this option, a full list of all current and previous Serial Numbers will be listed.
- Show Only Available: This option will be toggled off by default. A Serial Number will be considered Available if it has a quantity on hand and has not been allocated to a Sales Order.
- Item: Lists the Item that is related to the Serial Number that was entered into the system. Clicking on the Item Name will open the Item Info page for further information.
- Location Name: Lists the Location that was entered into the Transaction for the Item that was serialized.
- Serial Number: Lists the Serial Number that was entered or removed from the system based on related Transactions.
- Qty on Hand: Lists the quantity that is available for the specific Serial Number related to an Item. Clicking on this hyperlinked number will open the Qty On Hand dialog box which will list the related Transactions for ease of access.
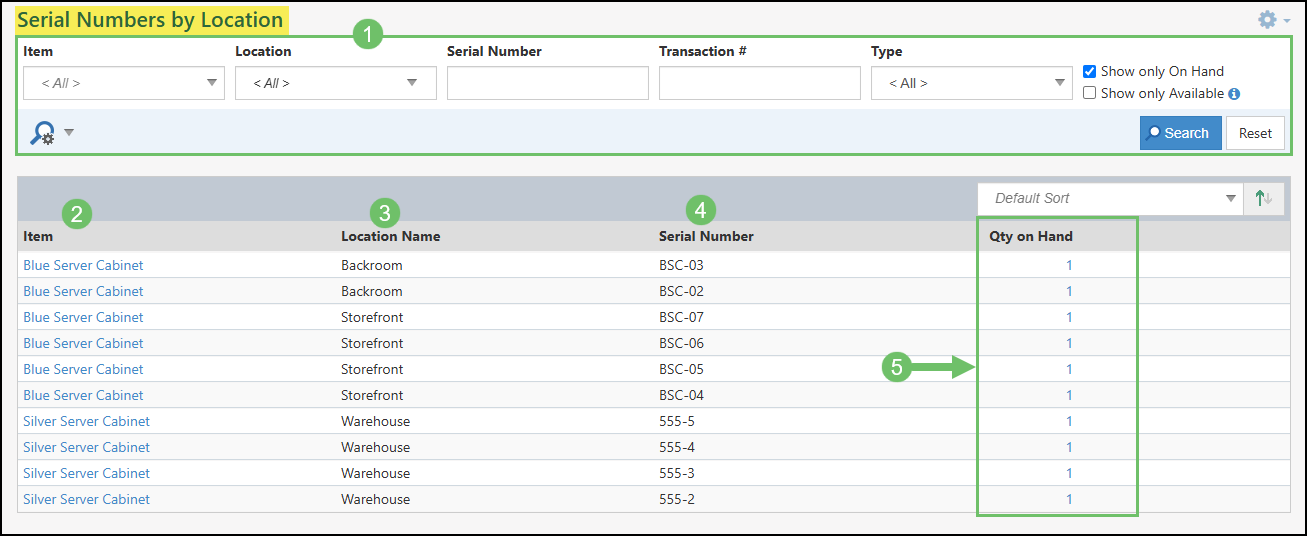
Example of the Serial Numbers by Location Report
As mentioned above, clicking on the number listed in the Qty on Hand column will open a Qty On Hand dialog box which will list the Transactions that are related to the Serial Number. Below is a screenshot illustrating how the Qty On Hand dialog box appears:
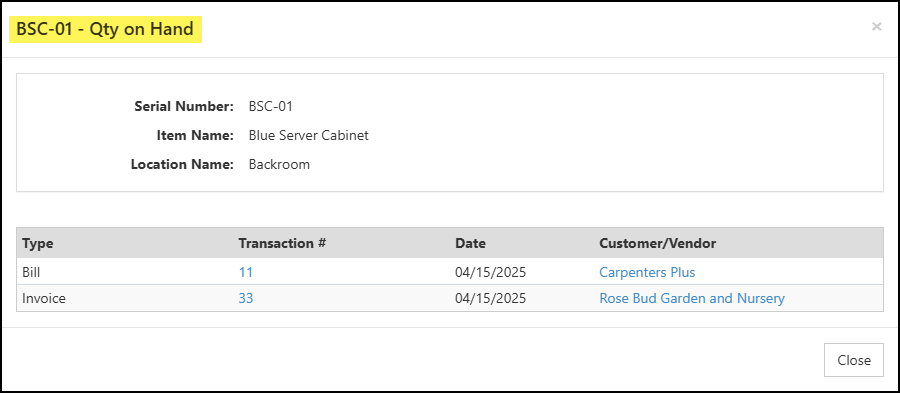
Example of the Qty On Hand Dialog Box from the Serial Numbers by Location Report
- Search Options: Allows for the user to narrow down results listed in the Serial Numbers by Location Report based on certain criteria:
-
Lot Number Management
Striven’s Lot Tracking enhances inventory management by incorporating Expiration Dates for each Lot, ensuring timely sales of goods. By enabling mandatory Lot Number tracking on specific transactions and offering customizable sorting within lots, Striven streamlines both purchasing and sales workflows. In the event of recalls or investigations, these Lot Numbers provide precise traceability, allowing for swift identification and resolution of any issues related to sold inventory.
-
Permissions
The following permissions will need to be configured for the Employee’s User Role if they will be utilizing and managing Lot Numbers in Striven:
- “Lot Numbers by Location – Export”
- “Lot Numbers by Location – View”
- “Lot Numbers Dataset”
- “Lot Numbers Dataset – API Access”
- “Lot Numbers Dataset – Export”
- “Lot Numbers Dataset – Share Internal Link”
- “Lot Numbers Dataset – Share Public Link”
Example of Lot Numbers Related Permissions
To edit or create a User Role, navigate to Company → Settings → Employees → Roles.
-
Enable Lot Numbers
For comprehensive management and traceability of your product flow, enabling Lot Number Tracking within your system is key. The following steps outline the process of initially enabling Lot Number functionality within the system’s settings and subsequently configuring individual items to utilize this crucial tracking capability.
Enable Lot Tracking in Settings
To begin using Lot Tracking in Striven, you will first need to enable the feature within your settings. To enable Lot Tracking, navigate to Company → Settings → Accounting → Items → Settings.
Example of Enabling Lot Number Tracking on the Inventory Settings Page
Once you have enabled Lot Tracking within your Inventory Settings, clicking the Configure button will give configuration choices of Transaction Types for which you would like to require a Lot Number to be entered for the Item.
- Note: The option to enter a Lot Number will still be available for the Item if you choose to not require it on this settings page.
In Striven, you are able to require Lot Numbers for Bills, Sales Orders, Invoices, Sales Receipts, and Builds to ensure the correct information is entered at the time of creation.
Example of Transaction Types where Lot Number Tracking May be Set as Required
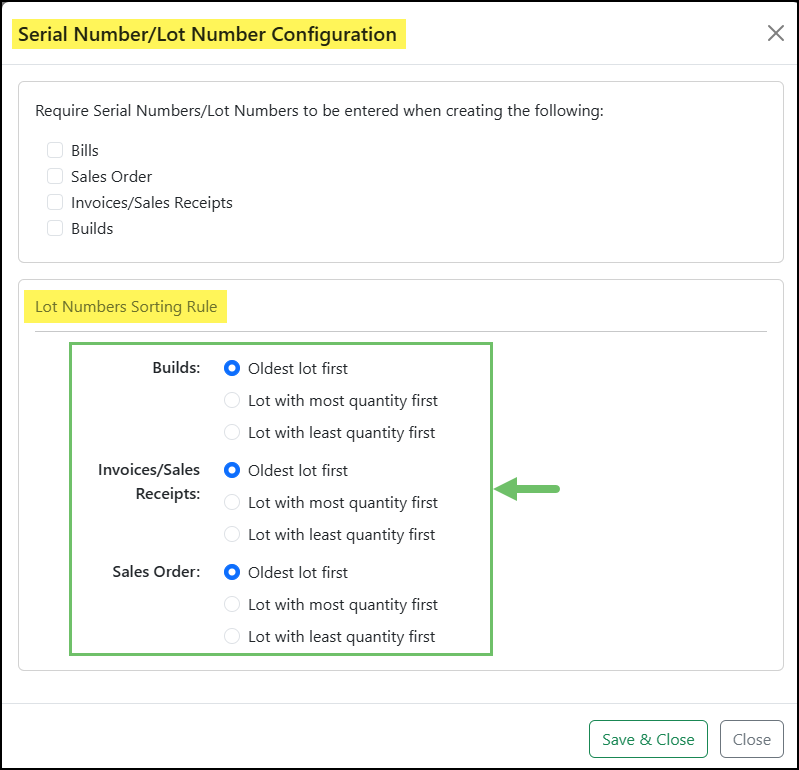
For Builds, Invoices, Sales Receipts, and Sales Orders, you have 3 available sort order options:
- Oldest Lot first
- Lot with the most quantity first
- Lot with the least quantity first
By default, the sort order will be set to the oldest Lot first to ensure goods are sold before the expiration set with the Lot Number.
Example of Sort Order Options Available for Lot Numbers
Enable Lot Tracking at Item Level
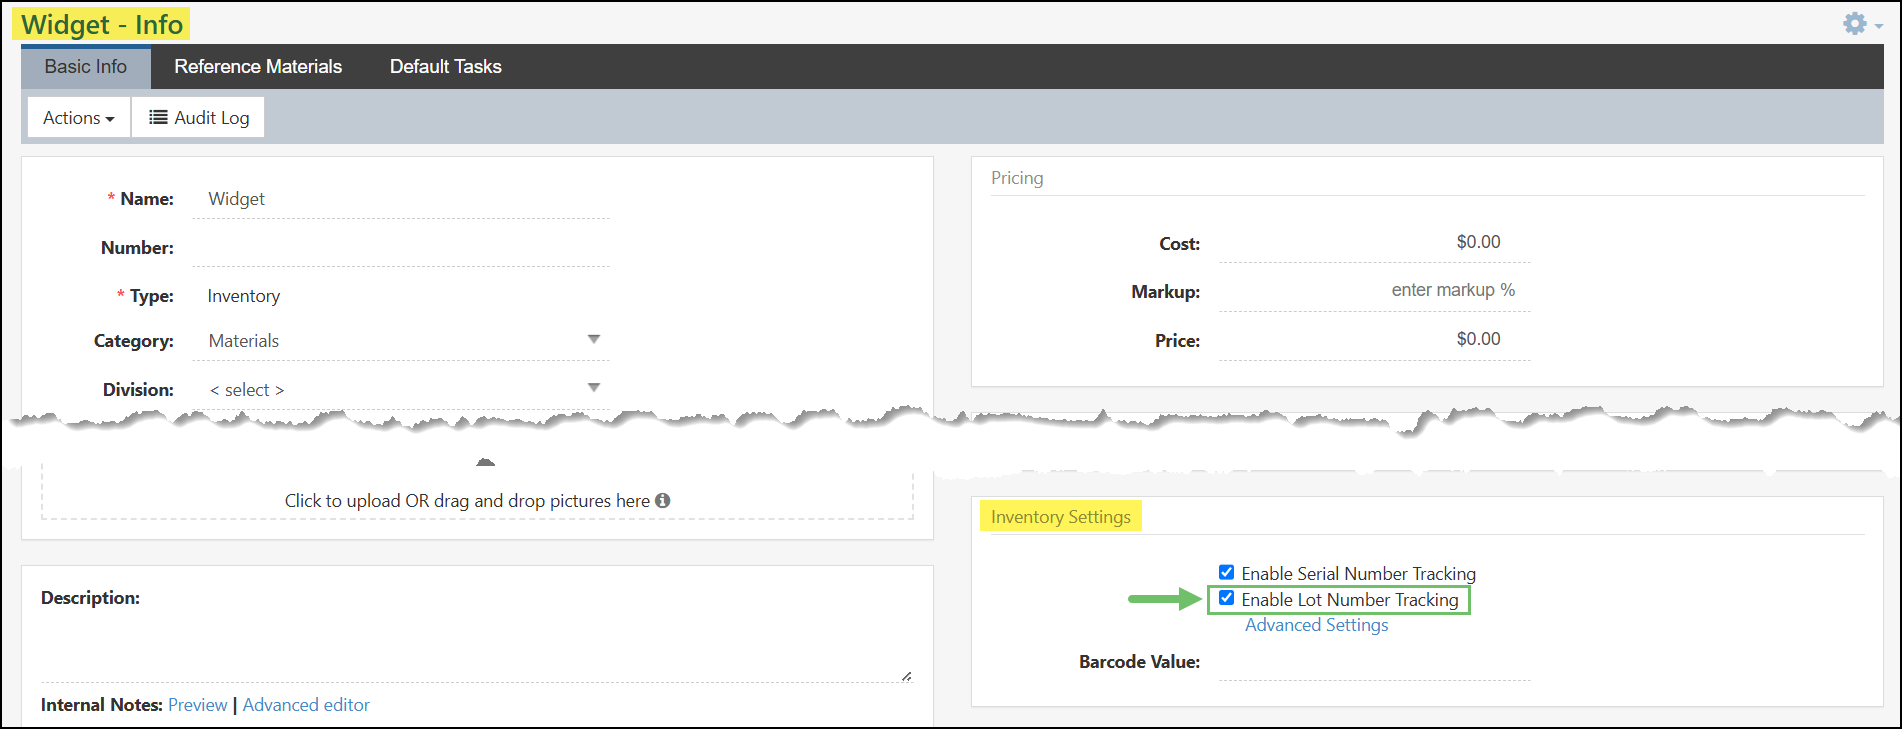
Once you have enabled Lot Tracking within your Inventory Settings, you will then need to enable this within the Item Info of the Item for which you wish to include Lot Tracking.
- Note: This setting must be enabled when the Item is created and/or before it is used on a Transaction in Striven. Once an Item has been used on a Transaction, you will no longer be able to enable Lot Tracking for the Item. The same is true for disabling Lot Tracking – once an Item is used on a Transaction, you cannot turn off the Lot Number Tracking.
To enable Lot Tracking for individual Items, you can navigate to Accounting → Inventory → Items.
From the Items List, you can utilize the search filters to specify which Item you wish to edit or click the Add button to create a new Item. Lot Number Tracking can be enabled for Inventory Items, Non-Inventory Items, and Manufactured Items.
To enable Lot Tracking for Items of these types, you will need to configure the Inventory Settings section within the Item Info page.
Example of Inventory Settings Option to Enable Lot Number Tracking on Item Info Page
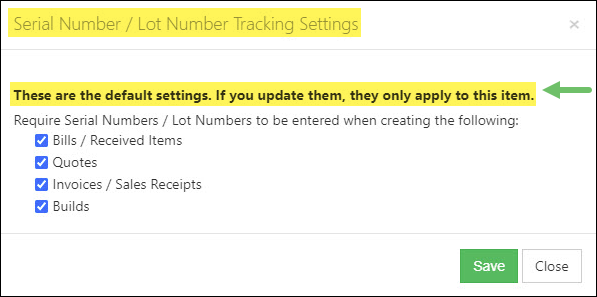
After you have enabled Lot Number Tracking for an Item, an additional option for Advanced Settings will appear for further configuration.
Example of Advanced Settings Option for Lot Number Tracking on the Item Info Page
By clicking on the Advanced Settings option, you will be given the same requirement options that you previously set within the Inventory Settings in your Company Settings. By default, the settings from your Company Settings will be set for the Item, but can be overridden if needed.
Example of the Default Settings for Lot Number Tracking for an Individual Item
-
Entering Lot Numbers on Transactions
Now that you have enabled Lot Number Tracking within your Company Settings, as well as at the Item level, you can now begin entering Transactions or Sales Orders and utilize the feature as you begin tracking your inventory in Striven.
- Note: It is important to update the quantity of your Item first before entering or selecting the Lot Numbers to ensure the accurate number of Lot Numbers are related for the line Item.
Bills & Received Items
When creating a Bill or Received Items in Striven, you will be able to select your Item that is set up for Lot Number Tracking within the Item section on the Bill. Once you have your Item selected, along with the Inventory Location, you will then have an extra button option that will appear next to the Item Name.
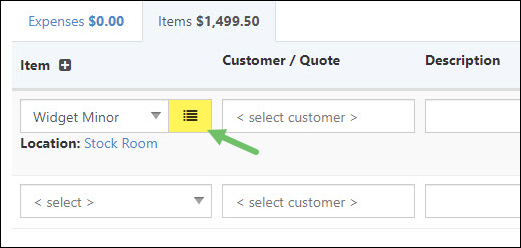
Example of Lot Number Selection Button on a Bill
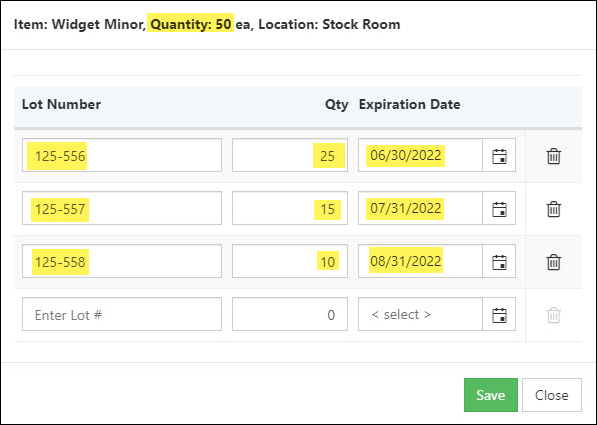
Clicking on this option will open a popup window for further Item entry for the Bill. The information you will be able to enter for the Item is the Lot Number, the quantity, and the expiration date.

Example of Lot Number Selection Popup Window on a Bill
If needed, the quantity can be split into multiple lines in order to associate the inventory with multiple Lot Numbers and expiration dates, as demonstrated in the example to the right.
Example of Splitting a Quantity of Items with Multiple Lot Numbers & Expiration Dates
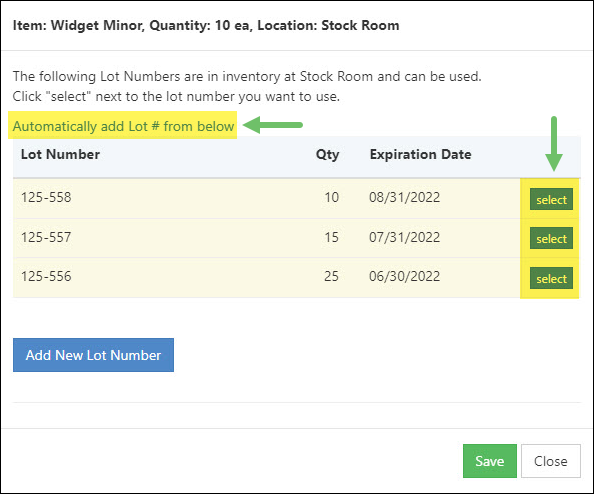
Sales Orders, Invoices, & Sales Receipts
On AR Transactions such as Sales Orders, Invoices, and Sales Receipts, you will be able to select the Item similar to the process for Bills to have the Lot Number Tracking icon appear next to the Item Name.
Example of Lot Number Selection Button on an AR Transaction
Once you click on the Lot Number Tracking icon for the Item, you will have the option to select from Items that have already been set in Lots based on other Transactions such as Bills and Builds. The expiration and quantity will appear for each Lot listed.

Example of Available Items Listed by Lot Numbers
To choose existing Items within Lots, you can click Select on each Line Item or choose Automatically add Lot # from below to quickly add all Items per Lot listed within your Transaction.
Example of Options for Selecting Items with Lot Numbers on Transactions
To add a new Lot Number that may not be listed, you can click the Add New Lot Number button to enter new information for the Item.
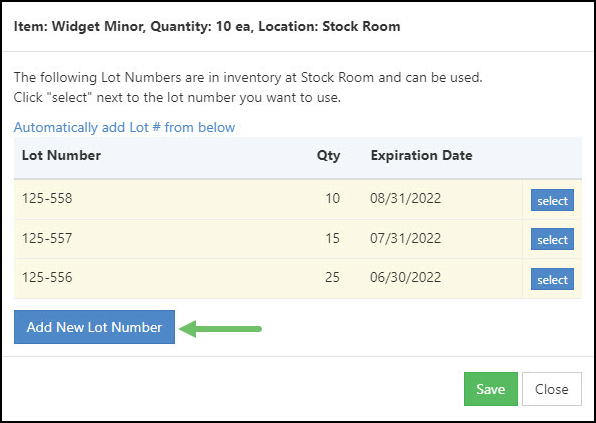
Example of Add New Lot Number Button
Item Builds
To enter Lot Numbers on Item Builds, you will first need to select the Item you are building so the individual materials will then be listed for the selected Item.
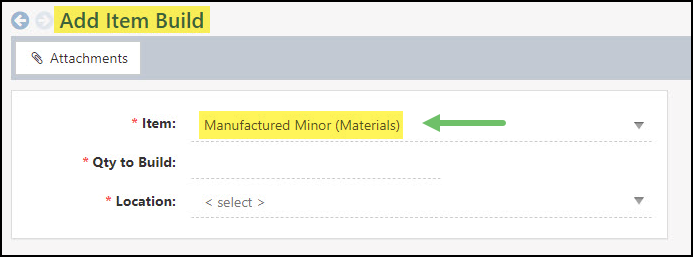
Example of Item Selection for a New Item Build
Once the individual materials are listed for the Item you are building, you will then have the option to click the Lot Number icon next to the Items listed in order to enter the Lot Number and expiration dates.
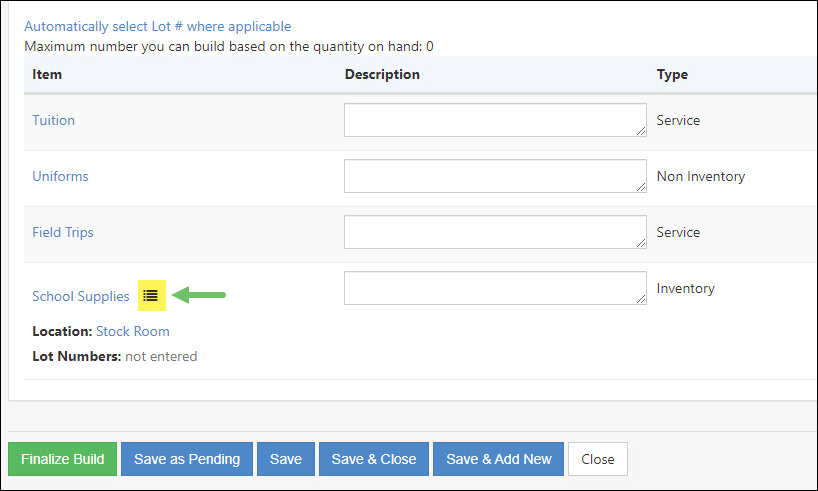
Example of Lot Number Icon on an Item Listed for a Build
Entering Lot Numbers for an Item when creating an Item Build will have an additional option for Update quantity with total number of Lot Numbers entered. This option will update the Quantity Needed column for the Item Build accordingly.
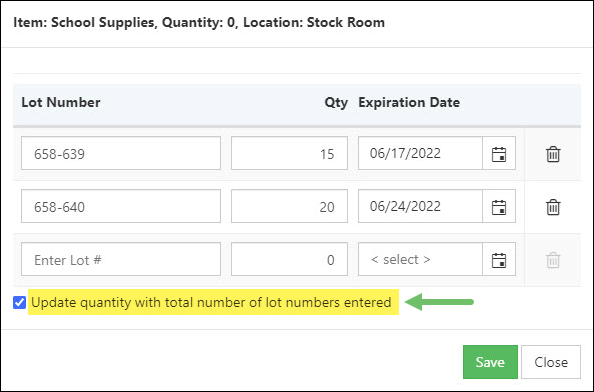
Example of Option to Update Quantity with Total Number of Lot Numbers Entered
With Item Builds, you will also see previously entered Lot Numbers listed as available to choose from, as well as to easily add them to your Item Build. You can add these to your Item Build by clicking the Select button next to each Lot Number listed, or by clicking the option to Automatically add Lot # from below.

Example of Options for Selecting Items with Lot Numbers for an Item Build
Once you have selected your Lot Numbers for your Item Build, the Lot Numbers with the expiration date and the quantity will be displayed within the Item List on the Item Build for easy reference.

Example of Selected Lot Numbers in Item List of Item Build
For the Item Build, once the Qty to Build has been entered, you will then have the option to Lot Numbers.
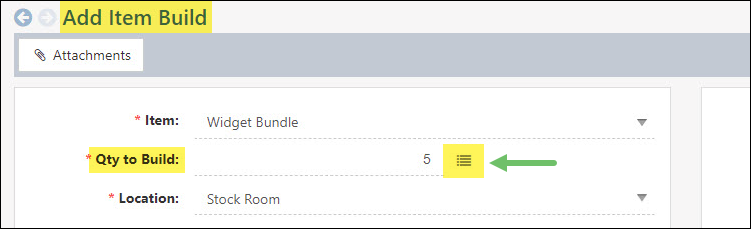
Example of Option to Add Lot Numbers to an Item Build
-
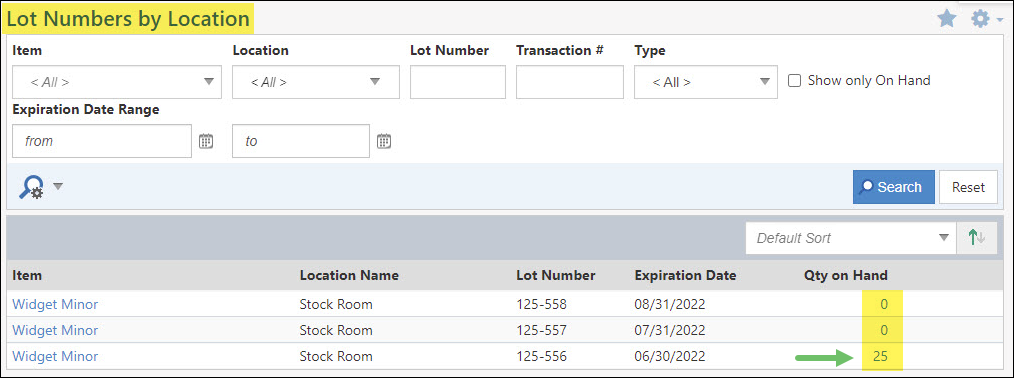
Lot Numbers by Location Report
The Lot Numbers by Location Report will allow you to take a deeper look into the quantity you have on hand per Item, along with the Lot Number and expiration date. This report will allow you to utilize filters to narrow down results based on information such as the expiration date range, type of Transaction, by Inventory Location, and more.
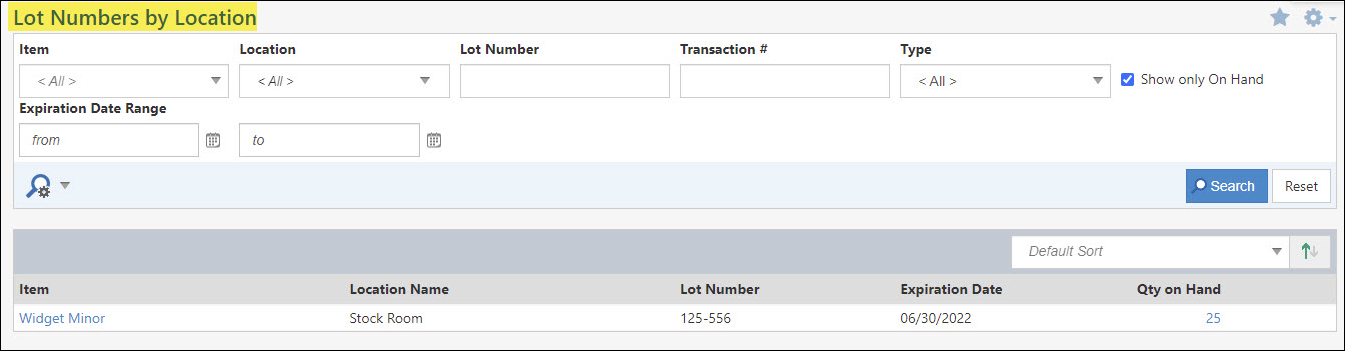
Example of Search Filters on a Lot Numbers By Location Report
By default, this report will be filtered to only show Items that have quantity on hand, but you can configure your search to include other Items by unchecking the checkbox for Show only On Hand and clicking search.

Example of Show Only On Hand Search Option on the Lot Number By Location Report
To see further details as to how the Qty on Hand column is being calculated, you can click on the number hyperlink to display a popup window with more information about that particular Item.
Example of Qty on Hand Column of a Lot Number By Location Report
Viewing the additional information of the quantity on hand will display each Transaction that was related to the Lot Numbers for the specified Item. By clicking on the Transaction number, you can quickly access the Transaction as needed.
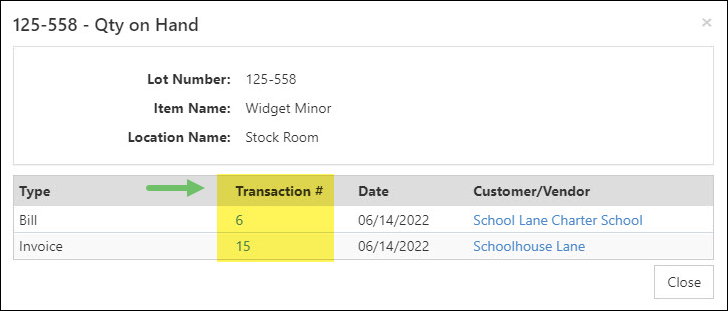
Example of Qty on Hand Details Popup from Lot Numbers By Location Report
-
Inventory Reports
There are a number of reports that are built into Striven that help gain insight into your Company’s inventory. From knowing the stock status to the valuation of the inventory on hand, there is a lot of information to be viewed right from these reports. Below are reports in Striven that are designed to help make informed decisions based on inventory information.
-
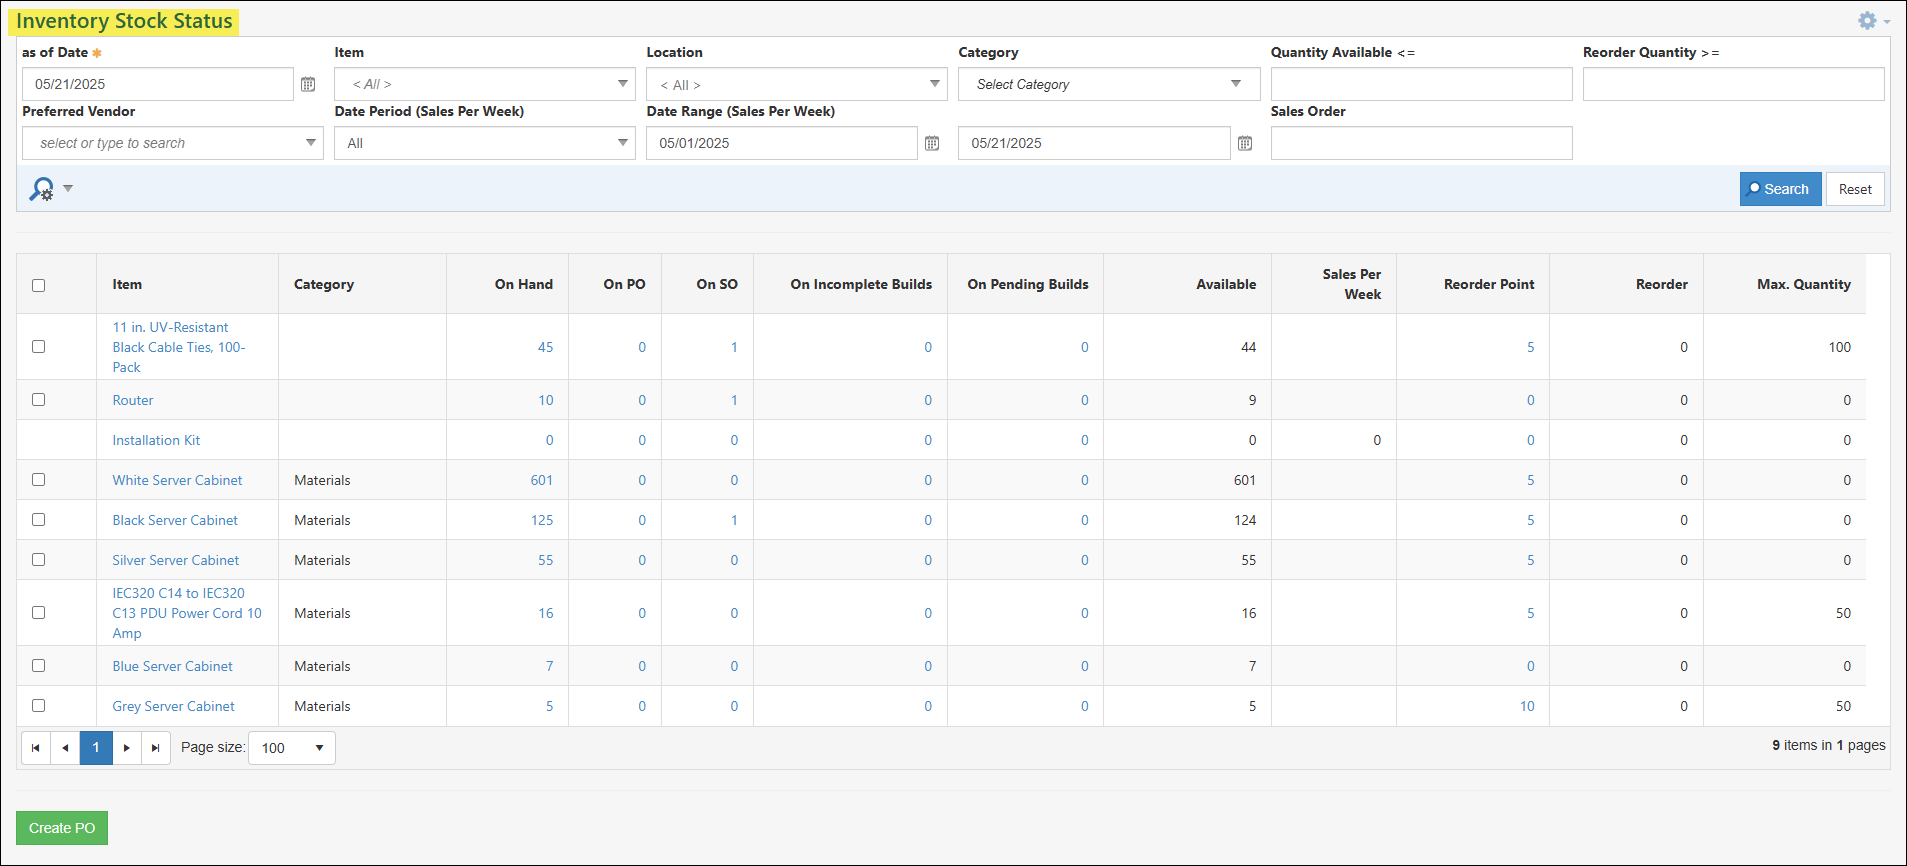
Inventory Stock Status Report
The Inventory Stock Status report tracks inventory levels, helping you decide what to reorder. It details on-hand quantities, including Items on purchase/sales orders or in pending builds, and adjusts for Items sold. The report takes into account the Reorder Point set at the Item to determine order quantities based on your desired stock level.
Example of the Inventory Stock Status Report
Permissions
There is one (1) User Role permission related to the Inventory Stock Status Report.
- “Inventory Stock Status – View”

Example of Permission Related to the Inventory Stock Status Report
Learn more about managing User Roles and Permissions in Striven by reviewing the User Roles Guide.
Viewing the Inventory Stock Status Report
To access the Inventory Stock Status report, navigate to Reports → Purchases & Payables → Stock Status.
Below is a screenshot illustrating how the Inventory Stock Status report appears and a description of what can be accomplished there.
- Search Filters: Narrows down results listed in the report based on the following criteria:
- As of Date: By default, the date listed in this filter will be the current date but can be adjusted as needed.
- Item: Allows the user to select a single Item in order to focus the results in this report to the specified Item.
- Location: Narrows down the report to display the Items that are housed in a specific Item Location.
- Category: Adjusts results listed in the report based on the Category that is set on the Item. Multiple Categories can be selected with this search filter.
- Quantity Available: Displays results based on less than or equal to the quantity listed in this field.
- Reorder Quantity: Adjusts results based on less than or equal to the Reorder Quantity amount listed in this field.
- Preferred Vendor: Filters the Items listed in the report based on the Vendor that is set within the Preferred Vendor field on the Item Info page.
- Date Period (Sales Per Week): Adjusts the Sales Per Week column displayed in the report based on the date period selected here.
- Date Range (Sales Per Week): Adjusts the Sales Per Week column displayed in the report based on the beginning and ending date range selected here.
- Sales Order: Filters the report based on the Sales Orders that are included in the On SO column.
- Item: Displays the Item name that is being reported on. By clicking on the Item name, the Item Info page will open for further details.
- Category: Lists the Category that is set within the Item Info page for each Item listed in the report.
- On Hand: Calculates the quantity that is on hand based on related Transactions. To see the related Transactions, click on the number listed in this column to open the Item Quick Report.
- On PO: Totals the amount of Purchase Orders that currently have the Item listed but have not been turned into an Accounts Payable Transaction yet. Clicking on the number listed in this column will open the Purchase Orders list filtered accordingly.
- On SO: Lists the total amount of Sales Orders that currently have the Item listed but have not been turned into an Accounts Receivable Transaction. Clicking on the number listed here will open the Sales Orders list prefiltered accordingly.
- On Incomeplete Builds: Displays the total number of Item Builds that are in an incomplete status and therefore have not been taken into account for the quantity on hand for the item. Clicking on the number listed here will open the Items Builds list for further details.
- On Pending Builds: Shows the total number of Item Builds that are in a pending status and therefore have not been calculated into the quantity currently on hand. Clicking on the number listed here will open the Items Builds list for further information.
- Available: Calculates how much quantity for an Item is available by subtracting the On PO, On SO, On Incomplete Builds, and On Pending Builds columns from the On Hand column.
- Sales Per Week: Calculates how much on average has been sold per week based on the Date Period or Date Range for the Sales Per Week search filters.
- Reorder Point: Lists the number entered into the Reorder Point field that is available on the Item Info page. Clicking the number listed here will open the Item Info page for further details.
- Reorder: Calculates the amount that currently needs to be reordered for the Item listed in the report.
- Max Quantity: Displays the amount that is entered into the Max Quantity field that is available on the Item Info page.

Example of the Information Available on the Inventory Stock Status Report
Create Purchase Order from Stock Status Report
One of the great features of this report is the ability to create Purchase Orders directly from the report to avoid manually creating them separately. You can select the Items you wish to reorder from the report and click on the Create PO button on the bottom of the page. Filtering your report results by Preferred Vendor will also help by pre-populating the Vendor when creating a Purchase Order from the report.
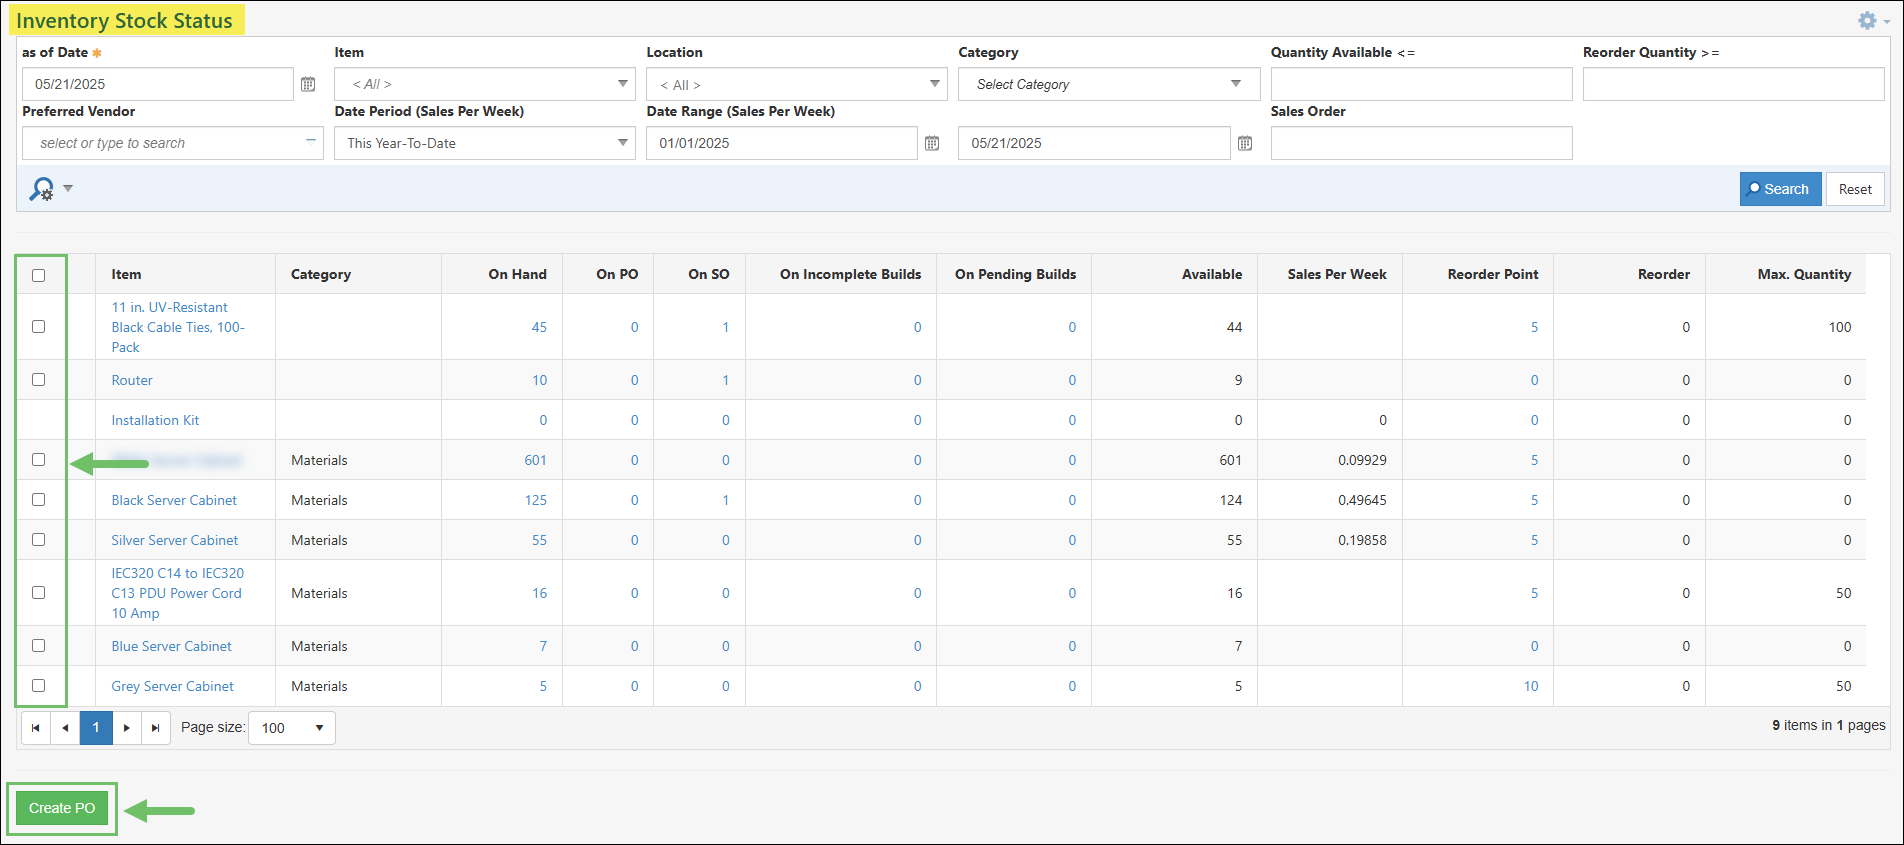
Example of the Create PO Option from the Inventory Stock Status Report
-
Inventory Valuation Report
The Inventory Valuation report is a useful report for determining the current quantities and values of your Inventory Items. The report lists each Inventory Item displaying information related to each Item such as the Quantity on Hand, Asset Value, and % of Total Asset. Using this report, you can get a detailed look at your Company’s inventory status as of a chosen date.

Example of the Inventory Valuation Report
Permissions
There are two (2) User Role permissions related to the Inventory Valuation Report.
- “Inventory Valuation – Export”
- “Inventory Valuation – View”
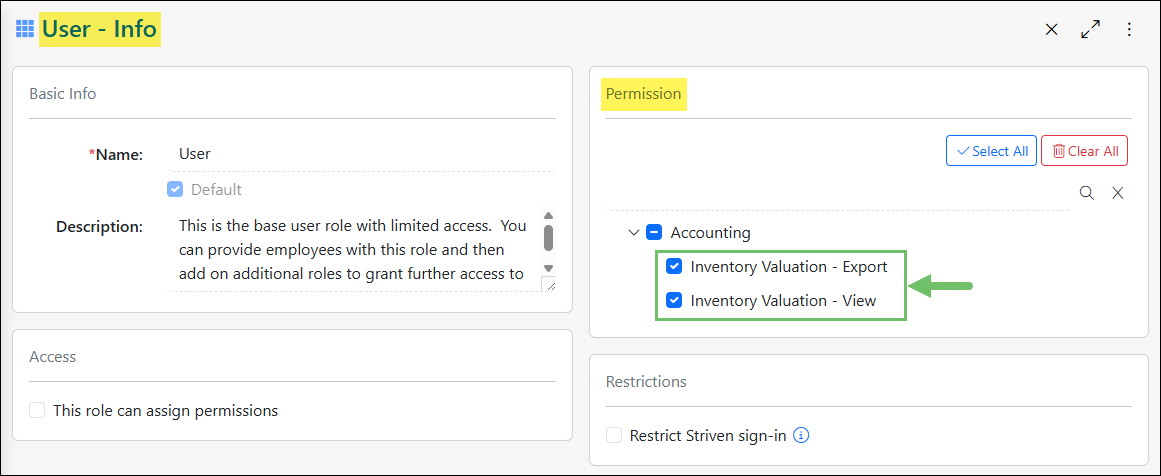
Example of Permissions Related to the Inventory Valuation Report
Learn more about managing User Roles and Permissions in Striven by reviewing the User Roles Guide.
Viewing the Inventory Valuation Report
To view the Inventory Valuation Report, navigate to Reports → Purchases & Payables → Inventory Valuation.
Below is a screenshot illustrating how the Inventory Valuation report appears and a description of what can be accomplished there.
- Search Filters: Narrows down results listed in the report based on the following criteria:
- Date As Of: By default, the date listed in this filter will be the current date but can be adjusted as needed.
- Item: Allows the user to select a single Item in order to focus the results in this report to the specified Item.
- Category: Adjusts results listed in the report based on the Category that is set on the Item.
- Location: Narrows down the report to display the Items that are housed in a specific Item Location.
- Status: Changes the results in the report based on the Item status. By default, this search filter will be set to Active so only Items that are active will be displayed.
- Suppress Items with No Qty On Hand: Removes results from the report that currently do not have any quantity on hand.
- Item: Displays the Items that are being reported on.
- Qty On Hand: Displays the current quantity on hand for the Item listed in the report. Each quantity is displayed as a hyperlink, which when clicked will present you with a transaction history to display how the Item’s quantity arrived at the current number on hand.
- Asset Value: Calculates the total value of the Inventory Item listed.
- % of Total Asset: Calculates how much the Inventory Item’s total value makes up your Inventory Asset Account’s total balance.
- Total: Calculates a total for the Qty On Hand and Asset Value columns.

Example of the Information Available on the Inventory Valuation Report
-
Recap
With this guide, we’ve discovered how to enable and utilize Barcoding to save time when entering Items on Transactions. We’ve also learned how to manage Items with the use of Serial Numbers. Finally, we’ve discussed how Lot Numbers can assist with expiration dates and ensure traceability for inventory purchased and sold.
FAQs
-
What is the best way to find a specific serial number and see its current status?
The Serial Numbers by Location Report is the most effective tool for this. By using the Serial Number search field, you can search for a specific Serial Number. The report will provide details such as the Item associated with that Serial Number, its current location, and the quantity on hand. The report can also be customized to display only On Hand or Available Serial Numbers.
-
Do I need special setup to use a Barcode Scanner with Striven?
Most Barcode Scanners only need to be plugged in to start working with Striven. If your scanner has a Bluetooth option for a wireless connection, you will need to follow the manufacturer’s instructions to set up the wireless connection.
-
Can I enable or disable Lot Tracking for an Item after it has been used on a Transaction?
No, once an Item has been used on a Transaction, you can no longer enable or disable Lot Tracking for that Item. It is important to complete your Lot Number set up for individual Items before they are available to use in Orders and Transactions.