A/R & Collections
Payment Profiles
Support Guide
-
Overview
Payment Profiles are an important tool in Striven for making transaction processing more streamlined and efficient. They’re a convenient feature that allows a Customer to store their payment information securely for future purchases. This guide will discuss the settings and key benefits of using Striven’s Payment Profiles feature.
Read this guide if you are trying to:
✔ Create Payment Profiles as an Employee or by the Customer.
✔ Create and manage Payment Profiles from the Customer Dashboard
✔ Configure and Manage AutoPay settings.
-
Permissions & Settings
A Payment Profile is a secure digital record that stores your billing information for online transactions. It acts like a digital wallet, pre-populated with details related to your Payment Methods. Payment Profiles are a great tool for storing and organizing Customer Info, such as Names, Addresses, Credit/Debit Card numbers and expiration dates, or Routing/Account Numbers for ACH Transfers or E-Checks.
With all this in mind, there are a few different settings that require configuration within your Striven system before users will be able to access Payment Profiles.
-
Permissions
There are particular permissions needed for User Roles or Portal Roles in order to access the Payment Integration and Payment Profiles settings in Striven.
Payment Integration Permission
The User Role permission needed to manage your Payment Integration settings is the “Payment Integration – Add/Edit“. Adding this permission will allow the user to enable or disable the settings for the Payment Integration page.- Note: To quickly check to see if you have this permission, you can click on the kebab menu on the top-right corner of the Payment Integration page and click Settings. This will open a new tab that shows the permission(s) needed to access the page and whether you already have access.

Example of the Permission for Access to the Payment Integration Settings

Payment Profiles Permission
The User Role permission needed to create and manage Payment Profiles is “Payment Profiles – Add/Edit“. Adding this permission will allow the user to set up or make changes to Customer Payment Profiles in Striven.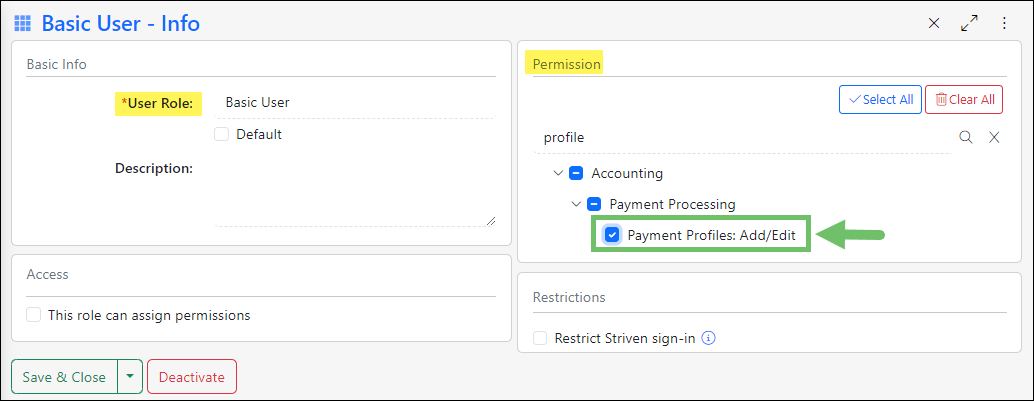
Example of the Permission Needed to Create or Manage Payment Profiles

Customer Portal Role Permission
The Portal Role permission needed to create and manage Payment Profiles is “Payment Profiles – Add/Edit“. Adding this permission to a Portal Role will allow the Customer to set up or make changes to their own Payment Profiles from the Customer Portal.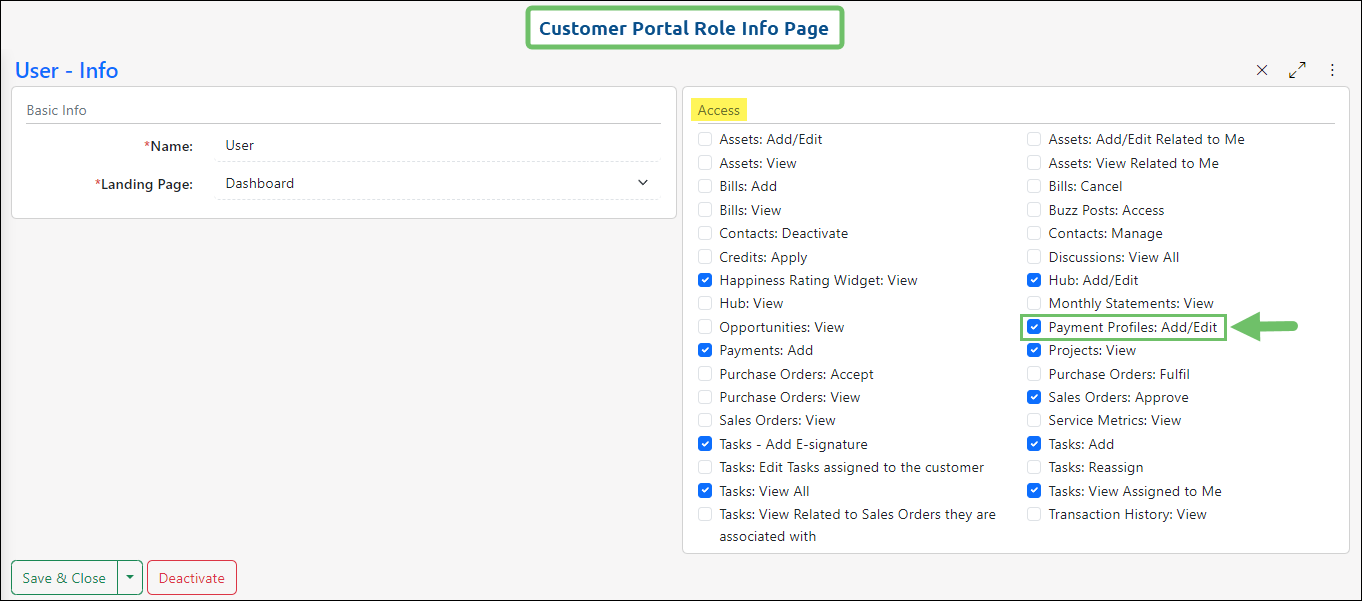
Example of a Portal Role Info Page

-
Payment Integrations
Striven provides the opportunity to receive payments from Customers with the use of Payment Profiles through a designated Payment Gateway Integration. This allows you to securely transfer payment information between Striven and your Customer’s preferred Payment Method for smooth sales transactions.
There are two (2) Payment Integration options available to use with Striven: Authorize.net or Stripe.
- Important Note: Your Striven system must have either the Authorize.net Integration or the Stripe Integration enabled in order to receive payments in Striven and set up Payment Profiles.
For more information about enabling one of these integrations, please visit our Authorize.net Integration Guide or our Stripe Integration Guide.
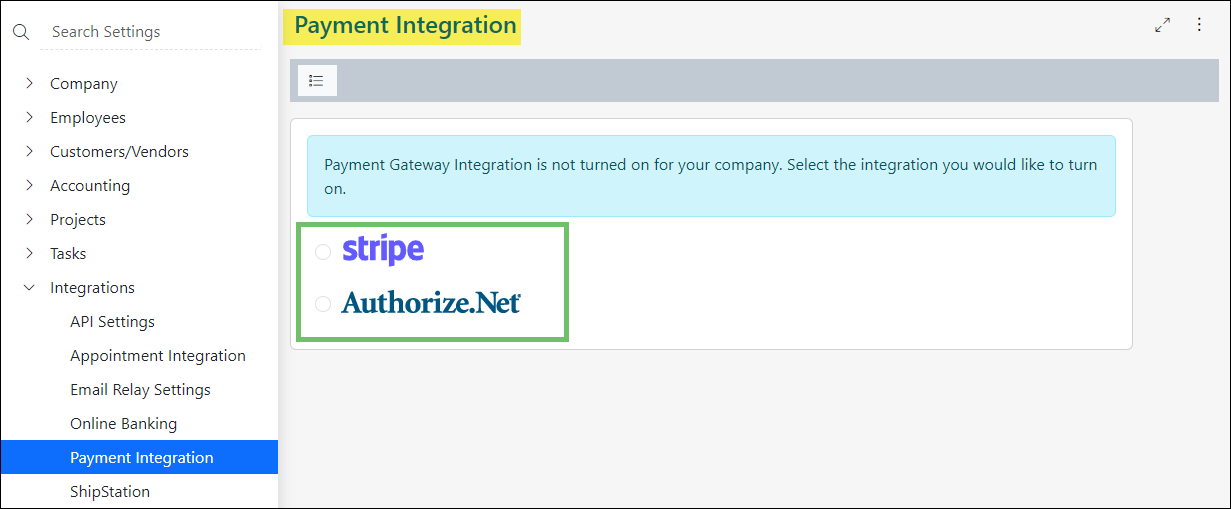
Example of the Payment Integration Page in Striven

Striven never stores your credit card or banking details. Instead, it uses a secure link with your chosen payment provider (Authorize.net or Stripe) to check if there is a valid Payment Method saved for current or future transactions within Striven.
-
Payment Methods
A Payment Method is the way you transfer money to a seller in exchange for goods or services. Many Payment Methods can be used digitally, making them practical for use with Striven. There are different Payment Method options available, each with its own advantages and considerations. Having an assortment of Payment Method options available for selection provides flexibility and convenience, making it more likely for Customers to make a purchase if their preferred method is offered.
Depending on the Payment Integration you have enabled, Striven offers multiple Payment Method Options.
-
Creating Payment Profiles
Payment Profiles can be set up by Employees within the Striven system, or by the Customers from within the Customer Portal, provided they have the necessary User Role/Portal Role permissions. The Payment Profiles can be used for one-time payments, future manual payments, or enrolling in automatic payments.
You can use the following Payment Methods for a Payment Profile:
- Credit Card
- Options vary depending on which Payment Integration you have enabled.
- E-Check/US Banks
- This option requires a Routing Number and Account Number.
- Credit Card
-
Create Payment Profile – By Employee
There are two (2) methods for Employees to add Payment Profiles within the Striven system. Employees can set up a Payment Profile for a Customer when manually entering a Payment into Striven, or from the individual Customer Dashboard.
From a Payment
When creating a Payment in Striven, you will have the option to create a Payment Profile or select an already existing Payment Profile. Click the Plus (+) icon to add new card or bank account information.

Example of the Add Payment Profile Button on the Add Payment Info Page

The steps that follow will vary depending on the Payment Integration you have enabled in your Striven system, so we’ll cover them separately.
Authorize.net
Adding a New Credit Card
When you click to add a new Credit Card using the Authorize.net Integration, a Profile Info popup will appear with a field for Payment Method selection. Once the credit card is selected, fields will appear for Card Number, Expiration Date, Card Code, as well as fields for the Billing Address details related to the card. Once the required fields (marked with an asterisk *) are completed, click Save & Close.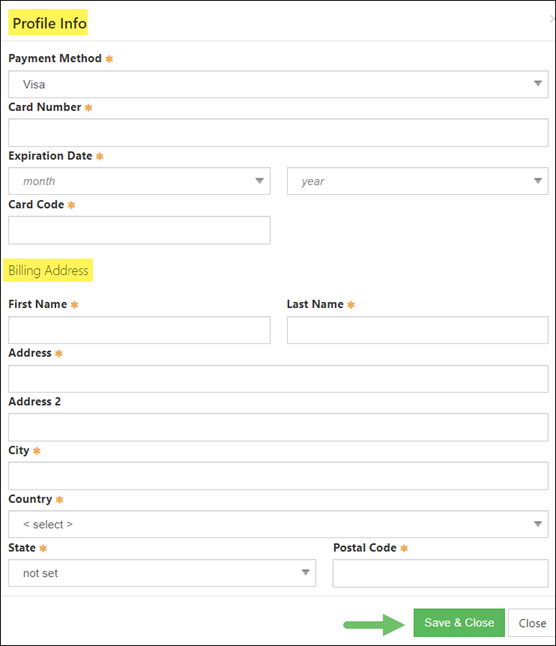
Example of the Add Payment Profile Page for Authorize.net Integration with Striven

Stripe
Adding a new Credit Card
When you click to add a new Credit Card utilizing the Stripe Integration, your browser will be redirected to a page in Stripe to collect your payment details. Once the fields are completed, click Save Card.
Example of the Enter Payment Details Page for the Stripe Integration with Striven

From the Customer Dashboard
To create a Payment Profile for a Customer from the Customer Dashboard, click the waffle menu in the top-left corner of the Customer Dashboard, next to the Customer Name, and choose Financial from the menu.
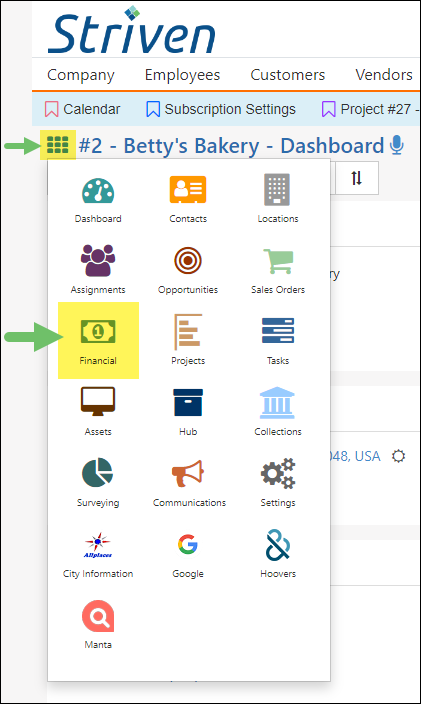
Example of the Financial Option on the Waffle Menu of a Customer Dashboard

By default, the Financial page will load displaying the Customer’s AR Transactions. Select the Payment Profiles option on the Left-side Menu Bar to proceed.
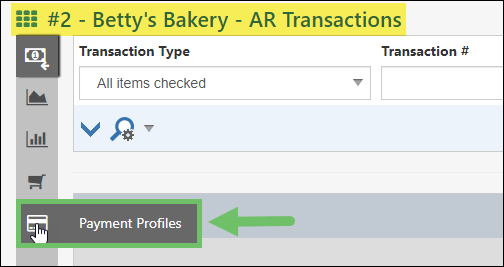
Example of the Payment Profiles Option on the Left-side Menu Bar of a Customer’s A/R Transactions Page

On the Payment Profiles page you will be able to see if the Customer already has any Payment Methods added. You will also have the option to click Add New Payment Method.
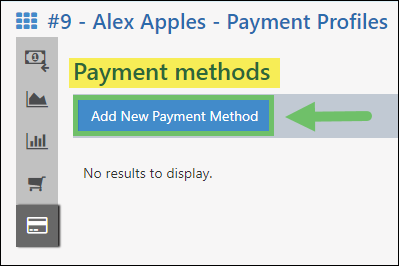
Example of the Add New Payment Method Button on a Customer’s Payment Profiles Page

This will trigger the Profile Info popup to display wherein the Payment Method and other settings can be configured. These options may vary depending on which type of Payment Method is being entered. At this point, you can reference the instructions above for adding a new Payment Method using either the Authorize.net or Stripe Integrations.
-
Create Payment Profile – By Customer
From the Customer Portal, a Contact with the required permission included in their Portal Role can create a Payment Profile by clicking on the Payment Profiles option under Customers on the Customer Portal menu.

Example of the Manage Payment Profiles Page in the Customer Portal

This will load the Manage Payment Profiles page, displaying the Payment Methods and AutoPay settings within the Portal. Depending on which Payment Integration is enabled, clicking the Add New button will display the associated prompts for adding a new Credit Card or E-Check details to use for processing payments with Striven.
Customers can store multiple Payment Methods in their Payment Profile, with options to edit or remove them. These options will display for selection when a Payment is manually processed in Striven.
-
Managing Payment Profiles
Now that a Payment Profile has been created for your Customer, there will be options to manage the Payment Methods saved for the profile. Management options will differ depending on whether you are viewing the settings as an Employee within Striven, or as the Contact from within the Customer Portal.
-
Payment Profile Management – By Employee
Once you have Payment Methods saved in the Customer’s Payment Profile, you will be able to see the following details:
- Account Details: Displays the Account Type and Account # for the individual Payment Methods.
- Delete: Deletes the Payment Method from the Payment Profile.
- Note: If AutoPay is enabled, at least one (1) saved Payment Method must remain active.
- Edit: Displays a Profile Info popup. This enables you to update the Expiration Date and Billing Address details related to the Credit Card. This option is not available on E-Check settings.
- Used for AutoPay: Displays if the Payment Method is currently set to be used for AutoPay. In order to delete a Payment Method that is set for AutoPay, a different Payment Method must be selected for AutoPay before the Delete option will become available.

Example of the Payment Profiles Page from a Customer’s Dashboard

-
Payment Profile Management – By Customer
Once the Customer has saved their Payment Methods in the Customer Portal, they will be able to see the following:
- Account Details: Displays the Account Type and Account # for the individual Payment Methods. This will also display the Convenience Fee, if applicable.
- Edit: Displays fields to update the Expiration Date, Card User’s Name, and Billing Address details related to the Credit Card. This option is not available on E-Check settings.
- Used for AutoPay: Displays if the Payment Method is currently set to be used for AutoPay. In order to delete a Payment Method that is set for AutoPay, a different Payment Method must be selected for AutoPay before the Delete option will become available.
- Delete: Deletes the Payment Method from the Payment Profile.
- Note: If AutoPay is enabled, at least one (1) saved Payment Method must remain active.

Example of Payment Methods Saved in the Customer Portal

-
AutoPay
The AutoPay feature automatically processes payments, eliminating the need for manual input from Customers each time a payment needs to be made.
-
AutoPay Setup
AutoPay settings can be configured by Employees from the Customer’s Payment Profiles page within Striven.

Example of the Set Up AutoPay Button on a Customer’s Payment Profiles Page

After clicking on the Set Up AutoPay button, a popup will display with the AutoPay Settings options. First, you will select whether to choose an existing Payment Profile, or create a new one for the Customer. The next step will be either selecting the existing profile or entering the details to create a new one. Then click Save & Close and voila! AutoPay is set and ready to go.
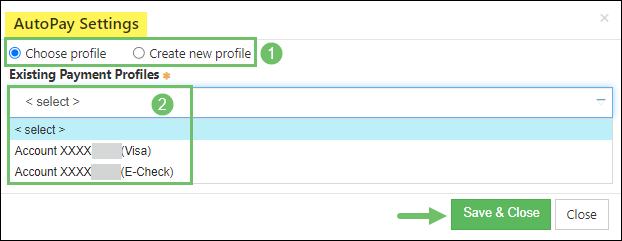
Example of the AutoPay Settings Popup in Striven

AutoPay can also be enabled by the Customer from the Customer Portal.
- Note: The Customer Portal would need to be enabled for your Striven system and Portal access would need to be granted to the Customer.
After the Customer logs into the Customer Portal, they can navigate to the Payment Profiles page from the Customer Portal menu on the left side of the screen.

Example of the AutoPay Option in the Customer Portal

Once the Customer clicks on the Enroll Now button, they will be enrolled in AutoPay and will need to select their Payment Method from the drop-down list and then click the green Confirmation button to save their preferences.
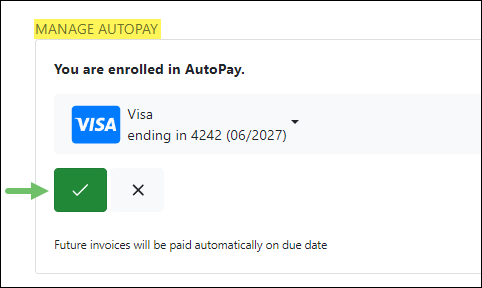
Example of the Confirmation Button to Save AutoPay Settings

The Payment Profiles page will then display options to edit your AutoPay Settings or Turn Off AutoPay.
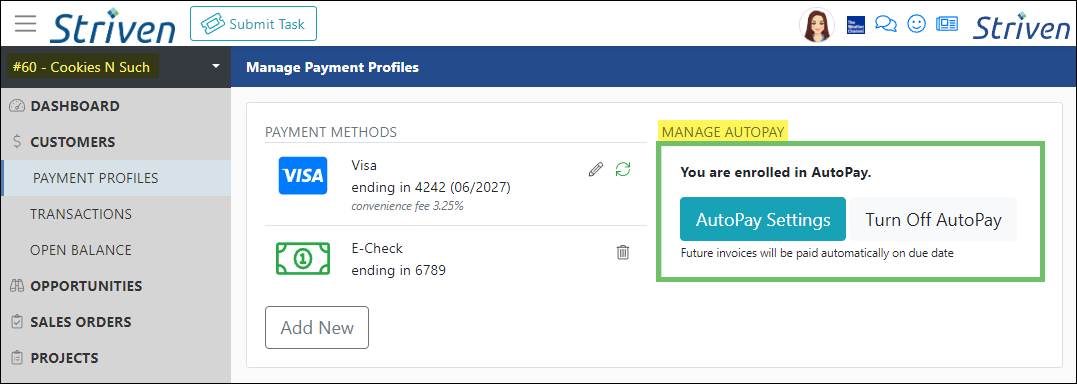
Example of the Payment Profiles Page with AutoPay Enabled

-
AutoPay Processing
AutoPay transactions run after 3:00 am EST on weekdays and 10:00 am EST on weekends. This process normally takes a few hours to complete.
-
Recap
With this guide, we’ve learned which permissions are required to create and manage Payment Profiles in Striven and the Customer Portal. We have reviewed the steps to create Payment Profiles in Striven while entering a Payment or from the Customer Dashboard. We’ve also learned how Contacts can add Payment Methods to their Customer profile in the Portal. Additionally, we covered the options available for managing Payment Profiles by Employees or Customers, as well as AutoPay settings. These details will help you add and maintain active Payment Methods to ensure smooth and effortless transactions.
FAQs
-
Does AutoPay process on the Invoice Date or the Due Date?
Within the Sales Settings page in Striven there are options for configuring when you wish your AutoPay payments to process. In the Payments section of the page, you can select the Due Date or the Invoice Date as the default choice for when Striven processes AutoPay payments. However, you also have the option to set exceptions to this default setting for specific Customers using the Manage Exceptions options link also located on this page.
