
Purchasing & AP
Purchase Orders
Support Guide
-
Overview
Purchasing in Striven can help your Company order goods or services, receive stock, report on what is owed, and much more. This guide will help set up your Purchase Order Types, PO printable formats, and more to align your Company for success with Striven.
Read this guide if you are trying to:
✔ Create Simple and Contract Managed Purchase Order Types.
✔ Create Purchase Orders involving multiple Vendors.
✔ Configure Purchase Order printable formats.
-
Purchase Order Types
Before your Company begins purchasing from Vendors, it is important to configure your Purchase Order (PO) Types. By configuring Purchase Order Types you can enable Vendor acceptance, require tracking information, and more. There are default Purchase Order Types in your settings on the PO Types List which can be edited, or you can add a new PO Type from here as well simply by clicking the Add button. After clicking Add, you will be brought to the Add PO Type page to start configuring the new type of Purchase Order. Below is a screenshot demonstrating how adding PO Types appears and details on what can be accomplished there. To view PO Types use the following steps below:
Company → Settings → Accounting → AP → PO Types
- Options: There are several options, which are described further below:
- Is Default: Notes this is the PO Type used by default when creating new Purchase Orders and therefore prefilling the type for convenience.
- Requires Internal Approval: Notes this type requires internal approval before sending it to the Vendor Contact.
- Allow Recurring: Allows you to create recurring POs based on frequencies configured and customized within Striven.
- Payment Terms: Enables you to choose from a drop-down list of your configured Payment Terms to utilize with this PO Type.
- Display Fields: Provides display options for POs of this Type, including adding a PO Name, Promise Date, Requested By, or a Vendor Contact.
- Note: If PO Name is selected, the name of the PO will be required when creating a new Purchase Order.
- Defaults: Allows you to choose whether this PO Type is used for Dropship orders by Default.
- Contract Management: Allows more options to be enabled, which are included and described below.
- Terms & Conditions: Enables you to choose to associate a Terms & Conditions for POs of this Type. This will allow you to effectively turn your Purchase Order into a contract with the selected Vendor. Terms and Conditions can be set up and configured within Striven to meet your Company’s needs.
- Requirements: These checkboxes will enable you to require the following:
- Vendor must enter tracking information: If you would like Vendors to enter tracking information for Purchase Orders you can enable that workflow with this checkbox.
- Requires Vendor Acceptance: Requires Vendors to accept Purchase Orders that you request. Once this option has been turned on, the below methods are available for acceptance.
- Allow Multiple Vendor Selection: Allows one or more Vendors to be selected for a particular PO. The first Vendor that accpets the PO will be designated for that PO.
- Acceptance Methods: There are three Acceptance Methods including the following:
- Electronic: Enables Vendor Contacts to sign their screen electronically to approve the Purchase Order.
- Written: Allows Vendor Contacts to approve Purchase Orders with written approval. You can also choose to require an attachment of a written agreement.
- Verbal: Allows Vendor Contacts to approve Purchase Orders with verbal approval. You can also choose to require an attachment of a verbal agreement.
- Note: The Written and Verbal Acceptance Methods also include the option to Require Attachment.

Example of Adding a PO Type

- Options: There are several options, which are described further below:
-
PO Acceptance Notifications
If you have created a Contract Managed PO Type with Vendor Acceptance enabled, you may configure Acceptance Notifications. These notifications will inform an assigned recipient when Purchase Orders greater than a specific amount, or containing certain items have been accepted by a Vendor.
To begin setting up your Acceptance Notifications, select the waffle menu located on the PO Type – Info page, then choose the Acceptance Notifications option.

Example of the Acceptance Notifications Option within the Waffle Menu
When adding a new Acceptance Notification, you have the option to configure the following criteria that the Purchase Order must contain to trigger the notification. It is possible to configure multiple Acceptance Notifications on one PO Type with various thresholds. Below is an example of the options available when configuring an Acceptance Notification.
- Recipient: The Recipient field features a type-ahead drop-down menu, where you may search for the Employee you would like to receive the Acceptance Notification by name or email address. Only email addresses that are currently assigned to an Employee may be entered and selected.
- Department: If you wish for the recipient to only be notified when Items from a specific Department are ordered, select the Department here. Departments can be assigned at the Item level. To learn more about Item Management, review our Item Management Guide.
- Order Total Greater Than: If you wish for the recipient to only be notified when Purchase Orders over a certain amount are accepted, you may enter the amount threshold here.
- Items: Selecting an Item in this field will make sure the recipient is always notified when a Purchase Order with that Item has been accepted by the Vendor.

Example of Adding an Acceptance Notification
-
Payment Terms
Payment Terms are time conditions on which two parties agree to fulfill a sale by a certain date or period. Payment Terms are available for both Accounts Receivable and Accounts Payable Transactions and will allow your Company to track late Payments in Collections. Learn more about setting up Payment Terms in Striven by reviewing the Payment Terms section in our Accounting Setup Guide.
You can add new Payment Terms from the Payment Terms List. To view Payment Terms use one of the following steps below:
Company → Settings → Accounting → Sales → Invoices → Payment Terms
Company → Settings → Accounting → Sales → Sales Orders → Payment Terms
Company → Settings → Accounting → Purchasing → Bills → Payment Terms
Company → Settings → Accounting → Purchasing → POs → Payment Terms

Example of the Payment Terms List
-
Purchase Order Printable Formats
Vendors can view Purchase Orders and transactions in many ways from the Vendor Portal, email, or mail. To provide a visual outside of the Portal, however, it is recommended you create printable formats. Using the Purchase Order formats will allow a PDF printable version of the Purchase Order to be sent to the Vendor. If Vendor Contacts are using the Portal, they will be able to view and print out Purchase Orders so they have a hard copy for their records. There is a default PO format in Striven for convenience, but a new format can also be created by using the plus sign icon on the PO Formats List.
When creating a new printable format, there are three main sections available for you to configure to suit your Company’s needs including Content, Items, and Totals. This guide will discuss each section and explore what they can help you accomplish with printable formats. Below is a screenshot displaying how the Purchase Order Formats List appears.
Company → Settings → Accounting → Purchasing → POs → PO Formats
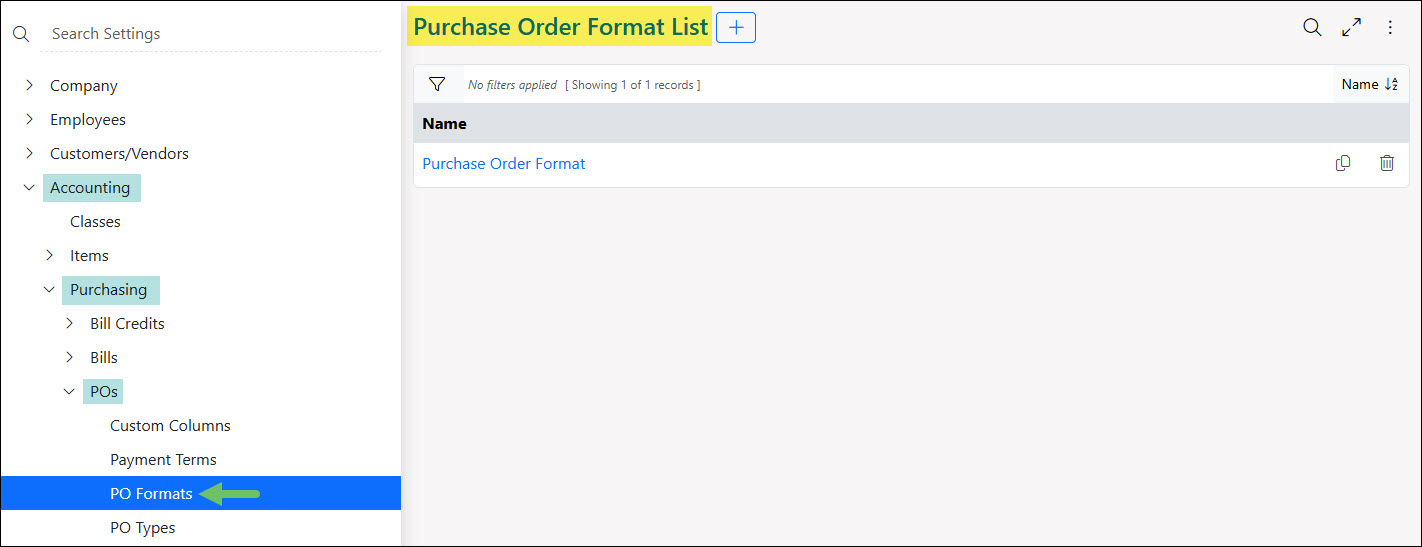
Example of the Purchase Order Formats List
Content: Allows you to utilize a text editor to add content or merge fields (as shown by the green arrow in the screenshot). Using merge fields is very important when setting up PO Formats. Merge fields will take information from the Order and merge it into the PDF automatically. Things like your Company logo or your Company’s primary address can be added to the format using merge fields. Content sections can serve as Headers, Footers, or Terms & Conditions sections. To the right is a screenshot featuring how the Content section appears with merge fields and formatting.

Example of Setting Up the Content Section for Printable PO Formats
Items: Allows you to configure how the Items appear on the printable format. To configure the section header, you can choose a column header background color along with the font size and color. Within the Items, you can also choose what to include and/or exclude in the section from Quantity, Name, Description, and more. The columns can also be renamed and rearranged to fit your needs. To the right is a screenshot illustrating how the Items section appears.
Note: If a column is configured to appear on the PO Format but is not entered on the Purchase Order, the column will still be displayed but the data field will show as blank when printing the PO using the selected format.
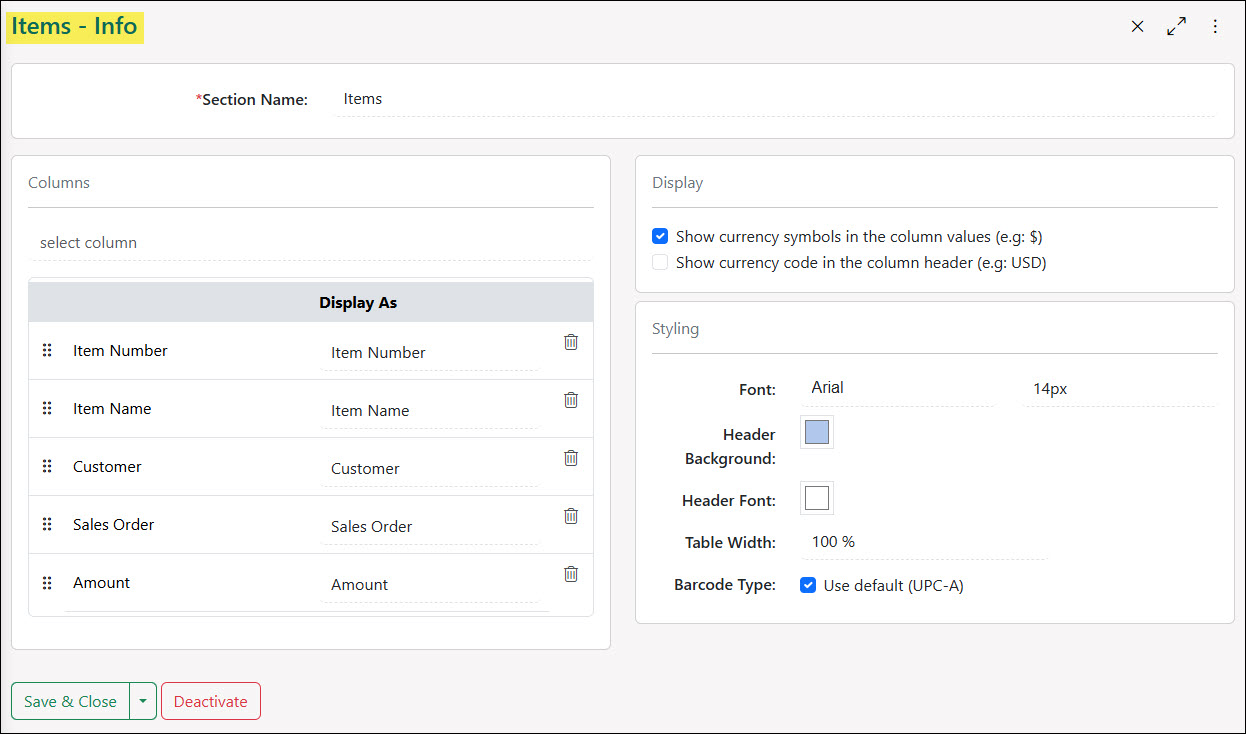
Example of Setting Up the Items Section for PO Formats
Totals: Adds everything up and totals Line Items on the PO. Configurations can be made to allow the hiding of information deemed less vital to your Company using a series of toggles. By using the Hide toggle, this notes that the section will be hidden on the format. Override the text for each piece of information by updating the Display As field. To the right is an image that displays how this appears and what can be configured there.
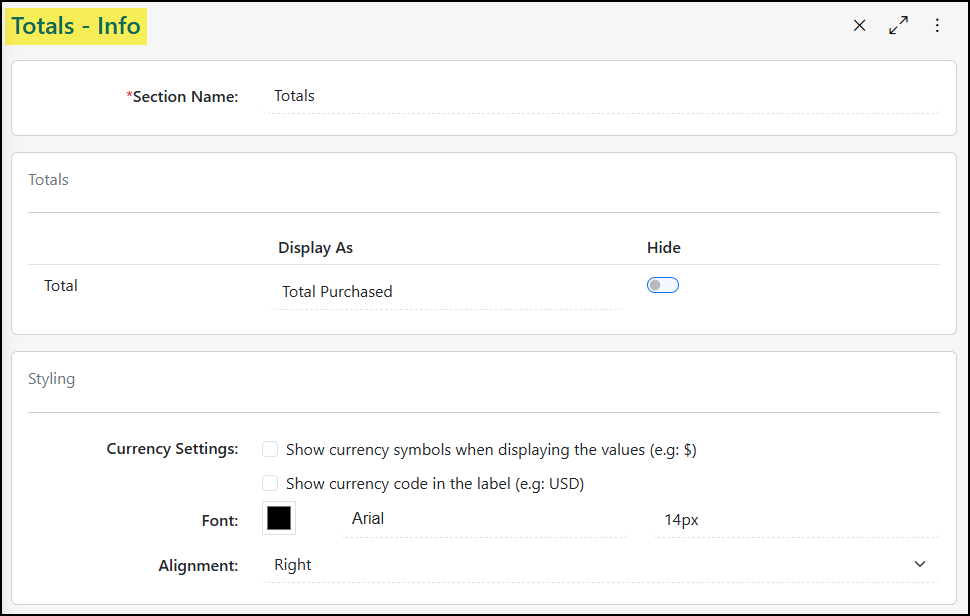
Example of Setting Up the Totals Section of PO Formats
-
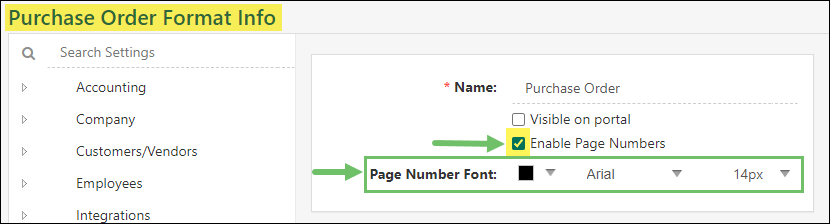
Page Numbers in PO Printable Formats
Striven’s Printable Formats have the option to include page numbering on transactions. To turn on page numbering for your transaction formats, you will need to find the page number checkbox on the Format Settings page, above your format sections.
When the box is checked, further options appear for you to select the page number font color, type, and size.
Example of Page Number Settings for a Purchase Order Printable Format
These page numbers will display in a “Page __/__” format on the bottom of your transaction pages, but only when printing a particular transaction. Printing in batches from the Invoice Print Queue, for example, will not display the page numbers.
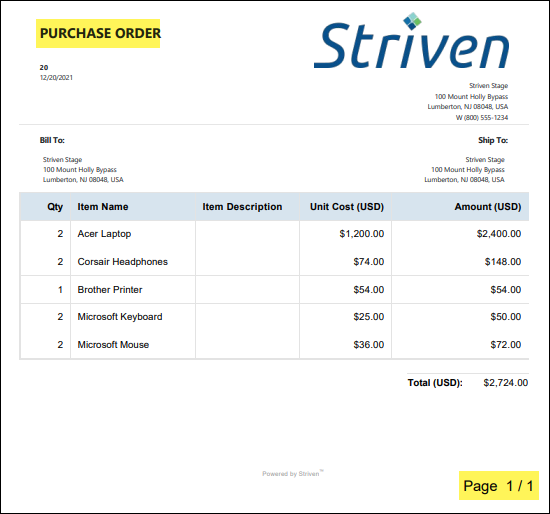
Example of Page Number Displaying on a Purchase Order
-
Currency Settings on Printable Formats
Currency display settings can be determined for transaction printable formats. These settings options are located on the Content, Items, and Totals sections of your formats. Striven provides the ability to select whether currency shows with currency symbols or currency codes.
The default setting for all printable formats will be to show the Currency Symbols (i.e. $, £, €, etc.), but you will also have the option to show the Currency Codes (i.e. USD, EUR, AUD, CAD, etc.) in addition to, or instead of the symbols.
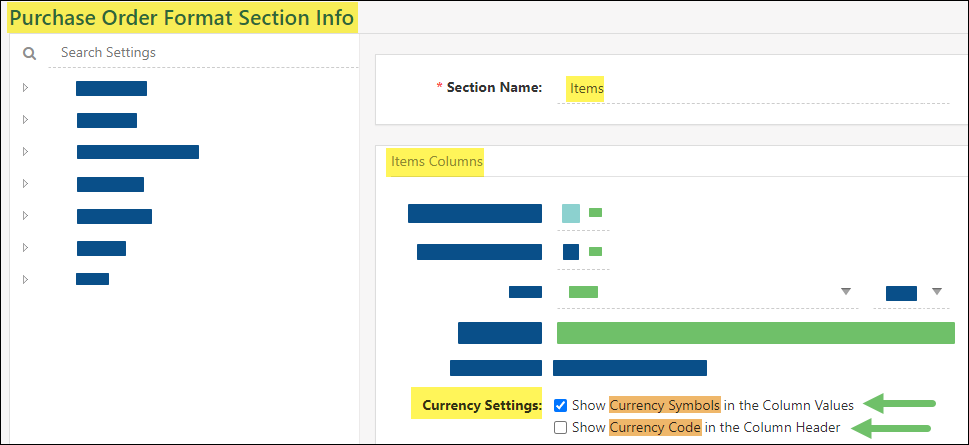
Example of Default Currency Settings for Items Section of an Purchase Order Printable Format
If you wish to remove a currency setting from displaying, simply uncheck the box next to the display option you do not want to be displayed.
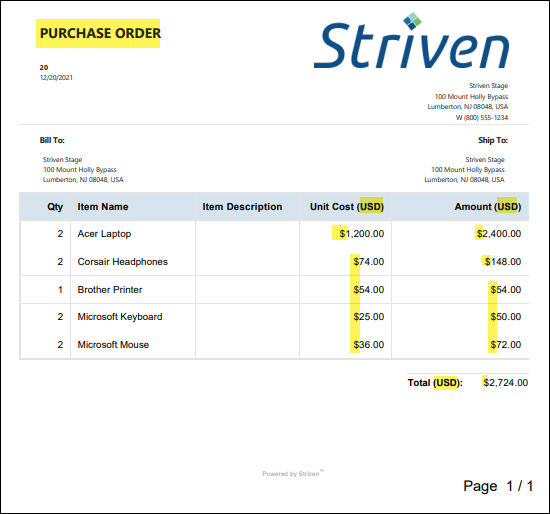
Example of Purchase Order Printable Format Displaying Currency Symbols & Currency Codes
-
Purchase Orders in Striven
Once you have configured PO Types and Printable Formats to suit your needs, you are ready to begin creating Purchase Orders in Striven. Purchase Orders are agreements to purchase goods or services from Vendors who supply those goods and services. Purchase Orders will differ depending on what PO Type has been selected upon creation as discussed in the Purchase Order Types section above. You can add new Purchase Orders using the Add button on the Purchase Orders List under the Vendors tab. Below is a screenshot exhibiting how adding a Purchase Order appears and details as to what can be accomplished there. To view the Purchase Order List, use the following steps below:
Vendors → Purchase Orders
- Type: Allows you to select a PO Type to use when creating a new Purchase Order.
- Note: If a default has been set within your PO Types List, this will populate here without having to select.
- Vendor: There are two options here, which are discussed further below:
- Select Vendor: Allows the selection of a single Vendor who will be completing this Purchase Order.
- Select multiple Vendors: Allows you to select multiple Vendors from whom you will be purchasing goods or services from. This option will allow you to search for Vendors based on the Vendors’ address and the first Vendor to accept the PO gets the job.
- PO Info: In this section, you can enter the following information:
- PO#: The PO number is auto-generated, but can be changed if desired.
- Promise Date: Notes when the Purchase Order should be fulfilled.
- Requested By: The Contact who is requesting the Purchase Order to be completed.
- Allow Vendor to submit a Bill that does not match PO: Allows Vendors to create Bills from the Portal that do not match the Purchase Order Line Items. Bills created by Vendors will be sent directly into the Bill Review Queue to be approved or denied.
- Allow partial fulfillment by Vendor: If you’d like to provide Vendors with the ability to partially fulfill POs you can do so with this checkbox.
- Note: Fields and requirements will be based on how the PO Type is configured.
- Payment Info: Enables you to designate the PO Date and Payment Terms.
- Shipping Info: Enables you to choose where you want the Vendor to ship the Items. You can choose to ship the Items to an internal location or you can choose to dropship the Items to a Customer Location. There is also an option to select the shipping method.
- Items Section: Allows you to add Items that your Company is purchasing from the Vendor. Options are described further below:
- Class: The default Class which will be posted to when Items are purchased.
- Item: Allows you to choose the Item in your system that is being purchased from the Vendor.
- Customer/Sales Order: Allows you to enter the Customer and/or Sales Order for whom the Items are being purchased. This will allow for a relation between the Customer’s Sales Order and the correlating Vendor’s Purchase Order.
- Description: The chosen Item’s description. If a description has been saved at the Item level, this will populate into this field once an Item has been selected. The description can be edited or replaced if needed.
- Quantity: The number of Items that are being purchased from the Vendor.
- Unit Cost: The cost for which the Item will be purchased. The cost can be saved at the Item level to be pulled in while creating Orders and transactions. This can be changed if necessary while creating the Purchase Order.
- Amount: The sum cost of the Items being purchased from the Vendor based on the quantity ordered.
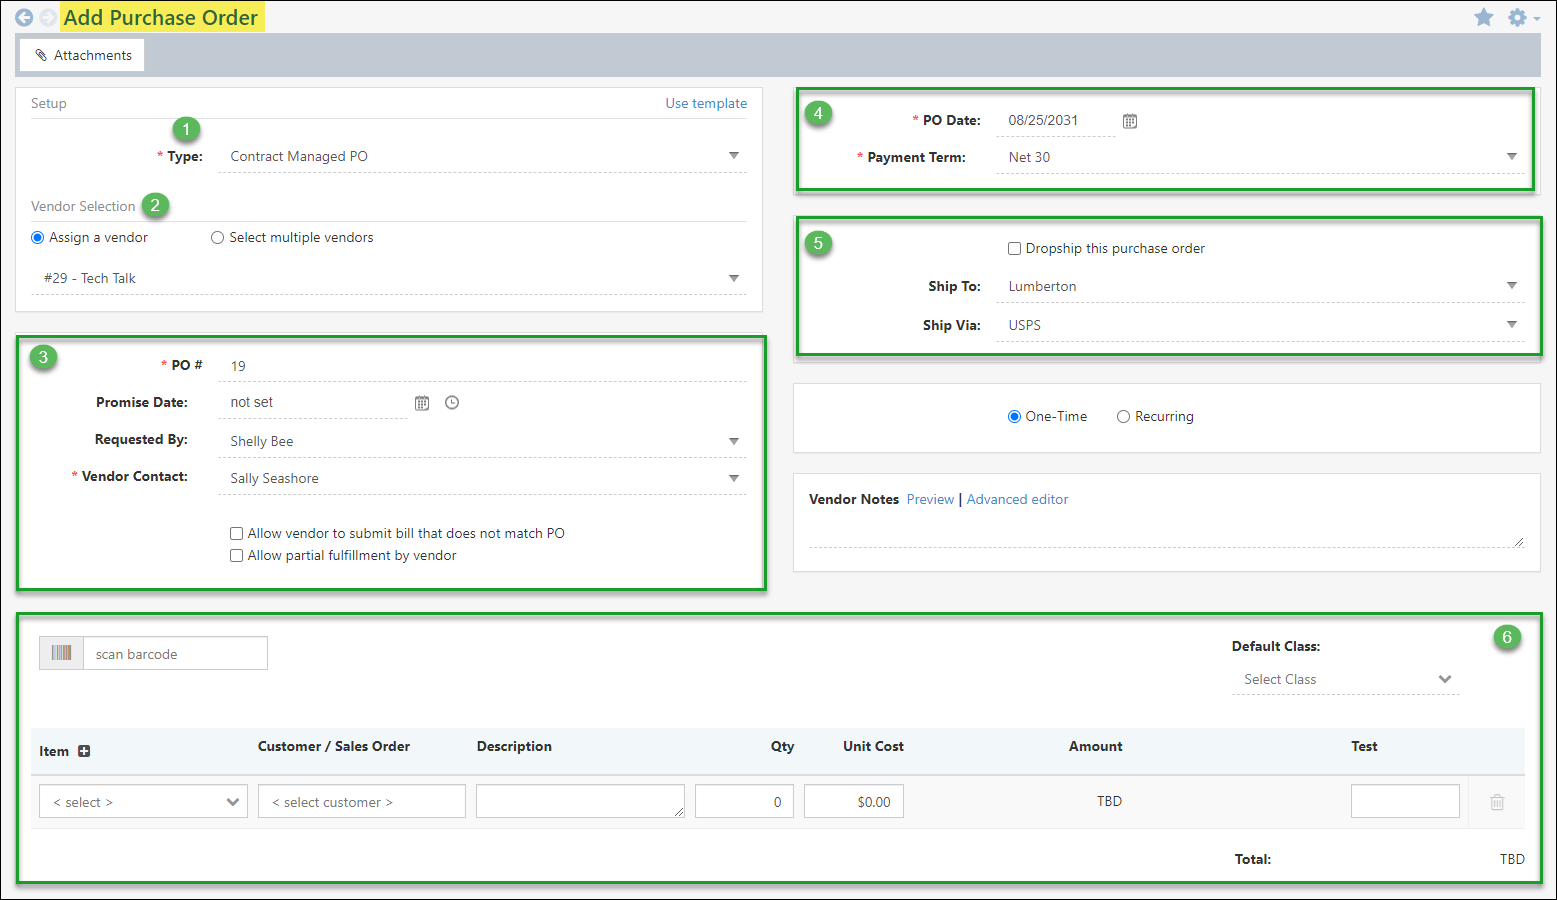
Example of Adding a Purchase Order
- Type: Allows you to select a PO Type to use when creating a new Purchase Order.
-
Purchase Order Menu Bar
The Purchase Order Menu Bar will have an array of actions and information that can be accessed from within the Purchase Order. The Menu Bar will appear once a Purchase Order has been saved in Striven. Certain actions or buttons may only appear based on configurations within the PO Type for Contract Managed. Below will detail each button or action that can be accessed from the Purchase Order Menu Bar.
- Actions Dropdown Menu: List of actions for a PO such as making a copy, changing the fulfillment method for Contract Managed POs, creating a bill or receiving items, or updating the status of the PO to Closed or Canceled.
- Print: Utilizes the Purchase Order Printable Formats to print a hard copy of the order. Learn more about Printable Formats that can be set up for Purchase Orders by reviewing the Purchase Order Printable Formats section in the Purchase Orders Guide.
- Email: Allows users to email another Employee from Striven. This is an easy way to quickly notify someone of a Purchase Order with easy access from the email received.
- Attachments: Any external documents, images or other types of attachments can be stored with the PO using the Attachments button.
- Reference Materials: Accesses Reference Materials related to the Items listed on the Purchase Order. The Reference Materials button will only be available for Contract Managed Orders. Learn more about Reference Materials by reviewing the Item Reference Materials section in the Item Management Guide.
- Audit Log: Tracks updates made to the Purchase Order as the work is being completed and processed.
- Notes Log: Allows users to add internal notes to the Purchase Order. Notes entered into the Notes Log will audit the date, time, and who entered the note.
- Discussions: Any Discussions related to the Purchase Order can be viewed and collaborated with using the Discussions button. To learn more about using Discussions in Striven, view the Discussions Guide.
- Related Transactions: Any Bills, Received Items, Bill Credits, or Sales Orders related to the Purchase Order will be listed in the Related Transactions button for easy access to related work or financial information.
- Billing Note: If the Purchase Order has the Contract Managed option enabled within the PO Type, an additional button will be available to enter Billing Notes. The Billing Note is a note field that can be adjusted as needed and does not save any previous versions.

Example of a Purchase Order Menu Bar
Relating Entities to Purchase Orders
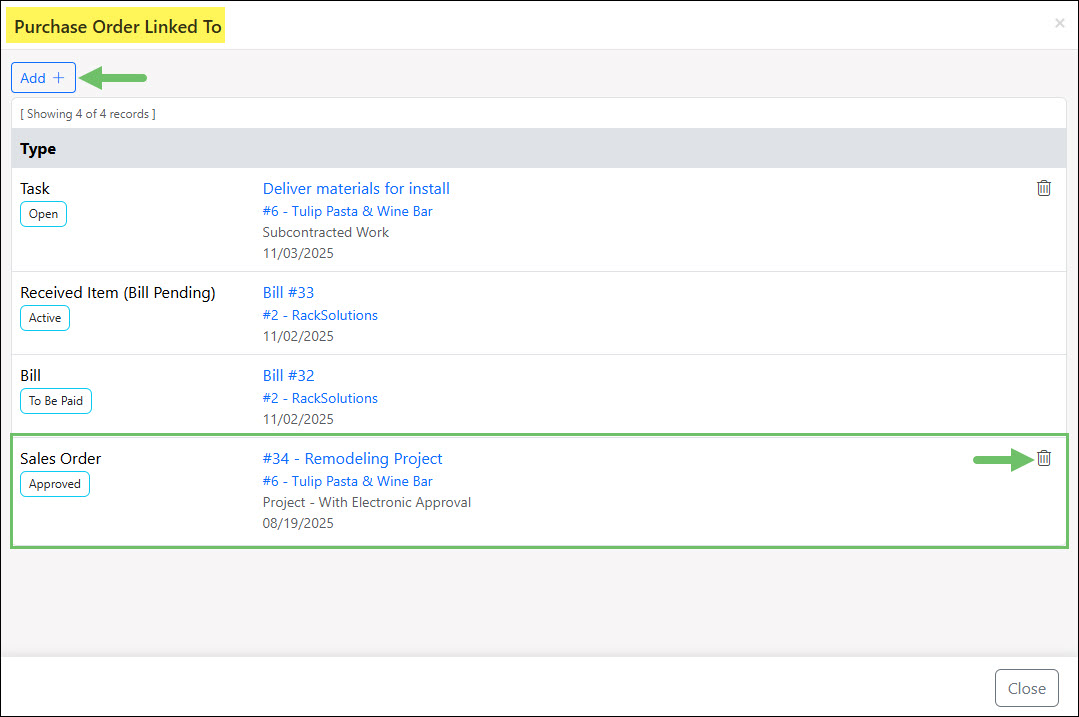
Purchase Orders in Striven can be linked to Bills, Received Items, Tasks, and Sales Orders.
The first option to create this relationship is to create a Bill or Received Items from the Actions Menu on a Purchase Order which will automatically create a relationship between the two. Entities linked to Purchase Orders using this option will not be able to be deleted and will remain related to one another.
Note: Tasks can be related to a Purchase Order by using the Linked To option on a specific Task. Sales Orders can also be related to a Purchase Order by creating the Purchase Order from a Sales Order’s Actions Menu or POs tab or using the Related To button on the Sales Order.
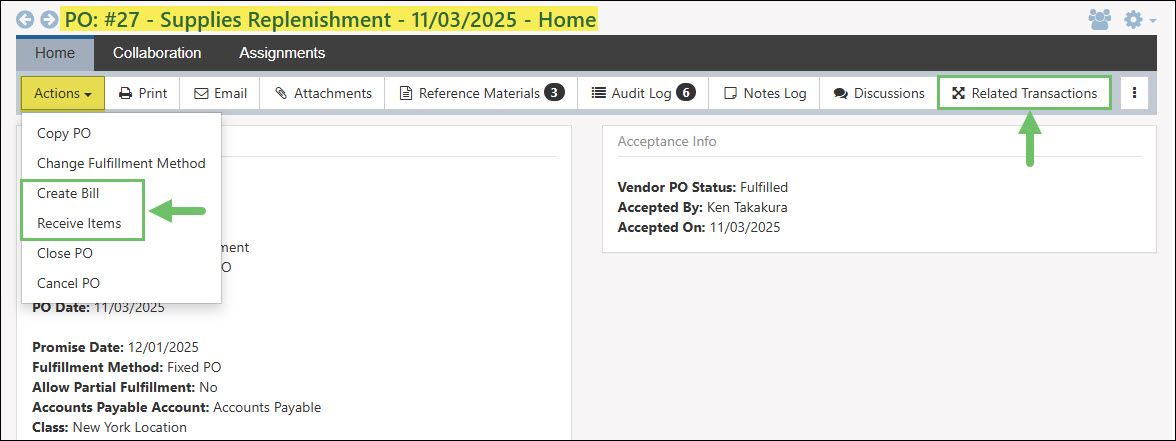
Example of Relating Entities to Purchase Orders from the Actions Menu
The second option is to manually link a Sales Order to the Purchase Order by clicking on the Related To button (Note: this button will be labeled Related Transactions for contract managed POs) at the top of the Purchase Order and selecting the Add button to choose Sales Orders in the drop-down menu. Entities linked to the Purchase Order using this method will allow the user to remove the relationship by using the Delete icon.
Example of a Manually Related Entity to a Purchase Order
Below is a screenshot illustrating how the Purchase Order Linked To window appears and a description of what can be accomplished there.
- Add: Allows you to manually add an entity to be linked to the Purchase Order. Entities that can be manually linked to a Purchase Order include Sales Orders.
- Type: Lists the entity that is related to the Purchase Order with the current status underneath. Entities that can be linked to a Purchase Order include Bills, Received Items, Tasks, and Sales Orders.
- Linked Entity: Lists the name and number if applicable for the linked entity. Underneath the linked entity will include additional information regarding the entity. Clicking on the hyperlink listed here will open the related entity to view more information.
- Delete: Allows you to remove a relationship between the entity and the Purchase Order. The Delete icon will only be listed for entities that were manually related to the Purchase Order through the Add button.
Example of the Information and Actions Available in the Purchase Order Linked To Window
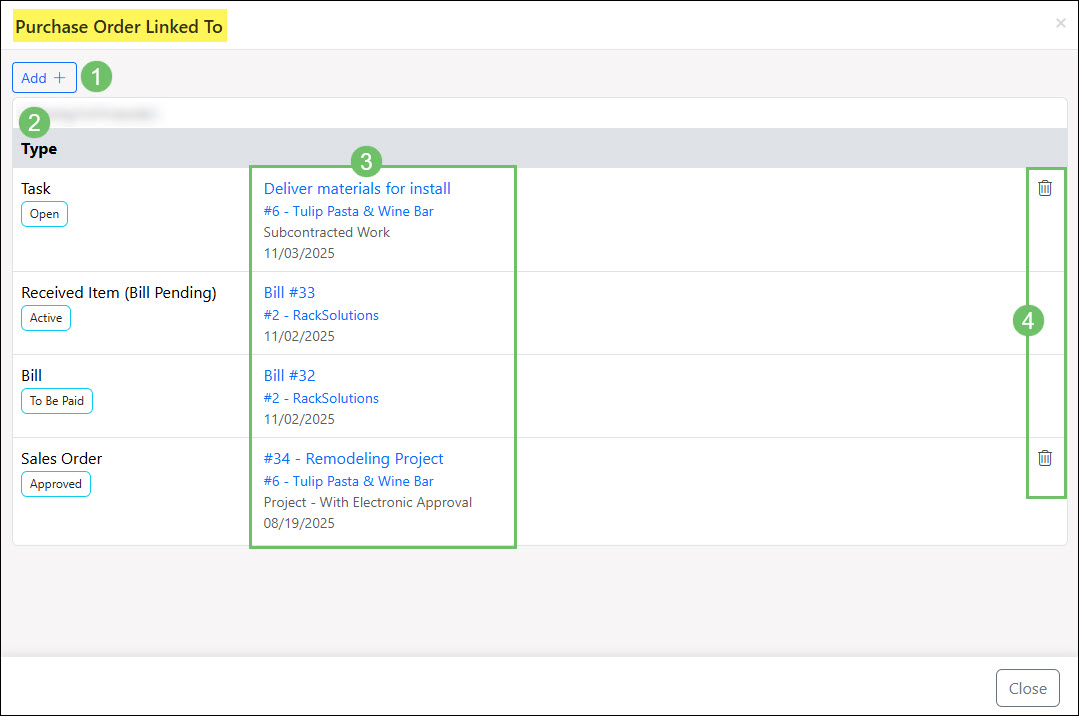
Below is a screenshot illustrating how the Add option in the Purchase Order Linked To window appears and a description of what can be accomplished there.
- Relate To: A drop-down menu which lists the entities that can be related to the Purchase Order which includes Sales Orders.
- Entity: A search field that will search for the entity being related to the Purchase Order based on the name or number.
- Entity URL: An additional option to add a related entity is to add in the direct URL without having to use the search option.
- Show Inactive: Will adjust the results to include inactive results to be selectable. By default, only entities in an Active status will be listed.
- Results: Lists the search results based on either the Entity search or the Entity URL search options from above. Results listed can be multi-selected to include as linked to the Purchase Order before using the Save button.
Example of the Actions and Information Available in the Add Option for the Purchase Order Linked To Window
-
Purchase Order Hub (Collaboration)
The Purchase Order Hub may be accessed by selecting the Collaboration tab on a created Purchase Order. The Purchase Order Hub allows you to store documents, links, and other materials related to the Purchase Order. These files can be organized within Content Groups for further organization and quick access. For more information on the functionality of Hub, please visit the Hub Support Guide.

Example of the Purchase Order Hub
-
Purchase Order Assignments
The Assignments tab located on a Purchase Order lists any Assignments that have been given to the Purchase Order along with the Assignment Category. This allows you to designate specific work that each Employee will be in charge of when it comes to the Purchase Order. To learn more about how Assignments can be set up and used in Striven, review our Assignments Support Guide.
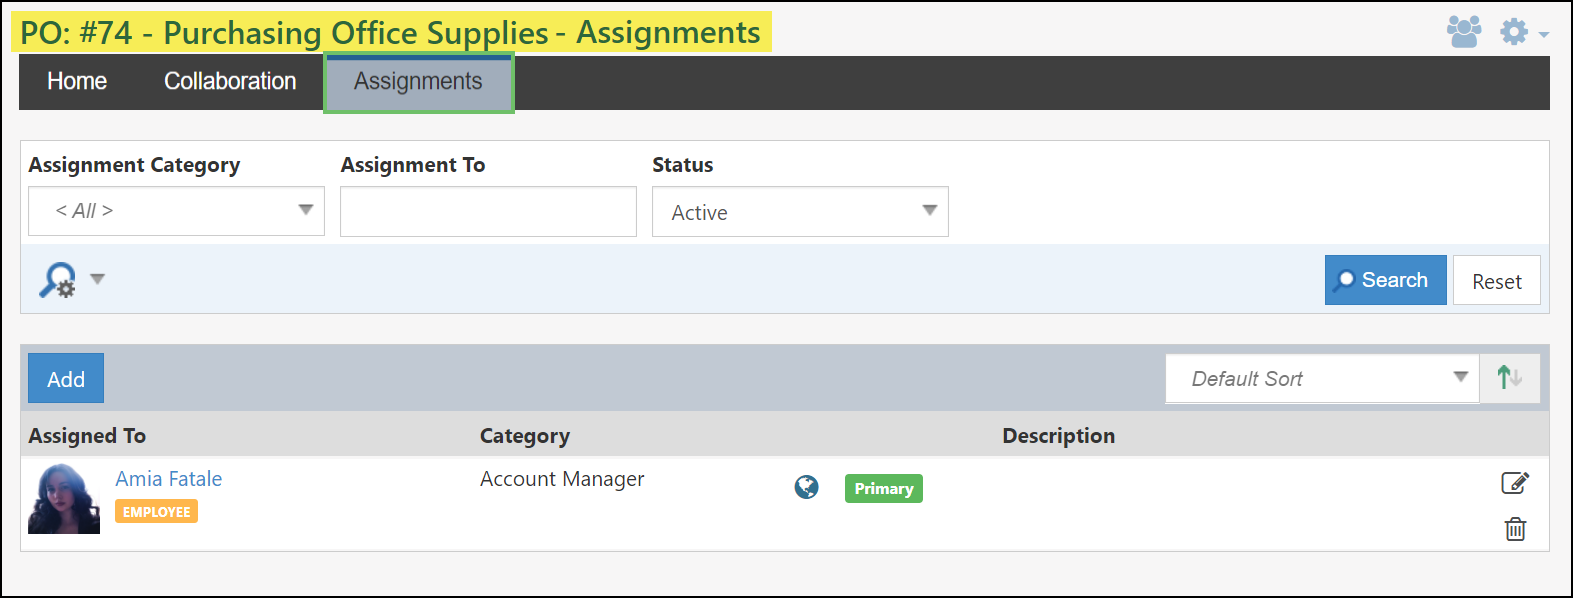
Example of the Purchase Order Assignments
-
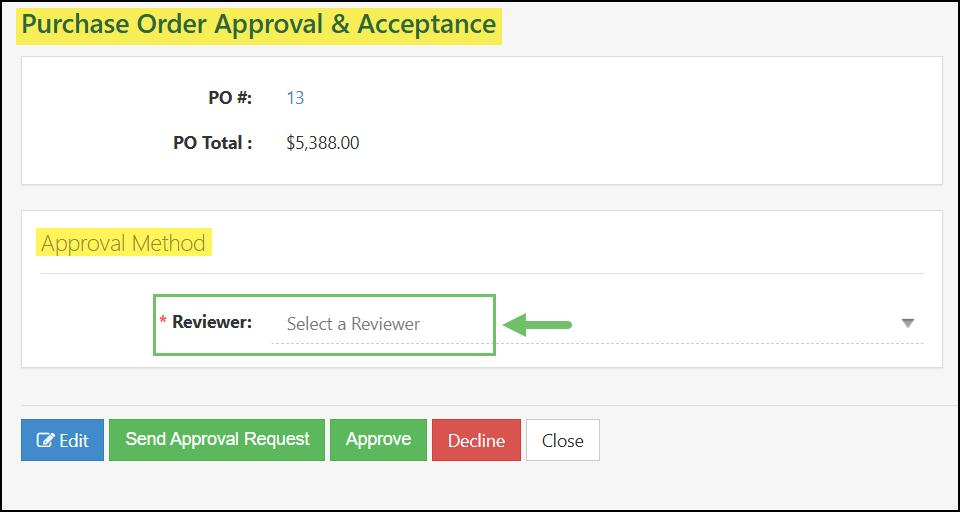
Purchase Order Approval & Acceptance
If your Purchase Order Type has the option configured for Turn on contract management, you will be prompted to send the Purchase Order for Approval and Acceptance when creating a new PO. Below details the information and actions available when sending a Purchase Order to the Contact for review.
- PO Info: Displays the Purchase Order Number and the Purchase Order Total. The PO # field is hyperlinked to easily access details related to the PO that is being sent for approval.
- Acceptance Method: Lists options to send this Purchase Order to the Vendor Contact for review. The sending options of Electronic, Written, and Verbal are available based on the PO Type settings. The Vendor Contact listed can be changed as needed, but will prefill in the Contact that was selected when initially adding the PO.
- Actions: Available Actions include Edit to make any changes before sending the PO for approval, Send Acceptance Request to send the PO for review, and Close which will navigate back to the Purchase Orders List without sending the approval notification.

Example of the Purchase Order Approval & Acceptance Page
-
Purchase Order Statuses
A Purchase Order Status refers to the current stage of a Purchase Order (PO) within the procurement process. As the PO progresses through various stages, the status is updated to reflect completed actions and ongoing activities. Monitoring the PO Status enables effective oversight and management of the procurement process.
The status of a Purchase Order in Striven can be classified as either a PO Status or a Vendor PO Status, depending on the settings within the Purchase Order Type. User and Vendor actions, as well as system configurations, can impact these statuses. Details on how each status may be affected are outlined below.
PO Status
The PO Status for a Purchase Order can be viewed from the Status column on the Purchase Orders List. A PO Status filter is available in the search options of the page to narrow the Purchase Order List down based on the current state of work.

Example of the Purchase Order List with the PO Status Filter Expanded
Vendor PO Status
These statuses are also available within the Vendor Portal for the Vendor Contact to view and filter by to narrow down the Purchase Order List. Additionally, the Vendor PO Status will be displayed under each Purchase Order listed for Contract Managed POs.
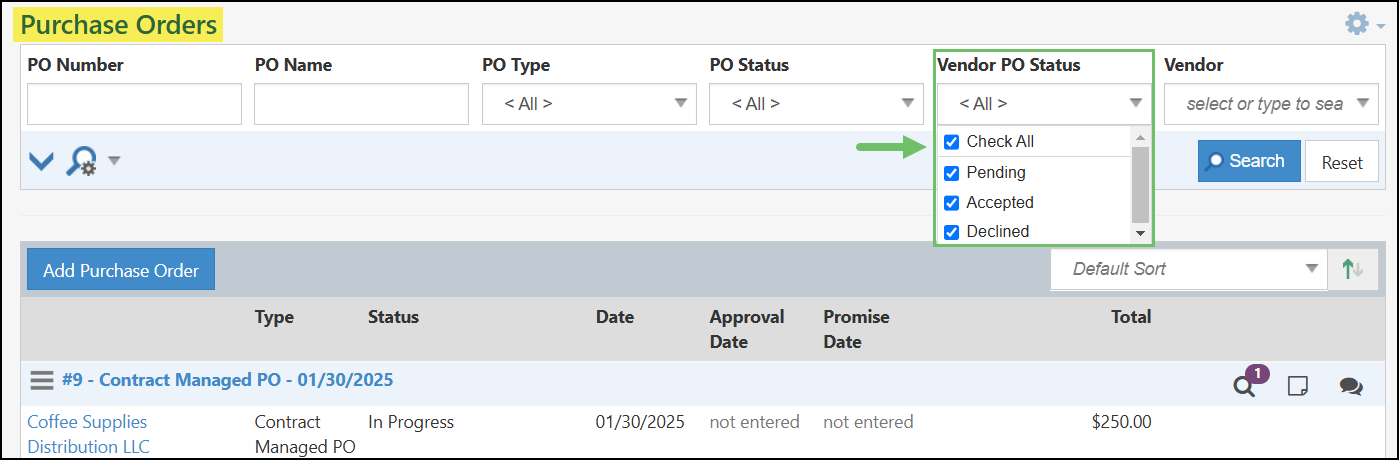
Example of the Purchase Order List with the Vendor PO Status Filter Expanded
The PO Status and the Vendor PO Status will also be viewable on a Purchase Order with the Contract Managed option enabled that are in an In Progress, Fulfilled, Closed, or Canceled status.

Example of a Contract Managed Purchase Order
These statuses are also available within the Vendor Portal for the Vendor Contact to view and filter by to narrow down the Purchase Order List. Additionally, the Vendor PO Status will be displayed under each Purchase Order listed for Contract Managed POs.

Example of the Purchase Order List in the Vendor Portal
-
Statuses
The Purchase Order Status and Vendor PO Status will be updated as a result of the actions or procedures listed below.
Pending Approval
The PO Status will be Pending Approval if the Purchase Order was created with the Requires Internal Approval setting enabled within the PO Type, but has not yet been approved by the Internal Reviewer.
Example of the Approval Method Page for a PO with Internal Review Enabled
Approved
If the PO Type has Requires Internal Approval enabled, and the Internal Reviewer approves the Purchase Order, the PO Status will be marked as Approved. The Purchase Order will stay Approved until fulfillment begins.
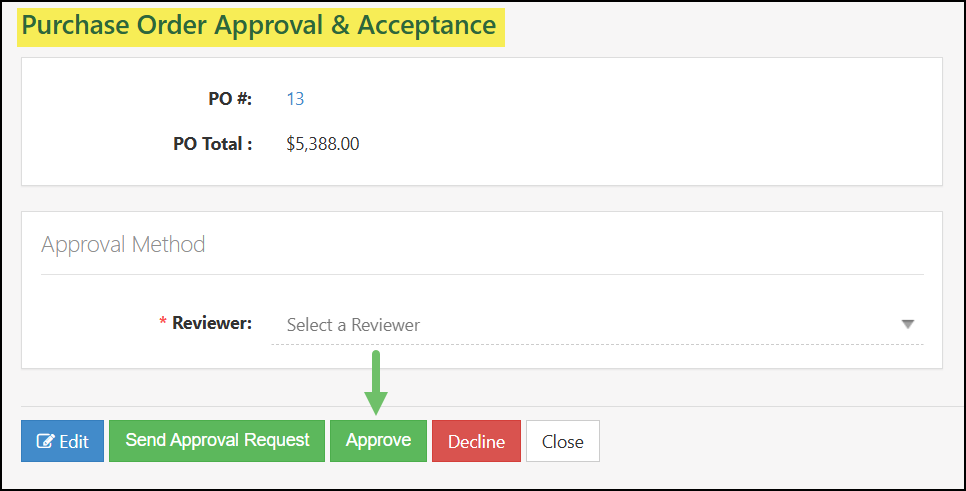
Example of the Approval Method Page for a PO with the Accept Button
Pending
The Purchase Order’s Vendor PO Status status will remain as Pending until the Vendor either Accepts or Declines the order through the Vendor Portal. This applies only if the Purchase Order has the Contract Managed option enabled within the PO Type and has been sent to the Vendor Contact for acceptance.

Example of Pending Purchase Orders Listed in the Vendor Portal
Accepted
A Purchase Order will have the Accepted Vendor PO Status once a Vendor has accepted the Contract Managed Purchase Order through the Vendor Portal.

Example of the Purchase Orders List Filtered for Accepted POs
In Progress
Once created, a Purchase Order’s status will be In Progress if the PO Type does not have Requires Internal Approval or Contract Managed enabled. The PO status will remain In Progress until all items are received or added to a Bill.
Purchase Orders with the Contract Managed option enabled within the PO Type will have their PO Status change to In Progress once the Vendor accepts the Purchase Order via the Vendor Portal.

Example of the Purchase Orders List Filtered for POs with In Progress Status
Partially Fulfilled
The Vendor PO Status for a Purchase Order will be set to Partially Fulfilled if the PO Type has Contract Managed enabled and the Purchase Order has only been partially billed or not all items for the Purchase Order have been received.
Vendor Contacts are able to filter for Partially Fulfilled Purchase Orders by utilizing the filter in the Vendor Portal.

Example of Partially Fulfilled Purchase Orders Listed in the Vendor Portal
Fulfilled
Once all Items from a Purchase Order have been received or added to a Bill in Striven the PO will acquire the Fulfilled status.
In the Vendor Portal, Vendors can mark a Purchase Order as Fulfilled. However, the PO Status in Striven won’t change until all Items are received or added to a Bill. Any Bill created by the Vendor in the Portal will need to be reviewed on the Approve Bills page in Striven.
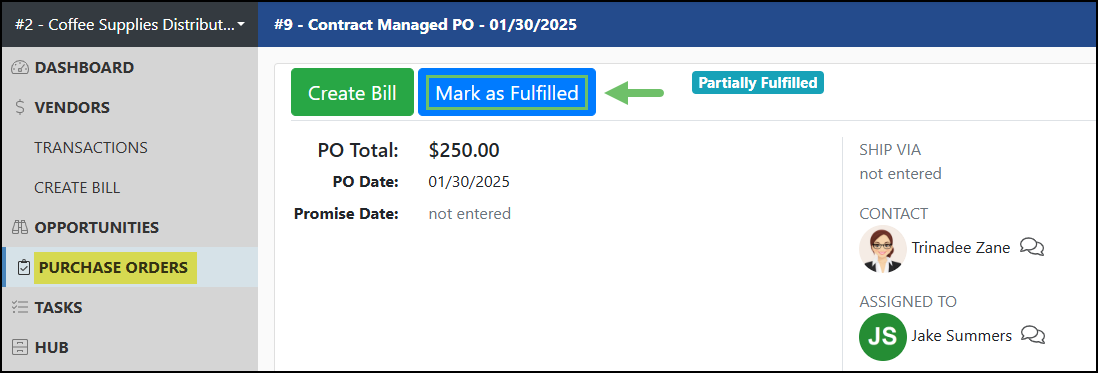
Example of the Mark as Fulfilled Button on a Purchase Order in the Vendor Portal
Declined
With the Requires Internal Approval option enabled within the PO Type, the Declined PO Status will be set on a PO if the Internal Reviewer has used the Decline button on a Purchase Order.
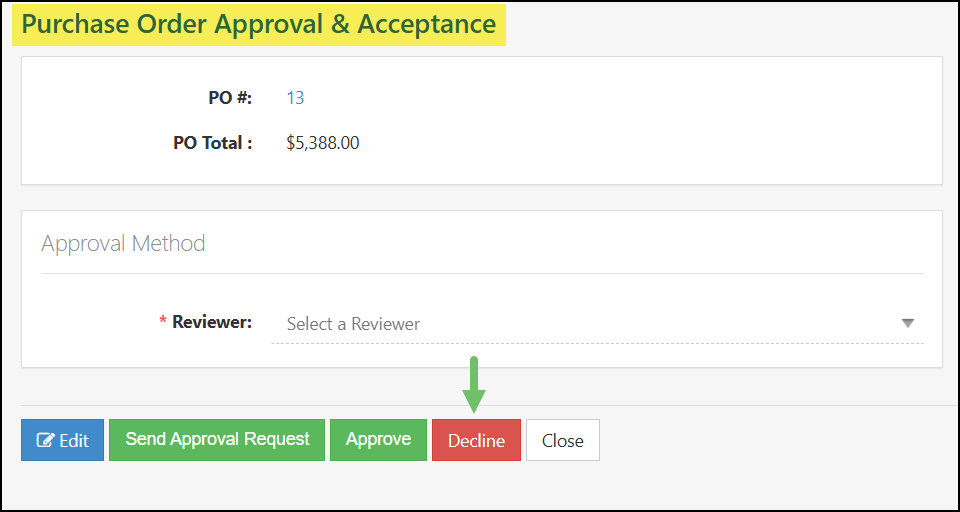
Example of the Approval Method Page with the Decline Button
If the Purchase Order has the Contract Managed option enabled within the PO Type, the Purchase Order will obtain the Declined status when the Vendor chooses to decline the PO through the Vendor Portal.

Example of the Decline Button in the Vendor Portal for a Purchase Order
Closed
If a Purchase Order is In Progress or Fulfilled the status can be updated to Closed in order to mark the completion of the work related to the Purchase Order.
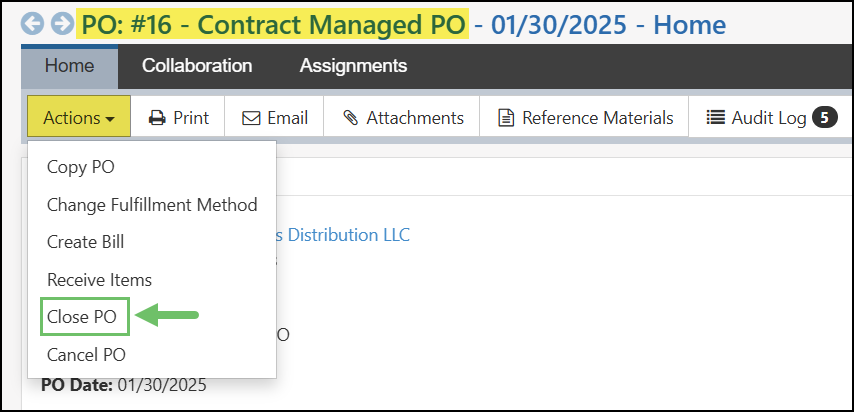
Example of Actions Menu with Option to Close PO from a Purchase Orders
Canceled
Regardless of the status of the Purchase Order, the PO Status can be set to Cancel in order to indicate unnecessary or incorrect Purchase Orders.
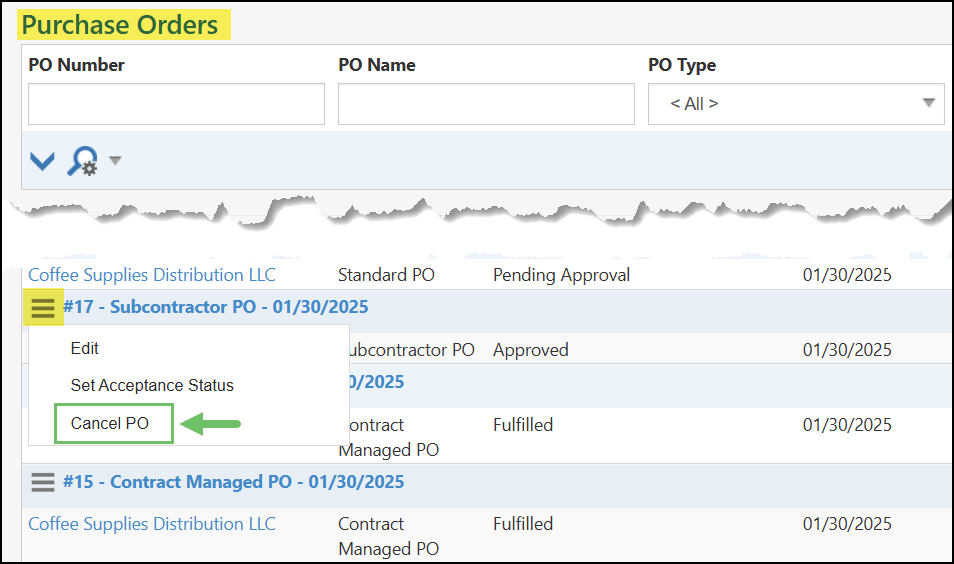
Example of Actions Menu with Option to Cancel PO from Purchase Orders List
-
Purchase Order Templates
If you frequently create Purchase Orders for the same Items at one time, Purchase Order Templates can help streamline the creation of these Orders. Purchase Order Templates allow you to create a template containing the items, item prices, where the Order should be shipped to, and the Vendor the items will be ordered from.
You can view and create Purchase Order Templates by navigating Vendors → Purchasing → Order Templates.
Below is an image showing how the Purchase Order Templates page appears and what options are available from this page.
- Search Options: If you would like to narrow the results on this page, you can do so by using the available Search fields. You can search for a Purchase Order Template by Name, PO Type, and Status.
- Add: Selecting the Add button allows you to create a new Purchase Order Template.
- Template Information: Information such as the Template Name, and Type are listed on the Purchase Order Templates page. Selecting the Template Name will allow you view the Template and edit the Template details.
- Create Purchase Order: Allows you to quickly open and create a new Purchase Order using the information from the Template.
- Deactivate: Selecting the trashcan icon allows you to deactivate the Template.

Example of the Purchase Order Templates Page
Creating Purchase Order Templates
To create a new Purchase Order Template, select the Add button from the Purchase Order Templates page. When creating a Purchase Order Template, you have the following options:
- PO Type: This drop-down menu allows you to select the PO Type that will be utilized when a Purchase Order is created using this Template. You may add a new PO Type by selecting the Plus icon that appears when hovering over this field.
- Vendor Selection: Allows you to select the Vendor whom the Purchase Order will be created for when using this Template. You may use the Search icon to locate a specific Vendor. The “Selected Currency” field will only display if multi-currency transactions have been enabled for your Company.
- Payment Information: You may select the Payment Terms for Purchase Orders created with this Template by using the drop-down menu. Depending on your Company settings, you may have the option to select the AP Account for billing.
- Shipping Information: Allows you to select whether Orders created with this Template will be dropshipped, and you may select the Ship To address with a drop-down menu. If a specific shipping method is desired, the Ship Via field can be used to select the carrier you prefer.
- Template Name: Enables you to enter a name for the Purchase Order Template.
- Vendor Notes: Allows you to enter any notes which may be necessary for the Vendor.
- Save Pricing Information: Selecting this checkbox will retain the Item Prices entered on this Template when creating a Purchase Order. If this option is not selected, pricing information on the created Purchase Order will reflect the item’s current price.
- Select Items: Allows you to add items to the Purchase Order Template. These items, their descriptions, and quanitities will be added to the PO when created from this Template.

Example of Adding a Purchase Order Template
-
Purchase Order Import
Striven has several imports available to allow you to import orders or transactions en masse. An importing option is available for Purchase Orders. Though the mapping for each import is different, the import setup functionality is much the same across the board for Striven importing. For more information about all imports, view our Import Management Guide.
The Purchase Order Import can be accessed by clicking the Import button found on the Purchase Orders List. The Import page appears with two sections which are described further below with a screenshot illustrating how the Purchase Orders Import page appears.
- Quick Start: This section contains 2 options which are detailed below:
- Generate Sample File: Provides a spreadsheet with pre-filled column headers (listed on the mapping) to assist with entering data.
- Import History: Directs you to the Import Progress page to select a file that has been previously imported into your Striven system.
- Ready to Import: Enables you to select a file to import into Striven with the following criteria:
- Accepted file types are .txt or .csv
- Maximum file size: 100 MB
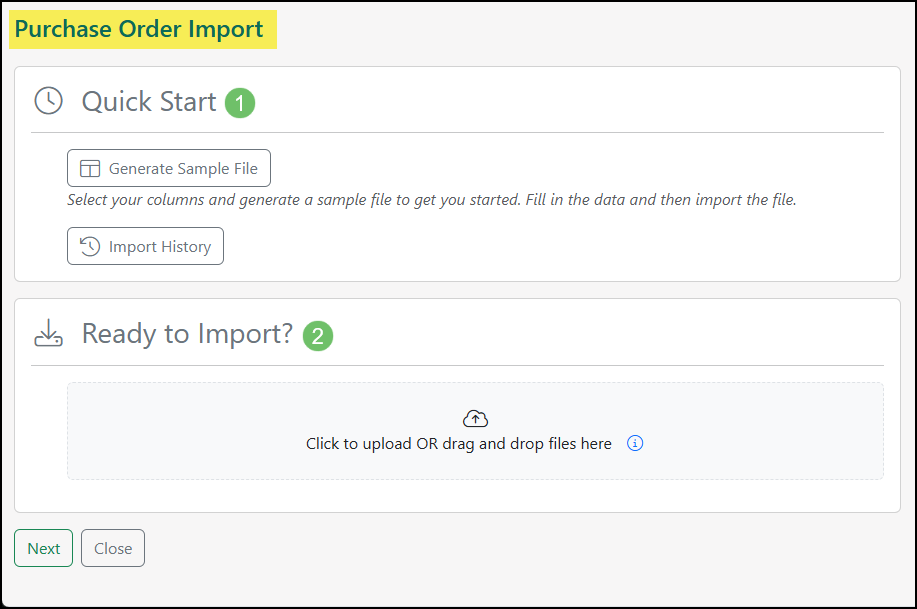
Example of the Purchase Orders Import Page
It is important to note the following regarding the Purchase Order Import feature:
- Existing Purchase Orders cannot be edited through the Import tool.
- Serial Numbers and Lot Numbers will need to be added directly into the Purchase Order after the Importing process has been completed
- Purchase Orders can only be Imported for Vendors that use the Home Currency set in your system
- Quick Start: This section contains 2 options which are detailed below:
-
Select Multiple Vendors
When choosing to select multiple Vendors on Purchase Orders, a Search for Vendors button will appear with which you can search for Vendors that have primary addresses in Striven. Vendors that have addresses will be available to choose from and will also be populated on a map to provide a visual reference on their location(s). Each Vendor you select will be sent an acceptance request for this Purchase Order. The first Vendor to accept the request will be assigned to this Purchase Order. Below is a screenshot featuring how the Vendors Search appears and details on what can be accomplished there.
- Select Vendors: Enables you to select which Vendors will receive a notification alerting them that a PO is available for acceptance.
- Map of Vendors: Illustrates where Vendors are located based on each Vendor’s primary address in Striven to help you select which Vendors to include.
- Select/Close: Saves your selections and brings you back to the Purchase Order with Vendors listed under the Search for Vendors button. Clicking Close will not save any Vendor selections.

Example of Selecting Multiple Vendors on Purchase Orders
-
Purchase Orders List
The Purchase Orders List is a list of POs within your Striven system. This list can be filtered to view Purchase Orders of a particular type, status, Vendor, and more. The Purchase Order names and Vendors are able to be selected from the list to view more information. The image below displays a Purchase Order List and the available options found there.
To access the Purchase Orders List, the path you can follow is:
Vendors → Purchasing → Orders
- Search Filters: The search filters available to narrow down the Purchase Order List results to show only those POs that meet the criteria.
- Add Purchase Order: Redirects you to the Add Purchase Order page to create a new Purchase Order.
- Import: Redirects you to the Purchase Order Import page wherein you can Generate a Sample File, Get Existing Data, view your Import History, or upload a file to add Purchase Orders en masse.
- Sort: Provides the option to sort the Purchase Orders List by PO#, PO Date, Promise Date, or Total.
- Actions (Hamburger) Menu: A drop-down menu next to each PO displaying options to Edit, Set Approval Status, or Cancel the PO.
- View Log: Lists anyone that has viewed the Purchase Order along with a date and timestamp of when it was viewed.
- Notes Log: Displays notes saved to the Purchase Order with the option to create a new note.
- Discussions: Displays Discussion threads related to the Purchase Order.
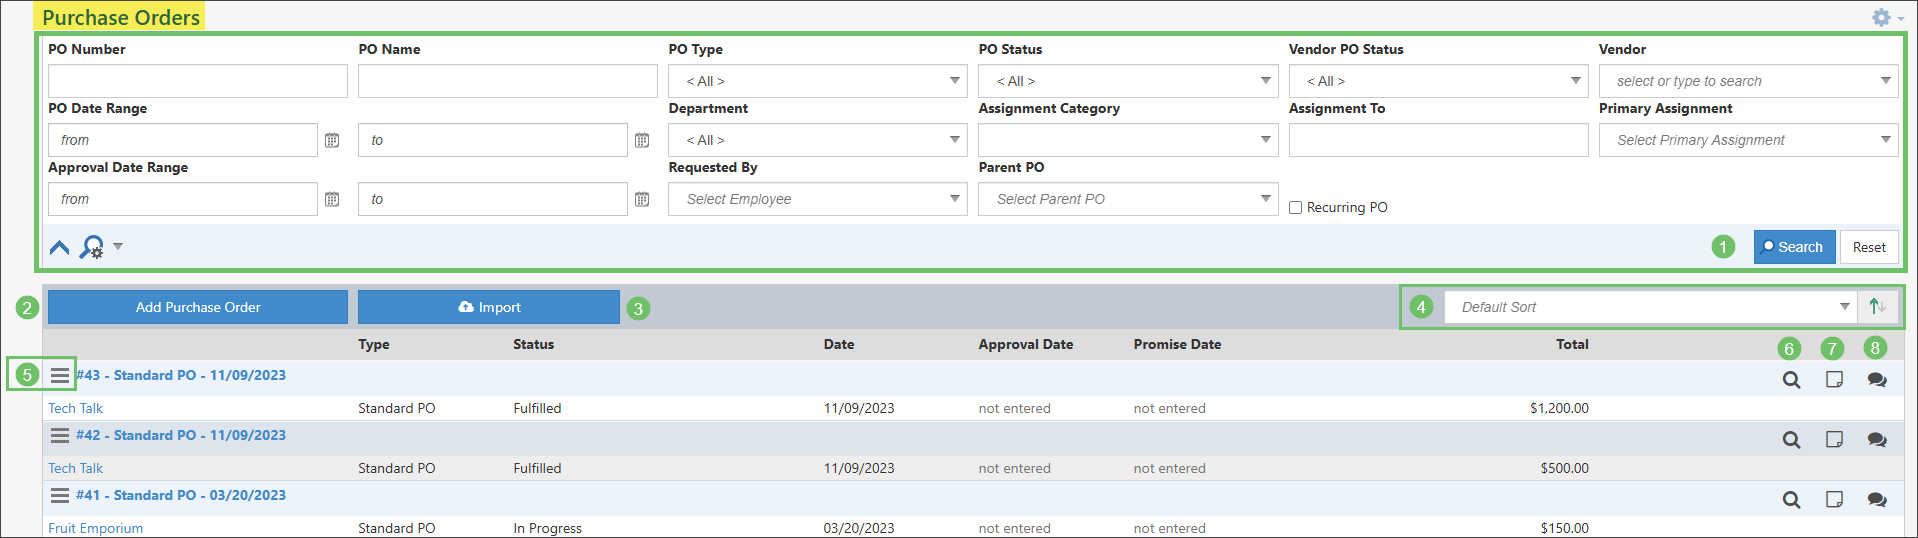
Example of Purchase Orders List
- Note: Any Purchase Orders with a green semi-circle to the right is an indication that the Purchase Order is recurring (not displayed in the example image).
-
Recurring Purchase Orders
Recurring Purchase Orders in Striven will automatically create Purchase Orders based on a Parent Purchase Order and a set Frequency and number of Terms. Based on settings in the PO Type, a Purchase Order will have the option to set it as Recurring when adding a new PO to Striven. In order to have this option available, the below settings will need to first be configured in order to enable Recurring Purchase Orders in Striven.

Example of the Add Purchase Order Page with Recurring Toggled On
Settings & Configurations
To enable the option for Recurring on a Purchase Order, the PO Type will need to have the Allow Recurring option checked on. To update a PO Type, navigate to Company → Settings → Accounting → Purchasing → POs → PO Types.

Example of PO Type with Recurring Enabled
Another setting that should be reviewed before you begin using Recurring Purchase Orders is the Recurring Frequencies. The frequency of an order will determine how often the recurrence takes place with the Purchase Order. To manage Order Frequencies, navigate to Company → Settings → Accounting → Sales → Sales Orders → Sales Order Frequency.
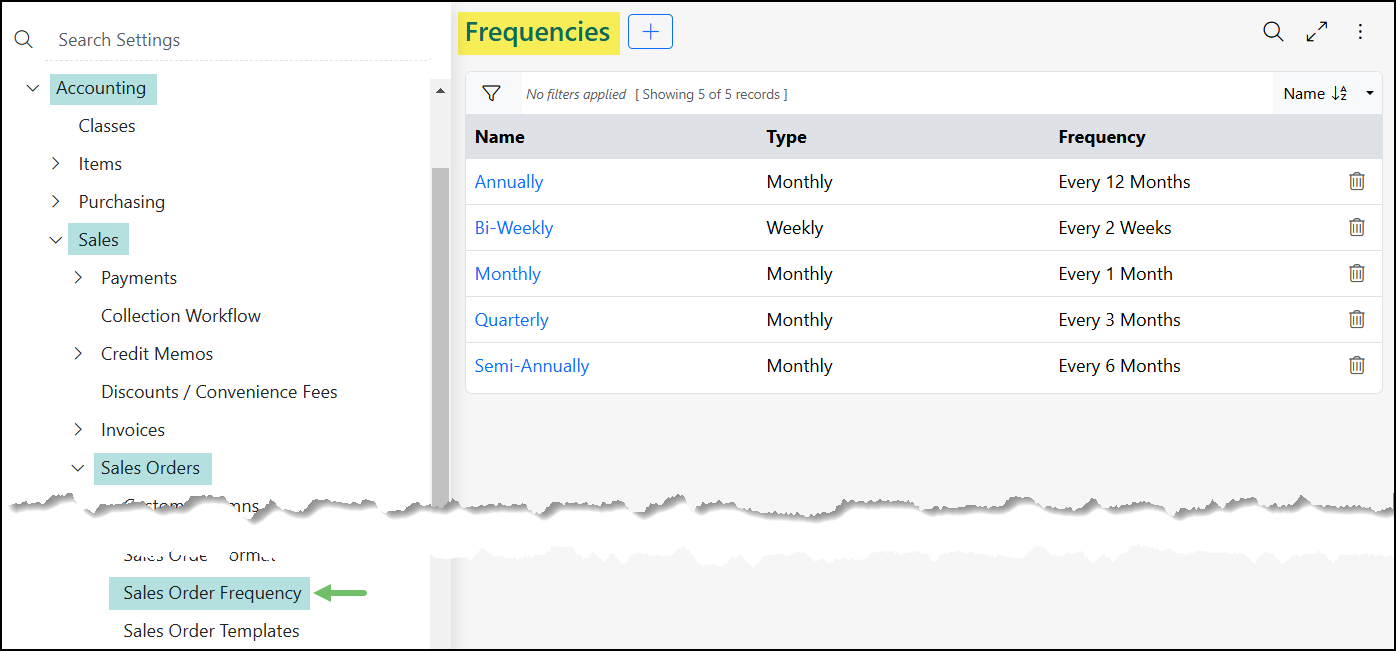
Example of Purchase Order Frequencies
Creating a Recurring Purchase Order
Once the above settings have been configured, Purchase Orders can be set to recur in Striven. Below will list out the options that are related to the recurrence of a PO when adding a new Purchase Order in Striven.
- Recurring: Once the Recurring toggle has been selected, additional options will appear to determine the frequency of how often the Purchase Order will recur and how many terms will the Purchase Order occur for.
- Frequency: Determines how often the Purchase Order will recur.
- Add Lead Time for PO Creation?: Allows a number of days to be set so a Purchase Order will be created in advance based on the frequency and lead time.
- Term: Determines how many times the Purchase Order should recur. The Term field can be set once the No Expiration field has been unchecked.
- No Expiration: Indicates that the Purchase Order will recur indefinitely rather than a set number of times. Checking the No Expiration option will remove the option to enter a number in the Term field.

Example of Recurring Options When Adding a Purchase Order
-
Recap
With this guide, we’ve discovered how to create and manage Purchase Order Types, Purchase Orders, and more to enable you to purchase goods or services from your Vendors. We’ve explored how to configure PO printable formats, as well. We’ve also covered the available options on the Purchase Orders List to best manage your Company’s purchasing needs with Striven.

Have a Question?
Ask the Striven Community
User-sourced how-to’s, feedback, and more!
FAQs
-
I’ve ordered raw materials, but how do I assemble a finished good from them?
This can be accomplished by creating Manufactured Items and later creating a Build to complete the assembly of Finished Items to be sold to Customers. To learn more please reference our Item Management Guide.