
Scheduling & Communication
Striven Calendar
Support Guide
-
Overview
This Calendar Guide will explore the many ways the Striven Calendar is a useful tool for viewing and maintaining you or your Employees’ schedules. The Striven Calendar allows you to create different Calendars to view schedules of various individuals or groups of Employees, as well as track the progress and scheduling of Opportunities, Tasks, Orders, and more. Striven Calendar can help you maintain your day-to-day workflow by keeping track of your time and availability. The Striven Calendar has a variety of configurations you can design to suit your needs and enable you to find and schedule important meetings with Employees or Contacts.
Read this guide if you are trying to:
✔ Create Calendars in Striven.
✔ Configure Calendars for various uses.
✔ Manage your Calendars.
Calendar Setup
-
Calendar Terminology
The Striven Calendar has great features to help maintain your schedule and work flow. As an introduction to this section, here’s a list of terms related to the Calendar that will be useful to reference while learning how to set up your Calendars and how they are designed to operate.
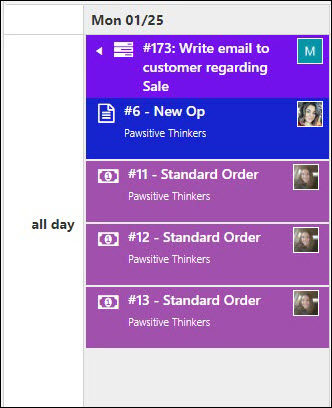
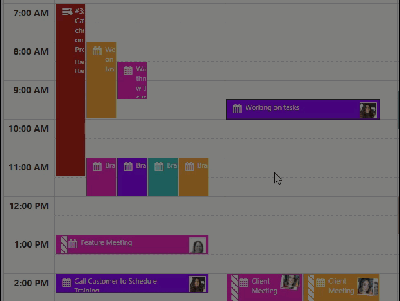
Event Types: Aspects of the Calendar, such as Appointments, Bills, Company Asset Reservations, Customer Asset Maintenance, Employees, Holidays, Invoices, Milestones, Opportunities, Orders, Projects, Tasks, and Time Off.
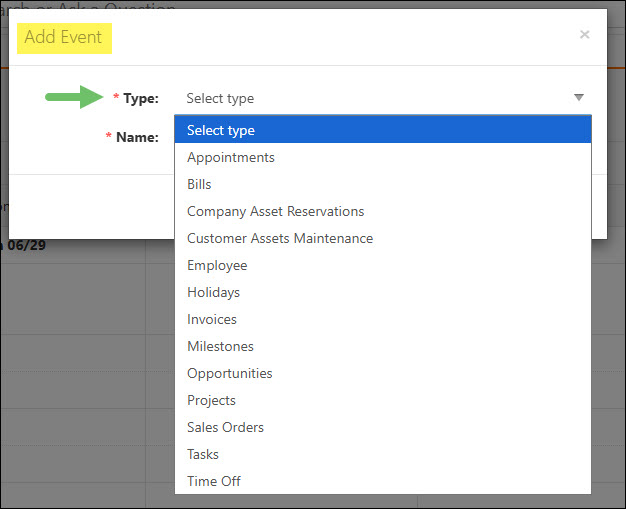
Example of the Calendar Event Types

Events: Events created of a specific Event Type and configuration that show up on the Calendar. These are the actual elements of the Calendar, such as a particular Employee’s Appointments. There are configuration options to specify the information desired for display for a particular Event. Events can be color coded, as well.
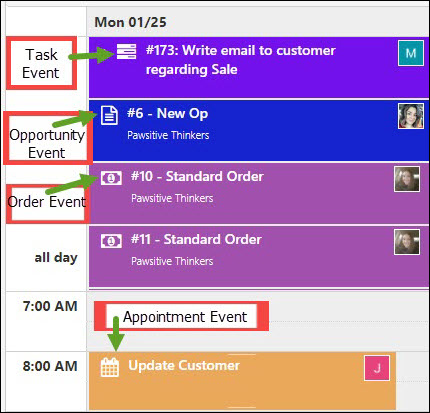
Example of the Various Calendar Events
Resources: Entities to which the Events are related. For example, Appointments or Tasks configured for a particular Employee, Team, or Department.
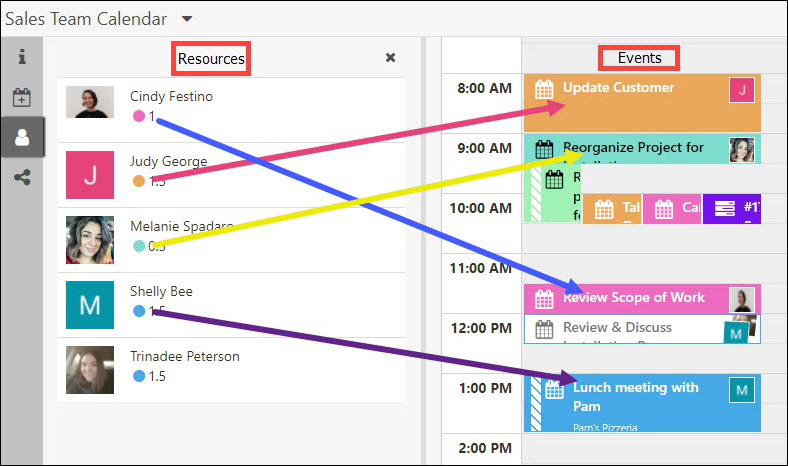
Example of Resources and Related Events
Group by Resource: When selected, this option will break up the Calendar by Resources to view each Resource’s Calendar individually on one Calendar view.
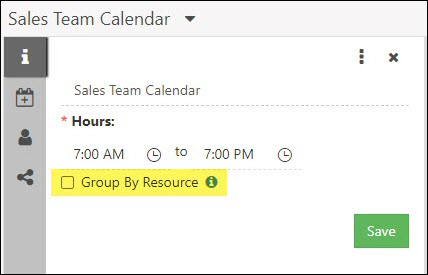
Example of the Group By Resource Option
Views: There are multiple views available for the Calendar, such as Day View, Week View (7 days, Monday through Sunday), Work Week View (5 days, Monday through Friday), Month View, and Agenda View.
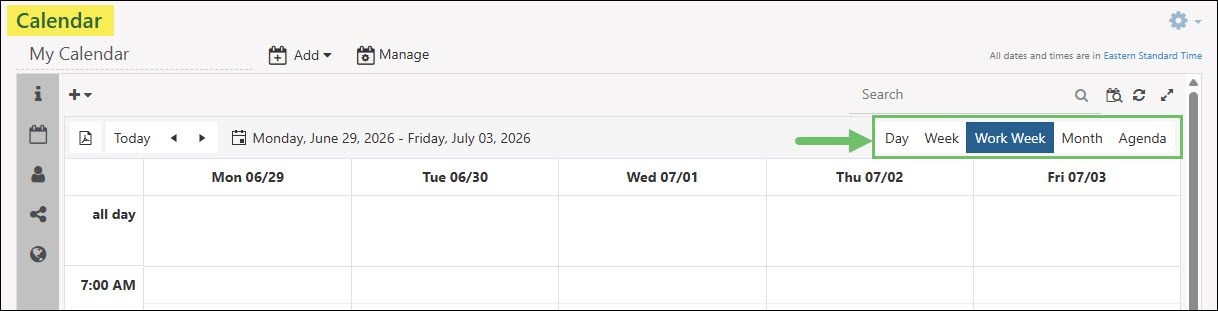
Example of the Different Calendar View Options
Filtering: Provides the ability to filter the Calendar by Resources and Events within a Calendar to narrow the view to specific elements. An example of this would be filtering the Calendar by Appointments (the Event) scheduled for a specific Employee (the Resource).
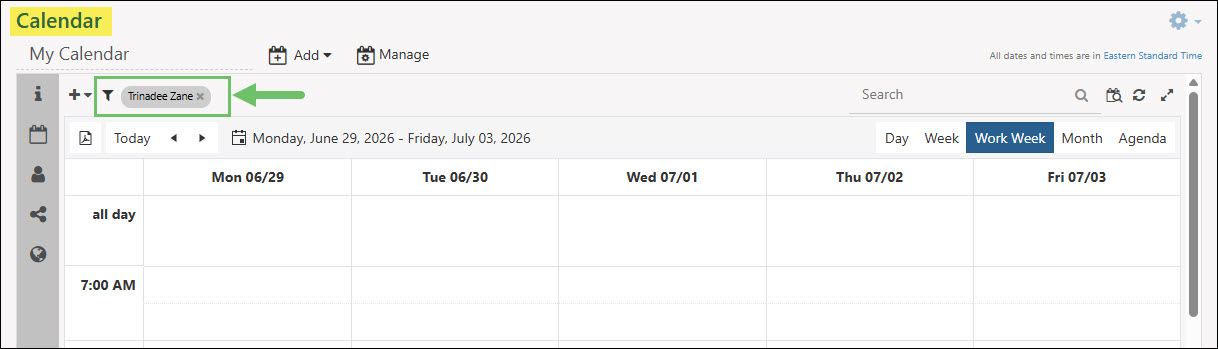
Example of an Event Filter Option
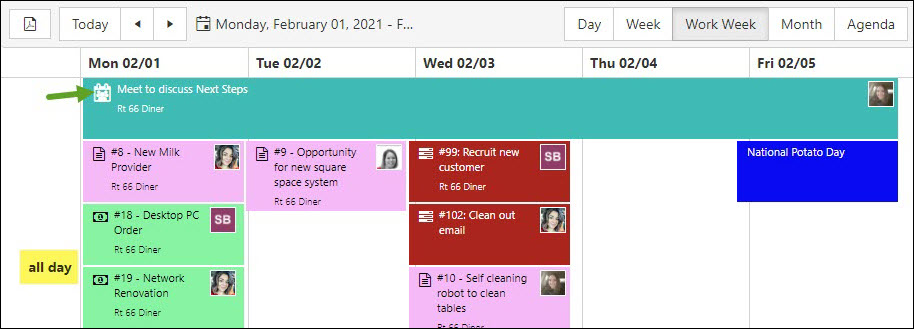
All Day Events: Events that span days or have no time components to them appear in the All Day section at the top of the Striven Calendar.
Example of All Day Calendar Events
Now that you are familiar with the terms, the next step will be to create your Calendar.
-
Creating Calendars in Striven
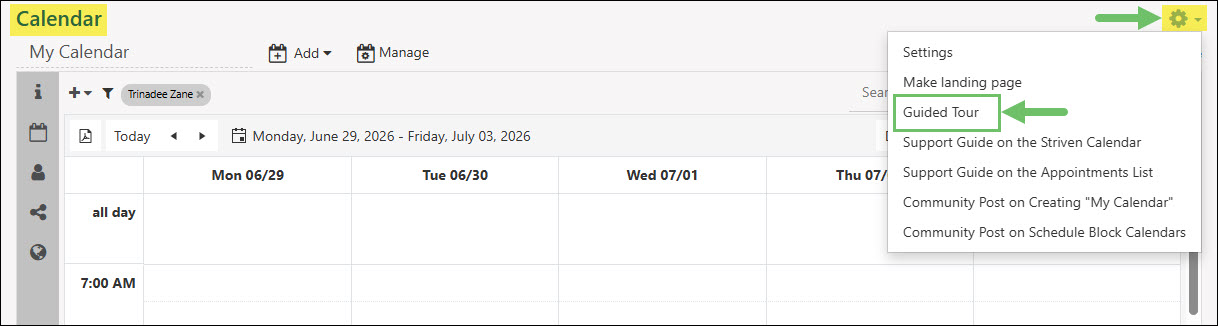
When you view the Calendar for the first time, a prompt will appear to guide you through the basic features of the Calendar. This Guided Tour can be followed by clicking next after each note, closed by clicking on the X and have it open again next time you view the page, or you have the option to Skip the tour completely so it will not show on the page when you view it anymore.
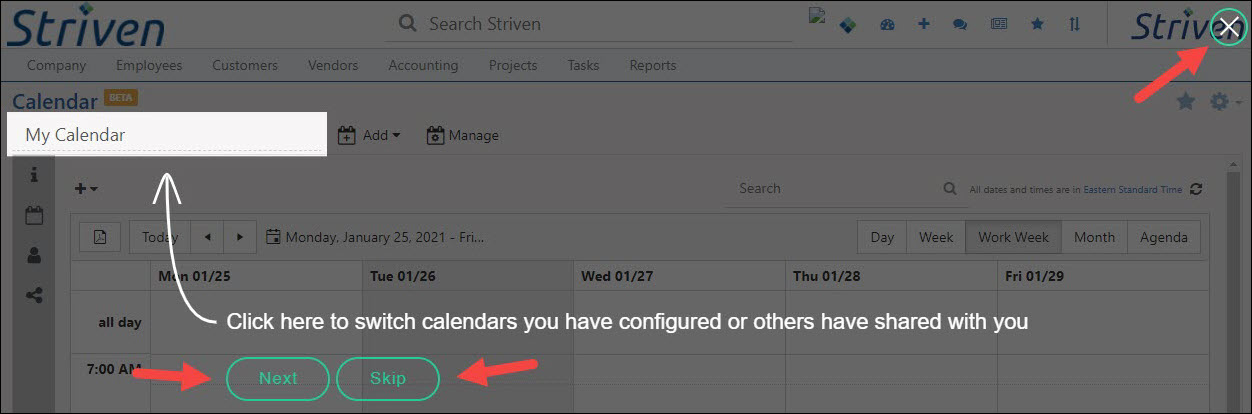
Example of the Calendar Guided Tour Option
You will also have the option to make it appear again by clicking on the Gear icon on the top right of the screen and selecting the Guided Tour.
Example of the Location of the Guided Tour Option
-
My Calendar Creation
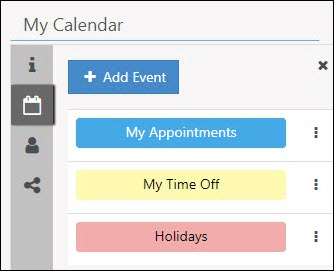
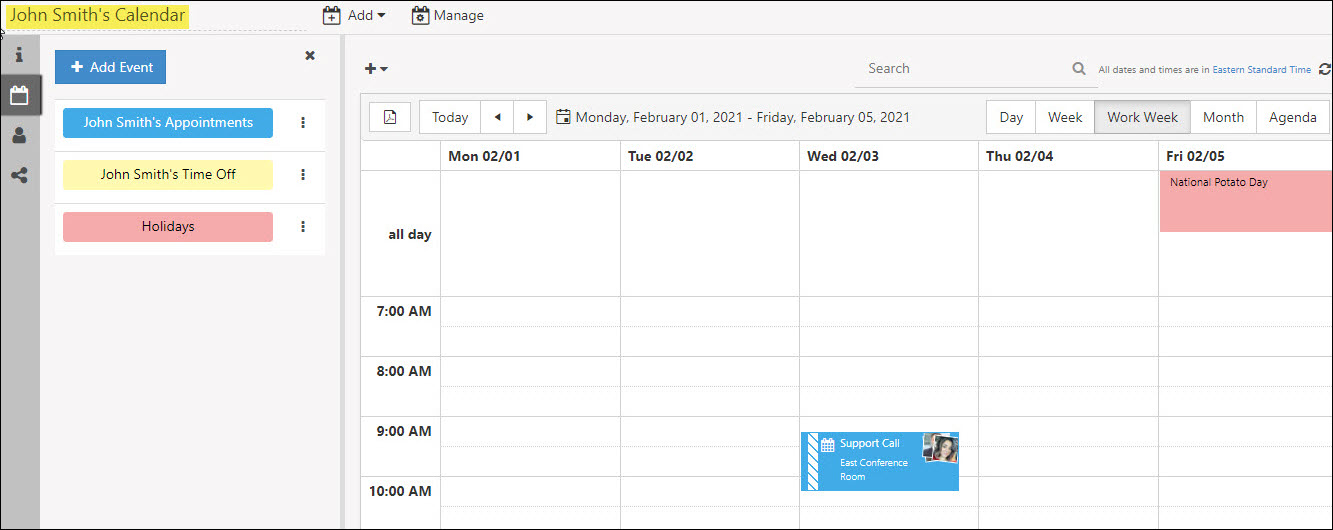
Striven Calendars provide the ability to create multiple Calendars with different Events on them, so when you come to the Calendar page for the first time, by default the system creates a Calendar for you called My Calendar. This will include different Events like Appointments, Time Off, and Holidays.
Example of the My Calendar Default Settings
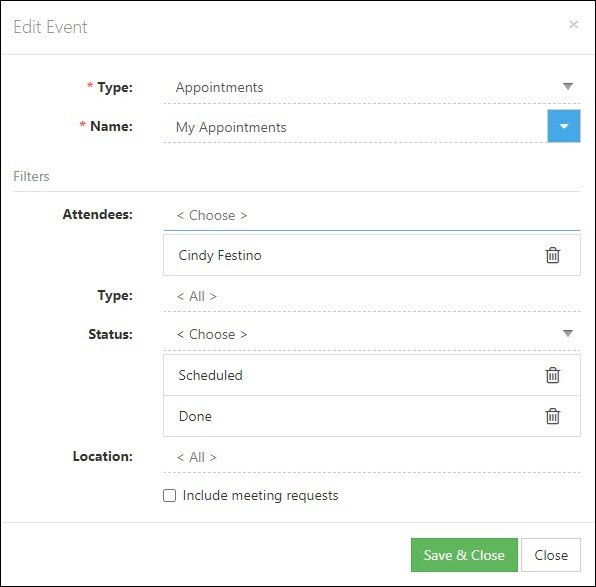
Each of these Events are pre-configured with filters with what makes sense for the Type of Event they are. For example, for Appointments it’s going to show Scheduled and Done Appointments in which you are an Attendee.
Example of My Calendar Default Appointment Settings
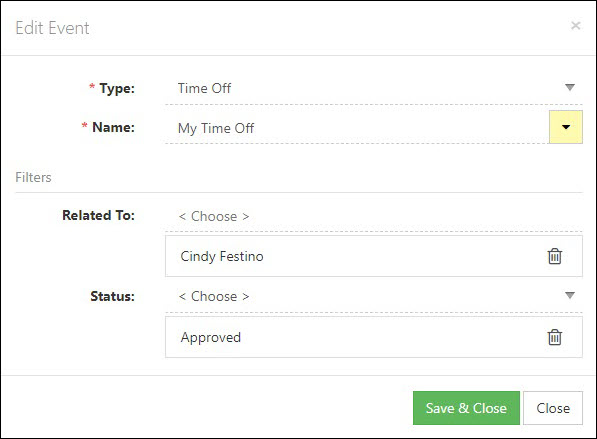
For Time Off it’s going to show all Approved Time Off for you.
Example of My Calendar Default Time Off Settings
And for Holidays it’s going to show all the Company Holidays.
Example of My Calendar Default Holidays Settings
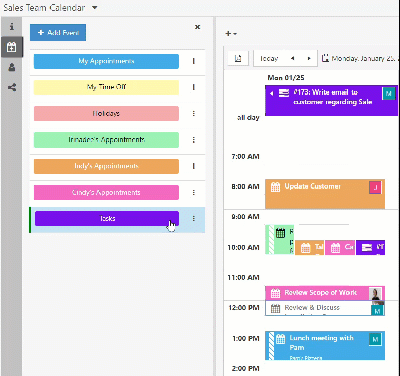
You can add more Events as you need to or modify these Events according to however you need it configured. These can even be designated by color for an at-a-glance identification of the Event. For example, this Calendar shows a Team’s scheduled Appointments, but they’re color-coded so one can identify which Team member the Appointment is for just by seeing the color selected for them.
It is important to note that each Calendar has a limit of 20 Event types to enhance the Calendar’s performance.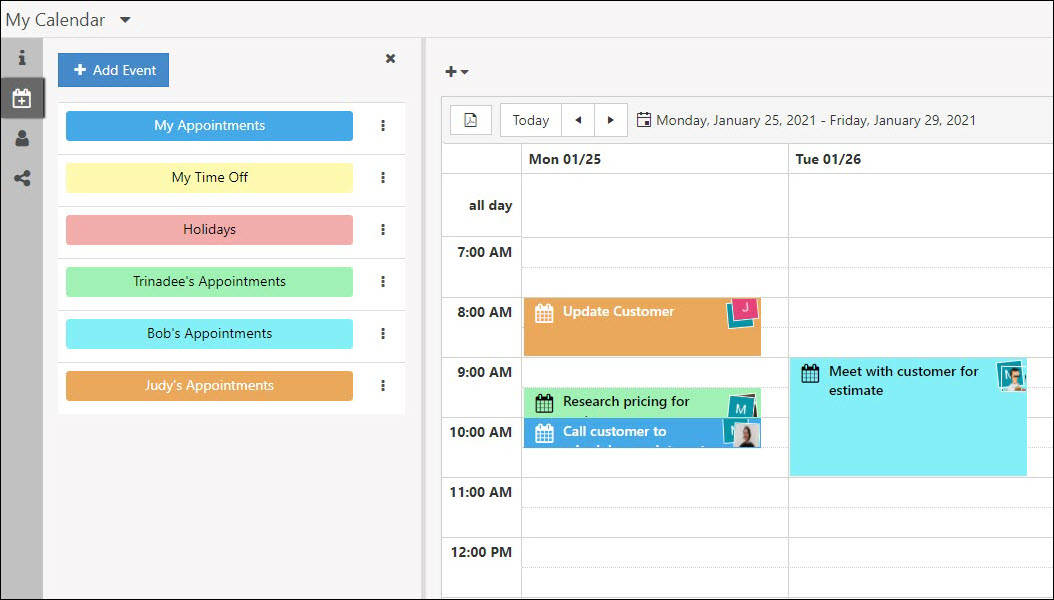
Example of Appointment Events on the Calendar
Looking at the Calendar, you have a Day, Week, Work Week, Month, and Agenda view, but the default view will be the Work Week view. Clicking on the arrows next to the word Today at the top of the Calendar will switch the view date range. If you wish to select a specific day, you can do so by clicking on the currently displayed date or date range and select the appropriate date to display.

Example of Calendar View Options
The Calendar will also remember the view you last used when viewing a Calendar, so when you switch between Calendars, the view will change to whichever view you used when you last visited that particular Calendar.
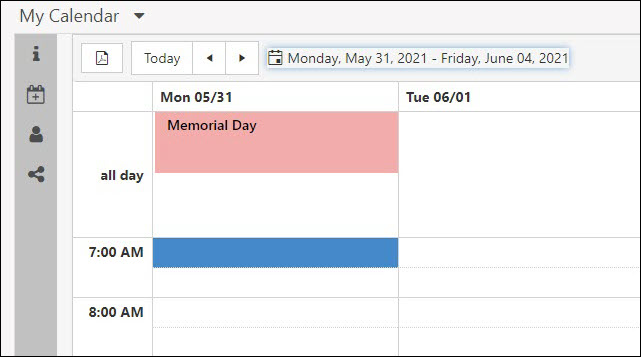
Since Holidays in Striven designate days the Company is closed, they are an all day Event and display in an All Day slot at the top of the Calendar instead of showing the Holiday or All Day Event across the entire day view of the Calendar.
Example of a Holiday Displayed on Calendar
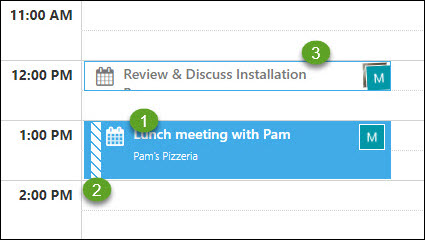
Appointment Type Events will display with the following details:
- Appointments will have a small Calendar symbol next to the Appointment name.
- Tentative Appointments will have a striped bar along the left side of the Appointment.
- When an Appointment is marked done, the color fill of the Event will white-out to identify the status of the Appointment.
Example of Appointment Display Features
Not only will the Calendar display Events by color based on the Event settings, but a small profile image will be shown in the right corner to identify the Assignee(s) of the Event. Please note that If there are multiple Events on the Calendar for the same time slot, the Events are shortened to fit and may not have room to display the assigned images.
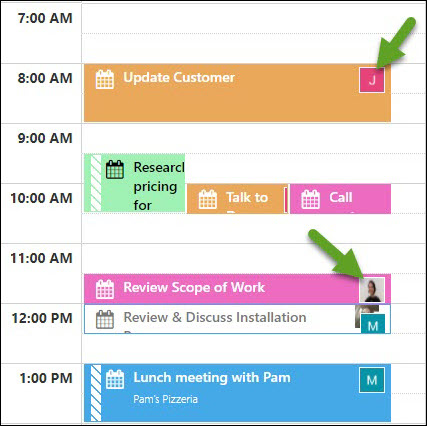
Example of Profile Image Identifying Event Assignee
-
Creating New Calendars
Now we’ll review the process of creating a NEW Calendar. If you want to create a new Calendar, click on the Add menu by My Calendar and click either Add Employee Calendar or Add a Custom Calendar, based on how you want the new Calendar configured.
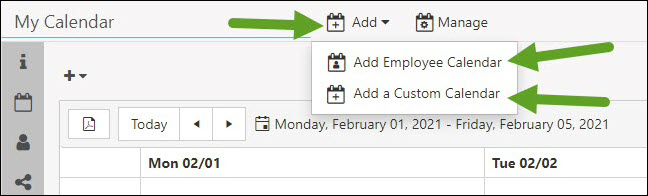
Example of the Add Calendar Menu Option
Depending on your choice of Calendar to create, here are the options provided:
For creating an Employee Calendar:
- Select the Employee you wish to add to this Calendar from the drop-down menu.
- Create a name for the Calendar.
- Select the options you wish to be displayed from Appointments, Time Off, Holidays, and Tasks.
- Save your selections.

Example of Creating an Employee Calendar
- Note: This option is helpful by allowing you to view another Employee’s Calendar for quick scheduling or reference. Another option to add an Employee Calendar is described in a separate section below.
For creating a Custom Calendar:
- Create a name for the Calendar.
- Select the hours you wish to display on the Calendar.
- Check the box if you wish the Calendar to be Grouped by Resource.
- Click Next to continue configuring the Calendar.
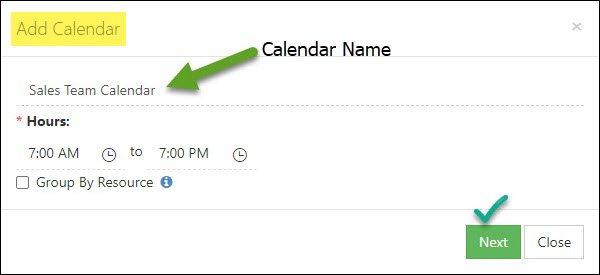
Example of Adding a Custom Calendar
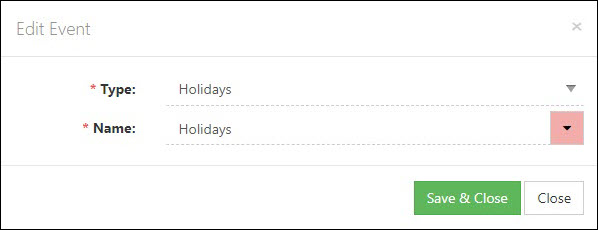
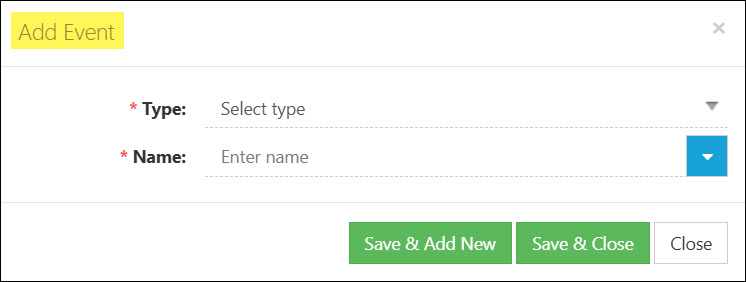
This will present a popup which gives you the option to select an Event you would like to add to this new Calendar. There are different options depending on which Event Type you select. All Events provide the option to select the Event Type, Event Name, and the color you wish the Event to display on your Calendar. Once these settings are configured, you can click Save & Add New if you want to continue adding Event Types to your Calendar, Save & Close if you’re done adding Event Types to your Calendar, or Close if you want to discard the Event you are currently creating.
Example of Adding an Event Type to a Calendar
Below are examples of some of the options you’ll see when creating Calendar Event Types.
Appointment Event Type
- Name: This can be named to fit your needs, depending on the filters you select for the information you want displayed on this Event.
- Attendees: You can choose any Employee, Team, or Department as the Attendee(s) from the drop-down menu to view all of their Appointments on one Calendar.
- Types, Status, Location: You have the option to select specific Appointment Types, the desired Appointment Statuses you wish to see, and/or the Appointment Locations.
- Include Meeting Requests: At the bottom you can check the box to select whether you want your Calendar to display Meeting Requests as well.
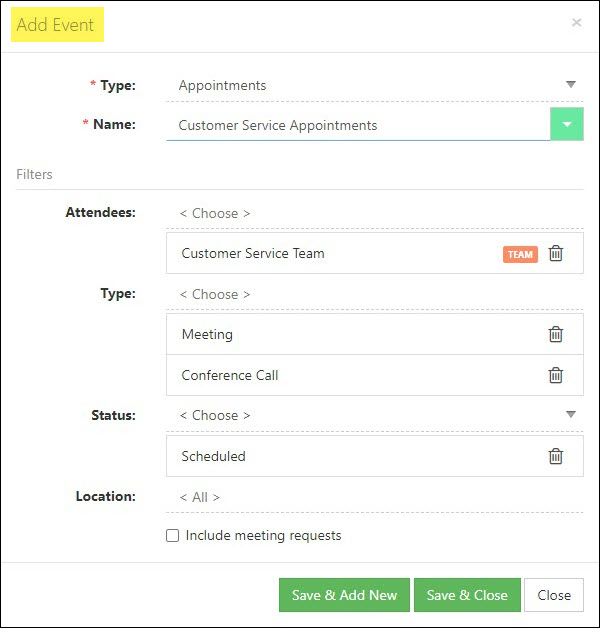
Example of Adding an Appointment Event Type
When you’re done configuring the Appointment Event Type, click either Save & Add New to continue adding Event Types, Save & Close to save your work and return to the Calendar, or Close to return to the Calendar without saving.
Task Event Type
- Name: This can be named to describe the type of Task information this Event will display on your Calendar.
- Assigned To: You can choose any Employee, Team, or Department as the Assigned To in order to display Tasks assigned to that entity.
- Task Type: Allows you to select to view only specified Task Types, or if left blank it will show ALL Task Types on your Calendar.
- Status: Allows you to select which Task Statuses you wish to display on your Calendar; includes options for Open, On Hold, Done, and Cancelled.
- Priority: Allows you to select from the Task Priorities you have set up in your Striven system to view only Tasks designated with those you’ve selected.
- Customer: You can select specific Customers to display only their Tasks on the Calendar, or leave the filter blank to default to display Tasks for ALL Customers.
- Project: Allows you to select individual Projects to display on your Calendar, or leave blank to view Tasks related to ALL Projects based on the other filters you have set.
- Order: Allows you to choose specific Orders to see related Tasks on your Calendar, or leave blank to view Tasks related to ALL Orders.
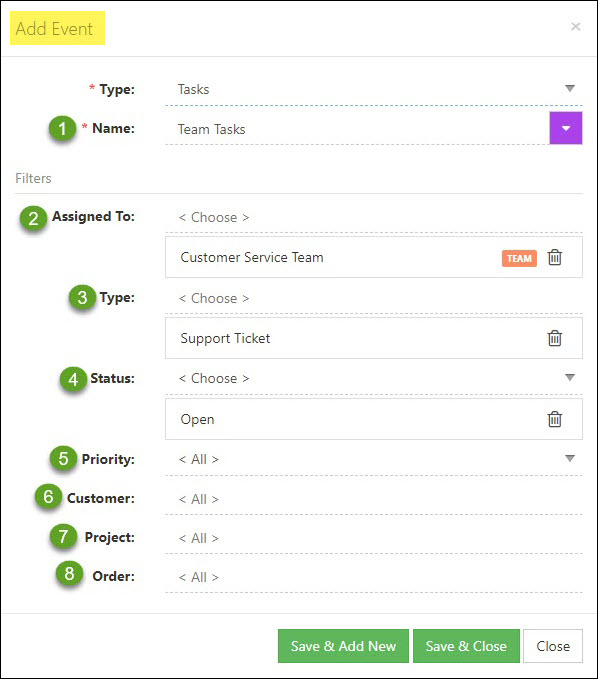
Example of Adding a Task Event Type
When you’re done configuring the Tasks Event Type, click either Save & Add New to continue adding Event Types, Save & Close to save your work and return to the Calendar, or Close to return to the Calendar without saving.
-
Create New Calendar From Employee Information
As mentioned above in this guide, there is another option for creating an Employee Calendar in Striven. If you view the Employee Information popup of an Employee you do not already have as a Resource on your Calendar, you can add their Calendar to your list by clicking on the small Calendar icon on the top right of the popup.
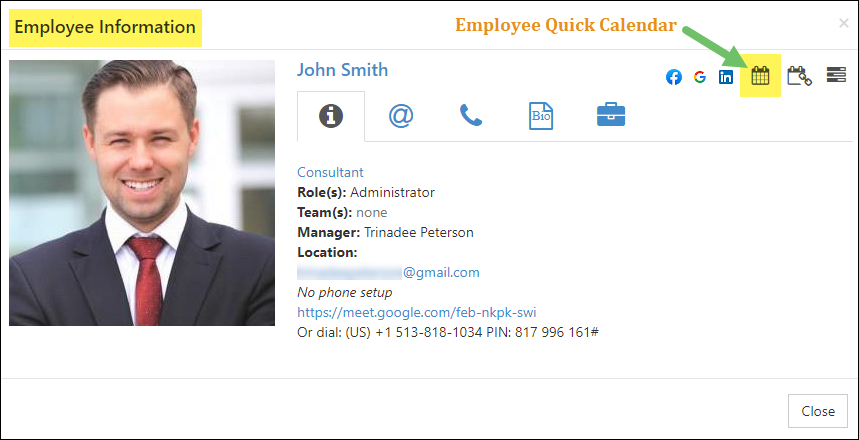
Example of the Employee Info Popup
This will redirect you to an Employee Quick Calendar which can be viewed in a read-only mode. You may add Appointments to this Calendar, but you can’t make changes to the setup unless you add the Calendar to your list of Calendars.
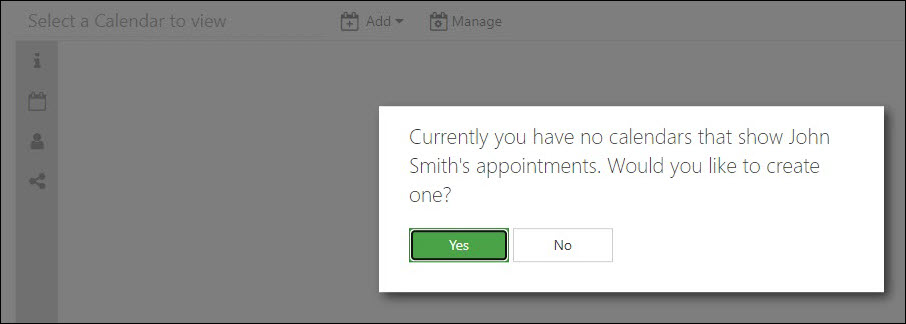
Example of Create New Employee Calendar Prompt
Clicking Yes will create and add this Employee’s Calendar to your Calendar List and will automatically be set to display their Appointments, Time Off, and Holidays. You can add or edit these Events as desired for this Calendar.
Example of Employee’s Calendar Created from Employee Info
-
Google Calendar & Microsoft Office 365/Outlook Calendar Integrations
Striven has the ability to integrate with both Google and Office 365/Outlook Calendars to easily merge your Striven Calendar to your personal calendar. This integration will not only enable Appointments in Striven to appear on your Google and Office 365/Outlook Calendar, but through the integration, you will also receive email notifications when a new meeting has been scheduled on your Calendar.
To enable this feature, navigate to:
Company → Settings → Integrations → Appointment Integration
This will open the Google/Microsoft Calendar Settings page which will display the options for turning on one of the Calendar integrations.
- Note: You can only have one Calendar integration turned on at a time.
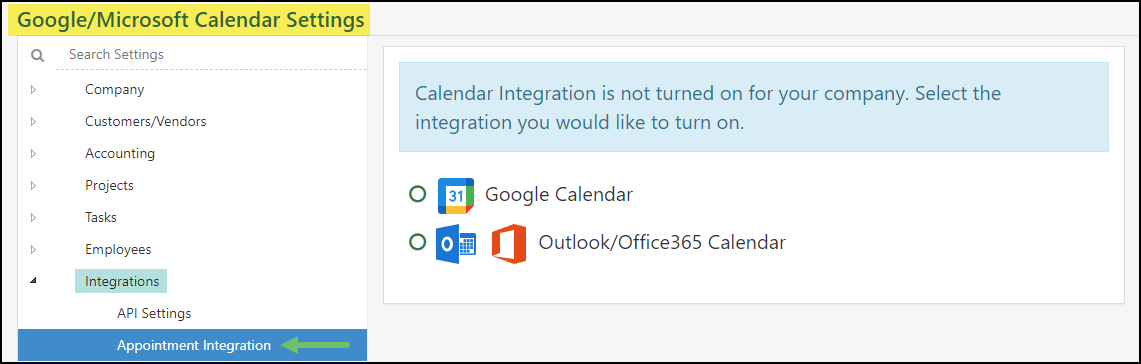
Example of the Google/Microsoft Calendar Integration Settings Page
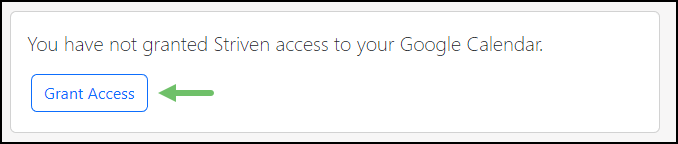
Once the Calendar Integration feature is enabled for your Striven system, you will need to navigate to your My Profile-Security page to click the Grant Access button (as seen below) to sync Striven with your Google or Office 365/Outlook Calendar.
- Note: Please allow 24-48 hours for all Appointments to sync between both calendars.
Resyncing Google Calendar
If you are unable to sync your Google Calendar with Striven, the most likely reason is because Google is not providing you with a refresh token. This causes you to lose access after a period of time, but can be easily resolved by following these steps:
- Visit this link to access your Google Account Security Settings.
- Click on Manage Third-Party Access.
- You should have Striven apps listed under your account. Remove Striven instances listed.
- Log out of Striven.
- Log back in to Striven.
- Go to your My Profile page.
- Use the Profile waffle menu to navigate to your My Profile-Security page. A message will be displayed with a button for you to authorize access to Google. Click the Grant Access button, and this will synchronize your calendars. See example below:
- Note: Please allow 24-48 hours for all Appointments to sync between both calendars.
If you find that these steps do not resync the calendars, please contact a Striven Support Specialist. You may do so by clicking on the Striven Diamond menu on the top right of the page and selecting Chatto chat with a Specialist right away (during our normal business hours), Schedule Support to make an Appointment for a screen share meeting with a Support Specialist, or you can create a Support Task for further assistance.
-
Selecting Calendars
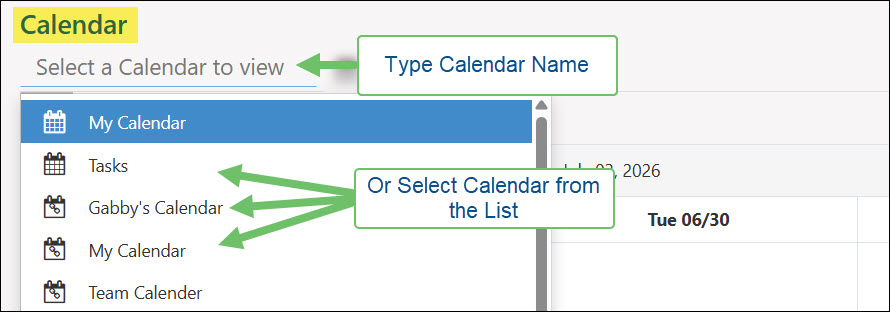
Once you finish creating your new Calendar in Striven, you can select which Calendar you wish to view by clicking on the Calendar Name field. Employee-owned Calendars will show first on your list, then shared Calendars, followed by the top 10 most recently viewed Employee Quick Calendars. If you create multiple Calendars for different purposes, you can use the “type-ahead” feature to display the desired Calendar without having to scroll through a long list of Calendar options.
Example of Selecting a Calendar
Calendar Management
-
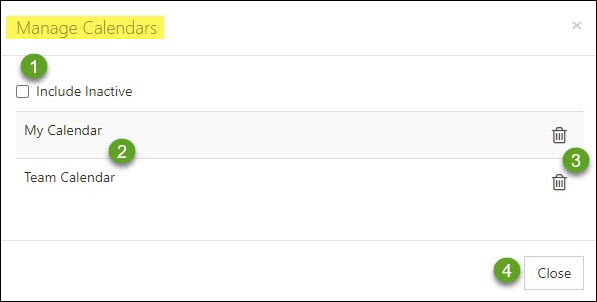
Managing Calendars
For options related to managing your Calendar, you can click on the Manage menu at the top of the screen. This will trigger a popup with the following options:
- Option to include Calendars on the list that have been deactivated.
- List of your Calendars.
- Trashcan icon used to deactivate a Calendar.
- Option to close the menu.
Example of Manage Calendar Options
-
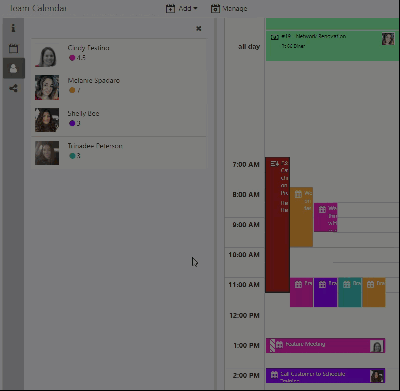
Calendar Resources
Striven Calendar Resources are computed automatically based on the Attendees or Assignees designated for the Events on the Calendar. For example, if there are multiple Employees assigned to an Appointment (the Event), all Employees (the Resources) assigned to that Appointment will display on the Resources tab.
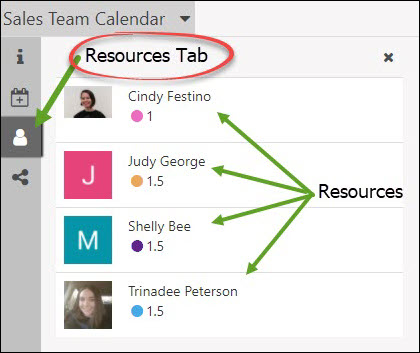
Example of the Calendar Resource View
The colorful dots beneath the Resources’ names on the list correlate to the color of their Event on the Calendar and represent the number of hours of Appointments they have in this particular Calendar view.
-
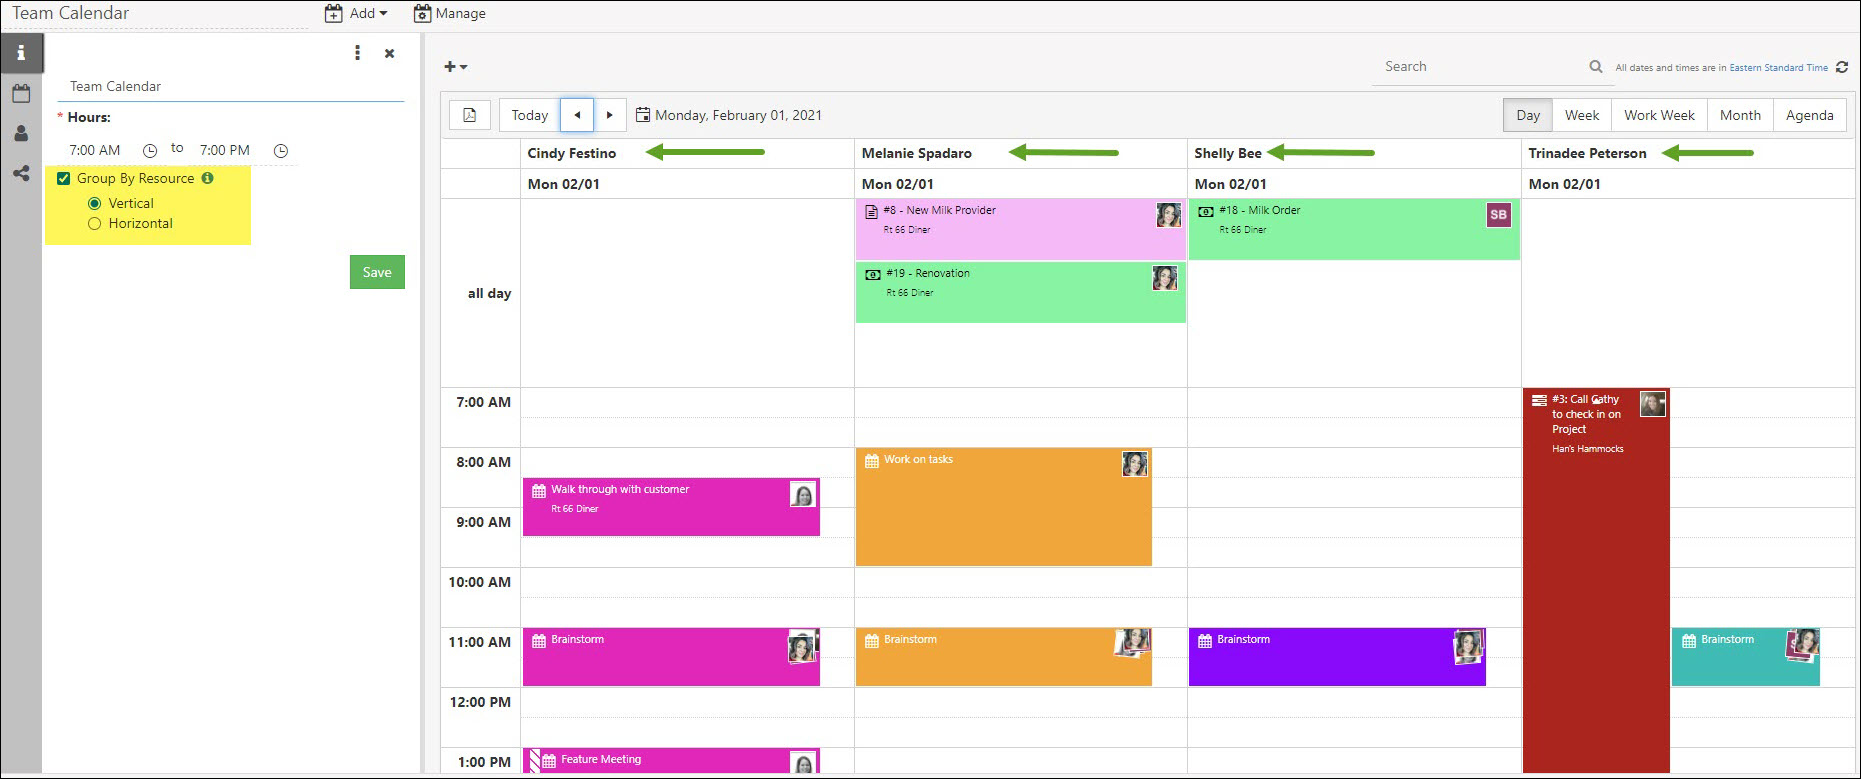
Grouping By Resource
When creating or editing a Calendar, you can choose the option to Group By Resource, which will display all Resources related to your Calendar to appear individually alphabetically on one Calendar view. When enabling this option, you are given the option to display the Resource Calendars as vertical columns (side-by-side) or as horizontal rows (stacked). Turning this option off will show one combined Calendar for all of the Resources together.
Example of Vertical Group By Resource Option
-
Filtering Calendars
Striven Calendars can be filtered by Resources or Events to narrow down the Attendees you wish to display on your Calendar. These filters can be removed by clicking on the X next to them at the top of the Calendar view.
Example of Filtering by Events
-
Adding Calendar Events
Adding Events such as Appointments, Time Off, or Tasks to your Calendar can be done either by clicking on the desired date and time you wish to schedule the Event for, or by selecting the Event Type from the plus sign for the Quick Add menu at the top of the Calendar screen.
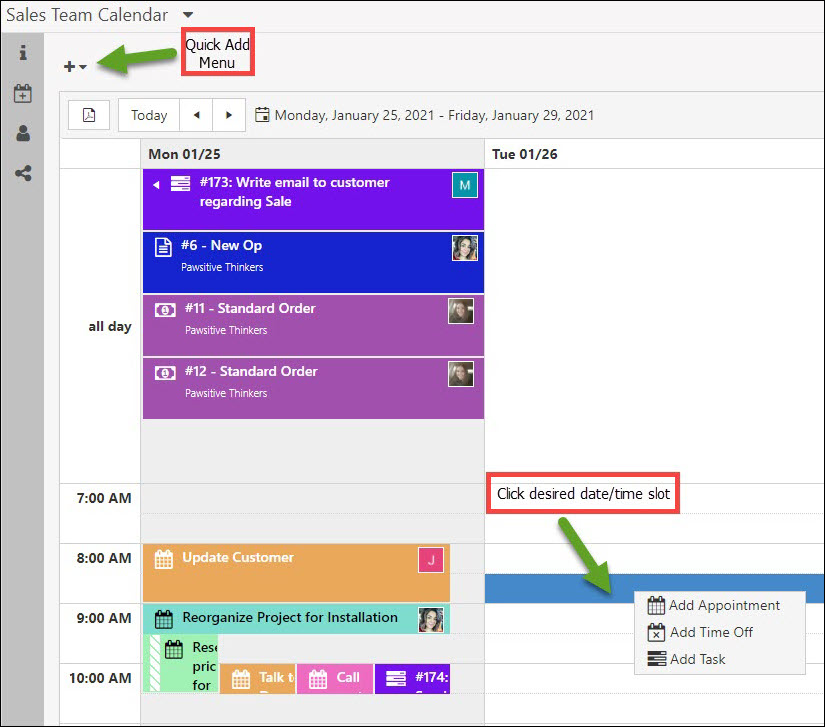
Example of Adding a Calendar Event
This Quick Add menu displays options for creating any other Event Types saved in the Calendar, including Asset Reservations, adding Employees, adding Opportunities, Orders, or Projects depending on your Calendar Event selections. These Quick Add options will trigger a popup screen to enter the Event information and create the Event.
-
Calendar Event Quick View
Another feature in the Striven Calendar is the ability to view a summary of each Event in a Quick View by clicking on the Event. This triggers a popup window where you can see a summary of information for the Event or take action, such as changing the status of an Appointment or Task. To see more information related to the Event, you can click the More Information button on the Quick View to open the full Event.
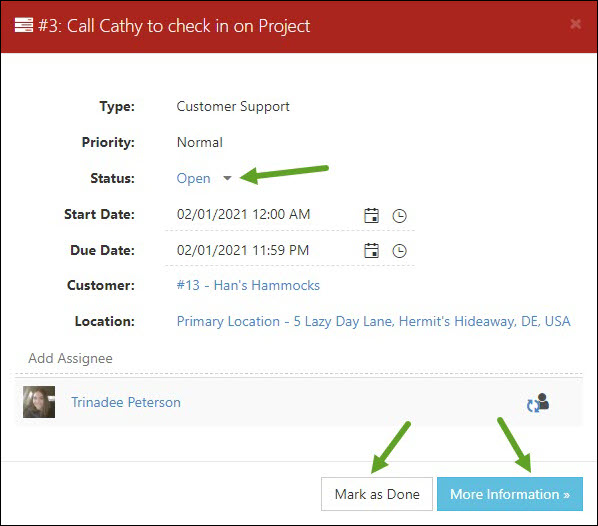
Example of a Task Quick View
Each Event will have its own Quick View based on the information provided in the Event. Some Quick Views do not have any action options and are view only. The actions available on the Quick View are also determined by the permissions of the user viewing the Event.
-
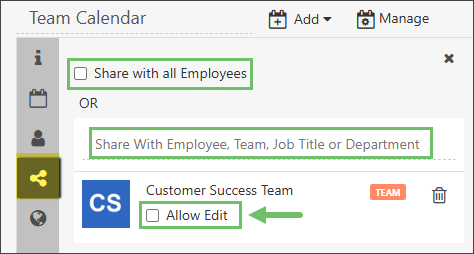
Sharing Calendars
The useful option of sharing your Calendars saves time and effort. This feature enables you to share your Calendar with all Employees, or just selected Employees of your choosing, and includes the option to give them access to Edit the Calendar. If the Employee is not given permission to edit the shared Calendar, they can choose to Copy the Calendar to make their own version which they can edit as desired. Sharing a Calendar triggers an email notification that lets the Employee know the Calendar has been shared with them. The Share option is located on the Left Navigation Menu of the Calendar.
Example of the Share Calendar Option
-
Reassigning Calendar Events
Another handy feature for the Striven Calendar is the ability to reassign an Event by dragging and dropping the Event to the desired Resource you wish to reassign the Event to. If the Event is able to be reassigned this way, it will be demonstrated by showing a green highlight of the desired Resource when dragging the Event to it.
Example of Drag/Drop Reassignment Option
Appointments cannot be reassigned in this way, which will be demonstrated by not allowing you to drag and drop them. Alternatively, This drag and drop method CAN be used to change the date and time of an Appointment by moving it to another slot on the Calendar. Please note that all the actions available for changes to Assignments are based on the user’s permissions.
Example of Drag/Drop Appointment to Change Date/Time
-
Exporting Calendar
For users looking to publish or print their Calendar, the Striven Calendar has the ability to export your Calendar to a PDF file by clicking on the Export Calendar button located at the top of the Calendar. This will download a PDF file of your currently displayed Calendar, whether it is in Day, Week, Work Week, Month, or Agenda view.
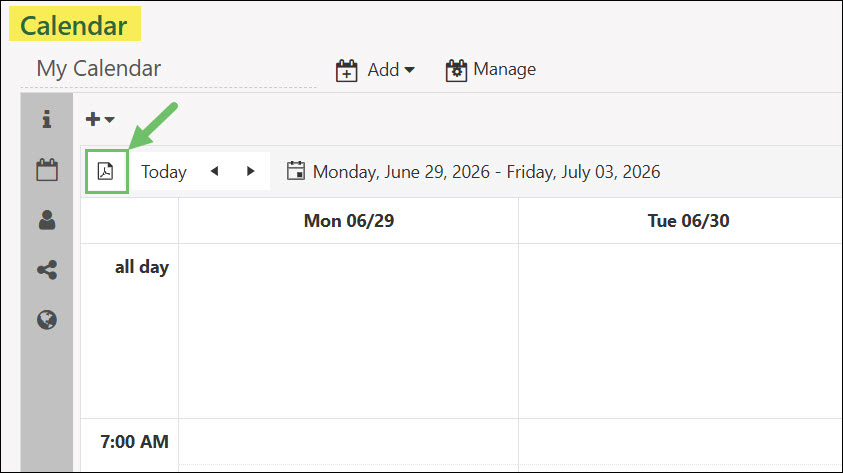
Example of Export to PDF Button
-
Searching the Calendar
The Striven Calendar includes a Search option to search for any string which matches the title of the Events being displayed in the current Calendar view. To clear the search criteria, you can click on the eraser button located next to the Search field.
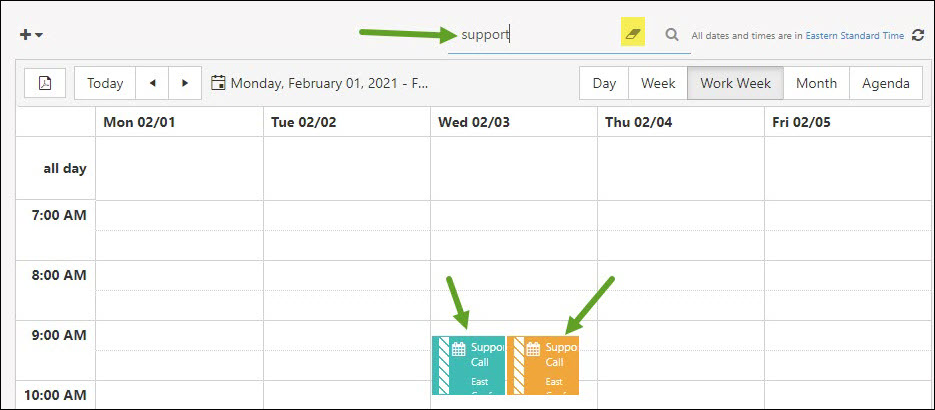
Example of Search Calendar Option & Eraser Button
-
Expanding the Calendar
To gain a full view of the Calendar, utilize the Expand button which is highlighted in the image. When using the Expand button, Calendars will be enlarged to a full view in the internet browser that is being used. With the Expanded view, users can still manage the calendar with full functionality while having an easier perspective.

Example of the Expand Calendar Button on a Calendar
-
Meeting Requests
Meeting Requests will show in the All Day slot at the top of the Calendar because Meeting Requests are set up to cover multiple days at a time for options to select from and do not include any specific times until the meeting is scheduled. They can be identified as Meeting Requests by the Group Calendar icon next to the Event name.
Example of a Meeting Request
Along with the Search option mentioned above, a button to view Meeting Requests has been included as a feature in the Calendar. Clicking on this button will open your Appointments List. Among other filtering options, this page will provide a checkbox to Only show Meeting Requests in order to filter your Appointment List by Meeting Requests exclusively.
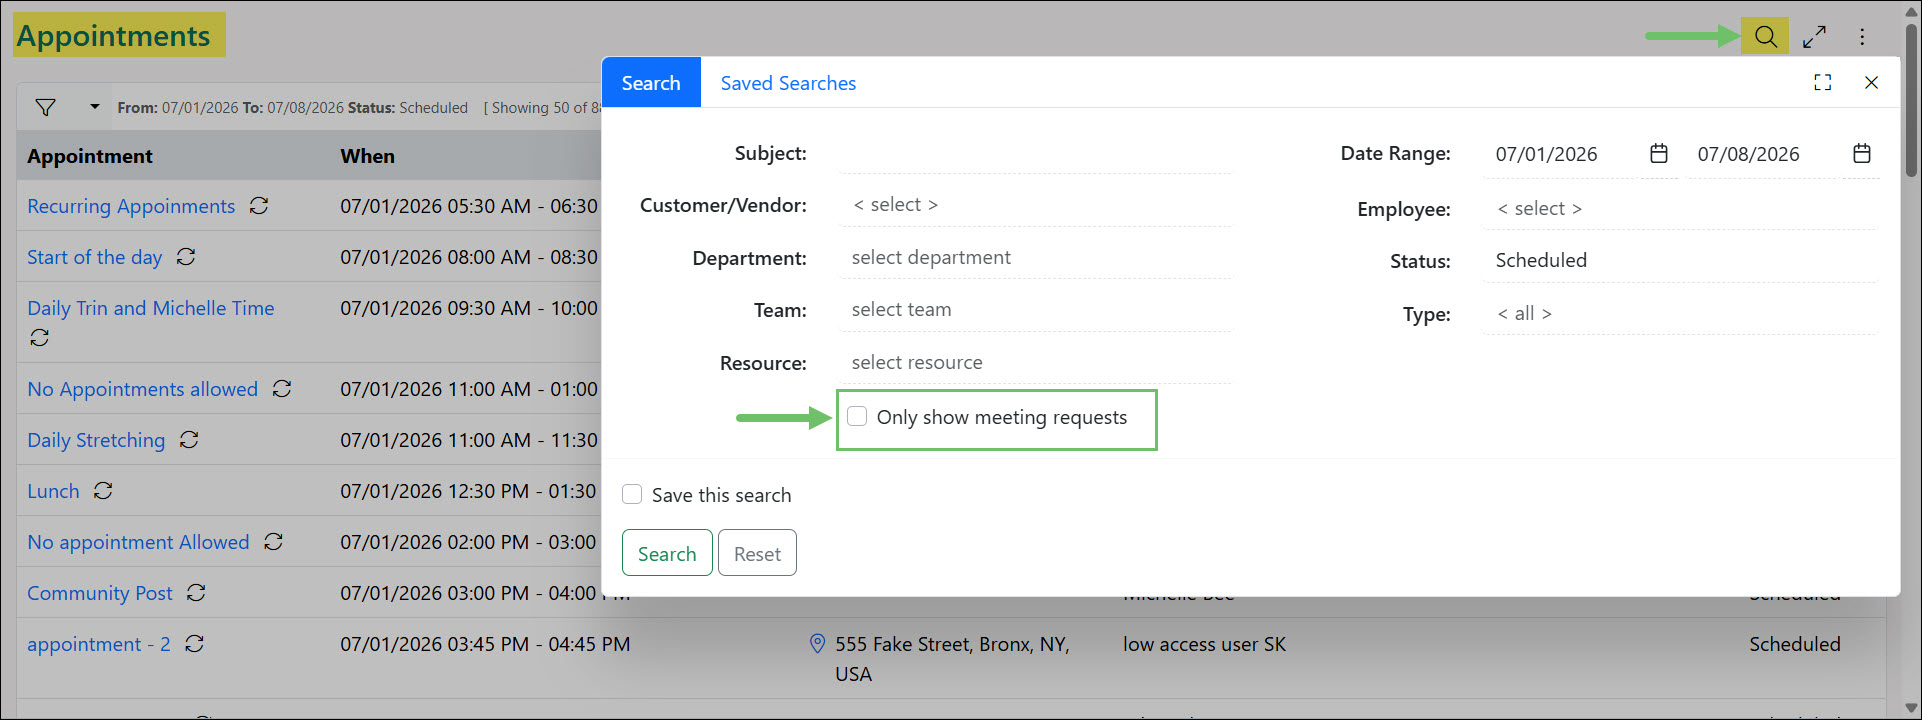
Example of Appointments List to View Meeting Requests
-
Mobile Calendar View
The Striven Calendar will display on mobile devices with small buttons and icons, with only the Day, Month, and Agenda views available for display. The views will match the last view used when they viewed that Calendar on the desktop mode.
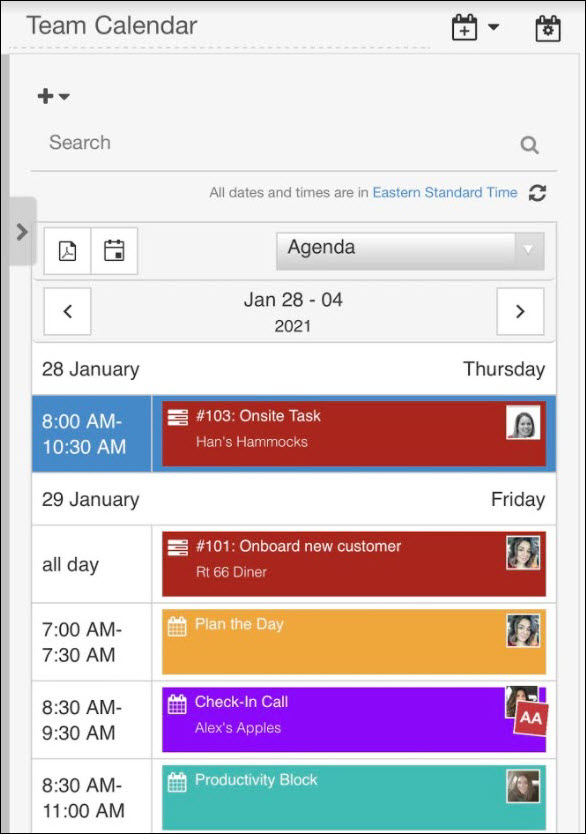
Example of Mobile Calendar in Agenda View
-
Recap
With this guide, we’ve reviewed the terminology, setup, and management of Calendars within Striven. These tools and configurations will assist you with managing your schedules and meetings so that you can provide the best service to your Customers.

Have a Question?
Ask the Striven Community
User-sourced how-to’s, feedback, and more!
FAQs
-
Striven Calendar is the feature I use most. How can I create an easy access to it?
You can mark your Calendar as a Favorite by clicking on the Star icon on the top right of the Calendar page beneath the Striven logo. This will enable you to select where to display the Favorite, on the Favorites Menu, Icon Bar, or both. If saving on the Icon Bar, you will also be able to select the color that displays next to the Favorite to easily seek out that link.
Clicking on the Star icon in the top right menu bar will provide options to Add to Favorites, Manage Favorites, or Add Custom Favorite. This is also where your Favorites Menu will list the links you’ve saved there.
-
I was added to an Appointment that I do not need to attend. How can I cancel or delete myself from the Appointment?
To remove yourself from an Appointment, you do NOT want to just Cancel the Appointment, as that will cancel it for all Attendees!
There are two options to remove yourself from an Appointment. First would be to click on the Appointment on your Calendar and then click the Remove Me button from the Quick View popup.
The other option would be to click on the More Information button from the Quick View popup to review the details of the Appointment. From there, you can click on the Actions menu on the top left of the screen and select Remove Me From This Appointment from the drop-down.