
AR & Collections
Time & Expenses
Support Guide
-
Overview
Managing Time & Expenses in Striven enables you to track employee work hours and submitted expenses for billing or reimbursement. This guide will provide steps for creating and managing Timesheets, Time Entries, Time Clock tracking, Expense tracking, setting up the Time Entry Approval Queue, and utilizing the Generate Time & Expense Invoices feature to convert billable time and expenses into customer invoices.
Read this guide if you are trying to:
✔ Track Billable Hours with Timesheets, Time Entries, & Time Clock.
✔ Set up Time & Expense Invoicing.
✔ Set up and manage the Time Entry Approval Queue.
-
Time & Expense Settings
Striven provides multiple time and expense tracking options that are efficient and easy to use. Before you begin utilizing Time & Expense features in Striven, it is important to review the following settings and configurations.
Permissions
There is one (1) User Role permission related to Time & Expense Settings Pages.
- “Time Tracking Settings – Add/Edit”

Example of Time and Expense Settings Permission

Learn more about managing User Roles and Permissions in Striven by reviewing the User Roles Guide.
-
Pay Types
Pay Types determine how much Employees will be paid and/or how much Customers will be charged per Employee Time Entry. There are two Payment Types in your settings by default, one Normal and the other is Surcharge. By adding a new Pay Type you can note how much is multiplied when billing a Customer and how much is multiplied when paying the Employee.
To view and manage Pay Types navigate to Company → Settings → Employees → Payroll → Pay Types.
Below is a screenshot displaying editing a Pay Type and how it appears in Striven and a description of what can be accomplished there.
- Payment Type Name: The name of the new Payment Type being created. This name will appear when selecting a Pay Type in the system and also in the Pay Types list.
- Is Default: Sets this Payment Type as the default Payment Type when Employees add new time on Time Entries and Timesheets.
- Billing Multiplier: The billing multiplier is a factor that multiplies an Employee’s rate to determine the final charge to the Customer for their work that is marked billable.
- Pay Multiplier: Sets the pay multiplier used for this new Payment Type. A pay multiplier is a calculation that is applied to rates paid to an Employee for work completed.
- External Payroll Custom Fields: Two custom fields have been added for Pay Types by default for ease of data entry when utilizing the External Payroll feature in Striven. Learn more about this feature by reviewing the Generate Payroll File Guide.
- External Payroll Type: External Payroll system mapped payroll type. Used to identify the Payment Type on the payroll file.
- External Payroll Code: External Payroll system mapped payroll code. Code used by payroll processors to identify the type of earnings in the payroll file.
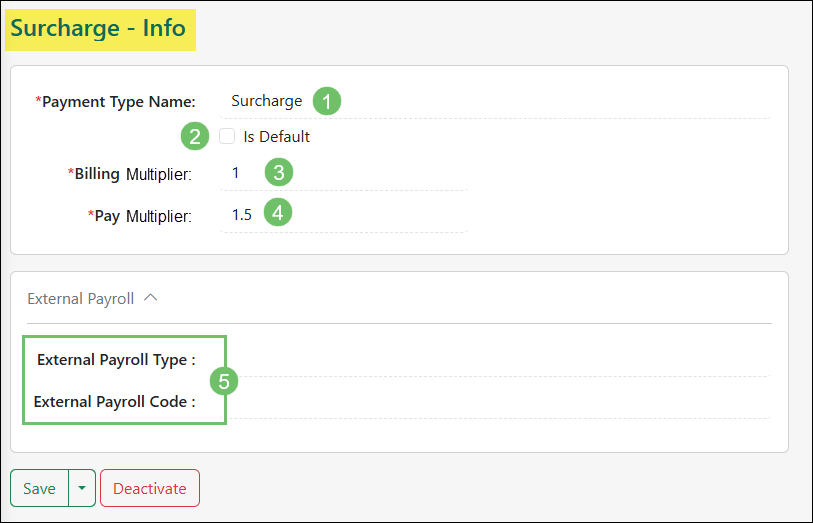
Example of Editing a Pay Type
-
Time Tracking Settings
The Time & Expense Settings display options related to how your Company tracks Time Entries submitted by Employees. Before you can begin tracking your Employees’ Time Entries, you’ll need to configure some settings within your Striven system.
These settings can be found by navigating to Company → Settings → Accounting → Sales Orders → Time and Expense Settings.
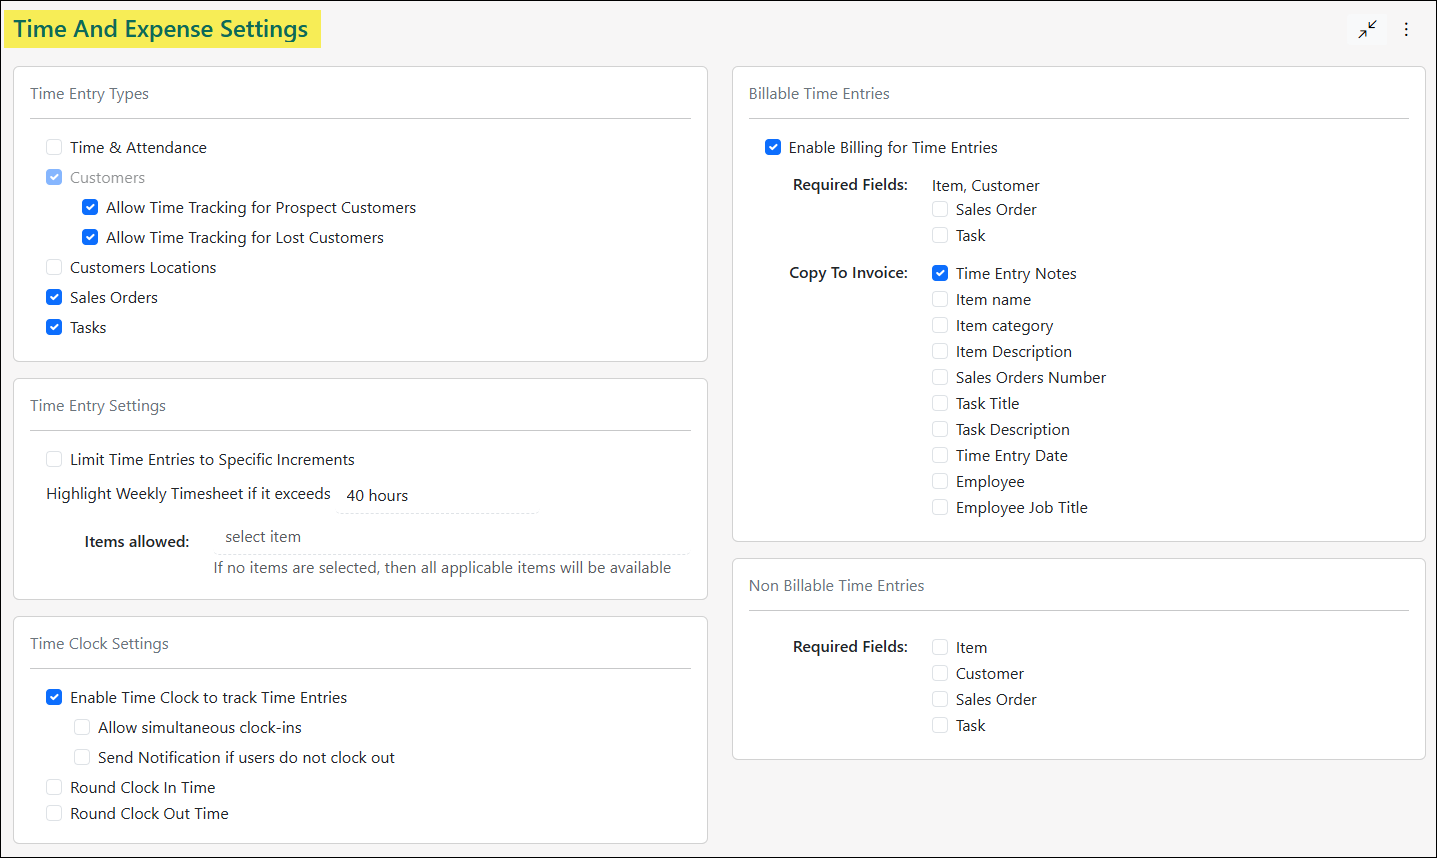
On the Time & Expense Settings page you’ll see settings options for Time Entry Types, Time Entry Settings, Time Clock Settings, Billable Time Entries, and Non Billable Time Entries.
Example of the Time and Expense Settings Page
Time Entry Types
The Time Entry Types you choose here will depend on the specific types of time you want to track within the system.
Below is a screenshot illustrating how the Time Entry Types section appears on the Time & Expense Settings page and a description of what can be accomplished there.
- Time & Attendance: Used for regular clock in/clock out Time Entry and attendance tracking. This type also has an option to Configure Time Tracking Categories. At least one Time Tracking Category will need to be added before these settings can be saved.
- Customers: Used for tracking time spent completing work for specific Customers.
- Allow Time Tracking for Prospect Customers: Adds the ability to select a Customer in a Prospect status when creating a Time Entry.
- Allow Time Tracking for Lost Customers: Adds the ability to select a Customer in a Lost status when creating a Time Entry.
- Customers Locations: Used to track time spent working at a particular Customer Location. Once a Customer has been selected on the Time Entry, a list of their locations will be available to select a specific location the work was completed at.
- Sales Orders: Allows you to track time spent completing work related to a particular Sales Order. Once a Customer has been selected on a Time Entry, a list of their available Sales Orders can be selected from.
- Tasks: Adds the ability to track time spent completing work related to a particular Task.

Example of the Time Entry Type Section from the Time and Expense Settings Page
Time Entry Settings
Under the Time Entry Settings, there are a few preferences to be considered.
Below is a screenshot illustrating how the Time Entry Settings section appears on the Time & Expense Settings page and a description of what can be accomplished there.
- Limit Time Entries to Specific Increments: Allows you to set specific time increments of 15 minutes, 30 minutes, or 60 minutes for time tracking instead of allowing specific time tracking.
- Highlight Weekly Timesheet: Allows you to set an indication highlight on the Timesheet for a set number of hours tracked. For instance, this setting would be used to ensure your Employee sees their Timesheet is highlighted if they enter more than 40 hours for the week.
- Items Allowed: Provides the ability to configure which Items will be selectable when creating a Time Entry. Once Items have been chosen for this option, a default Item can be selected. If this field is left blank and no Item is selected, all applicable Items will be available for selection when creating a Time Entry.

Example of the Time Entry Settings Section from the Time and Expense Settings Page
Time Clock Settings
The Time Clock feature provides the ability to clock in and clock out to track Time Entries. This section will need to be enabled in order for this feature to be available for Employees.
Below is a screenshot illustrating how the Time Clock Settings section appears on the Time & Expense Settings page and a description of what can be accomplished there.
- Enable Time Clock to Track Time Entries: Once this option has been enabled, the below settings can be configured and set up.
- Allow Simultaneous Clock-Ins: Used when you need to track time for multiple Time Entry types at once.
- Send Notification if Users Do Not Clock Out: Triggers a notification to be sent to warn that an Employee did not clock out based on the below configurations.
- After the Clock In Time Has Exceeded: Number of hours before a notification is sent to the selected notification recipient to let them know an Employee has not clocked out. Only full numbers can be entered into this field to set an exact amount of hours. If the Send Notification if Users Do Not Clock Out option is enabled, this field will be required.
- Select Notification Recipient: The Employee that will receive the notification if an Employee has not clocked out. If the Send Notification if Users Do Not Clock Out option is enabled, this field will be required. Multiple Employees can be selected as well as the Employee’s Manager or the Logged In User.
- Round Clock In Time: Provides the option to set increments for rounding the time at clock in. This option can be set to round the clock in time by the Nearest, Up, or Down by increments of 15 Minutes, 30 Minutes, or 60 Minutes.
- Round Clock Out Time: Gives the option to set increments for rounding the time at clock out. This option can be set to round the clock out time by the Nearest, Up, or Down by increments of 15 Minutes, 30 Minutes, or 60 Minutes.

Example of the Time Clock Settings Section from the Time and Expense Settings Page
Billable Time Entries
The Billable Time Entries section displays the option to enable or disable billing for Time Entries. If this setting is enabled, options are given to determine which fields should be required as well as what type of information will be copied to the Time & Expense Invoice that can later be created.
Below is a screenshot illustrating how the Billable Time Entries section appears on the Time & Expense Settings page and a description of what can be accomplished there.
- Enable Billing for Time Entries: Turns on the ability to mark Time Entries as billable. Once this setting has been enabled, the below options can be configured for the Required Fields and Copy to Invoice.
- Required Fields: Determines what information will be required when entering a Time Entry that has been marked as billable. Item and Customer must be required. Other additional required options include the following:
- Customer Location
- Sales Order
- Task
- Copy to Invoice: When Billable Time Entries are converted to an Invoice through the Create T&E Invoice feature, the following fields can be copied to the Invoice if selected here:
- Time Entry Notes
- Item Name
- Item Category
- Item Description
- Customer Location
- Sales Order Number
- Task Title
- Task Description
- Time Entry Date
- Employee
- Employee Job Title

Example of the Billable Time Entries Section from the Time and Expense Settings Page
Non Billable Time Entries
Similar to the Billable Time Entries section, a separate section is available to determine required fields for when entering time for Non Billable Time Entries.
Below is a screenshot illustrating how the Non Billable Time Entries section appears on the Time & Expense Settings page and a description of what can be accomplished there.
- Required Fields: Determines what information will be required when entering a Time Entry that has not been marked as billable.The following information can be marked as required:
- Item
- Customer
- Customer Location
- Sales Order
- Task

Example of the Non Billable Time Entries Section from the Time and Expense Settings Page
-
Employee Hourly Rate / Cost
Individual Employees can be configured to have an hourly rate and cost associated to their Time Entries. An overall rate and cost can be set per Employee or individual Items can be set for the Employee with each having its own rate and cost.
To set up an Employee’s Hourly Rate / Cost page, navigate to Employees → List. Search and select the Employee you wish to update these settings for and navigate to their Hourly Rate/Cost tab within their Employee profile.

Example of an Employee’s Hourly Rate and Cost Tab
Permissions
There are two (2) User Role permissions related to editing an Employee’s Hourly Rate/Cost tab within their Employee profile.
- “Employees – Add/Edit”
- “Employees – Edit in their Hierarchy”
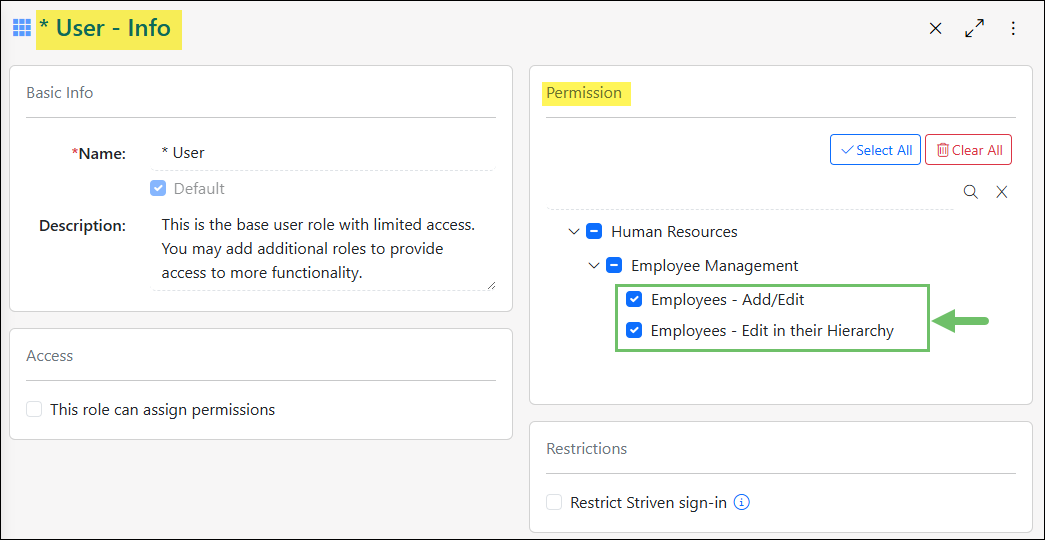
Example of Employee Hourly Rate and Cost Permissions
Learn more about managing User Roles and Permissions in Striven by reviewing the User Roles Guide.
Employee Hourly Rate / Cost Configurations
Below is a screenshot illustrating how the Hourly Rate/Cost tab appears from an Employee’s Profile and a description of what can be accomplished there.
- Not Billable by Default: This option will by default set Time Entries entered by the Employee as not billable.
- Default Hourly Rate / Cost: Sets up the default hourly rate and cost for the Employee. This setting will take effect for all applicable Items except for Items that are set up separately in the Hourly Rate / Cost by Item section. Multiple entries can be entered into this section with the Effective Date determining what data will be calculated.
- Hourly Rate / Cost by Item: Determines if specific Items will have a different hourly rate and cost than the default that is set in the Default Hourly Rate / Cost section. Multiple entries can be entered into this field based on per Item and the Effective Date.

Example of Configuration Options for an Employee’s Hourly Rate and Cost Tab
-
Time Tracking
Striven offers comprehensive time tracking capabilities through both individual Time Entries, weekly Timesheets, and a Time Clock feature for real-time tracking with clock-in and clock-out functionalities. Employees can conveniently log their work hours through multiple avenues, including a quick add menu, within specific Sales Orders, or directly from Tasks, ensuring accurate time allocation.
Permissions
There are seven (7) User Role permissions related to the Time Entries and Timesheets.
- “Time Entry – Add/Edit for all employees”
- “Time Entry – Add/Edit for anyone in their hierarchy”
- “Time Entry – Add/Edit Manual Time Entries”
- “Time Entry – Approve and Adjust for all Employees”
- “Time Entry – Approve and Adjust for anyone in their hierarchy”
- “Time Entry – Self Approve”
- “Timesheet Report”

Example of Time Entry Related Permissions
Learn more about managing User Roles and Permissions in Striven by reviewing the User Roles Guide.
-
Time Entries
One way to track time in Striven is to submit a Time Entry. A Time Entry records the amount of time worked on a single day. The required fields are displayed based on the Time Entry Type selected when entering a new Time Entry. After Time Entries are submitted, the time will be added onto a Timesheet which can be built upon or edited as the week continues.
Example of the Add Time Entry Page
Adding Time Entries
There are multiple areas in which an Employee can enter a Time Entry in order to track time which will be detailed in this section.
The first way an Employee can add a Time Entry is to navigate to the Quick Add menu located in the Striven Menu Bar and select Time Entry.

Example of the Time Entry Option in the Quick Add Menu
Adding a Time Entry can also be accessed from within a specific Sales Order. This will associate the time being tracked with the Sales Order. When adding a Time Entry from a Sales Order, information regarding the Order will prefill into the Time Entry such as the Customer, Sales Order, and Location.

Example of Adding a Time Entry From a Sales Order
When viewing a Task, adding a Time Entry will relate the time being tracked with a specific Task. When adding a Time Entry from a Task, information regarding the Task will prefill into the Add Time Entry page such as the Customer, Sales Order, and Location if these fields are filled in on the related Task.
Example of Adding a Time Entry From a Task
Entering a Time Entry
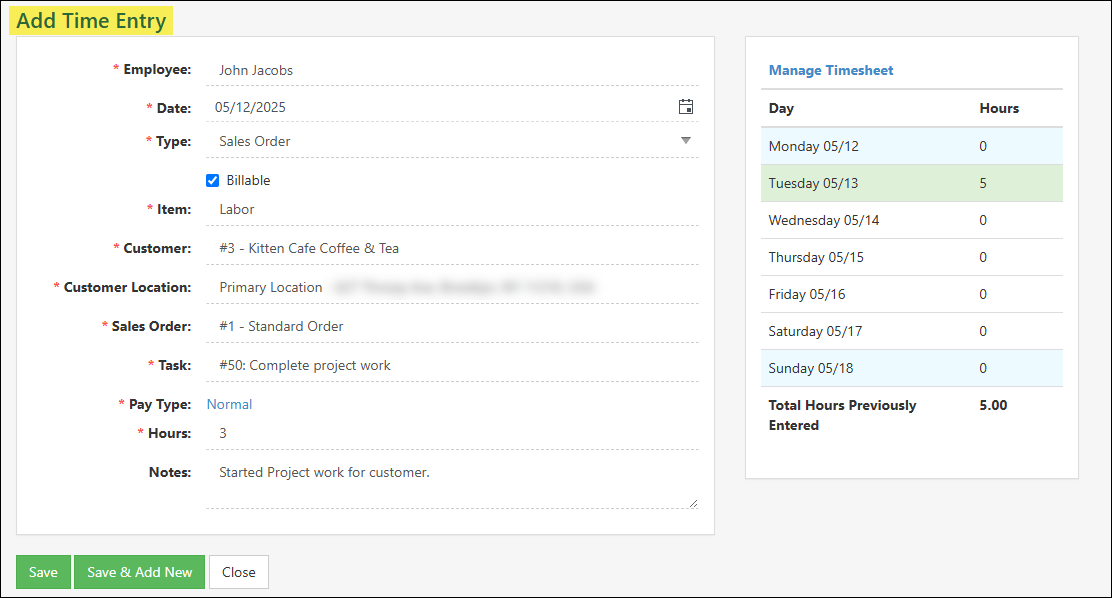
Below is a screenshot illustrating how a Time Entry appears and a description of what can be accomplished there.
- Employee: Name of the Employee the Time Entry is being recorded for their weekly Timesheet.
- Date: The date on which the work was completed.
- Type: The type of work based on the Time & Expense Settings page. Based on your settings options for the Time Entry type can include Time & Attendance, Customers, Customers Location, Sales Orders, or Tasks.
- Billable: This checkbox dictates whether the Time Entry is billable or not. If time is marked as billable, you can create a Time & Expense Invoice for Customers for the hours entered on the Time Entry.
- Item: Allows the selection of an applicable Item to associate to the Time Entry. This Item will then be used when a Time & Expense Invoice is created.
- Customer Information: These fields will vary based on the type that has been selected on the Time Entry and the Time & Expense Settings. Information entered here will determine the specific Customer the hours will be related to along with additional information such as a related Sales Order, Customer Location, or Task.
- Pay Type: The Payment Type being submitted by the Employee and can be changed by clicking on the hyperlink and choosing another option. The Pay Type will determine the Billing Multiplier and the Pay Multiplier.
- Hours: The amount of hours the Employee performed work on the Time Entry being entered.
- Notes: Field to enter notes related to the Time Entry. This may include specific details about the work completed or any other information the Employee wishes to document regarding the Time Entry. Notes will carry over to the weekly Timesheet after the Time Entry is submitted.
- Manage Timesheets: Hyperlink to the Timesheet page where edits can be made to other Time Entries made during the week if needed.
- Total Hours Previously Entered: Sum of the Time Entry hours for the week up to the current Time Entry being created.

Example of Adding a Time Entry
-
Time Clock
The Time Clock feature is an additional way for Employees to track their time entries by clocking in and out for their shifts or for a specific type of work within Striven. When using the Time Clock, you have the option to clock in for yourself or other Employees. There are multiple areas in which an Employee can access the Time Clock feature in order to clock in.
Accessing the Time Clock
There are multiple areas in which an Employee can access the Time Clock feature in order to clock in which will be detailed in this section.
The first way to access the Time Clock feature is to navigate to the Employee Actions Menu located within the Striven Menu Bar and select Time Clock.
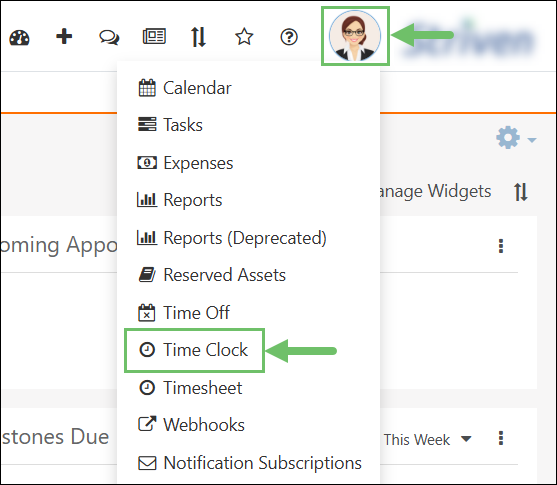
Example of the Time Clock Located in the Employees Action Menu
The Time Clock feature can also be accessed from within a specific Sales Order. This will associate the time being tracked with the Sales Order. When accessing the Time Clock feature from a Sales Order, information regarding the Order will prefill into the Time Clock information such as the Customer, Sales Order, and Location.
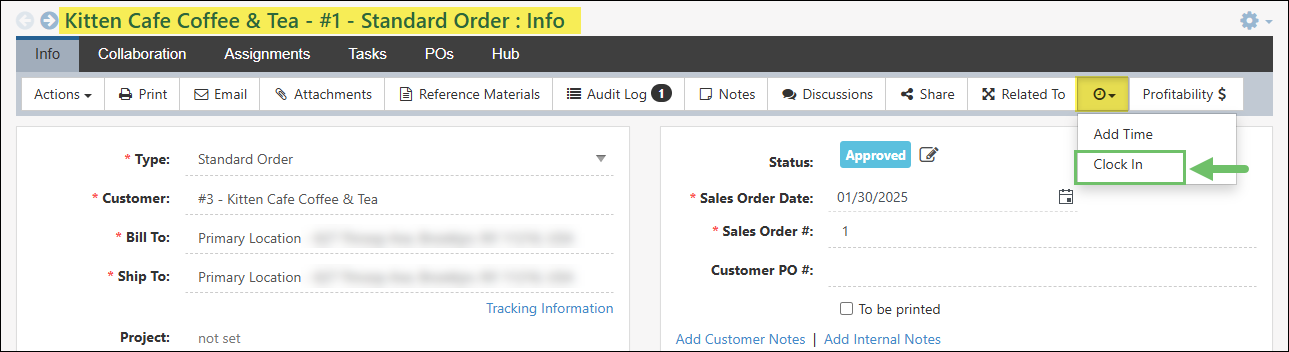
Example of the Time Clock Located in a Sales Order
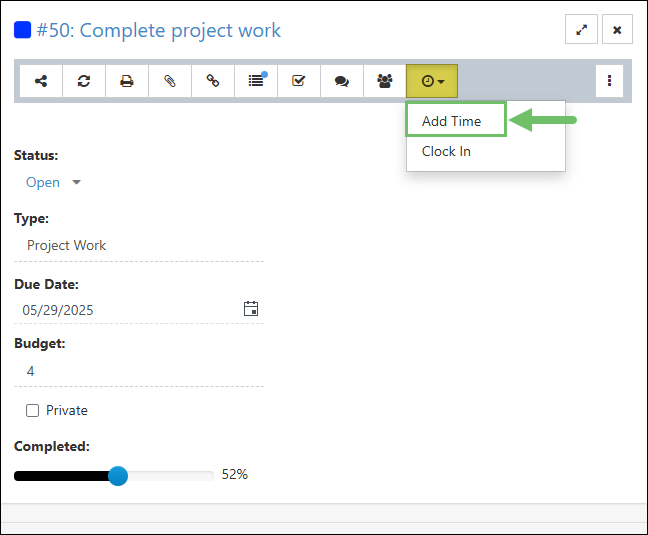
When viewing a Task, accessing the Time Clock feature will relate the time being tracked with a specific Task. When accessing the Time Clock feature from a Task, information regarding the Task will prefill into the Time Clock information such as the Customer, Sales Order, and Location if these fields are filled in on the related Task.

Example of the Time Clock Located in a Task
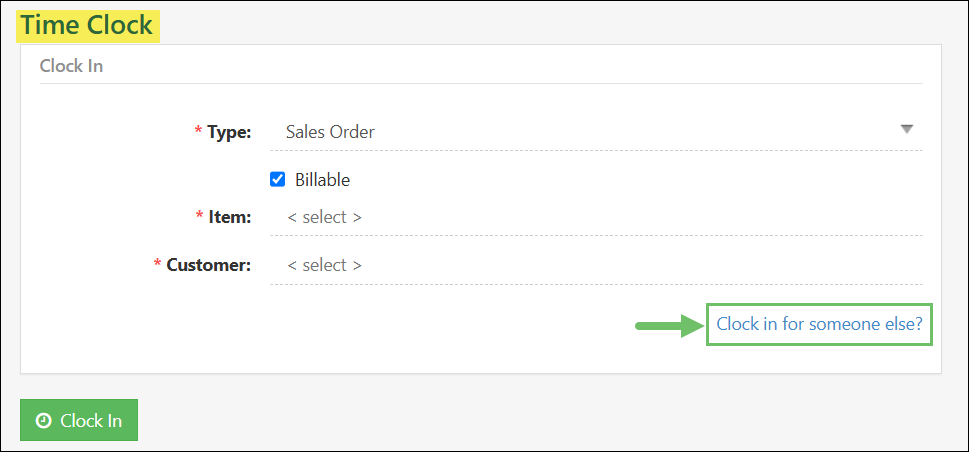
Clocking In
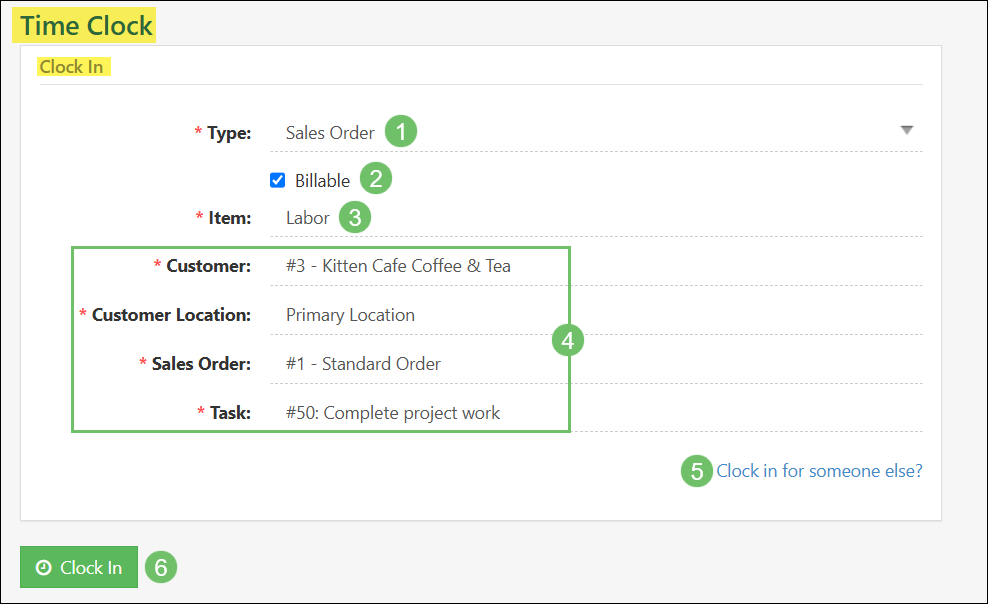
There is an array of information that can be entered when using the Clock In feature. Entering this information will ensure that the work being done is tracked with the specific type of work within Striven.
Below is a screenshot illustrating how the Clock In feature appears and a description of what can be accomplished there.
- Type: The type of work based on the Time & Expense Settings page. Based on your settings options for the type can include Time & Attendance, Customers, Customers Location, Sales Orders, or Tasks.
- Billable: This checkbox dictates whether the time being tracked with the Time Clock feature is billable or not. If time is marked as billable, you can create a Time & Expense Invoice for Customers for the hours tracked.
- Item: Allows the selection of an applicable Item to associate to the time being tracked. This Item will then be used when a Time & Expense Invoice is created.
- Customer Information: These fields will vary based on the type that has been selected when clocking in and the Time & Expense Settings. Information entered here will determine the specific Customer the hours will be related to along with additional information such as a related Sales Order, Customer Location, or Task.
- Clock In For Someone Else: When this option is selected, an additional field will appear at the top of the Time Clock page to select a different Employee.
- Clock In: Begins to track the time from the moment the Clock In button is clicked.
Example of Clocking In
Clocking Out
Once you have clocked in the Time Clock page will display an additional area which is work that is waiting to be clocked out from as well as the option to clock in for additional type of work.
Below is a screenshot illustrating how the Time Clock page appears after clocking in and a description of what can be accomplished there.
- Clocked Into: Lists the type of work that is being tracked while clocked in. The hyperlink listed here will open the additional work for more details.
- Started: List the date and start time that the Time Clock began tracking time for the specific work.
- Time Elapsed: Lists the amount of time that has passed since the work has been clocked into.
- Clock Out: Will end the time tracking for the specific type of work and will create a Time Entry on the weekly Timesheet.
- Clock In: Allows the Employee to clock in to additional type of work in order to track multiple time tracking at once.

Example of the Time Clock Page After Clocking In
Once the Clock Out button has been clicked a summary page will be displayed with an additional action needed to officially clock out of the work being tracked. It is important to review the information before finalizing the time tracked and clicking the Clock Out button at the bottom of the page.
Below is a screenshot illustrating how the Time Clock page appears when clocking out and a description of what can be accomplished there.
- Tracked Work: The information listed here will reflect the details that were entered in when clocking into the work being tracked.
- Start Time: Lists the date and time that the work was initially clocked into.
- Time Elapsed: Calculates the amount of time that was tracked between the time the work was clocked in and currently being clocked out.
- Clock Out Time: List the time that will be set for when the Clocked Out button is clicked.
- Notes: Allows the Employee to enter a note that will be added to the weekly Timesheet.
- Click Out: Completes the clocking out of the work being tracked.
- Close: Will navigate back to the Time Clock page without completing the clocking out process.
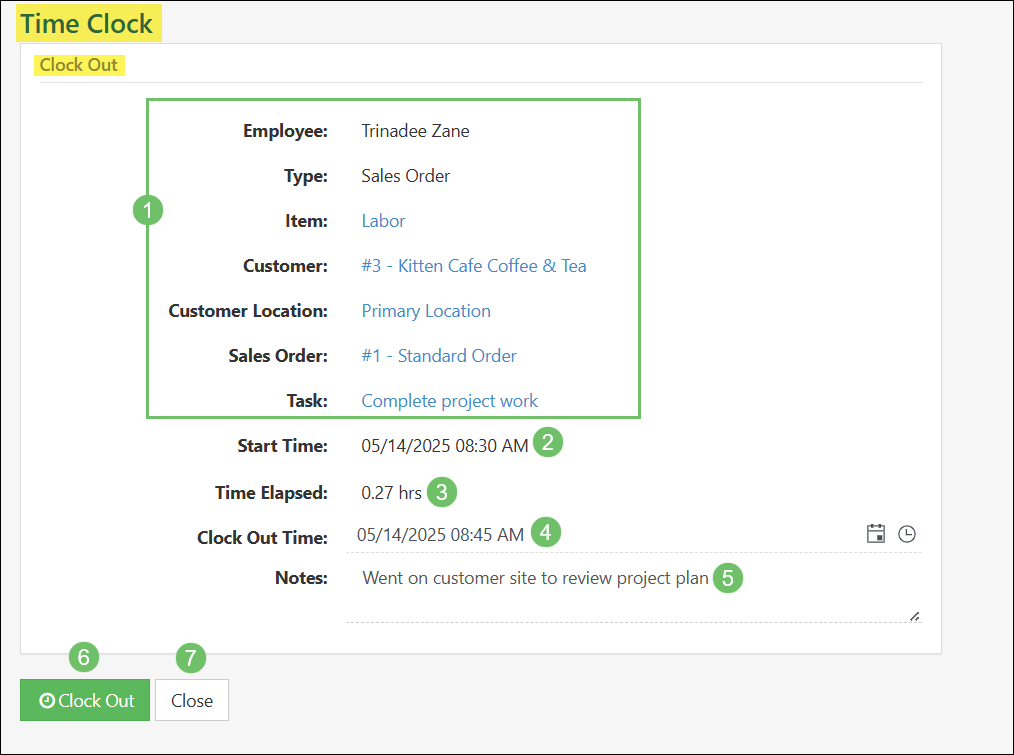
Example of Clocking Out
To clock out for someone else, the Clock in for someone else? option will need to be selected from the Time Clock page.
Example of the Clock In for Someone Else Option
Once you have searched for the Employee at the top of the Time Clock page, you will have a list of their current Clocked Into information with a button to Clock Out.

Example of Clocking Out for Someone Else
-
Timesheets
Another way to enter time in Striven is to submit a Timesheet. A Timesheet is a way to enter time for hours worked for multiple days of the week. Timesheets can be marked as Billable and Employees can also associate a Customer, Customer Location, Sales Order, Task, or Item depending on the Time Entry Type selected. After Timesheets are submitted, the Time Entries entered on the Timesheet will go through the approval process which will be further discussed in a section below.
Example of the Timesheet Page
Adding Time to a Timesheet
To access the Timesheet page navigate to the loyee Actions Menu located within the Striven Menu Bar and select Timesheet.
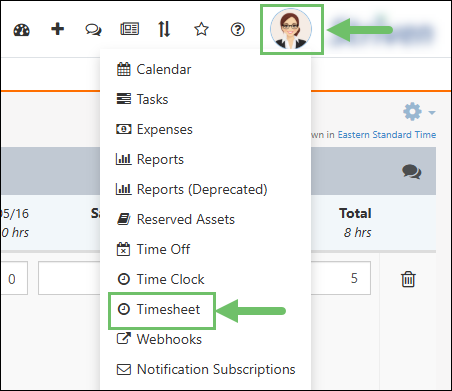
Example of Timesheet within the Employee Actions Menu
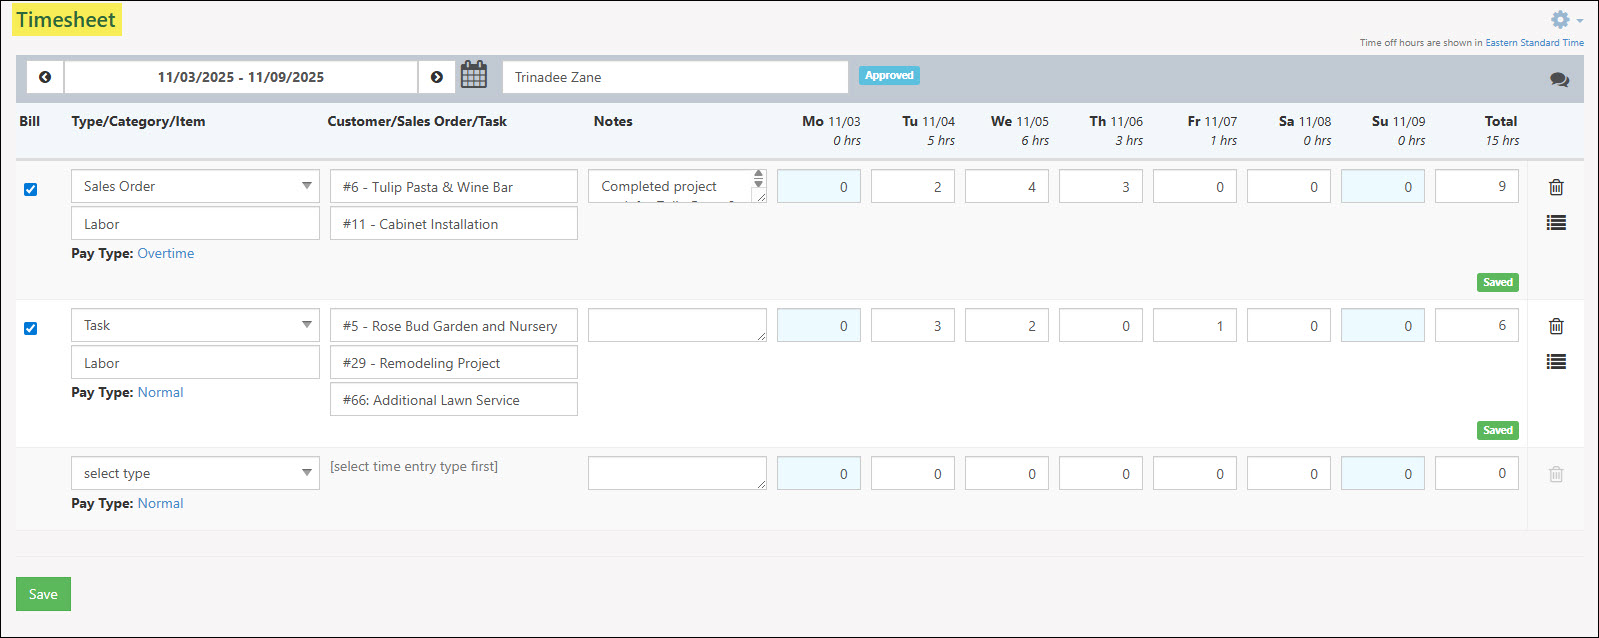
Below is a screenshot illustrating how a Timesheet page appears and a description of what can be accomplished there.
- Weekly Date Range: Shows the week for which the Employee is entering time.
- Employee: The Employee the Timesheet relates to.
- Timesheet Status: Shows the overall status of the current week’s Timesheet. Statuses include the following:
- Pending Approval: Indicates no Time Entries entered on the Timesheet have been approved.
- Partially Approved: Indicates some Time Entries have been approved on the Timesheet but not all Time Entries that have been entered. Individual Time Entries will have an Approved tag located underneath the specific date and hours entered. Clicking on the Approved tag will open the Entry Approval Details window for the specific Time Entry.
- Approved: Indicates that all Time Entries entered on the Timesheet have been approved.
- Discussions: Allows you to send or view Discussions related to the weekly Timesheet.
- Bill: Checkbox to determine if the hours entered should be considered billable and can later be added to a Time & Expense Invoice. If the Time & Attendance option is selected for the type, the Bill option will not be available.
- Type/Category/Item: The type of work based on the Time & Expense Settings page. Based on your settings options for the Time Entry type can include Time & Attendance, Customers, Customers Location, Sales Orders, or Tasks. An additional field will be available to select the Item and the Pay Type. If Time & Attendance is selected, another field will appear in order to select the Time Tracking Category which was configured on the Time & Expense Settings page.
- Customer/Sales Order/Task: Relates the hours entered to a selected Customer. Additional fields can be entered to associate the time with a specific Customer Location, Sales Order, or Task depending on the Required Fields configurations in the Billable Time Entries and Non Billable Time Entries sections from the Time & Expense Settings.
- Notes: Allows you to enter a note about the time being entered.
- Date and Hours: Each date listed can have a number of hours entered in order to track time for a single type of work over multiple days. A total will be displayed to the right of the entries.
- Delete: Deletes a Time Entry that has been entered onto a Timesheet.
- View Approval Details: Opens the Entry Approval Details window to view specific details regarding each Time Entry approval including the approver and date and time of approval. This icon will only appear if all Time Entries has been approved per row.
- Save: Submits the Time Entries entered on the Timesheet for the approval process.
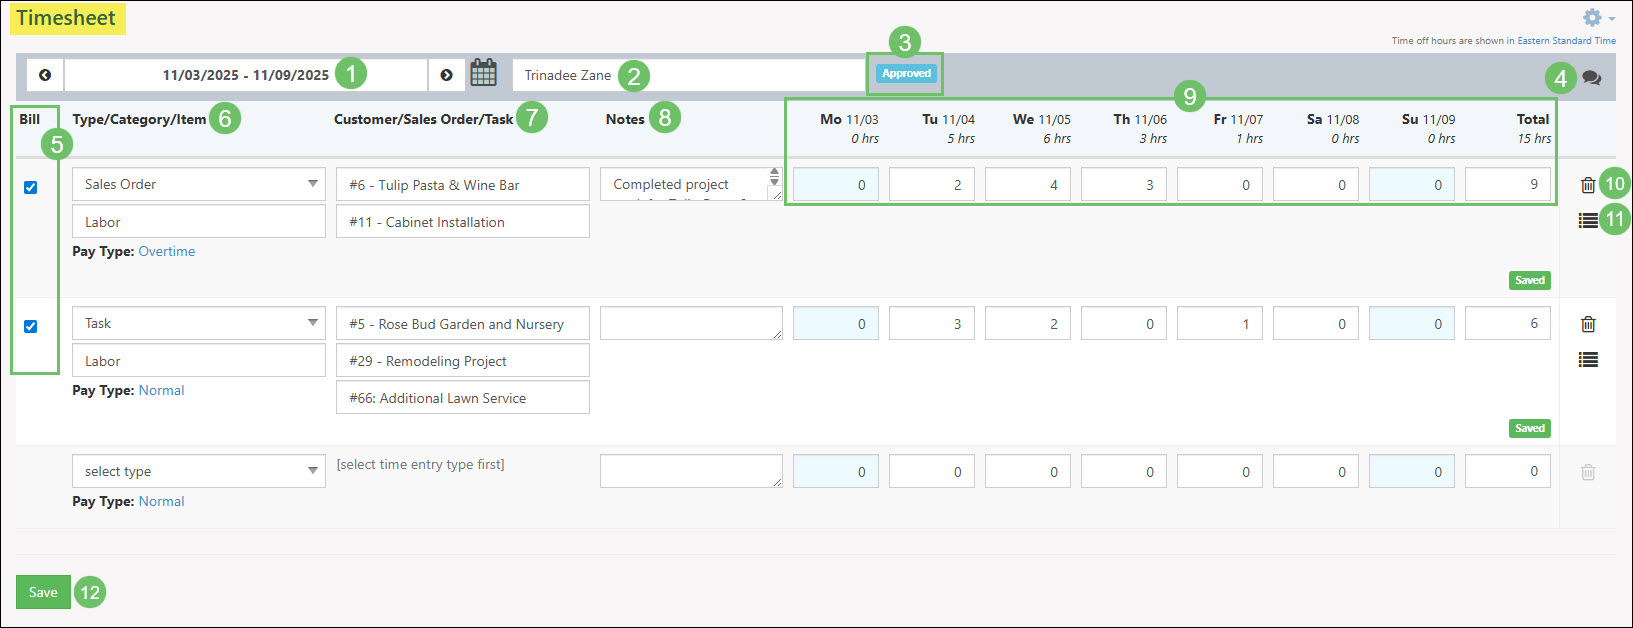
Example of Actions Available from the Timesheet Page
Timesheet List
Weekly Timesheets that have been previously submitted can be viewed and accessed from the Timesheet List. To view the Timesheets List, navigate to Employees → Time Tracking → Timesheets.
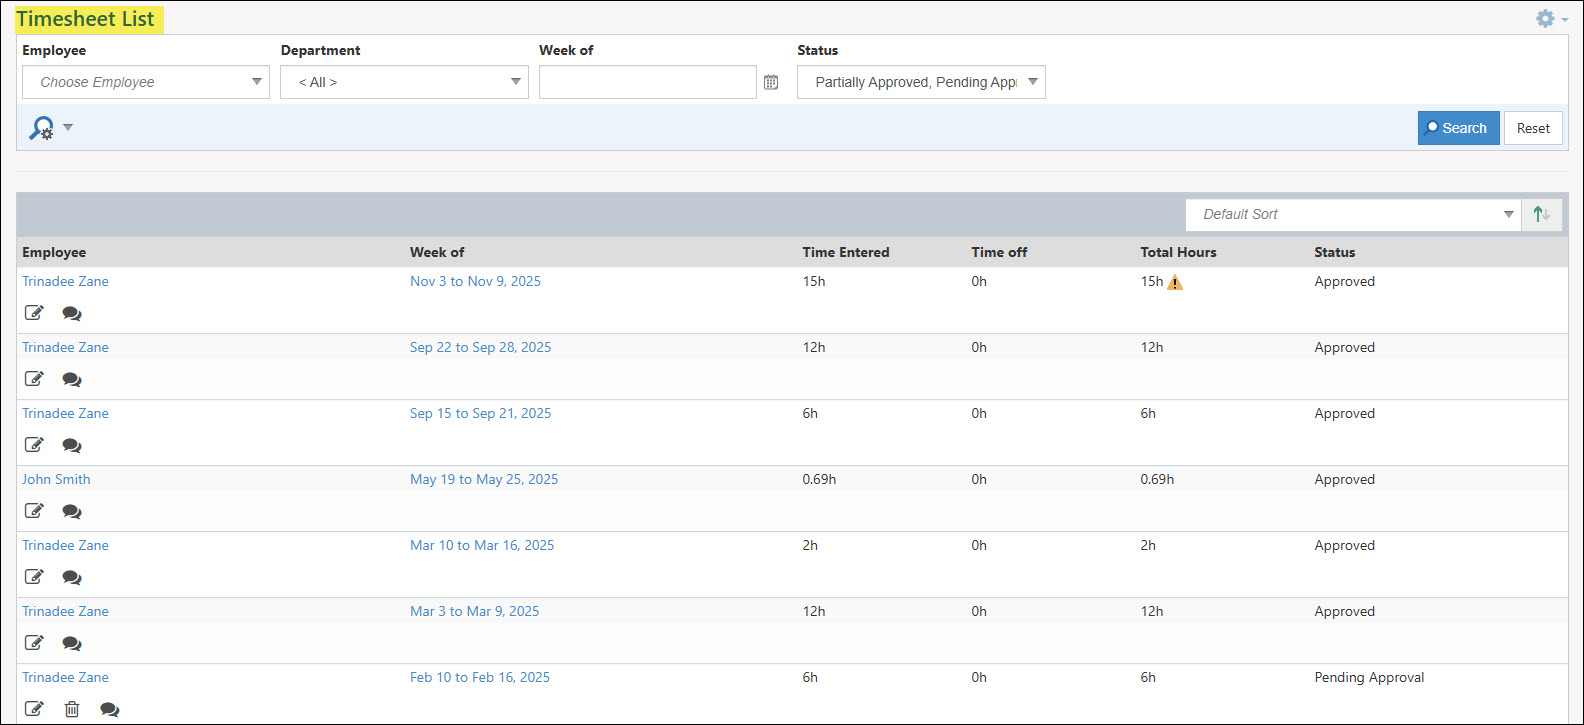
Example of the Timesheet List
Below is a screenshot illustrating how the Timesheet List appears and a description of what can be accomplished there.
- Search Filters: Narrows down results listed in the Timesheets List based on the Employee, Department of the Employee, Week Date Range, and the Status of the Timesheet.
- Employee: Lists the Employee that the Timesheet is related to. Clicking on the Employee’s name listed here will open the Employee Information card for additional details regarding the Employee.
- Week Of: Lists the week that the Timesheet is set for. Clicking the week listed will open the Timesheet in order to view or make necessary changes.
- Time Entered: Total number of hours entered within the Timesheet that is listed.
- Time Off: Lists the total number of hours the Employee has entered for Time Off in the specific week the Timesheet relates to.
- Total Hours: Totals the amount of hours entered for the weekly Timesheet based on the Time Entered and the Time Off columns. A warning icon may be present which can be hovered over to view the amount of hours that are not set to the default Pay Type.
- Status: Lists the current status the Timesheet resides in. Statuses include the following:
- Pending Approval: Indicates no Time Entries entered on the Timesheet have been approved.
- Partially Approved: Indicates some Time Entries have been approved on the Timesheet but not all Time Entries that have been entered.
- Approved: Indicates that all Time Entries entered on the Timesheet have been approved.
- Actions: Timesheets listed will have actions that vary depending on the status the Timesheet resides in. The following actions may be available:
- Edit: Opens the weekly Timesheet in order to make changes and edits as needed.
- Delete: Will move the Timesheet into a Deleted status. Previously deleted Timesheets can be viewed from the Timesheets List by updating the Status filter to include Deleted.
- Discussions: Opens a Discussion Threads page that will be related to the weekly Timesheet. Previous Discussions can be viewed along with options to send new Discussions or reply to existing Discussions.
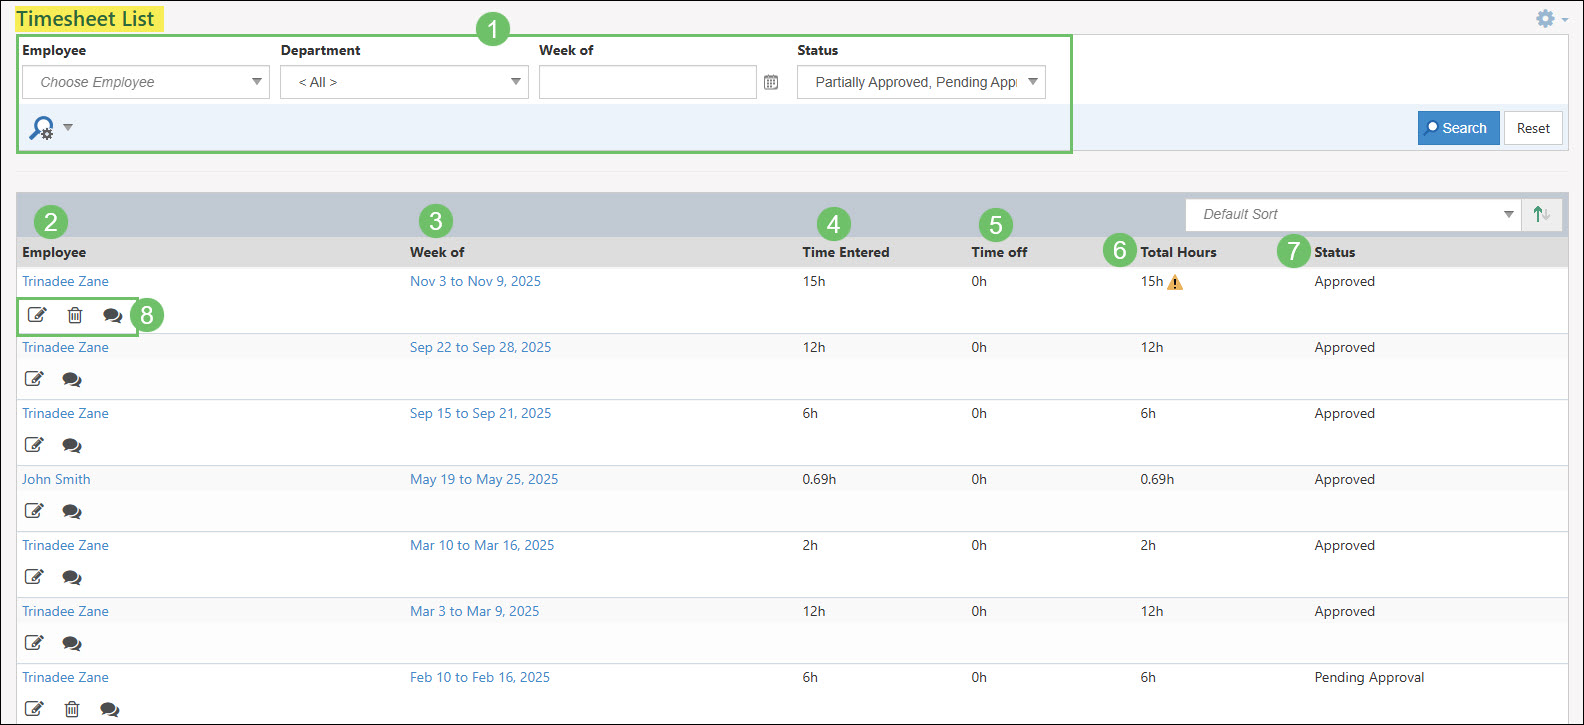
Example of the Actions and Information Available on the Timesheets List
-
Time Entry Approval Queue
The Time Entry Approval Queue is where you can view time that has been approved or pending approval based on a specified date range. Actions are available to approve pending Time Entries and also unapproving Time Entries that have already been through the approval process. To access the Time Entry Approval Queue, navigate to Employees → Time Tracking → Approve.
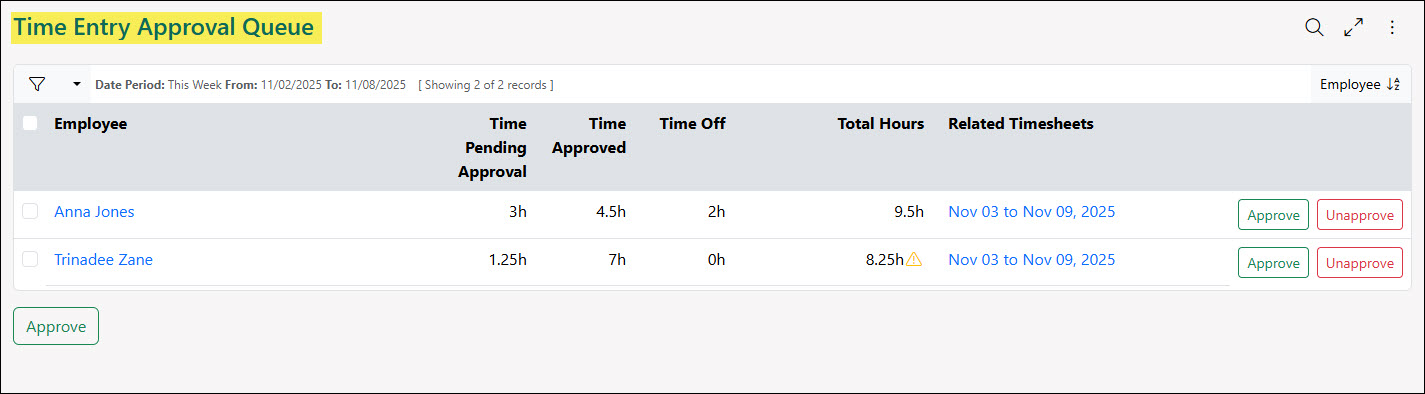
Example of the Time Entry Approval Queue
Below is a screenshot illustrating how the Time Entry Approval Queue appears and a description of what can be accomplished there.
- Search Filters: Adjusts results listed in the Time Entry Approval Queue based on the following available search criteria:
- Date Period: Updates the Date Range search filter based on a specific date period.
- Date Range: Adjusts the results listed in the Time Entry Approval Queue based on the date range selected. This field is required in order to view results in the queue.
- Employee: Changes the queue to only show Time Entries that a specific Employee has entered.
- Department: Updates the Time Entry Approval Queue to list Employees with Time Entries that are part of a specific Department.
- Team: Updates the Time Entry Approval Queue to list Employees with Time Entries that are added to a specific Team.
- Employee: Lists the Employee who has entered Time Entries. Clicking on the Employee’s name will open the Employee Info Card to view more information.
- Time Pending Approval: Displays the total number of hours within the selected date range that has not been approved.
- Time Approved: Displays the total number of hours within the selected date range that has already been approved.
- Time Off: Calculates the amount of hours the Employee has entered as approved Time Off for the selected date range.
- Total Hours: Adds up the total number of hours of Time Entries that have been approved, waiting approval, and approved Time Off. A warning symbol will be displayed and can be hovered over to show the number of those hours that have been set as non-default hours.
- Related Timesheets: Lists the Timesheet Week that the Time Entries listed in the Approval Queue are a part of. Clicking on the hyperlink listed here will open the Timesheet to view additional details.
- Actions: The following actions are available for each Employee listed in the Time Entry Approval Queue:
- Approve: Changes the Time Entry hours listed in the Time Pending Approval column from Pending Approval to Approved.
- Unapprove: Changes the Time Entry hours listed in the Time Approved column from Approved back to Pending Approval.
- Approve: Toggle the checkbox listed next to each Employee listed in the Time Entry Approval Queue and click the Approve button at the bottom of the list to approve all the pending hours listed.
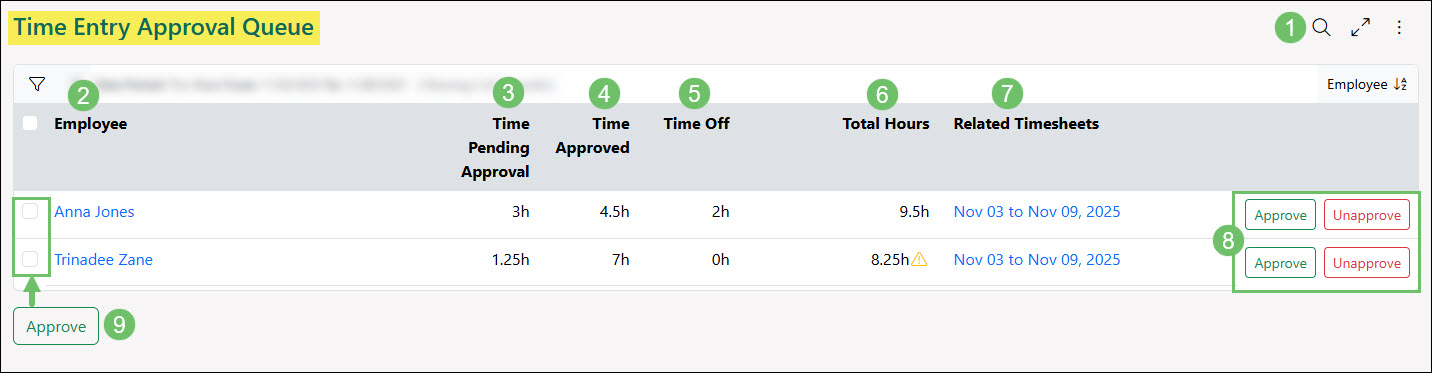
Example of Actions and Information Available from the Time Entry Approval Queue
- Search Filters: Adjusts results listed in the Time Entry Approval Queue based on the following available search criteria:
-
Expense Tracking
Striven enables comprehensive expense tracking for Time & Expense Invoices through multiple avenues. Employees can log expenses directly. Billable line items can be designated within Checks and Credit Card Charges. Purchase Orders and Bills also allow marking Items for client billing. These features ensure that all billable expenses can be accurately tracked and invoiced to clients.
-
Employee Expenses
Employees can track work-related expenses incurred for customers. These expenses can be designated as billable and subsequently included in a Time & Expense Invoice to bill the customer. Learn more about setting up and managing expenses added by Employees by reviewing the Employee Expenses Guide.

Example of Adding an Employee Expense
-
Bills, Checks, and Credit Card Charges
Line Items or Expense Line Items that have been added to Bills, Checks, or Credit Card Charges can be marked as billable and later added to a Time & Expense Invoice to bill to the related Customer that the expense is related to. For each line listed on these Transactions the Employee will have the ability to select the Customer and Sales Order that the cost is associated with in order to track these expenses accurately.

Example of a Check Line Item Marked Billable
-
Time & Expense Invoices
Turning billable time, expenses, and Items into Customer Invoices is streamlined through the Generate Time & Expense Invoices feature, saving you time and ensuring accurate billing. Generating multiple Invoices simultaneously for similar items further enhances efficiency. For added flexibility, the ability to directly add Unbilled Items to new Invoices or Sales Receipts simplifies the process when creating these Transactions, ensuring all billable activities are captured without needing to navigate away from the Invoice or Sales Receipt creation process.
Example of the Generate Time & Expense Invoices Feature
Permissions
There is one (1) User Role permission related to creating a Time & Expense Invoice.
- “T&E Invoices – Add”
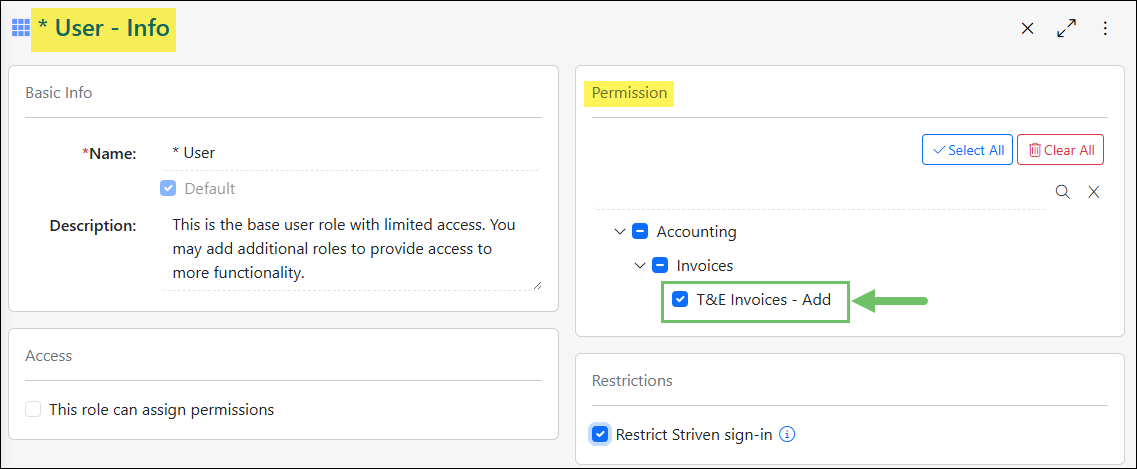
Example of Time & Expense Invoice Related Permission
Learn more about managing User Roles and Permissions in Striven by reviewing the User Roles Guide.
-
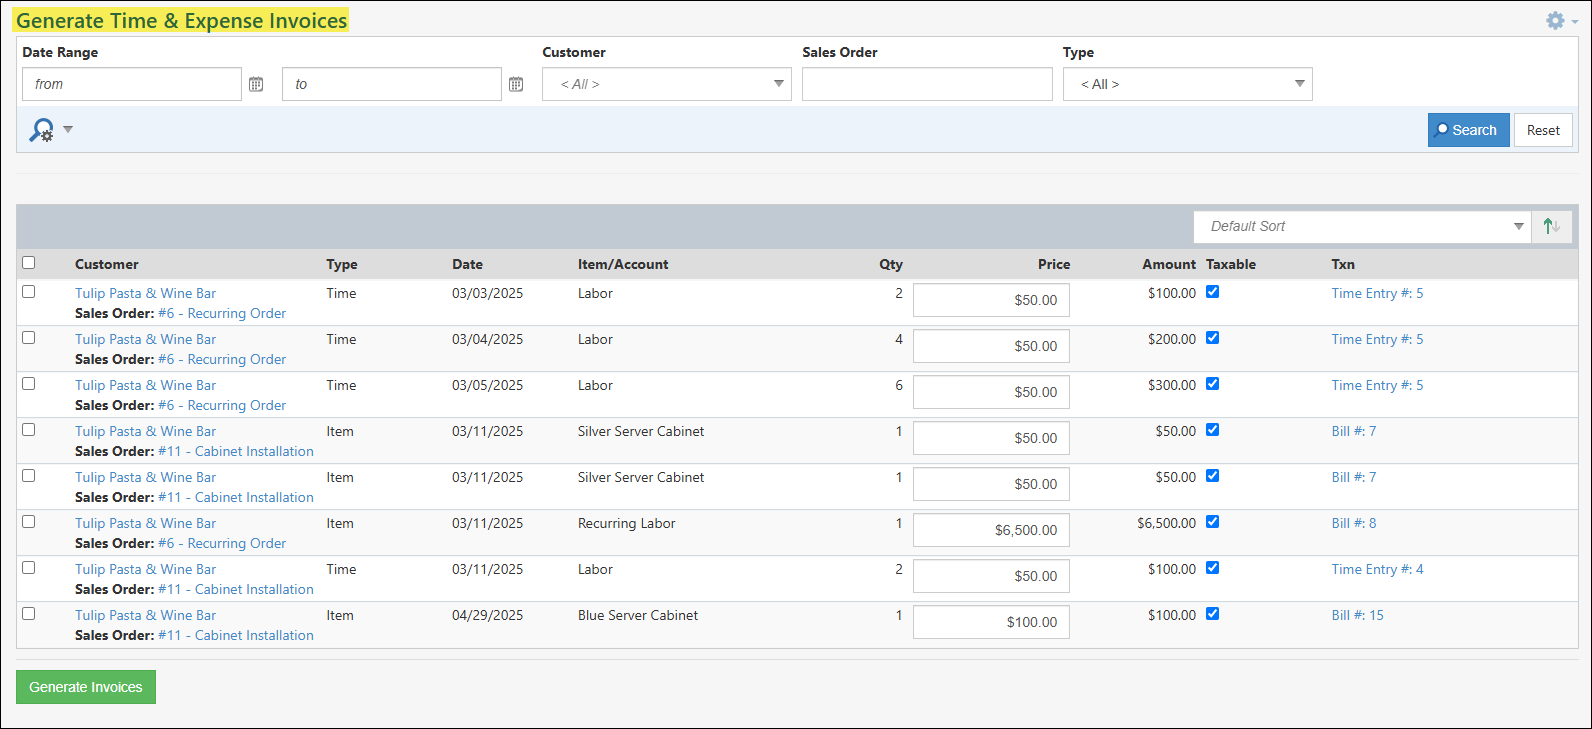
Creating Time & Expense Invoices
Once time, expenses, or items from Transactions or Timesheets have been marked as billable and associated with a Customer a Time & Expense Invoice can be created to charge the Customer as needed. To create a Time & Expense Invoice navigate to Customers → Financial → T&E Invoice.
Below is a screenshot illustrating how the Generate Time & Expense Invoices page appears and a description of what can be accomplished there.
- Search Filters: Narrows down results based on the following search filter options:
- Date Range
- Customer
- Sales Order
- Type
- Multiple Select: Allows the Employee to select multiple results in order to add multiple items to a T&E Invoice or create multiple T&E Invoices at once. If the Customer and Sales Order are the same for each result selected, one Invoice will be created. If multiple Customers and Sales Orders are listed, multiple Invoices will be created accordingly.
- Customer: Lists the Customer name that the time or expense is related to. If a Sales Order has also been associated, this will be listed underneath the Customer’s name. Clicking on either the Customer name or the Sales Order number will allow the Employee to access additional details.
- Type: Displays the type that is being charged to the Customer which includes the following:
- Expense
- Item
- Time
- Date: Shows the date that the time or expense was submitted and available to be added to a Time & Expense Invoice. This date will also prefill in as the Invoice date that is being created.
- Item/Account: Displays the related Item or Expense GL Account that was selected on the related Check, Credit Card Charge, or Bill.
- Charge Amount: Details the amount that will be charged to the Customer through the Time & Expense Invoice. The amount will be calculated by multiplying the Price column along with the Quantity column. A taxable checkbox is available as well so the line Items listed on the Invoice will be marked as taxable or not upon creation.
- Txn: The related transaction where the item or expense account was marked billable can be accessed by clicking on the results listed in this column.
- Generate Invoices: Based on the results selected either one or multiple Invoices will be generated. Once the Invoice has been generated, this action cannot be undone and the related time and expenses will be removed from the Generate Time & Expense Invoices page.
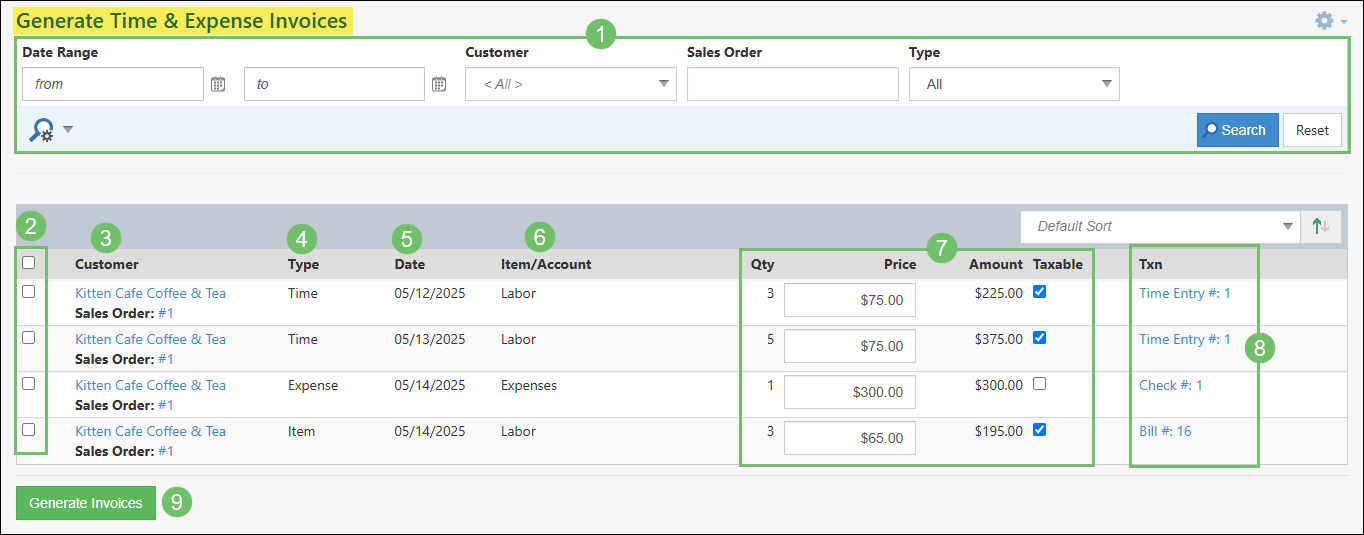
Example of the Generate Time & Expense Invoices Page
Invoicing Summary
Once the Generate Invoices button has been clicked from the Generate Time & Expenses Invoices page, an Invoicing Summary dialog window will appear to view details regarding the invoices that have been created.
Below is a screenshot illustrating how the Invoicing Summary dialog window appears and a description of what can be accomplished there.
- Invoice Date: The date listed here will be the date that is set on the Invoices that are being created. The date can be updated from the Invoicing Summary dialog window if needed and will take effect once the Employee clicks the Save and Close button.
- Email Invoice to Default Recipients: Will send the notification regarding the Invoice has been created based on the Customer’s notification settings. This option can be updated before the Employee clicks the Save and Close button.
- To Be Printed: Determines if the Invoice being created will be set as To Be Printed or not. This option can be updated before the Employee clicks the Save and Close button.
- Invoice #: Lists the Invoice number for the Invoice that has been created. Clicking the hyperlinked number listed here will open the Invoice to view in more detail.
- Customer: Will show the Customer related to the Invoice and also the related Sales Order that is set on the Invoice.
- Invoice Total: Displays the total amount that will be listed on the Invoices being created.
- Actions: There are two actions available from the Invoicing Summary dialog window which includes the following:
- Save and Close: Takes into account any changes that were made in the Invoicing Summary dialog window including the Invoice Date, notification options, and printing options.
- Close: Creates the Invoice without updating any changes that were made in the Invoicing Summary dialog window including the Invoice Date, notification options, and printing options.

Example of the Invoicing Summary for a Time & Expense Invoice
- Search Filters: Narrows down results based on the following search filter options:
-
Add Unbilled Items
Time and expenses that should be billed to a Customer can also be added right from the Add Invoice and Add Sales Receipt pages once the Customer has been selected rather than creating the Invoice through the Generate Time & Expense Invoices page.
Once a Customer has been selected on an Invoice or Sales Receipt, an additional Options button will appear at the top of the Item section. From the Options button, the Employee can select Add Unbilled Items from the list to bring up an Unbilled Items dialog window in order to select which time tracked and billable expenses should be added as line items to the Invoice or Sales Receipt.
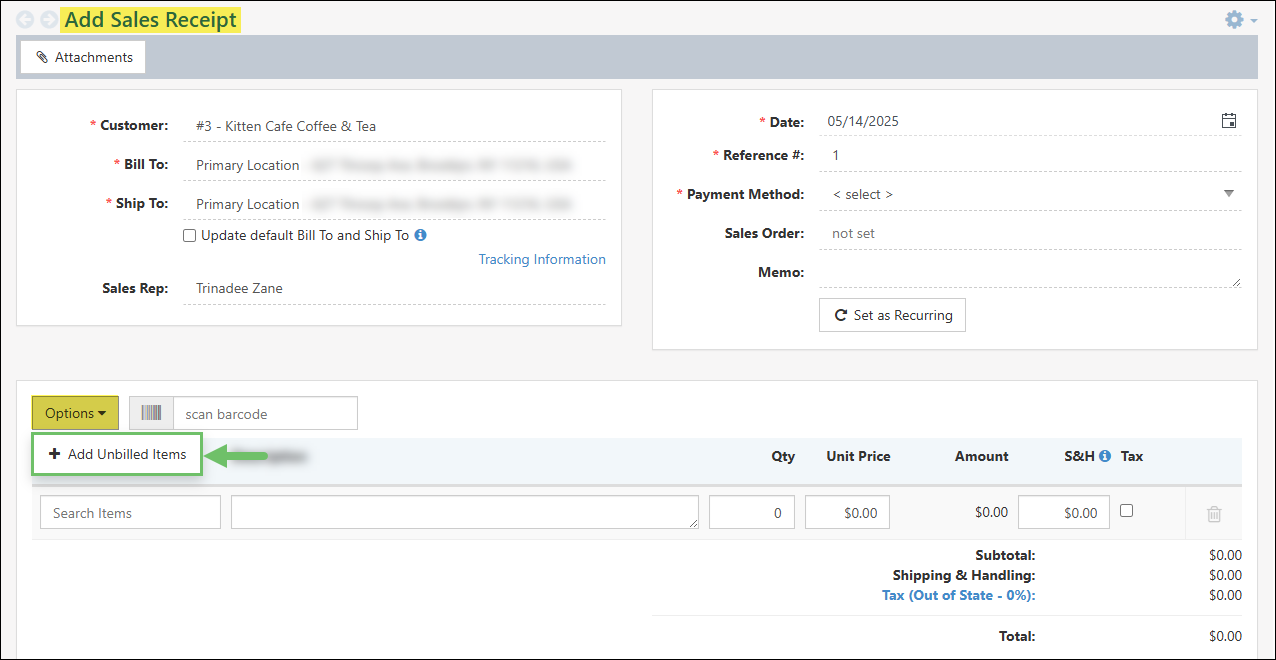
Example of the Add Unbilled Items Option on a Sales Receipt
Below is a screenshot illustrating how the Unbilled Items dialog window from an Invoice or Sales Receipt appears and a description of what can be accomplished there.
- Show All Unbilled: If a Sales Order has been selected on the Invoice or Sales Receipt, this list will only show Unbilled Items related to that Order. To have all Unbilled Items appear regardless of the related Sales Order, check the Show All Unbilled option.
- Item/Account: Displays the related Item or Expense GL Account that was selected on the related Time Entry, Check, Credit Card Charge, or Bill.
- Type: Lists the type of Unbilled Item that can be added to the Invoice or Sales Receipt. A hyperlink is also available to quickly access the related Transaction or Time Entry.
- Date: Lists the date that the Unbilled Item was made accessible to add to an Invoice or Sales Receipt.
- Qty/Price/Amount/Taxable: The information listed here will determine what the line Item will be when added to the Invoice or Sales Receipt. The amount will be determined based on the quantity multiplied by the listed price. The price can be adjusted here before adding the Unbilled Item to the Invoice or Sales Receipt.
- Actions: There are two actions available after Unbilled Items have been selected which are the following:
- Add to Invoice: Adds the Unbilled Items that have been selected from the Unbilled Items dialog window to the Invoice or Sales Receipt that is currently being created.
- Close: Will return to the Add Invoice or Add Sales Receipt page without adding any selected Unbilled Items.

Example of the Unbilled Items Dialog Window
-
Recap
With this Time & Expense Management Guide, we’ve discovered how to create and manage Time Entries, Timesheets, and manage Time Clock activity. We’ve explored the Timesheet Approval Queue process. We’ve also discovered how to create Time & Expense Invoices for the purpose of billing Customers.

Have a Question?
Ask the Striven Community
User-sourced how-to’s, feedback, and more!
FAQs
-
Why are our Timesheets automatically approving?
The User Roles need to be updated. Any User Role which should NOT be able to have an automatically approved Timesheet needs to have the following permissions should be removed:
- Timesheet – Approve and Adjust for all Employees
- Timesheet – Self Approve
-
How can billable time and expenses be converted into customer invoices in Striven?
Billable time, expenses, and items can be converted into Customer Invoices using the Generate Time & Expense Invoices feature. This feature allows for generating multiple invoices simultaneously for similar items. Additionally, unbilled items can be directly added to new Invoices or Sales Receipts when creating these Transactions.