Striven Integrations
API Settings
Guide
-
Overview
API stands for Application Programming Interface. An API is a software “messenger” that allows two applications to communicate with each other by taking requests and telling other systems what you want to do and returning the response.
With Striven, you can enable our APIs to connect with outside sources to interconnect data, ranging from reports to accounting. By clicking Enable API Access on the API Settings page, you will receive your Client ID and Client Secret. You will also be able to assign an Employee as the Resource Owner, which is the Employee who will be notified and responsible for the API access.
- Note: User Role permissions will need to be set in Striven to allow for API access and use.
To view your API Settings in Striven, navigate to Company → Settings → Integrations → API Settings.
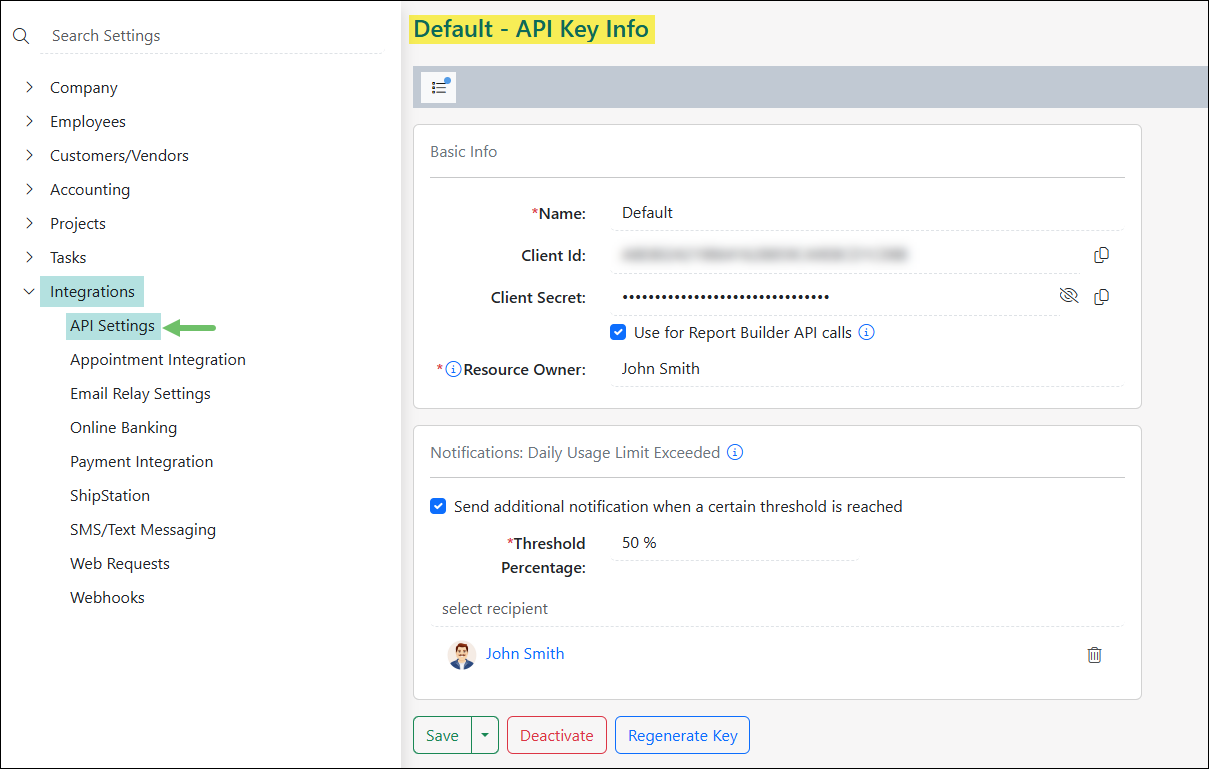
Example of the API Settings Page

For more detailed information regarding Striven APIs, please visit our Striven API Reference Page.
-
Threshold Notifications for API Usage Limits
On the API Settings page in your Striven system, you will notice there are Daily Usage Limit Exceeded Notifications that can be sent to a selected recipient when the usage limit is exceeded for the day. Additionally, there is an option to send a similar notification when a designated API usage threshold is reached. This threshold can be set anywhere between 1% to 99%.
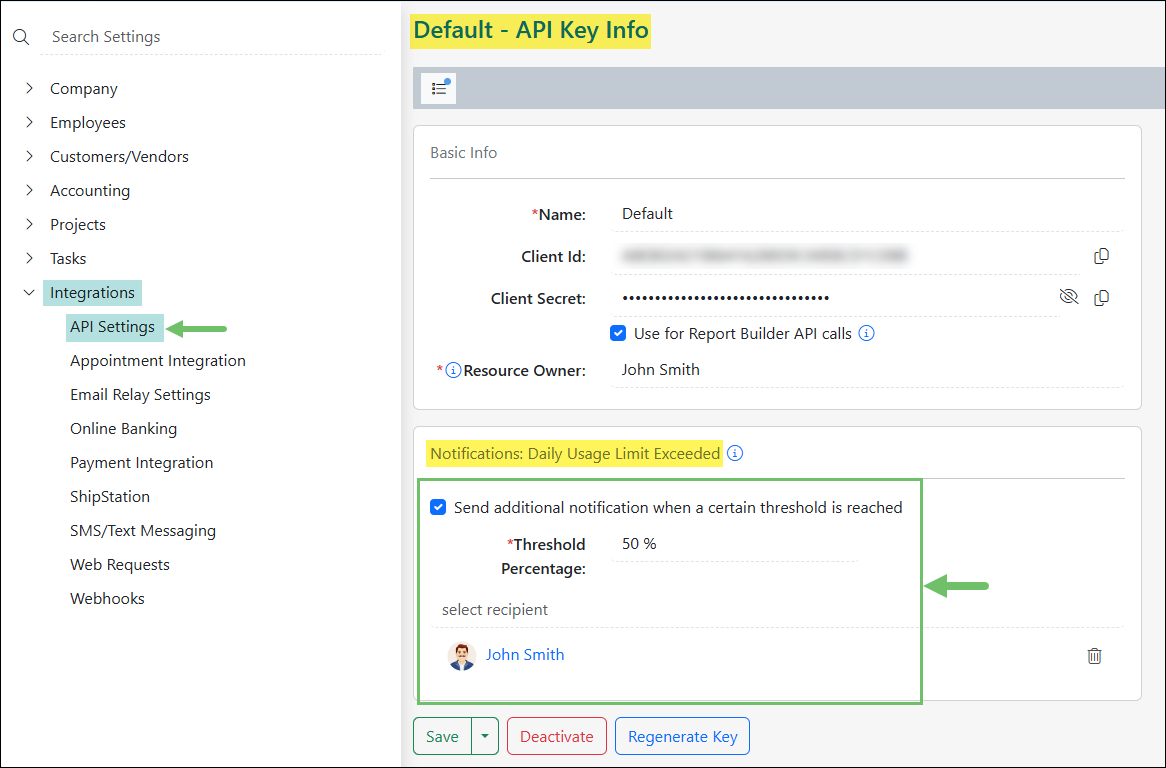
Example of the Daily Usage Limit Exceeded Notification Settings on the API Settings Page

-
Multiple API Keys
Your Striven subscription includes access to one (1) API Key, which is limited to the API usage limits associated with your subscription plan (i.e. Standard or Enterprise). You have the option to add supplementary API Keys to your subscription for additional fees, which will provide the ability to scale up your usage limits.
Once you have enabled and configured your API Access in Striven, the API Settings page in Striven will list the available API Keys associated with your subscription, along with related details, such as Resource Owner, Subscription fee, and a link to the API Key Call Log.
- Note: If you have not subscribed to any additional API Keys, the list will only display your default API Key included with your Striven subscription.
Click the blue Plus (+) button at the top of the page to add and configure an additional API Key.
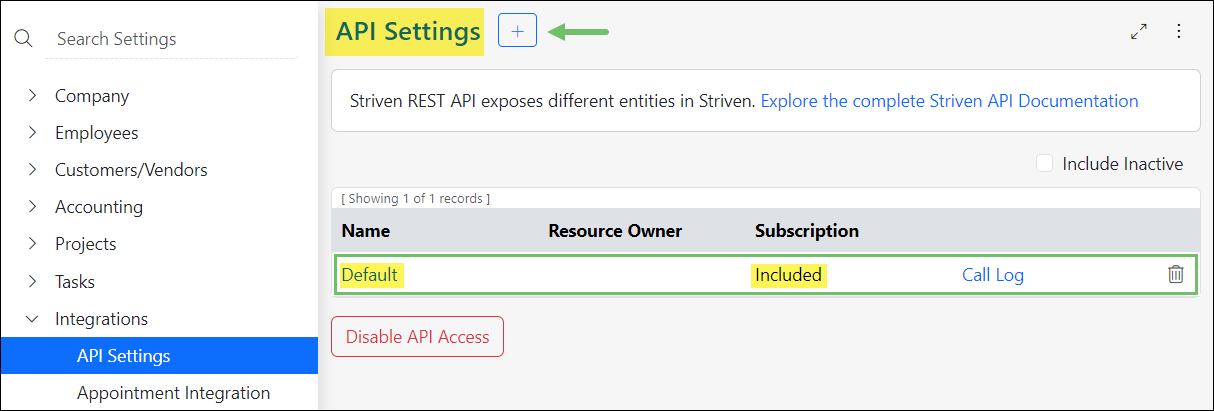
Example of Add API Key Button on API Settings Page

The Add API Key page will list the start date of the new API Key subscription. It will also indicate the prorated amount of the first invoice based on where the subscriber is in their billing cycle.
- Note: Threshold notification Settings are available on all API Keys settings and can be configured in the same way for each of them to track and maintain usage limits.
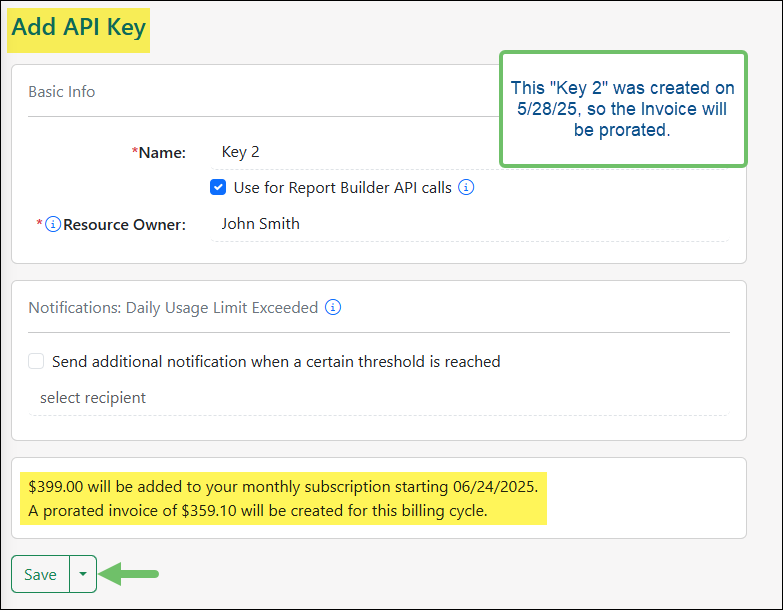
Example of the Add API Key Page Showing the Subscription Details of an Additional Key

After you Save the new API Key, it will display in the list with your default API Key details. If you wish to view the API Key Info, click on the name of the API Key.
Under the Subscription column on the API Settings List, you will see the fee associated with adding the additional API Key to your subscription. This fee is based on whether you have a Standard or Enterprise Subscription.
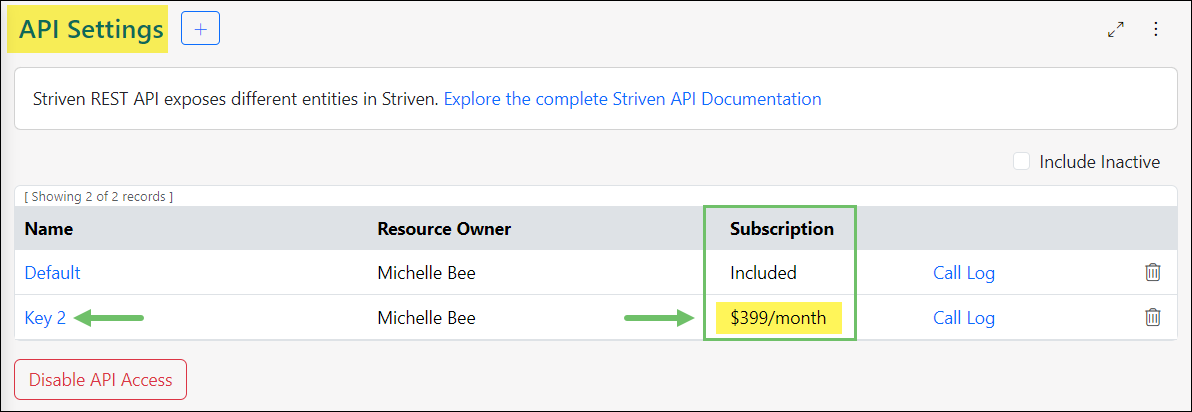
Example of the API Settings Page Showing the Subscription Details of an Additional Key

Your API Key subscription information will also be displayed along with the rest of your subscription details. You can view this information from the Employee Actions menu in the top right corner of the window, then click on Subscription.
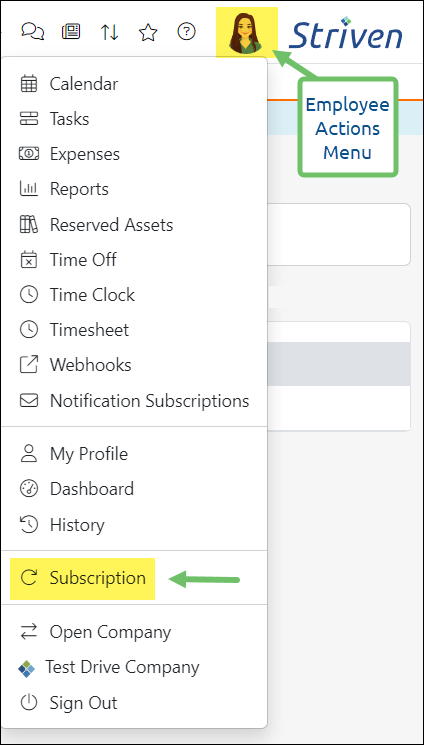
Example of the Subscription Option in the Employee Actions Menu

The subscription fees for additional API Keys are as follows:
- Standard Plan: Fee of $199.00 per additional key for the monthly subscription
- Enterprise Plan: Fee of $399.00 per additional key for the monthly subscription
Your subscription details can be found by clicking on the View Current Usage and Total link on the Subscription page. This will display a popup showing all of your Striven subscription information, including your Current Monthly Subscription details for additional API Keys.
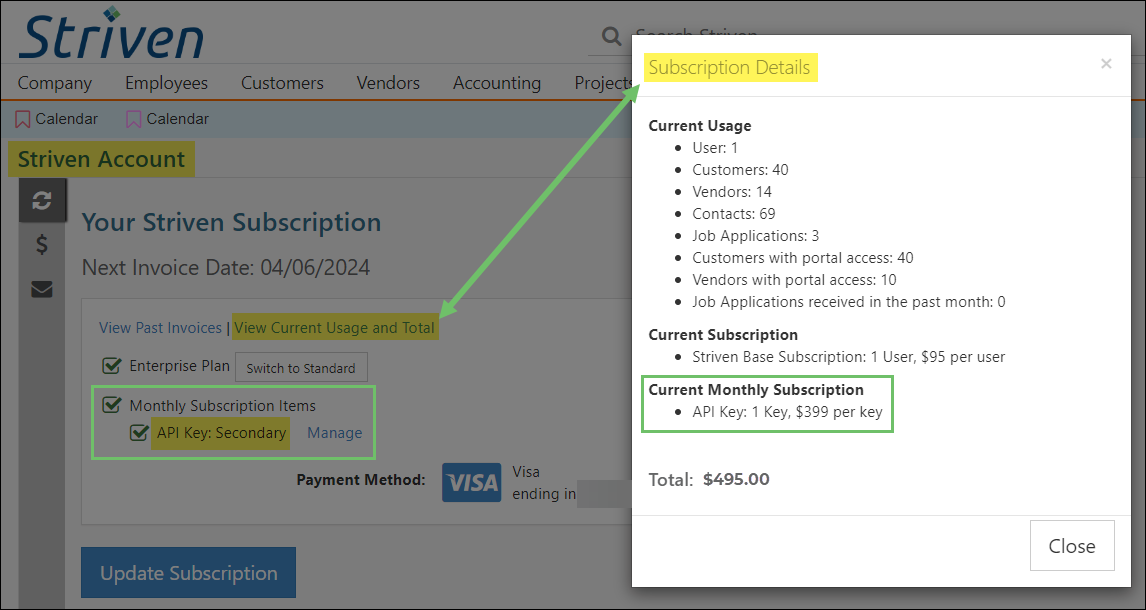
Example of a Striven Subscription Page with API Key Subscription Details

Use for Report Builder API Calls
When using the Report Builder in Striven, a feature that is available is to Share the report which enables API access for the report which will generate an API Key. The API Key that is generated in this manner will be associated with the default API Key within the API Settings.
To specify a specific API Key to be associated with the report shared in this manner, check the option within the API Key Settings for Use for Report Builder API Calls. With this option toggled on within an API Key any API calls being made from the report built with the Report Builder will be associated with the selected API Key.
If multiple API Keys have this option toggled on, the API Calls will be associated with the API Key that was first created. Once this key has run out of usage, the Report Builder will roll over to the next selected API Key with this option toggled on.
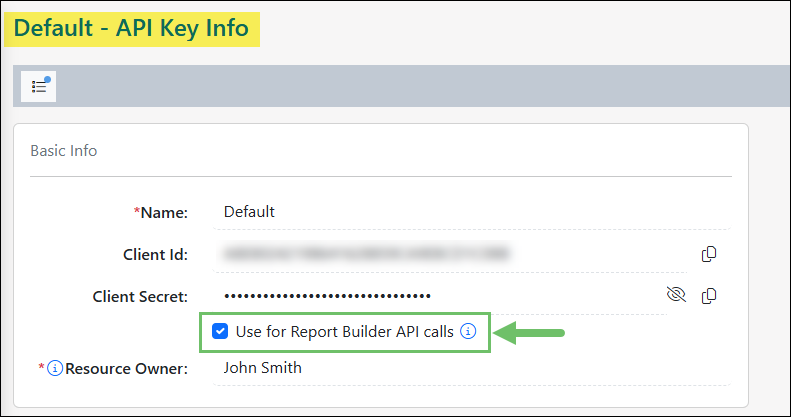
Example of the Use for Report Builder API Calls Option

Learn more about building reports with the Report Builder by reviewing our Report Builder Guide.
Deactivating API Keys
Any API Key can be deactivated by clicking on the Trashcan icon next to the API Key name on the API Settings page. Keep in mind that deactivating the Default Key that is included in your Striven subscription will deactivate ALL of your API Keys.
- Note: API Keys cannot be reactivated once they are made inactive.
-
API Call Log Report
Striven has an API Call Log Report that will allow you to view details about your recent API usage. You can locate this report by navigating to Reports → Communications → API Call Log or by clicking on the Call Log button located on the API Settings page in Striven.
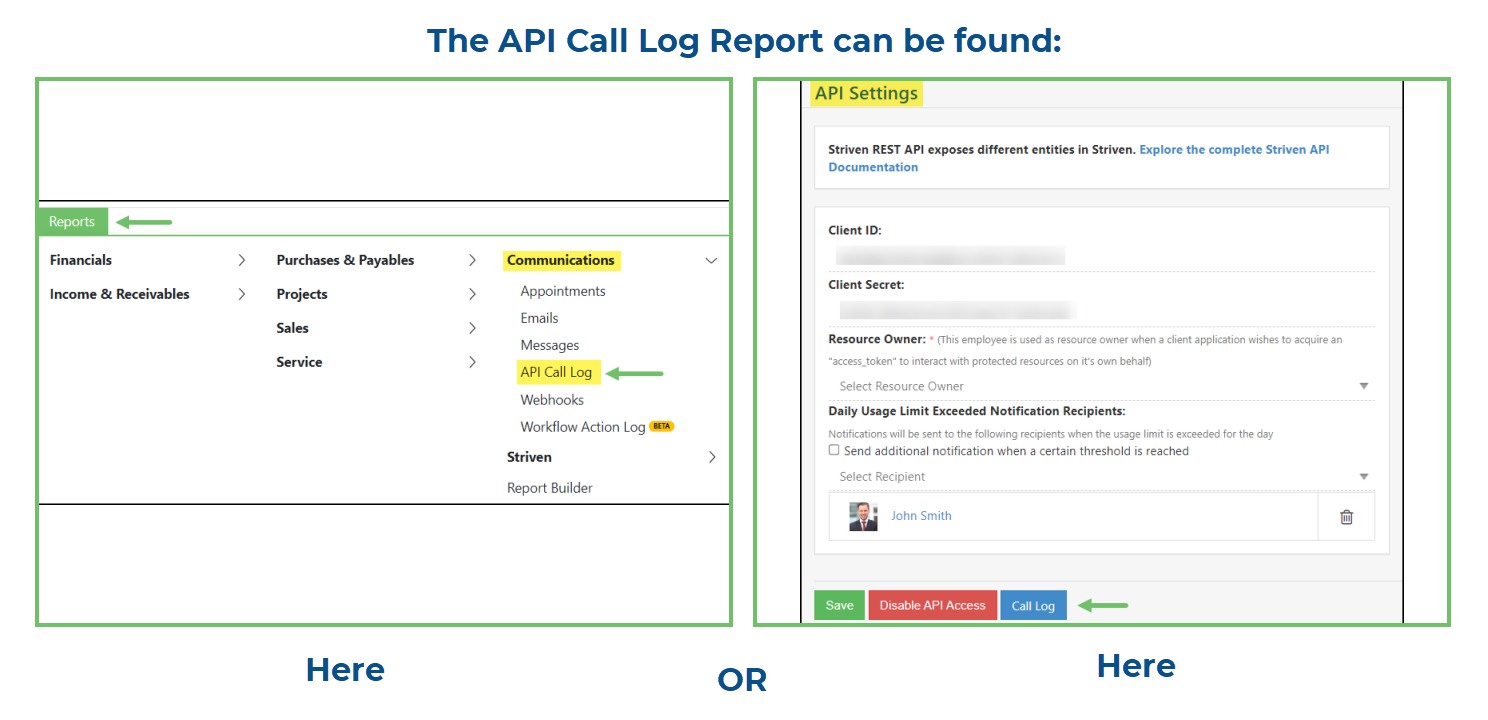
Example of How to Access the API Call Log Report in Striven

There are two (2) User Role permissions associated with access to this report:
- “API Call Log Report – View”
- “API Call Log Report – Export”

Example of the User Role Permissions Related to the API Call Log Report

Important Note: The permission to View the API Call Log Report is a very HIGH level permission because it exposes the Custom Report URIs, which effectively gives access to the data contained in the report.
This report displays a variety of information related to all calls made to the Striven API within the last 30 days. The following information is provided in columns of this report:
- Request URI: Where the request is being made (i.e. the source of the information being requested).
- Method: GET, POST, PATCH, or DELETE. The Method can contain a hyperlink, which will allow you to view the API Request when selected.
- IP Address: The address from which the call was made.
- Owner: Either the resource owner selected on the API Settings page, or in the case of Custom Reports, it will be the report owner.
- API Key Name: Identifies which API Key was used to make the call.
- Report Name: Name of the Custom Report used in the call, if applicable.
- Dataset Name: Name of the Dataset used to create the Custom Report.
- # of Calls: Lists the number of calls for that particular Request URI. This also hyperlinks to a Breakdown page with further details about each call. The Breakdown details are also exportable.
- Last Called: Displays the last date/time a call was made to that particular Request URI.
By default, the report is sorted by Last Called, but you can choose to sort by Request URI, Method, Owner, or # of Calls, if desired.
Next to the Sort options you’ll find the Export button to download the report.
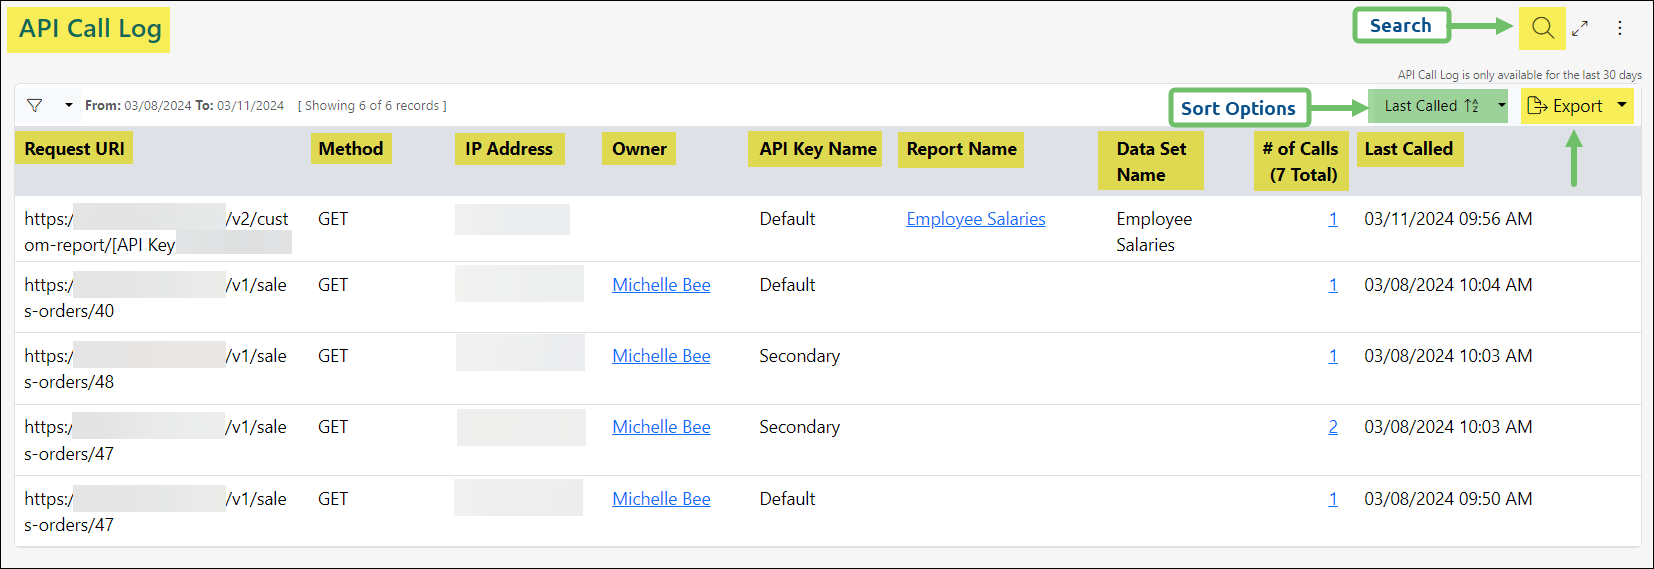
Example of the Columns Available on the API Call Log Report

At the top right corner of the page, you will also find a Search icon. This will provide the following search filters:
- Date Range
- IP Address
- Request URI
- Request Method
- Owner
- Report Name
- API Key Name
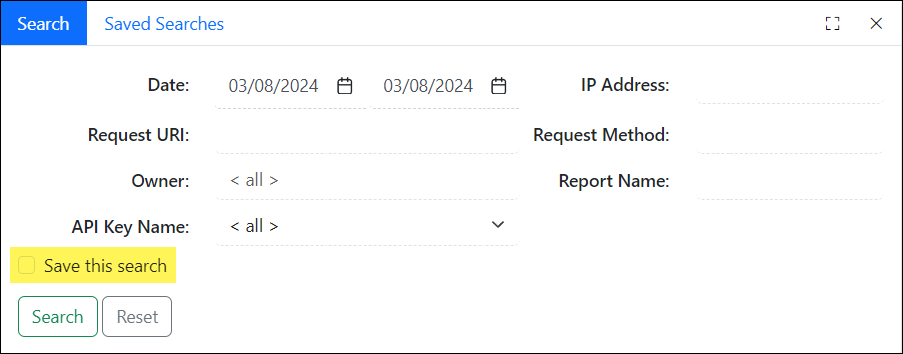
Example of the Available Search Filters for the API Call Log Report

At the bottom of the page you will find the option to save your search filters for use in the future.
-
Custom Web Requests
Custom Web Requests allow you to exchange information with other servers using GET and POST methods. These Web Requests function similar to Webhooks by using a Request URL to locate the API endpoint being accessed.
You can view and configure your Custom Web Requests by navigating Company → Settings → Integrations → Web Requests.
The Web Requests List allows you to view the Custom Web Requests configured within your system. If you would like to edit a Web Request, select the hyperlinked Web Request Name. To add a new Web Request, select the Plus icon located at the top of the page.
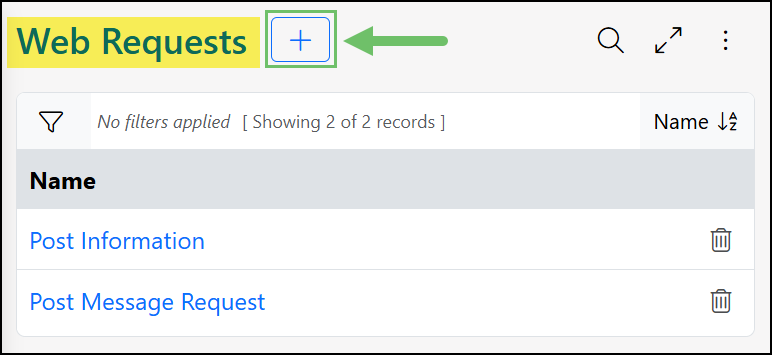
Example of the Web Requests List

When creating a new Web Request, the following fields are available for configuration on the Add Web Request page:
- Request Name: Allows you to enter a name for the Web Request so it may be easily identified.
- Request URL: The Request URL specifies the location of the resource, or API Endpoint, you are attempting to communicate with. The merge field “[[token]]” may be used to insert your API Token into the URL.
- Method: You may select either the GET or POST method for the request.
- Payload: You may enter the data to be sent with the request here. The Payload should contain the information required to execute the requested operation.
- Authorization: If Authorization is required to perform the action associated with your request, you may enter your Authorization information here by hovering over the field and selecting the Plus icon. If you have previously configured and saved your Authorization information, you may select it using the drop-down menu.
- Authorization Header Settings: The “Request has authorization header” checkbox may be selected, if applicable. Once selected, an Auth Header field will appear, allowing you to enter the appropriate header. By default, “Bearer” will be entered into this field upon population.
- Try: Selecting the Try option will run the request and inform you if any errors occur while the request is executed. A success or error message will be returned at the bottom of the Web Request Payload section.
- Save: Allows you to select whether to Save, Save & Close, or Save & Add New.

Example of Creating a New Web Request

Have a Question?
Ask the Striven Community
User-sourced how-to’s, feedback, and more!
