
A/R & Collections
Accounts Receivable Transactions
Support Guide
-
Overview
Transactions are anything that posts to your General Ledger, and in the case of A/R Transactions, anything that posts to your A/R Account(s). A/R Transactions do not include Sales Orders as they do not post to your General Ledger until they are invoiced. This guide will explore different A/R Transactions that will affect your Collections process including Invoices, Payments, and Credit Memos and how each functions in Striven.
Read this guide if you are trying to:
✔ Learn how to navigate to A/R Transactions in Striven.
✔ Understand the different type of A/R Transactions in Striven.
✔ Review steps to import A/R Transactions in Striven.
-
Transactions List
The Transactions List is where you can find all the financial transactions in Striven. You can view individual transaction data from here as well. There are import tools located here which include ways to import Invoices, Credit Memos, Payments, Bills, and Journal Entries. With each transaction listed here, there are two helpful hyperlinks including the Customer/Vendor Name and the transaction number. By clicking on a hyperlink, you can either view the Customer information by clicking on the Customer/Vendor name or the transaction details by clicking on the transaction number. Below is a screenshot representing how the Transactions List appears.
To view the Transactions List use the following steps:
Accounting → Transactions
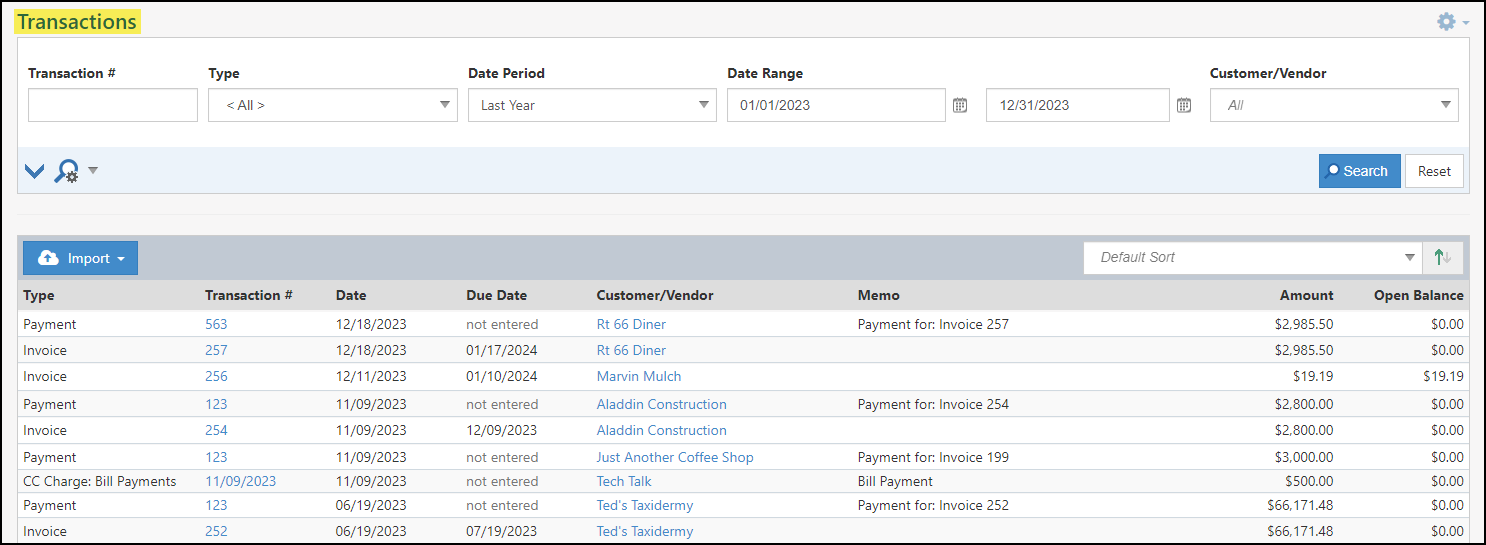
Example of Transactions List Page

-
Invoices
Invoices are transactions that represent money owed by Customers for goods or services you sell. Invoices can be generated from Sales Orders or generated on their own. On this page, you can add attachments to the Invoice if desired as well. Once the Invoice is generated, the transaction will post to GL Accounts in your Striven system and the Customer will be responsible for fulfilling Payment by the due date. Below is a screenshot depicting how adding an Invoice appears and details on what can be accomplished there.
- Customer Info: Displays who is purchasing goods or services from you and who they are dealing with from your Company. This section includes the following described below:
- Customer: The entity who is purchasing Items from you.
- Bill To: The Location that will be billed for the Items
- Ship To: The Location the Items will be shipped to.
- Sales Rep: The Employee who made the sale.
- Note: Customer/Vendor address changes will not reflect on existing transactions, only new transactions after the address change was made.
- Transaction Info: Information about the transaction and is described further below:
- Dates: Allows you to choose the date and due date for the transaction.
- Payment Terms: Choosing Payment Terms here will automatically adjust the due date based on the date chosen.
- Order: Allows you to associate a Sales Order to the Invoice. If the Invoice is generated from the Sales Order, the Order will be associated.
- AR Account: The Accounts Receivable Account the Invoice will post to.
- Format: Allows you to choose the Invoice Printable Format.
- Memo: Allows you to write a memo for the Invoice.
- Do Not Charge Convenience Fee: Allows you to disable charging Convenience Fees on Payments related to this Invoice
- To Be Printed: Checking this box will add this Invoice to the Print Invoices Queue.
- Set as Recurring: Allows you to set the Invoice as recurring. By clicking this button, you can set either a daily, weekly, or monthly recurrence.
- Options: The Options tab enables you to add Unbilled Items associated with a Customer to the Invoice, and allows you to adjust the Line Item Grouping for Items on the Invoice.
- Note: The Item price will be set on an Invoice based on the Item Info Price field when added from the Add Unbilled Items option. If there is no price set at the Item Info, the price will then be added to the Invoice based on the cost related to the AP Transaction. If the Customer has a Price List assigned, the price that is set on the Price List will override both the Item Info and the related AP Transaction.
- Default Class: This option will only appear if you’ve chosen to track GL Classes in your Accounting Settings (reference our Accounting Setup Guide). By choosing a GL Class here, each Line Item added will automatically be assigned this GL Class. Classes can also be overridden at the Line Item level as shown by the number 4 in the sample screenshot.
- Items Section: Allows you to add Items that the Customer is purchasing. Options are described further below:
- Item: Choose the Item in your system the Customer is going to purchase.
- Description: The chosen Item’s description.
- Quantity: The number of Item units to be sold to the Customer.
- Unit Price: The price a single Item unit will be sold for.
- Amount: The price you are charging the Customer for the quantity ordered.
- S&H: Here you can enter shipping & handling charges per Item.
- Tax: Charges applicable taxes if checked.

Example of Add Invoice Page
- Note: For information regarding the Discount Calculator on transactions, visit the Discount Calculator section of our Sales Orders Guide.
- Customer Info: Displays who is purchasing goods or services from you and who they are dealing with from your Company. This section includes the following described below:
-
Sorting Line Items on Invoices
Line Items can be dragged/dropped to rearrange them into whatever order you wish them to display on the Invoice. This sorted order will be reflected throughout the system and any changes made to the Line Item order will be noted on the History page.
The Line Item order will also be maintained in the Portal view, as well as in the Printable Formats, as long as the format used hasn’t overridden the Sort Order Column setting at the Sales Order Format level.
When creating an Invoice from a Sales Order, whether manually or automatically, the Line Item order specified at the Sales Order level will carry over to the Invoice.
And while you will be able to rearrange Line Items within an Item Group, you will not be able to drag/drop Line Items between groups when Line Item Grouping is selected on Invoices.
-
Credit Memos
Credit Memos are transactions that represent money that is credited or refunded to Customers who have purchased goods or services you sell. Credit Memos can facilitate crediting damaged products received by the Customer, and once saved there are three options to apply the Credit. One option is to create a Refund Check to the Customer from the Credit amount. Another option is to keep it as an Open Credit for the Customer, which will allow you to apply it to an Invoice later. The final option is to apply the Credit to an Open Invoice, which you can perform after choosing that option. Below is a screenshot demonstrating adding a Credit Memo and details of what can be accomplished there.
- Customer Info: Represents who have purchased goods or services from you and who they are dealing with from your Company. This section includes the following described below:
- Customer: The entity who purchased Items from you.
- Bill To: The Location that will be credited or refunded for the purchase.
- Ship To: The Location the Items will be shipped to.
- Note: Customer/Vendor address changes will not reflect on existing transactions, only new transactions after the address change was made.
- Transaction Info: Information about the transaction and is described further below:
- Date: Allows you to select the date of the transaction.
- Order: Allows you to associate a Sales Order to the Credit Memo.
- Format: Allows you to choose the Credit Memo Printable Format.
- Memo: Allows you can write a memo for the Credit Memo.
- Set as Recurring: Allows you to set the Credit Memo as recurring. You can set either a daily, weekly, or monthly recurrence.
- Default Category: This option will only appear if you’ve chosen to track GL Categories in your Accounting Settings (reference our Accounting Setup Guide). By choosing a GL Category here each Line Item added will automatically be assigned this GL Category. Categories can also be overridden at the Line Item level as shown by the other 4 in the sample screenshot.
- Items Section: Allows you to add Items to the Credit Memo transaction. Options are described further below:
- Item: Allows you to select the Item in your system for which the Customer will be credited.
- Description: The selected Item’s description.
- Quantity: The number of Item units to be credited to the Customer or returned from the Customer.
- Unit Price: Displays the price for which a single Item unit will be sold.
- Amount: The amount for which you are issuing the Credit or Refund.
- S&H: Enables you to enter shipping & handling charges per Item.
- Tax: Included applicable taxes if checked.
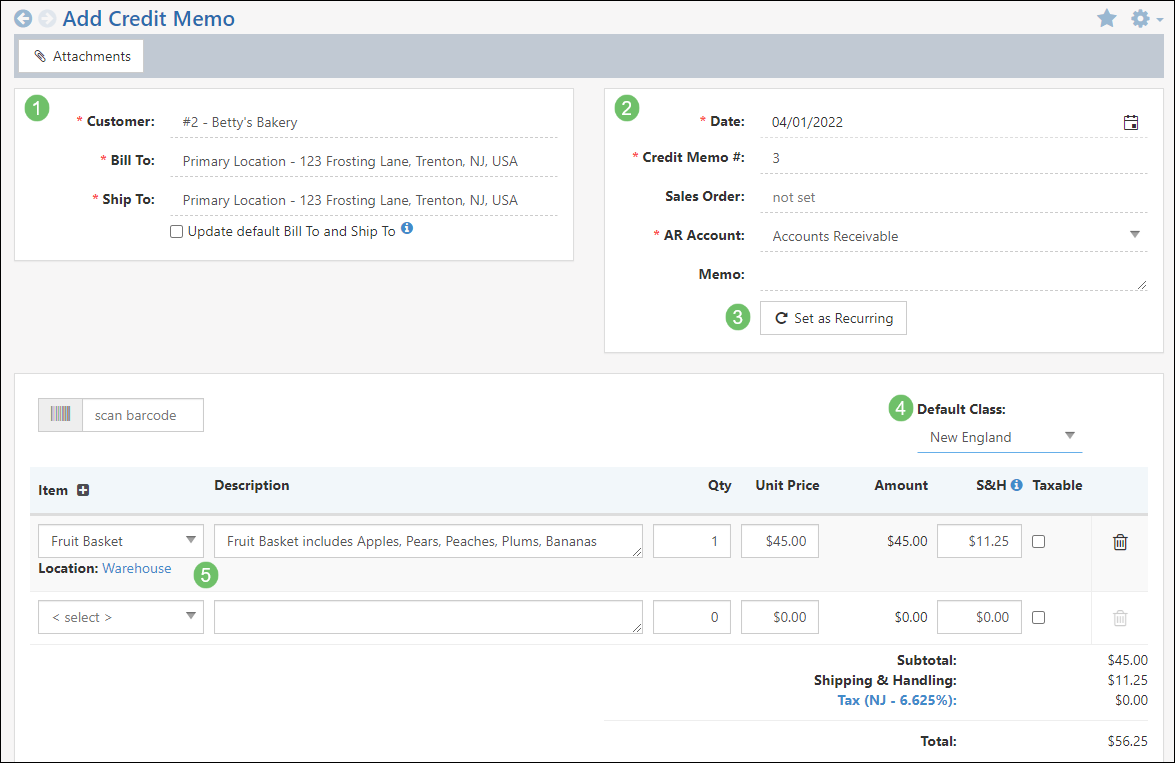
Example of Add Credit Memo Page
- Customer Info: Represents who have purchased goods or services from you and who they are dealing with from your Company. This section includes the following described below:
-
Payments
Payments are financial transactions representing money received from Customers for goods or services sold. You can create Payments from Invoices, or independently. If you create a Payment directly from an Invoice, the Payment will automatically be applied to that Invoice. However, if you create a Payment independently, you have the flexibility to allocate it to one or multiple Invoices belonging to the same Customer post-creation. Below is a screenshot displaying adding a Payment and details on what you can accomplish there.
-
Adding a Payment
Adding a Payment in Striven should be relatively quick and easy. The following details are provided to assist you in understanding the fields on the Add Payment page and how they function in Striven:
- Customer: Allows you to select the Customer who is paying you.
- Received From: Allows you to choose who is paying you from a list of the Customer’s Contacts.
- Payment Method: Provides a list of Payment Methods for you to select from as the Customer’s method of Payment.
- Amount: Allows you to enter how much the Customer has paid you.
- Reference #: Assigns a reference # of your choosing for the Payment.
- Payment Date: Using the Calendar icon, you can choose the date on which you received the Payment from the Customer.
- Memo: Allows you to enter a memo relating to the Payment.
- AR Account: Notes the selected Accounts Receivable account to which the Payment will post.
- Format: Enables you to select the printable format for the Payment. This will provide the ability to print a Payment Receipt in an organized format.
- Attachments: Provides the ability to upload attachments to the Payment. You can click to select a file or drag/drop to this field to add the attachment.
- Open Balance/Payments/Credits: Once a Customer is selected, their Open Balance, Open Payments, and Open Credits will display on the page. Each is hyperlinked to the list page for each entity for easy access to view these Customer-specific details.
- Open Invoices: Shows a list of open Invoices to which you can apply the Payment. You can check the box next to the invoice(s) you wish to apply the Payment to, as well as determine how much of the Payment you wish to apply to the individual Invoices, and the totals will reflect in the Payment Details section below.
- Search: Provides search filters to find Invoices based on Invoice Number, Amount, or Due Date Range.
- Payment Details: Notes the Payment Amount, Payment Used, and Remaining Payment totals based on the settings selected or entered in the fields on this Payment. These totals will adjust as you make changes to the Amount to Apply for each Invoice selected.
- Save: Provides options to Save, Save & Add New, or Save & Close.
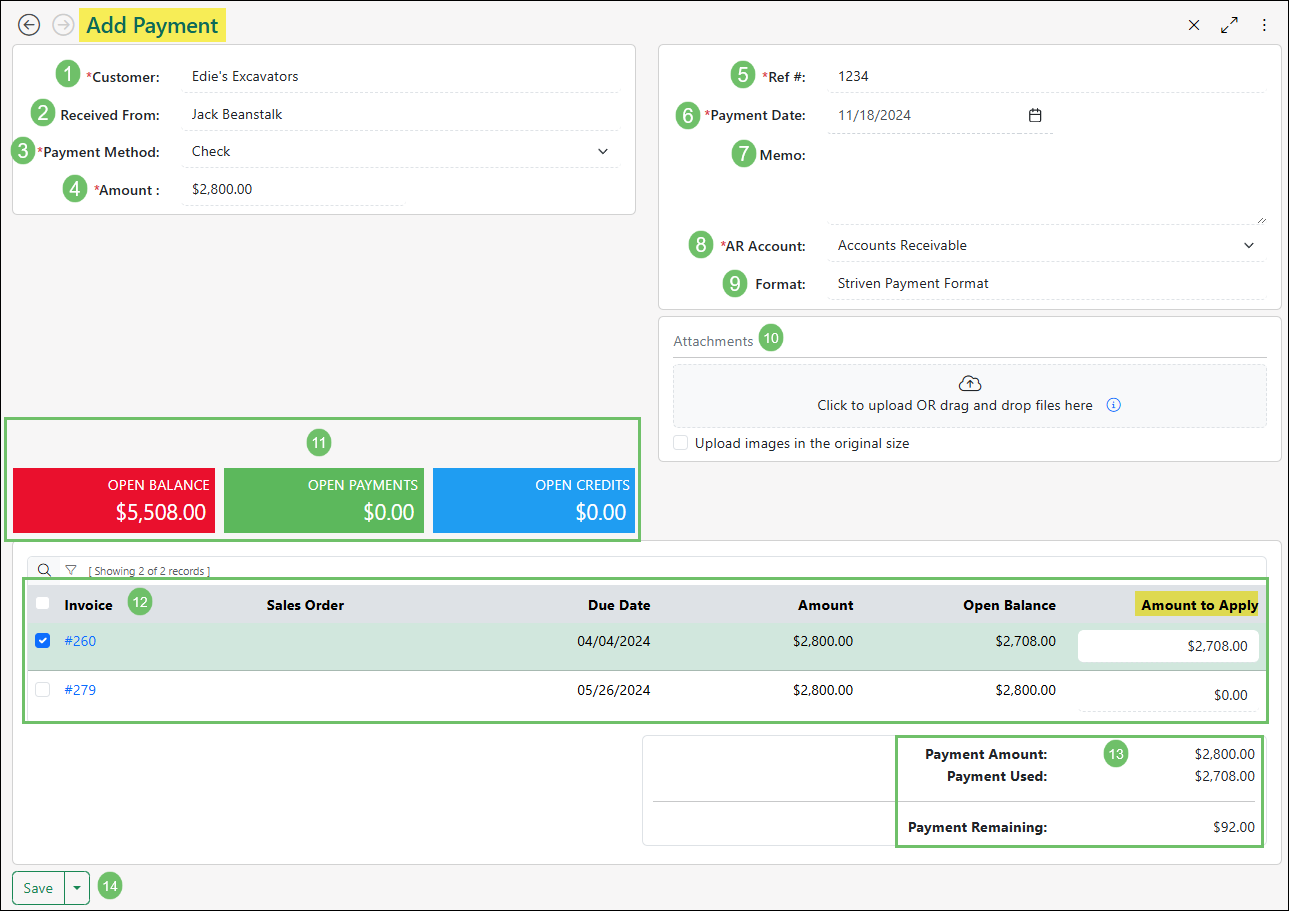
Example of the Add Payment Page
-
Sending a Payment Notification
After a Payment is created, you will be prompted to email a Payment Receipt to a Contact associated with the Customer on the Payment, an Employee within your system, or you can enter any email address you desire.
The Message, the Format, and the Subject of this email can be edited or customized on the spot, or you can navigate to the Notification & Portal Content settings to manage the default message content for the Payment Notification email. The default content editor has optional merge fields available, including the Portal-Payment-PDF-Link merge field that will allow the recipient to view the Payment as a PDF as long as there is a Payment Format selected. Once your email has been composed to your liking, you can click Send.
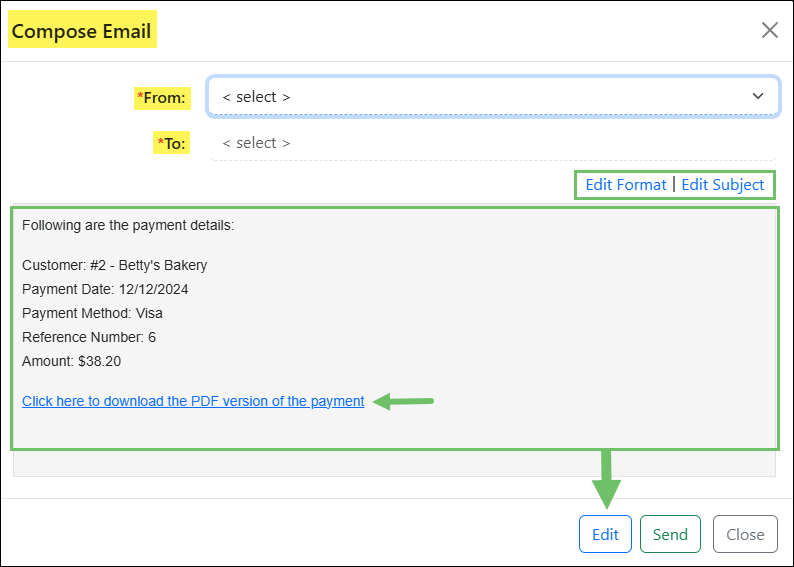
Example of the Compose Email Popup from a Payment
- Note: If you plan to resend a Payment Notification using the Email button on the Payment Info page, please review the Notification & Portal Content for the Resend Payment Receipt email to add the Portal-Payment-PDF-Link merge field, if desired.
-
Editing a Payment
When viewing a Payment saved in your system, there are a selection of fields that can be edited after the Payment has been created. You will be able to edit the fields for Received From, Payment Method, Reference #, Payment Date, Memo, and Format.
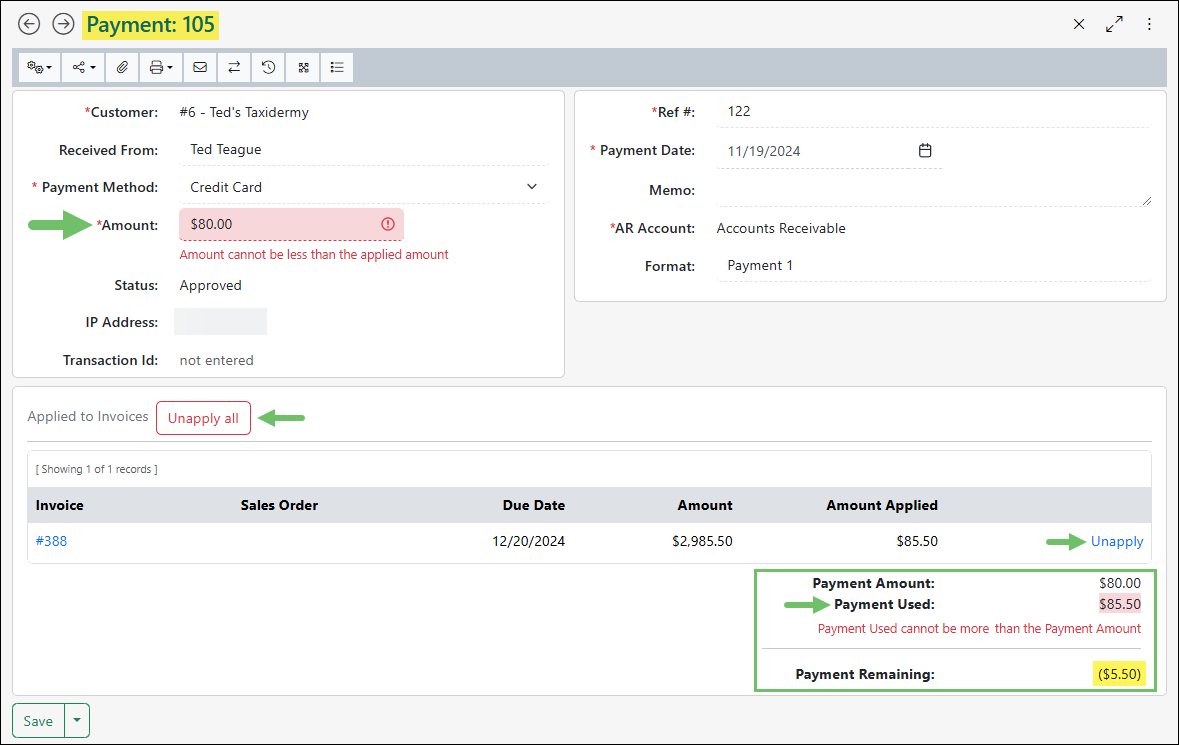
There are a set of rules in place that will allow you to edit the Amount on a saved Payment, but only under certain conditions:
The Amount field will be editable if the new Payment amount is GREATER than the originally saved amount.
If the new Payment amount is LESS than the amount from the originally saved amount (something less than the amount that was applied) you will not be able to save the changes.
- In this case, the Amount field will turn red and an alert will display, stating “Amount cannot be less than the applied amount”.
- The Payment Used total will highlight red and an alert displays: “Payment Used cannot be more than the Payment Amount”.
- The Payment would need to be unapplied from the Invoice(s) before the Amount could be reduced.
If a Payment was processed by a third party integration (i.e. Authorize.net or Stripe), the amount cannot be changed because it has already been processed, regardless if it was applied to an Invoice or saved as an Open Payment.
Example of Editing a Payment
-
Payment Info Page
The Payment Info page will display all the details of the Payment, with a variety of actions available in the Payment Actions Toolbar located at the top of the page. The available options on the Payment Info page are explained below:
- Previous/Next Arrows: Allows you to click the back/forward arrows to navigate through existing Payments in your system based on the Payment Date. Clicking the Next arrow beyond the last Payment record will display the Add Payment page to allow you to create a new Payment.
- Payment Actions Toolbar: Provides a variety of functions and options related to the Payment. These options are described below as seen from left to right on the toolbar:
- Actions: Displays available actions that can be taken from the Payment.
- Apply to Invoices: If the Payment is Open and the total amount is not already applied to Invoices, you can choose this option to select the Open Invoices to which you wish to apply the Payment. This option is unavailable if the Payment total is already completely applied.
- Give a Refund: Provides the ability to issue a Refund to the Customer for the Payment. You can choose the Payment Method for issuing the Refund, the Refund Amount, the Bank Account you wish the Refund to be issued from (or check the box for Undeposited Funds), and the Date for the Refund. You may also include a Memo or select a Class, if applicable.
- Void: Allows you to void the record of the Payment in Striven.
- Note: This will only void the record in Striven, not the transaction if processed by a third party integration like Authorize.net or Stripe.
- Share: Offers share options for an Internal Link or a Customer Portal Link.
- Attachment: Provides the ability to click to upload or drag/drop files to add as attachments to the Payment.
- Print: Enables you to select the Printable Format you would like to use to print the Payment.
- Compose Email: Displays a popup allowing you to send a Payment Receipt via email to a Contact or Employee selected from a drop-down list, or you can enter an email address not saved in the system. The email will include the Customer Name, Payment Date, Payment Method, Reference #, and Amount by default, but you will also be provided with the option to edit the content of this message before sending it.
- Posting Journal: Displays a popup of the Posting Journal report related to the Payment, with the option to view the report based on an Accrual or Cash basis.
- History: Shows a detailed Payment History page of all edits made to the Payment. The default view is the current state of the Payment, but in the top right corner there are links to view previously saved states of the Payment.
- All edits will be highlighted on the page as described in the small legend found in the upper right corner as well. Hovering over the edits will show the previous value for that field.
- Related To: Shows a list of related transactions. The transaction’s title will link to the related transaction in Striven.
- Audit Log: Keeps track of changes made to the Payment’s status. If a Payment is voided, the status change will be logged.
- Actions: Displays available actions that can be taken from the Payment.
- Payment Details: Shows the recorded details and settings related to the Payment, including the Customer, Received From, Payment Method, Amount, Status, IP Address, Transaction ID, Reference #, Payment Date, Memo, AR Account, and Format. Some of these fields are editable, as noted previously in this guide.
- Unapply All: Provides the option to un-apply all Invoices to which the Payment has been applied.
- Applied Invoices: Presents all of the Invoices to which the Payment has been applied. There are columns for Invoice #, Sales Order, Due Date, Amount, and Amount Applied. You can click the hyperlinked Invoice # or Sales Order Name to view them directly in another browser tab. You will also be provided the option to un-apply each Invoice listed individually.
- Save: Provides you with the option to Save, Save & Add New, or Save & Close the Payment.
- Payment Discussions: Displays existing Discussion threads and provides the ability to create a new Discussion related to the Payment.

Example of a Payment Info Page
-
Payment Refunds & Negative Deposits
Striven provides the option to create Refunds related to Payments. This feature is only available when Payments are in the Approved status and can only be issued against Open Payments.
To issue a Refund within Striven, select the Give a Refund option from the Actions Menu on the Payment you wish to return to the Customer. See example below for reference.

Example of Option to Give a Refund
While creating the Refund, you can specify the Bank Account or select the Undeposited Funds Account. When the Undeposited Funds Account has been selected, the Bank Account selection is no longer available for selection. Once the Refund Check is created, it will be applied to the Payment to affect its open balance. The Refund will also display in the Related To transactions section of the Payment to show the Check Refund as a hyperlink to view the Refund.
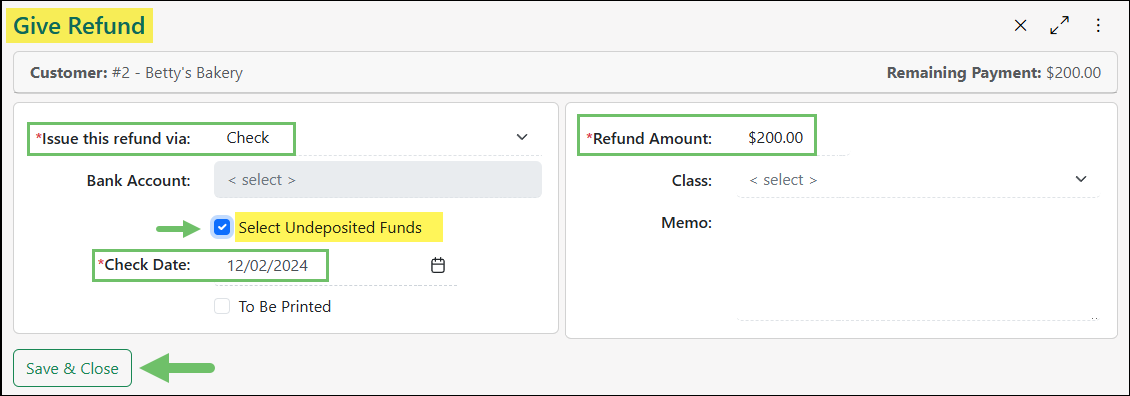
Example of the Give Refund Page
Once the Refund is created and you view the Refund Check you’ll notice the Bank Account field can be changed to any Bank Account as long as the Refund Check is not deposited.
When adding a deposit, the Refund Check will show with a negative amount. Once the deposit is completed, you’ll see the Bank Account field can no longer be changed when processing the Refund Check and the check cannot be voided.
The deposit will also display in the Related To transactions section for reference.
Example of Adding Deposit with a Refund
Voiding Payments & Credit Memos Related to Refund Checks
In order to ensure that your accounting reports are accurate, users will not be able to un-apply Payments and Credit Memos related to Refund Checks. When viewing a Payment/Credit Memo where a Refund Check has been issued, the Void Payment option under Payment Actions has been grayed out and cannot be selected. Additionally, when viewing the Applied Payments on the Payment, you may not un-apply the Check Refund as the checkbox is grayed out.
In order to void a Payment or Credit Memo related to a Refund Check, the Refund Check will need to be voided first.
-
Sales Receipts
Sales Receipts can be employed to keep a record of any sales your Company makes. Once a Sales Order has been completed and the Invoice has been paid by the Customer, a Sales Receipt can be generated. Sales Receipts can also be created for sales made outside of Striven that affect your inventory count, such as over-the-counter transactions. This feature functions the same as a receipt from a point-of-sale would. An example of what creating a Sales Receipt looks like and the options available there are displayed below.
You can create a Sales Receipt from the Quick Add menu, or by navigating to:
Customers → Financial → Sales Receipt.
- Customer Info: Displays who is purchasing goods or services from you and who they are dealing with from your Company. This section includes the following:
- Customer: Entity who is purchasing Items from you.
- Bill To: The Location that will be billed for the Items. This can be selected once the Customer is selected.
- Ship To: The Location the Items will be shipped to. This can be selected once the Customer is selected.
- Sales Rep: The Employee who made the sale.
- Note: Customer/Vendor address changes will not reflect on existing transactions, only new transactions after the address change was made.
- Transaction Info: Information about the transaction:
- Date: Allows you to choose the date for the transaction.
- Reference #: Allows you to easily keep track of and reference the Sales Receipt.
- Payment Method: The method of Payment for the transaction.
- Payment Profile: Allows you to select Authorize.net Payment Profiles for the Customer. This setting becomes visible when Credit Card or E-Check are selected as the Payment method. This will be displayed depending on the Payment Method.
- Order: Allows you to associate a Sales Order with the Sales Receipt.
- Format: Allows you to select the Printable Format from your saved formats within Striven.
- Memo: Allows you to write a memo for the Invoice.
- Set as Recurring: Allows you to set the Invoice as recurring. By clicking this button, you can set either a daily, weekly, or monthly recurrence.
- Scan Barcode: Allows you to enter a barcode number associated with an Item to easily add that Item to the Sales Receipt.
- Items Section: Allows you to add Items that the Customer is purchasing. Some of the general options available here are described further below:
- Item: Choose the Item in your system the Customer is going to purchase.
- Description: The chosen Item’s description.
- Quantity: The number of Item units to be sold to the Customer.
- Unit Price: The price a single Item unit will be sold for.
- Amount: The price you are charging the Customer for the quantity ordered.
- S&H: Here you can enter shipping & handling charges per Item.
- Tax: Charges applicable taxes if checked.
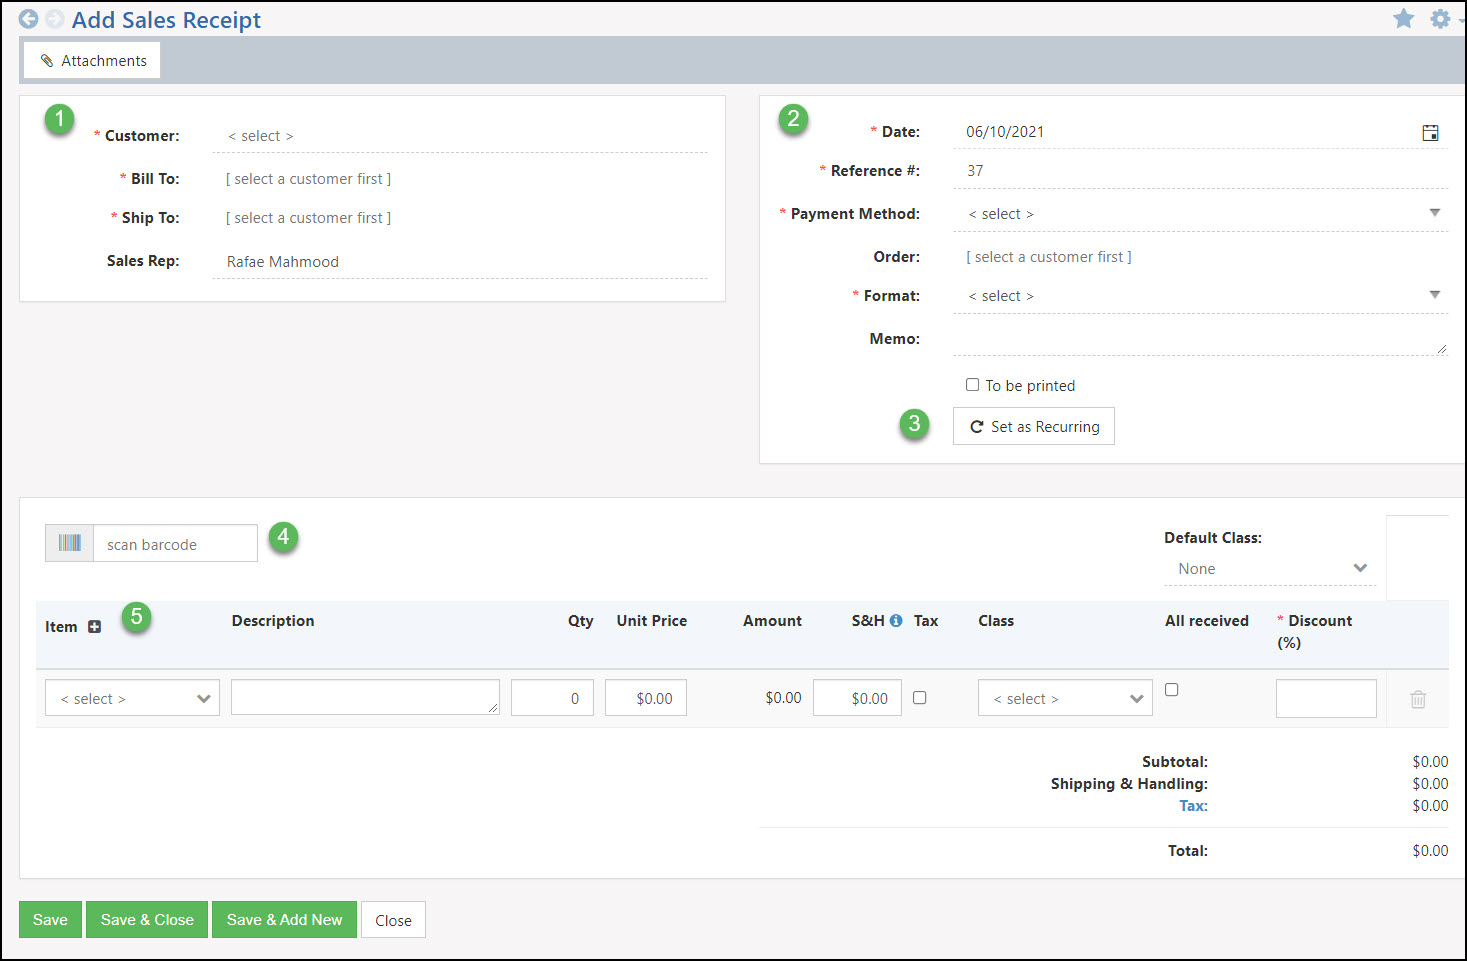
Example of the Add Sales Receipt Page
- Note: There is a settings feature that allows you to add Custom Columns to your Sales Receipt format as well. To designate the settings for Custom Columns per Line Item for Sales Receipts, navigate to Company → Settings → Accounting → AR → Sales Receipts → Custom Columns.
- Customer Info: Displays who is purchasing goods or services from you and who they are dealing with from your Company. This section includes the following:
-
Sorting Line Items on Sales Receipts
Line Items can be dragged/dropped to rearrange them into whatever order you wish them to display on the Sales Receipt. This sorted order will be reflected throughout the system and any changes made to the Line Item order will be noted on the History page.
And while you will be able to rearrange Line Items within an Item Group, you will not be able to drag/drop Line Items between groups when Line Item Grouping is selected on Sales Receipts.
-
Journal Entries
Journal Entries are transactions in which Line Items represent GL Accounts which are either debited or credited to create an equal amount of Debits and Credits. When adding a GL Account on a Journal Entry, you can enter the amount in either the Debit or Credit field as needed. Debit and Credit fields will either show up or down arrows depending on the GL Account Type and how debiting or crediting affects the Account. In Striven Journal entries Accounts Receivable can be added on a Line Item, but A/R can also be billed to a Customer as well. Below is a screenshot exhibiting how Journal Entries appear.
To view Journal Entries use the following steps:
Accounting → Journal Entries
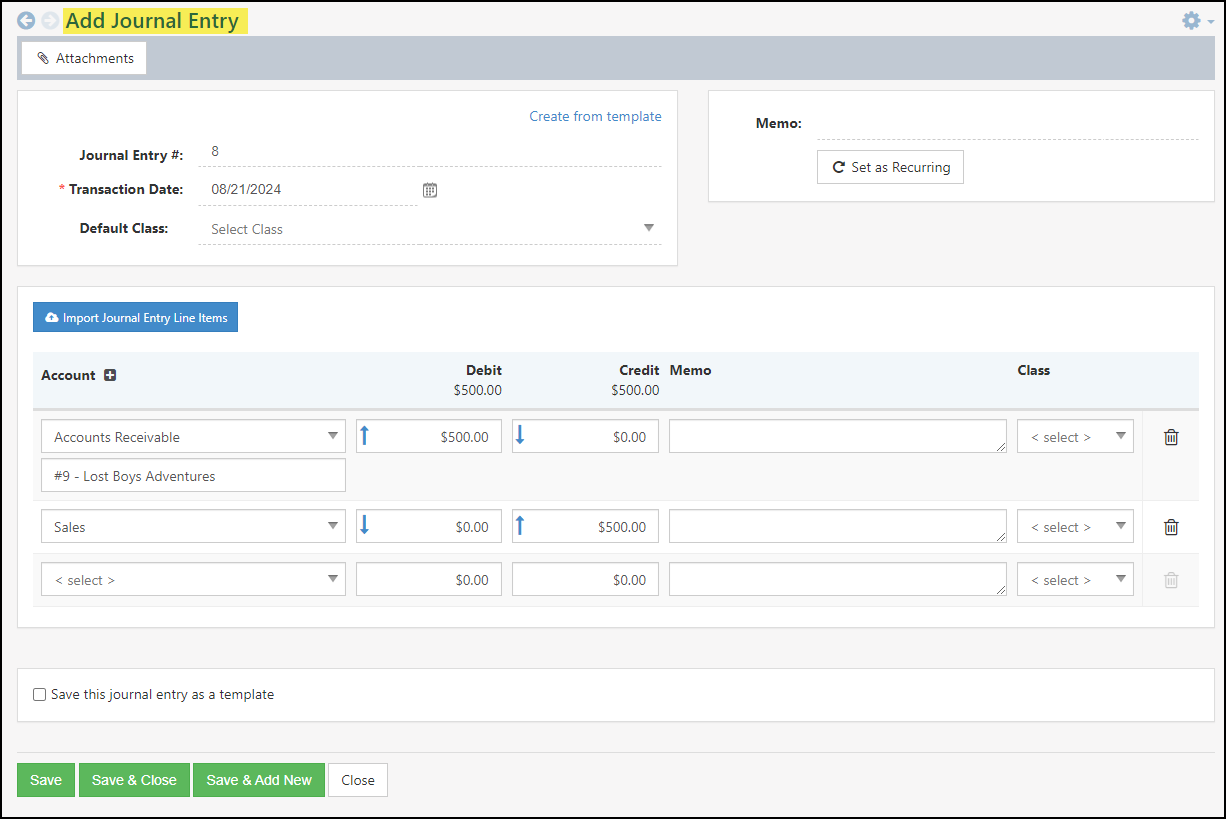
Example of a Journal Entry
-
Importing A/R Transactions
Striven has several imports available to allow you to import transactions en masse. Imports are available for A/R Transactions including Invoices, Credit Memos, Payments, and Journal Entries. Though the mapping for each import is different the import setup functions much the same for all the imports. For more information about all imports, view our Import Management Guide. Transaction Imports can be accessed by clicking the Import button found on the Transactions List and choosing what type of transaction you would like to import into Striven. Each Import page appears with the same importing options which are described further below. A screenshot featuring how the Invoice Import page appears is also provided for reference.
- The Generate Sample File button initiates a Mapping popup detailing what goes into the import spreadsheet and allows for the selection of other available importing information options.
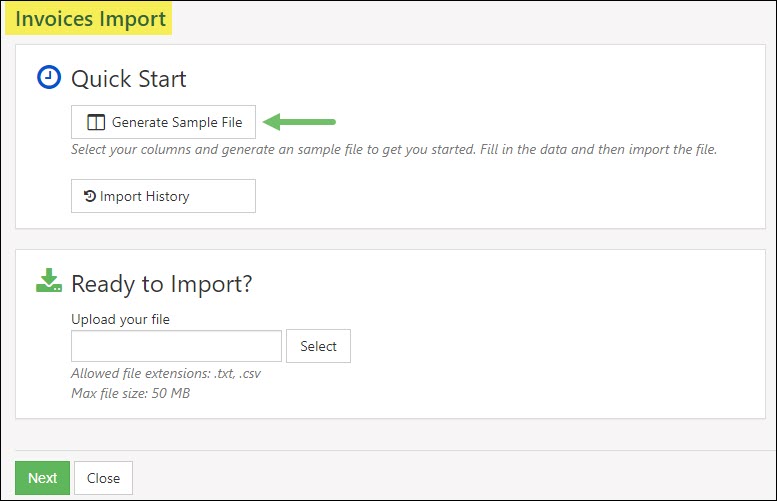
Example of the Invoice Import Page
- The Download Sample button at the bottom of the Mapping popup provides a spreadsheet with pre-filled column headers (listed on the mapping) to assist with entering data.
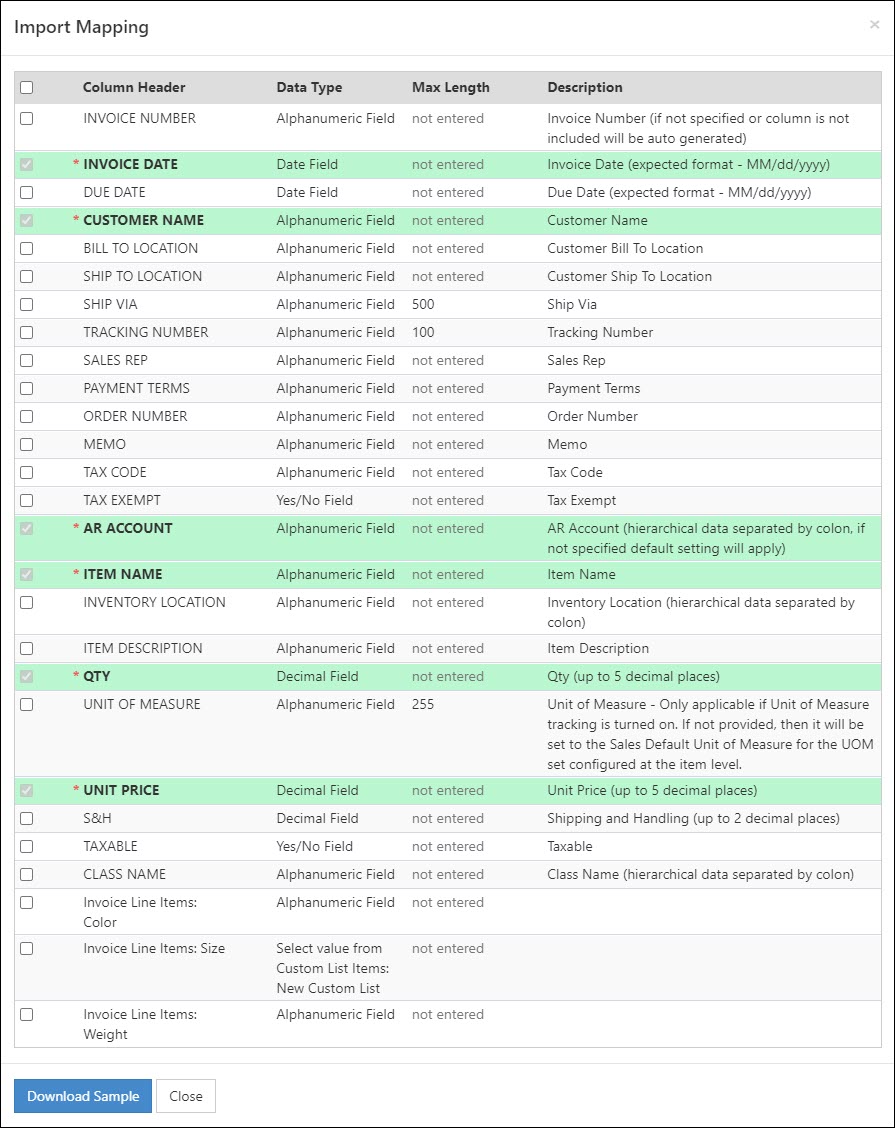
Example of Invoice Import Mapping Popup
-
Recap
With this guide, we’ve discussed how to navigate to A/R Transactions in Striven. We have covered the different types of A/R Transactions available in Striven including Invoices, Credit Memos, Payments, Sales Receipts, and Journal Entries. Additionally, we’ve reviewed the process to import A/R Transactions into Striven.
FAQs
-
My Customer has not gotten back to me yet. How can I tell if they have seen the Invoice yet or not?
If you view a Customer’s Transactions page from the Customer Navigation waffle menu, you will see a list of all your transactions with that Customer. There will be a Magnifying Glass icon next to the transaction name. If you click on that icon, there will be a list of the date and time of each time the Invoice was viewed on the Customer/Vendor Portal. This will also give you the name of the Contact who has viewed the transaction as well. If there is no Magnifying Glass icon next to the transaction name, that means it has not been viewed yet.