
Employees
Employee Setup & Information
Support Guide
-
Overview
One of the exceptional functions included in Striven is Employee Management, which includes many components such as Job Titles, Teams, permissions, and much more. This guide will help provide information on how to configure and use specific functions related to setting up and managing Employees in Striven. The Striven Team recommends that before continuing with this guide that you first reference the Company Setup Guide to configure your Company, including Locations, Departments, Shifts, and more.
Read this guide if you are trying to:
✔ Create User Roles for Employees.
✔ Manage security and permissions.
✔ Manage and track Employee information.
-
Employee Settings
Before adding or managing Employees, it is important to configure the settings related to Employees. You can configure values related to Employees including Default Shifts, User Roles, and more. Below is an image of what this page looks like and a description of what you can configure there. To view the Employee Settings, use the following steps below:
Company → Settings → Employees → Settings
- User Role: Choosing a User Role will note that this is the default for Employees. This User Role will be selected automatically when adding an Employee to Striven. You can then choose to select a different User Role or add on additional User Roles.
- Default Shifts: Enables you to assign a default shift for Employees. An Employee’s shift can be changed at the Employee level if needed. Employee Shifts will be explained further on in this guide.
- Notifications: Indicate who receives notifications when employment information such as email, phone, address, etc. is updated.
- Signature Template: Enables you to configure the default signature template for Employees. Any changes an Employee makes to their signature within their My Profile – Signature page will override defaults set here.
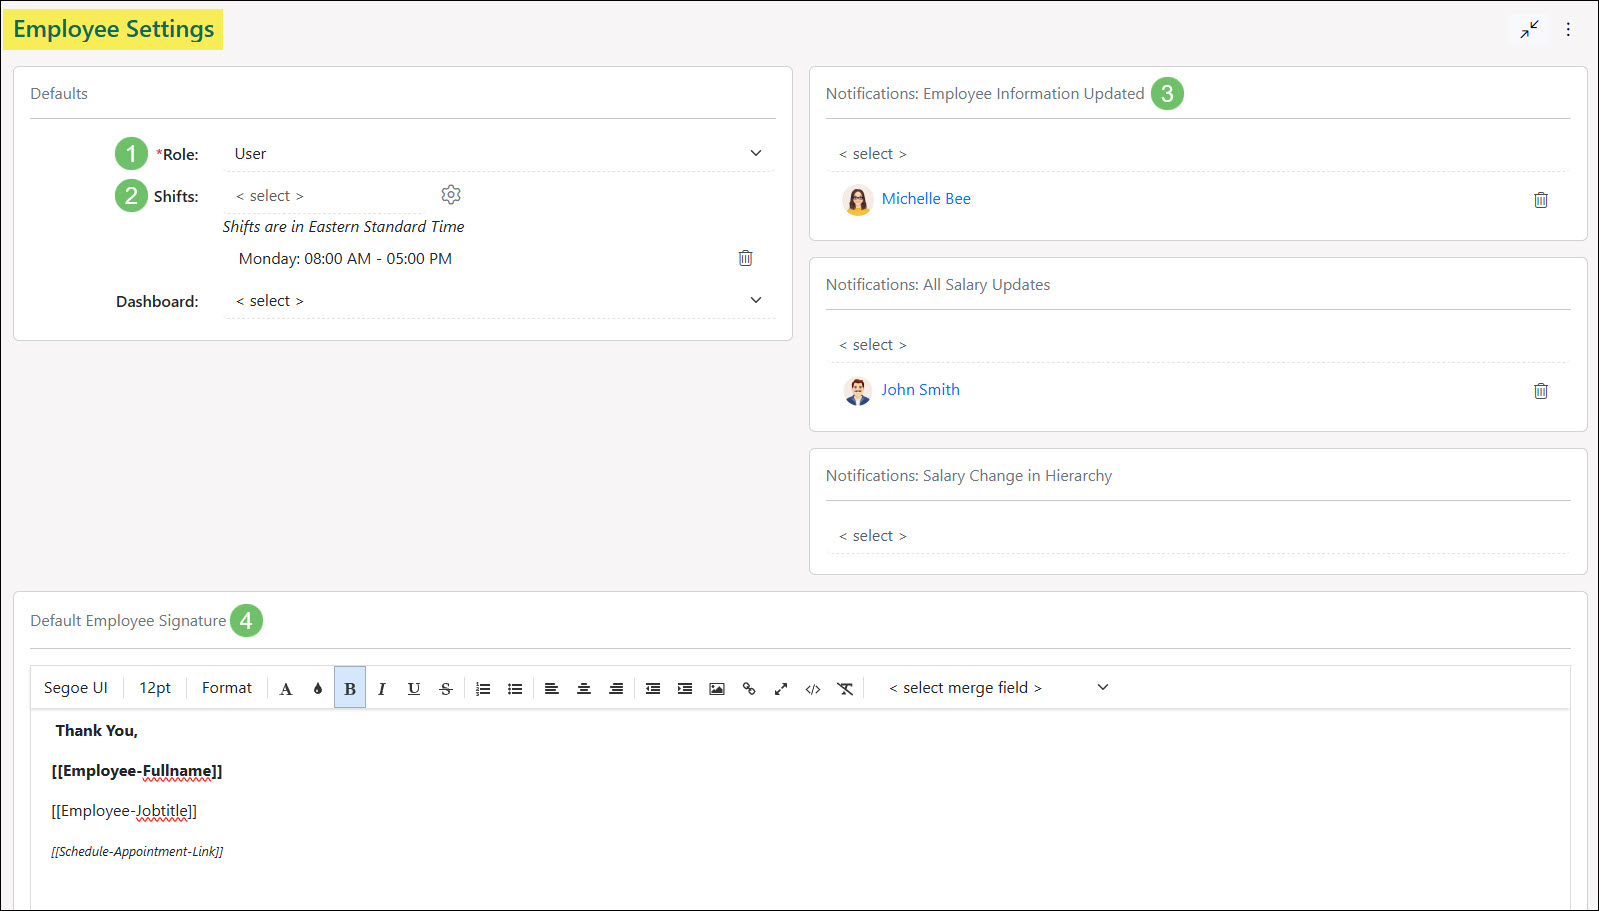
Example of the Employee Settings Page

Creating a Default Employee Signature
You may find it beneficial to customize the Default Signature Template to fit your company’s needs more accurately. The Default Employee Signature editor allows you to edit the appearance of the signature using rich text and Merge Fields. Below is a more in-depth look into the features the editor offers.
- Rich Text Format Options: Allows the user to format the text, add images, links, and even view and adjust the HTML coding for the signature.
- Merge Fields: You can add Merge Fields that will populate information such as the Employee’s Full Name, Job Title, Contact Information, Picture, Picture Path, and the Employee’s Schedule Appointment link.
- Note Using the Employee Picture Path Merge Field will allow you to edit the size and shape of the Employee photo, using HTML coding.
- Text Field: You can type text you would like to appear within the Employee’s signature here, such as a sign off that you would like to be standard for all Employees.
- Preview: Clicking this button will allow you to preview what this signature will look like for a selected Employee. This is helpful if you would like to see what the size of your text, alignment, and picture size looks like before saving.
- Update Signatures of All Employees: If you would like to push an updated signature to all Employees, you can do so by clicking this hyperlinked text. It is important to save your changes to the signature before clicking this.
- Save: Once you are finished creating or editing the Default Employee Signature, click save to ensure no changes are lost.
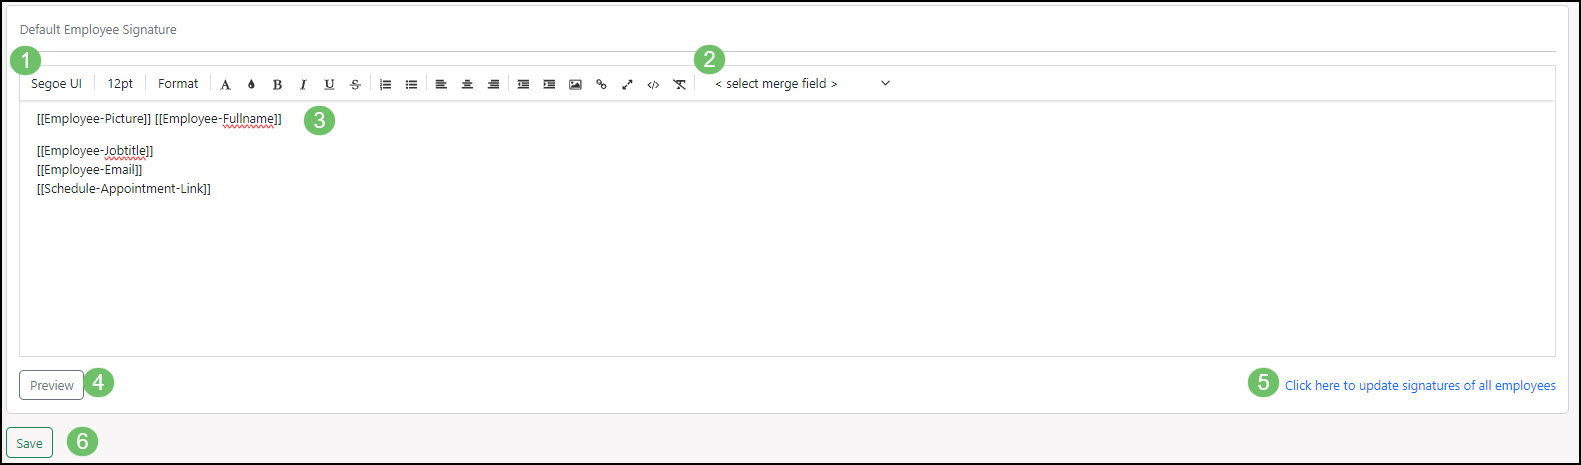
Example of the Default Employee Signature Editor
-
Permissions
Striven prioritizes data security and empowers you to implement strict security measures to prevent unauthorized access and protect your Employee records. Access to these records can be limited to users whose assigned User Role reflects certain permissions.
There are many Employee related permissions to consider when assigning User Roles, so be sure to review and adjust them carefully. Clicking on the Settings option from the kebab menu in the top right corner of the page will allow you to review the permissions required to access the features on that page. Visit our User Roles Guide for further details.
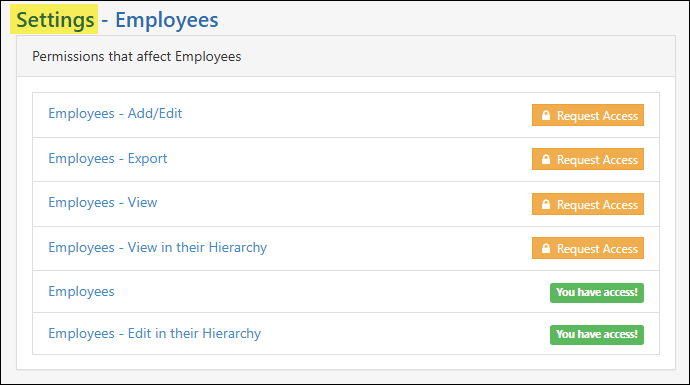
Example of Some of the User Role Permissions Related to Employees in Striven
-
Employees List
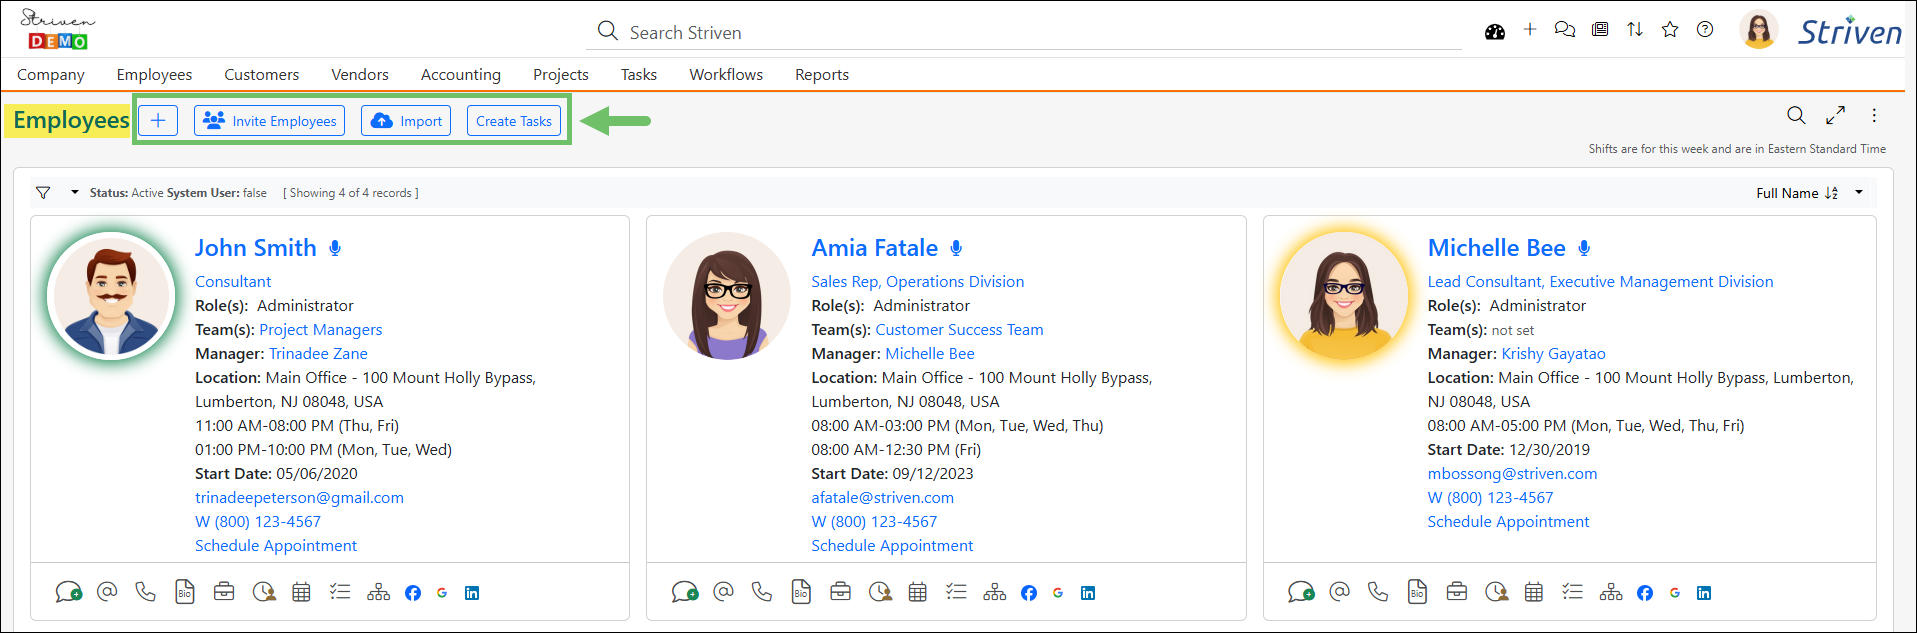
Employee records can be accessed directly from the Employees List. This page provides a variety of search options to enable you to filter through all of the Employee records saved in your system. Additionally, there are buttons available to Add Employees, Invite Employees, Import Employees, or Create Tasks for selected Employees.
The Employees List is split into three (3) columns of Employee results and displays recently viewed records by default. The records displayed on this page provide a large variety of details related to the Employee, with the option to click on the Employee Name to access the Employee Info and other data in the Employee record, depending on your User Role permissions.
To view the Employees List, navigate to Employees → List
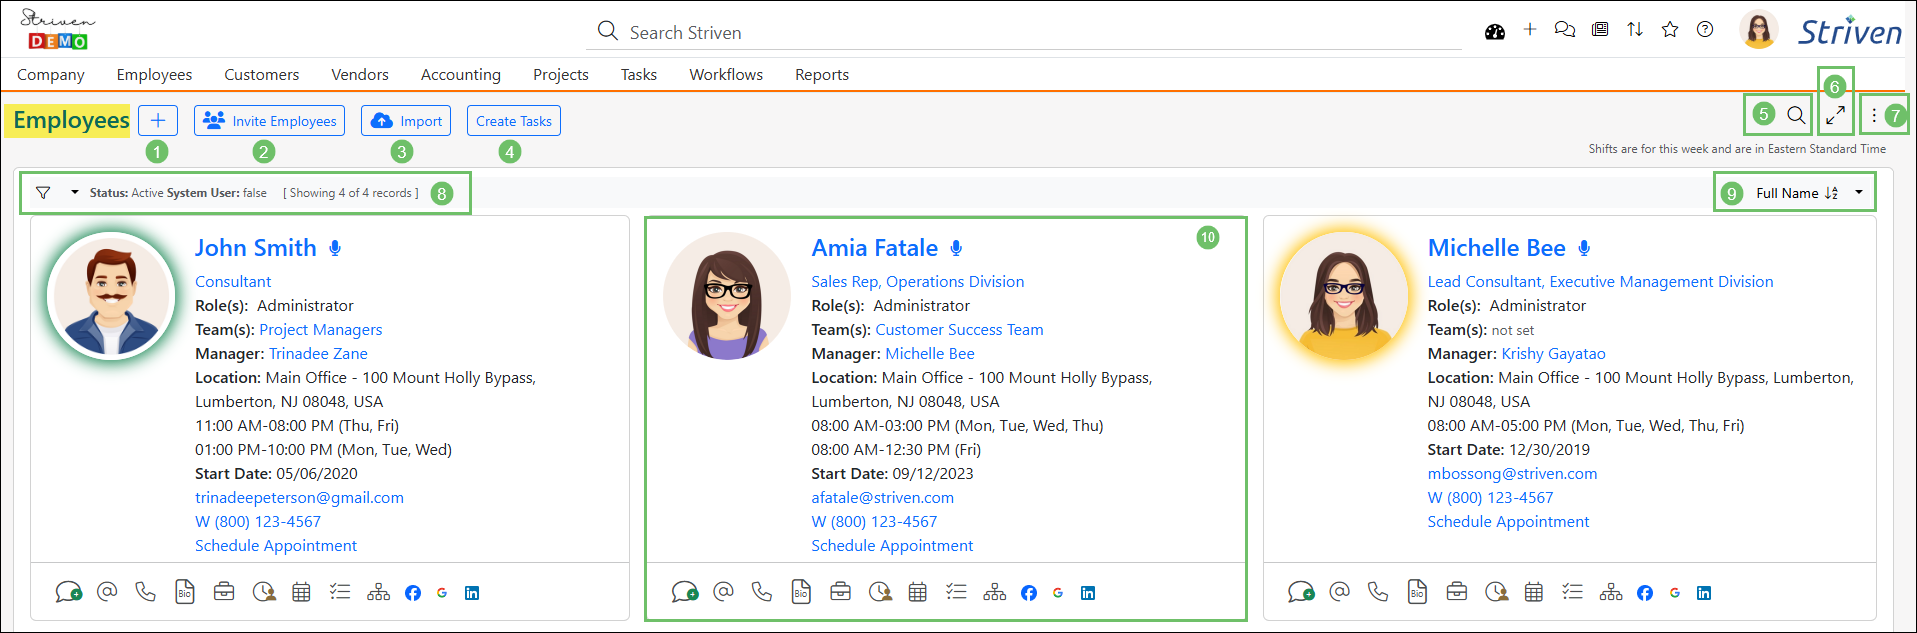
Example of the Employees List Page
- Add Employee: Directs your browser tab to the Add Employee page.
- Invite Employees: Allows you to add new Employees as users to your system by entering their name and email to send them a Welcome Email. Additional details about this feature are available in the next guide section.
- Import: Allows you to import Employees into Striven. To learn more about importing, please reference the Import Management Guide.
- Create Tasks: Displays the Create Tasks popup to enable you to assign Task Groups to selected Employees. Choosing a Task Group from the drop-down list will show the option to select a Customer/Vendor to relate to the Tasks being created. The popup will show how many Tasks are in the selected Task Group, as well as how many total Tasks will be created based on the selected Employees. For more information about Task Groups, please refer to the Task Groups & Task Library section of our Task Management Guide.
- Search: Displays a popup with a variety of search filters to find specific Employees.
- Enter/Exit Fullscreen: Enables you to toggle the page view to Fullscreen.
- Settings Menu: Displays the following options:
- Settings: Opens the Settings page in another browser tab to view the permissions that affect access to the Employees List page. This page will identify if you have the necessary permissions to view the info on the page, or will provide the option to Request Access to those permissions you do not have.
- Make Landing Page: Sets the Employees List page as your landing page in Striven so that whenever you sign on, that will be the first page that displays.
- Search Filters: Displays the search filters currently in use on the Employees List with a Filter icon to adjust the settings or choose from any Saved Searches. This will also display the number of records that match your search criteria.
- Note: The Employees List will display the first 12 records that match your search criteria with a Load More button at the bottom to view the remaining records in the search results.
- Sort: Allows you to choose how to sort your Employee List results, in either ascending or descending order. Sort options include Full Name, First Name, Last Name, and Start Date.
- Search Results: Displays a snapshot of the Employee records that match the search criteria. The results view will be explained in more detail below.
Employee Snapshots
Here is a breakdown of the details provided in the search results displayed on the Employees List.
- Employee Profile Image: Displays the Employee’s profile image. Depending on the time of day, this image may have a colored halo around it indicating whether the Employee is currently working.
- Green Halo: Indicates the Employee currently is working.
- Yellow Halo: Indicates the Employee is currently working, but their shift will be ending within an hour.
- No Halo: Indicates the Employee does not currently have an active shift.
- Employee Name: The full name of the Employee as it is saved in their Employee record. Clicking this hyperlink will redirect your browser tab to the Employee Info page of their Employee record to view more detailed information about the Employee.
- Name Recording: Allows the Employee to save and/or play a recording of the pronunciation of the Employee’s name. This feature can also be accessed from the My Profile – Info page.
- Employee Info: Indicates settings for a variety of Employee details, such as:
- Job Title & Department: Displays the Employee’s designated Job Title and Department within your organization. Clicking this hyperlink will display the Job Title Description popup for further details related to the Job Title.
- Role(s): Lists the name of each of the User Roles the Employee has assigned to them in Striven. If the length of this list exceeds 100 characters, the list will truncate and display a clickable ellipsis (…) to reduce visual clutter. Clicking on the ellipsis opens a popup showing the full list of Roles.
- Team(s): Lists the name of all of the Teams the Employee is assigned to in Striven. If the length of this list exceeds 100 characters, the list will truncate and display a clickable ellipsis (…) to reduce visual clutter. Clicking on the ellipsis opens a popup showing the full list of assigned Teams.
- Note: Clicking on the Team name will open the corresponding Team Information popup.
- Manager: Indicates the Employee’s Manager. Clicking on the Manager name will open their Employee Info card.
- Location: Provides the work Location of the Employee as set in the system.
- Shifts: Displays the Employee’s shift assignments for the current week in your Striven system’s designated time zone.
- Start Date & Original Start Date: The Start Date lists the start date of the Employee’s current employment with your organization for quick and easy reference, while the Original Start Date lists the start date of the Employee’s initial employment with your organization.
- Note: The Original Start Date will only appear if the Employee has been deactivated and later reactivated, resulting in multiple start dates. This info helps maintain accurate historical records and offers better insight into the Employee’s full tenure with your company.
- Contact Info: Displays the Employees Email, Phone Number, and their Schedule Appointment Link if it is set in their My Profile settings.
- Profile Actions: Provides the following options related to the Employee’s profile:
- New Discussion: Triggers a New Discussion popup to allow you to start a new Discussion thread with the Employee. The Employee is added automatically, but you will have the option to add additional participants as well.
- View Email Book: Displays a popup with all of the Employee’s email addresses listed, including an indication as to which is their Primary email address.
- View Phone Book: Displays a popup with all of the Employee’s phone numbers listed, including an indication as to which is their Preferred number.
- View Bio: Shows a popup displaying the Employee’s bio info as it is saved within their My Profile – Bio page.
- View Skillsets: Shows a popup displaying the Employee’s saved Skills and the level they’ve achieved for that Skill. This information is set from the Skillsets tab of the Employee record.
- View Time Off: Opens another browser tab displaying the Employee’s Time Off page.
- View Calendar: Opens the Employee’s Striven Calendar in another browser tab to view their scheduled Appointments, Time Off, and Holidays to determine their availability.
- View Tasks: Launches a new browser tab displaying the Tasks List filtered for the Employee’s Open Tasks.
- View Organization Chart: Loads the Employee Reporting Tree page in another browser tab, pre-filtered for the Employee’s reporting details.
- Integrated Links: Displays customized integrated links to websites you have set in your Integrated Links settings in Striven. Links for Facebook, Google, and LinkedIn are provided by default for Employees, but other links can be added as desired.
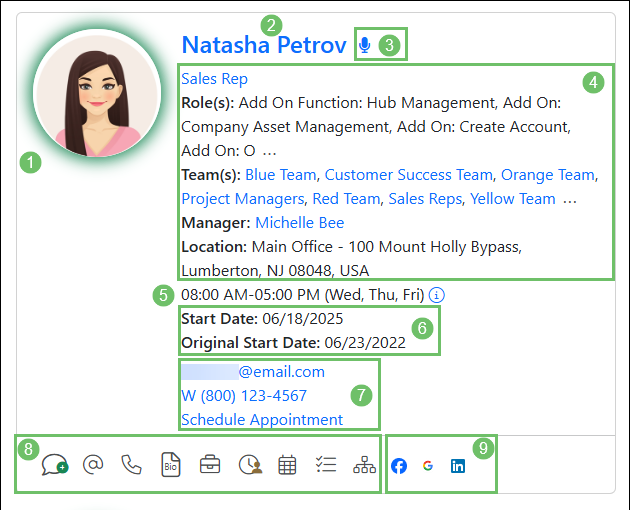
Example of the Employee Snapshot as Displayed on the Employees List
- Note: Remember that many of the Employee features are protected by User Role permissions, so if you do not have access to one of the many features listed in this guide, please be sure to check with your system administrator to review your permissions.
-
Adding Employees
There are several locations within Striven that will allow you to quickly and easily add Employees. This section of the guide will explore these methods, starting with the most common options.
-
Add Employees – Employees List
The Employees List can be found by navigating to the Employees menu on the Striven Navigation menu bar at the top of the page.
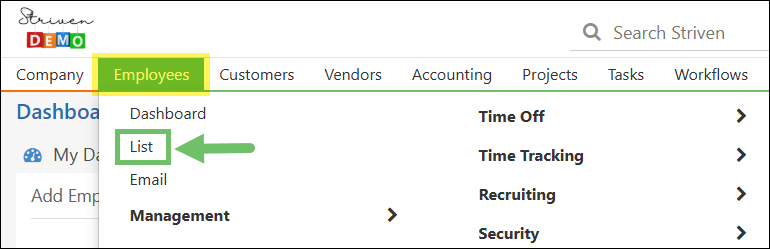
Example of the Employees List Option on the Employees Menu
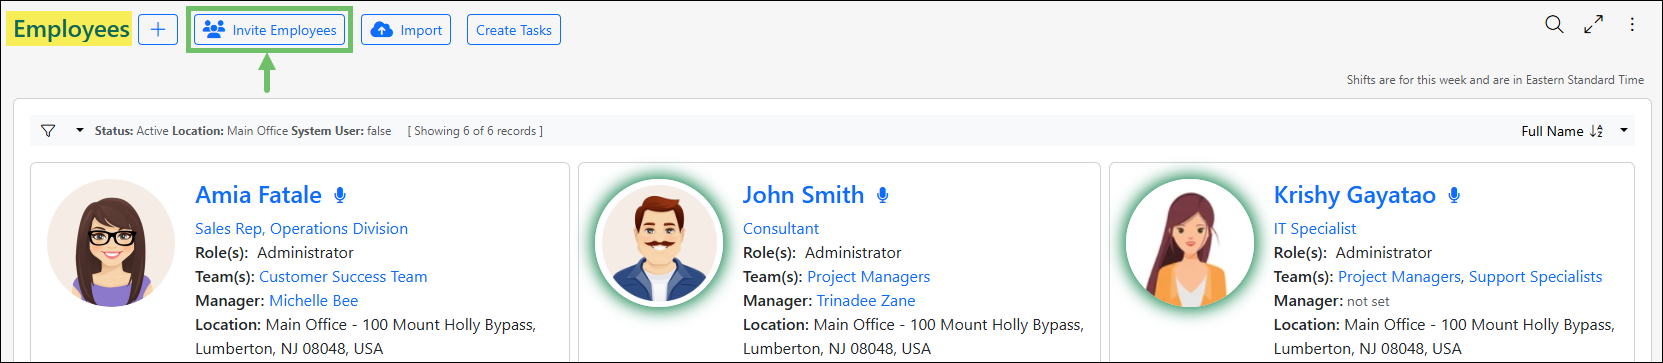
Once you have loaded the Employees List, there will be four (4) buttons next to the page title: Add Employee, Invite Employees, Import, and Create Tasks.
Example of the Add Employee Options on the Employee List Page
Add Employee Button
This button diverts your browser tab to the Add Employee page with informational fields to fill in, such as Full Name, Phone, and Email.
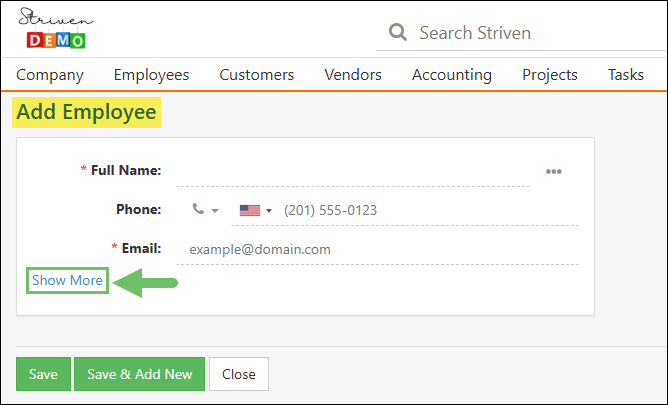
Example of the Show More Option on the Add Employee Page
The Full Name and Email are required in order to save the record, but there is an option to Show More, which will display further fields to gather Employee related information, including:
- Employment Info
- Start Date: Records your Employee’s first day of employment. If left blank, this field will auto-populate with the current date.
- Manager: Designates the Manager for the Employee. This is selected from a drop-down list of Employees set in your system as Managers.
- Location: Identifies the location from which the Employee works. This is selected from a drop-down list of Company Locations saved in your system or by adding a new Location using the hovering Plus (+) icon.
- Job Title: Sets the Employee’s Job Title by selecting from a drop-down list of available options saved in your system’s settings or by adding a new Job Title using the hovering Plus (+) icon.
- Department: Shows the Employee’s designated Department setting. This can be selected from a drop-down list of saved Departments within your system or by adding a new Department using the hovering Plus (+) icon.
- Job Type: Designates the Employee’s Job Type from a default list of choices, including Full-Time, Part-Time, Temporary, Contract, Internship, or Commission.
- Copy Options
- Copy from Employee: Provides you with the option to copy settings from an existing Employee’s record. This is useful when entering Employees that will have similar settings to an existing Employee, allowing their record to be used as a sort of template to save time and effort when completing the various fields.
- Create from Candidate: Allows you to create an Employee from an already existing Candidate record. This will carry over data from the Candidate record to minimize duplication or errors in re-entering the information to the Employee record and save time while creating the new Employee.
- Security
- Not a System User: Designates the Employee as a non-system user, allowing you to keep an Employee record in Striven without providing the Employee with sign-on access to the system.
- Role: Sets the Employee’s User Role within your Striven system. This role will limit their access to only the areas of the system you have configured in the permissions related to the role.
- Note: Multiple roles can be assigned to provide access to various areas of the system without providing Full Access or the need to select permissions one by one. It should be noted that some User Roles can override permissions from other roles, so care should be taken when adding roles to an Employee in order to maintain system security.
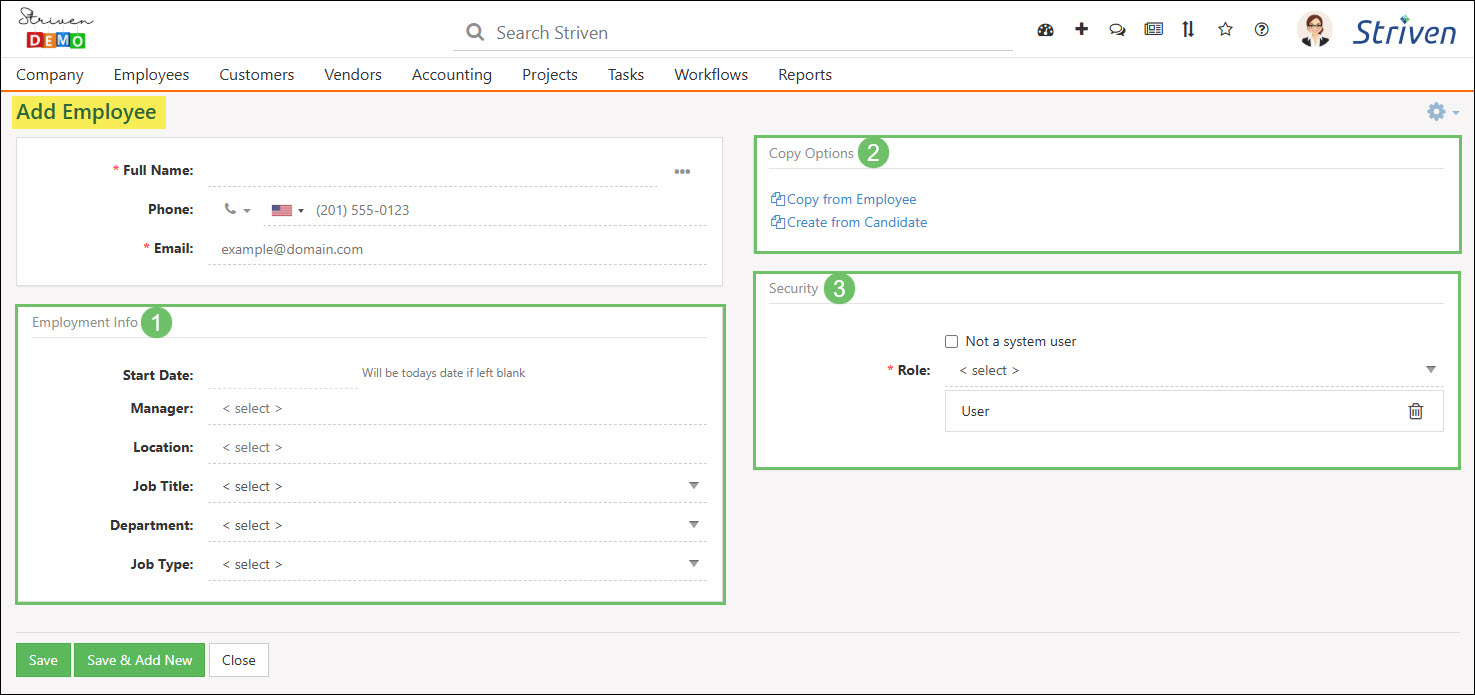
Example of the Add Employee Page
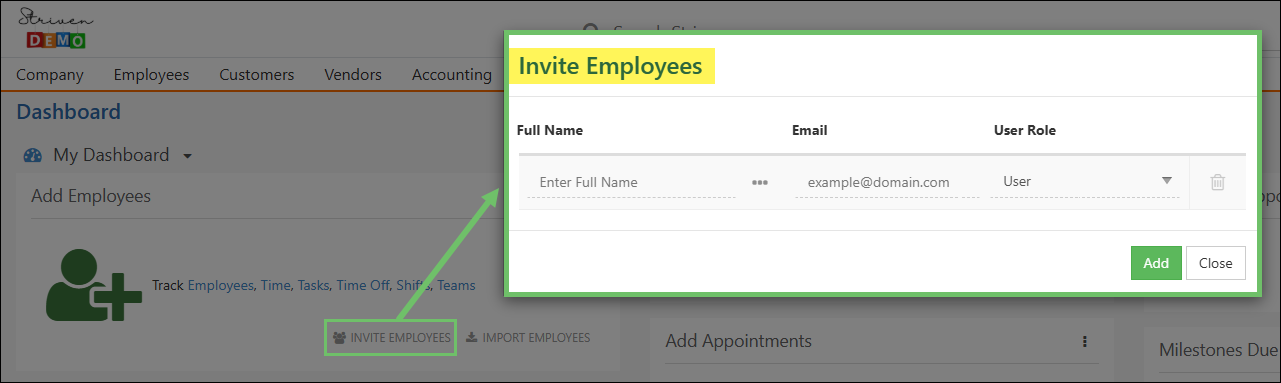
Invite Employees Button
The Invite Employees button allows you to add one or more new Employees with only their basic information, like Name, Email Address, and User Role, so you can quickly send out Welcome Emails inviting them to sign in to your Striven System. The Invite Employees button is located on the Employees List page near the top-left corner.
Example of the Invite Employees Button
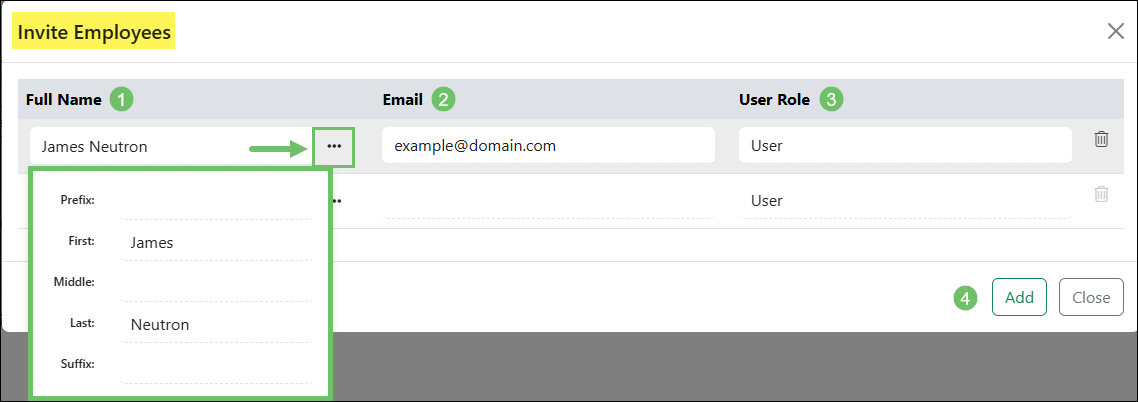
Once the Invite Employees popup window appears, you have the option to add information for one or more Employees. The fields available within this popup window are detailed below.
- Full Name: Allows you to enter the new Employee’s Full Name. Selecting the kebab icon to the right of the field enables you to enter prefixes, middle names, and suffixes, in addition to specifying the First and Last Name.
- Email: Enables you to save and set your Employee’s default email address. Additionally, this is the email address where the Welcome Email to your system will be sent.
- Note: Welcome Emails will be discussed in more detail in the Employees Info section of the guide.
- User Role: Allows you to select the User Role assignment for the new Employee, providing them access to areas of the system based on the role permissions.
- Add: Adds the Employee data to your system and creates the Employee record(s). This also triggers the Welcome Email to be sent to each new Employee.
Example of the Invite Employees Popup Window
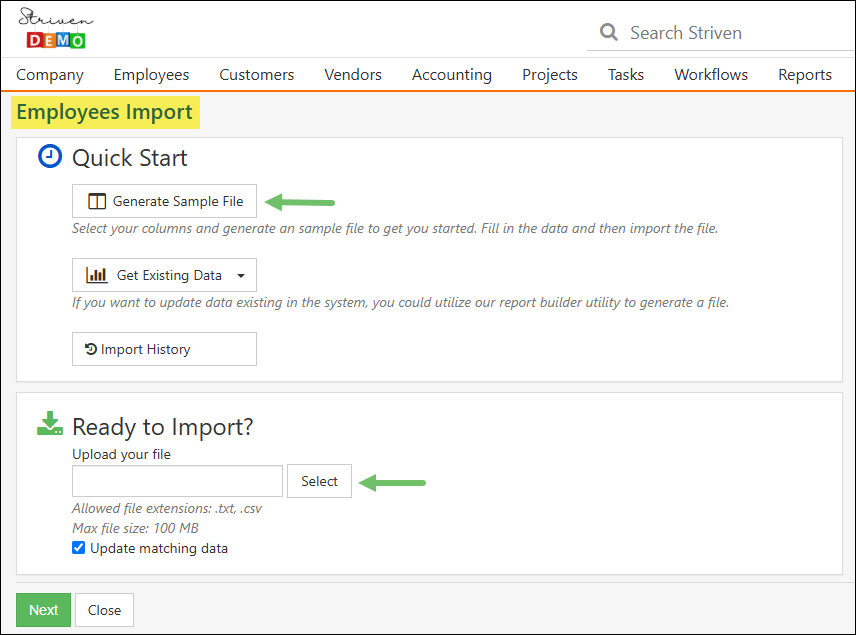
Import Button
The Import button simplifies the process of adding multiple Employees to the system simultaneously. This is a valuable tool for managing Employee data and a significant time-saver, especially if your organization has a large number of Employees. Whether you’re onboarding a small team or migrating a large existing database, the Import button on the Employees List page allows you to upload Employee data in bulk, rather than entering each Employee individually. This streamlined approach minimizes manual data entry and reduces the risk of errors, making the Employee onboarding process much more efficient.
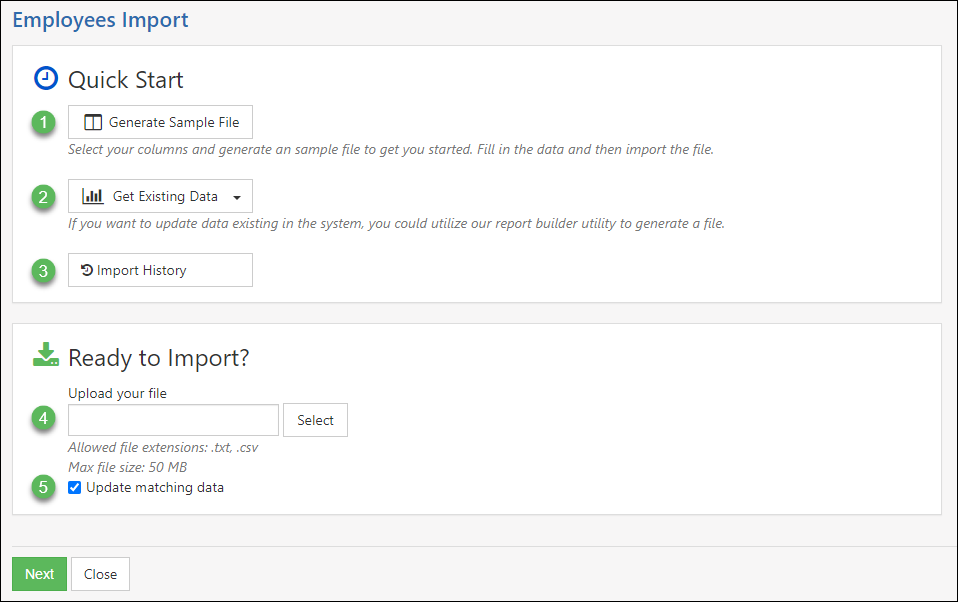
Clicking on the Import button located at the top-left of the Employees List page will open the Employees Import page in another browser tab. The following options are available on this page:
- Generate Sample File: Displays the Import Mapping popup window to select the desired column headers to include in the sample spreadsheet to assist with successfully entering your Employee data. Once all of the necessary columns are selected, you can click the Download Sample button at the bottom of the mapping window to create a template for your import file.
- Get Existing Data: Provides the following options to export Employee information that already exists in the system to make updates:
- Create New Report: Opens the Add Report page in a new browser tab enabling you to use the Report Builder tool to create a new custom report filtered for Employee data. You will then choose the appropriate columns and filters to include the Employee data you need to export.
- Choose Existing Report: Opens the Reports page in a new browser tab providing the ability to search for an existing report to export your Employee data.
- Import History: Directs you to the Import Progress page where you can search for previously utilized Import Files. These files can be exported for editing or updating if needed.
- Select: Allows you to select an Import File from your computer to upload to Striven. Only .TXT or .CSV file extensions are allowed for imports.
- Update Matching Data: Enables you to update existing Employee records via the import. This checkbox must be checked to update records. Otherwise, duplicate records may be created. The Employee ID data will also be required in the import mapping for this function to work.
Example of the Employee Import Page
- Employment Info
-
Add Employees – Quick Add Menu
The Quick Add menu is a super handy feature for swift access to the Add option for dozens of features in Striven. This menu is located in the Striven Menu Bar in the top right corner of virtually all pages in Striven.
To add an Employee from the Quick Add menu, simply click on the Employee option on the menu drop-down list. This displays the Add Employee page where you can fill in the fields to create a new Employee record.
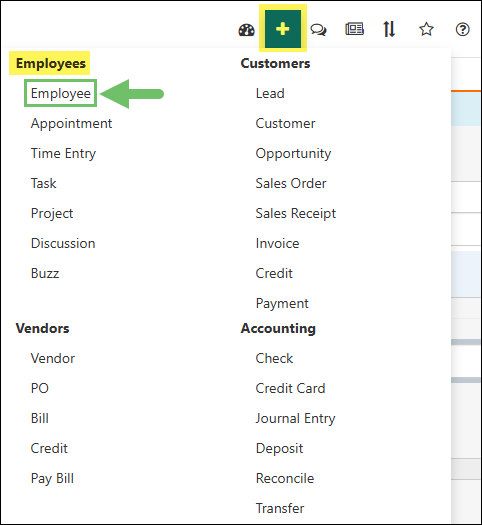
Example of the Add Employee Option on the Quick Add Menu
-
Add Employees – Dashboard Widgets
There are two popular Dashboard widgets that provide the option to add Employees: the Add Employee widget and the Recent Employees widget. These widgets can be added to your My Dashboard or any other custom Dashboard.
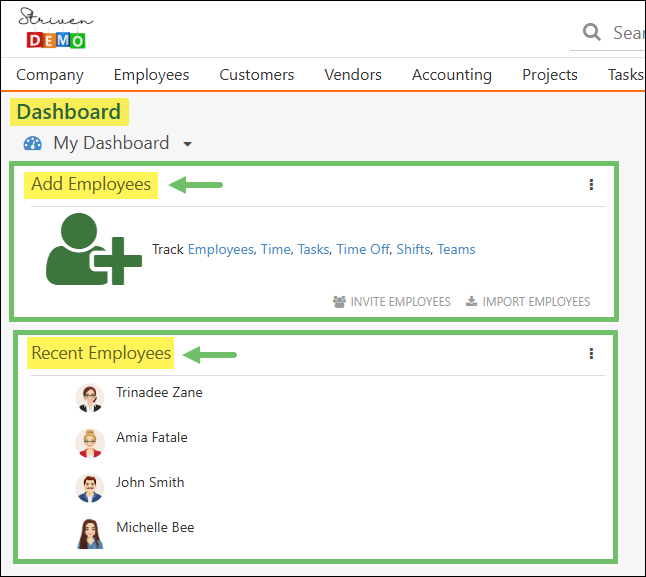
Example of the Add Employees & Recent Employees Dashboard Widgets
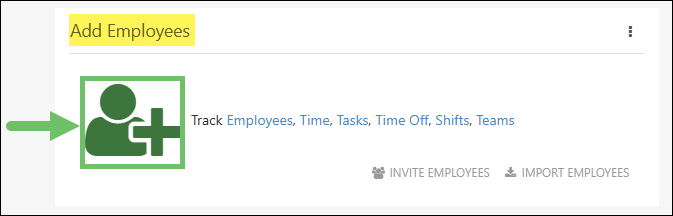
Add Employee Widget
The Add Employee widget has three (3) options for adding an Employee to Striven.
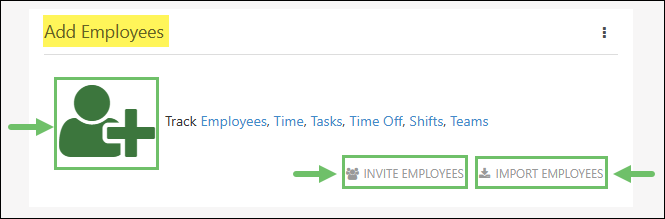
Example of the Add Employees Dashboard Widget
- Add Employee icon: Clicking on this icon will open the Add Employee page in a new browser tab.
Example of the Add Employees Icon on the Add Employees Dashboard Widget
- Invite Employees: Triggers the Invite Employees popup to display, allowing you to enter the new Employee’s Full Name, Email, as well as set their User Role.
Example of the Invite Employees Popup
- Import Employees: Opens the Employees Import page in another browser tab. There you can generate a sample file to import your Employee data in bulk, or you can use your own .CSV or .TXT file to upload the data.
Example of the Employees Import Page
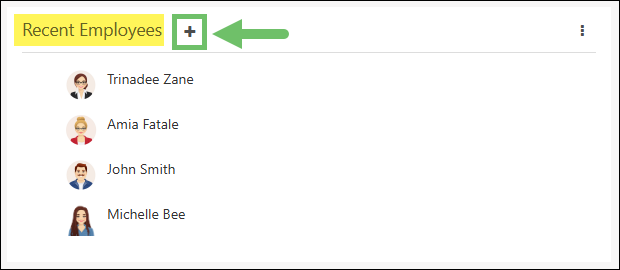
Recent Employees
From the Recent Employees widget, you can add an Employee by hovering your cursor next to the widget title until the Plus (+) icon displays. Clicking on it will open the Add Employee page in another browser tab.
Example of the Add Employee Option on the Recent Employees Dashboard Widget
-
Additional Methods to Add Employees
Additional methods exist that enable you to add an Employee on the spot while working in Striven. These methods include:
Candidate Record
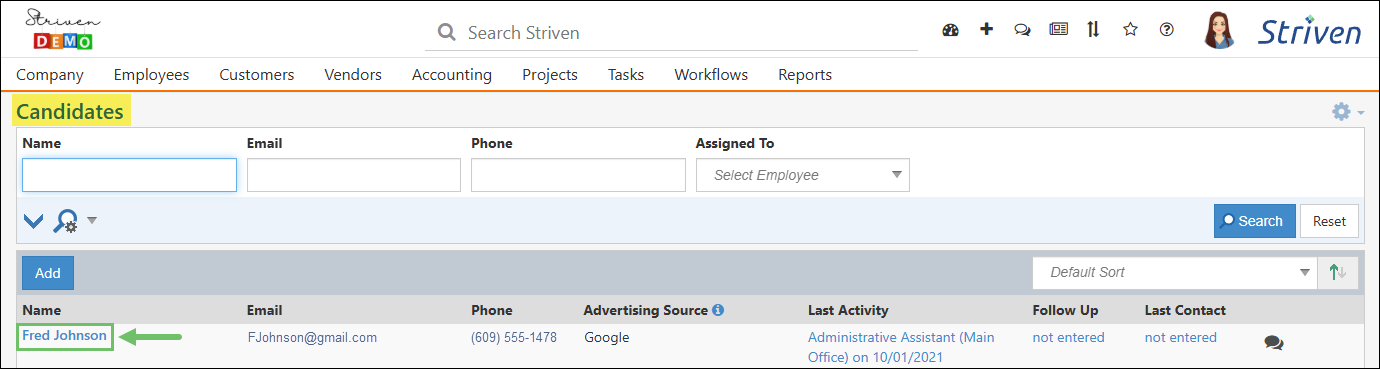
Users with access to the Candidates List can locate a particular Candidate record by navigating to Employees → Recruiting → Candidates.

Example of the Candidates List Option on the Employees Menu
Use the search filters to find and view the Candidate you wish to convert to an Employee. Click on the Candidate’s name and their Candidate record will display.
Example of a Candidates List
Once the Candidate record displays, you can select Create Employee from the Candidate Actions menu at the top left of the screen.
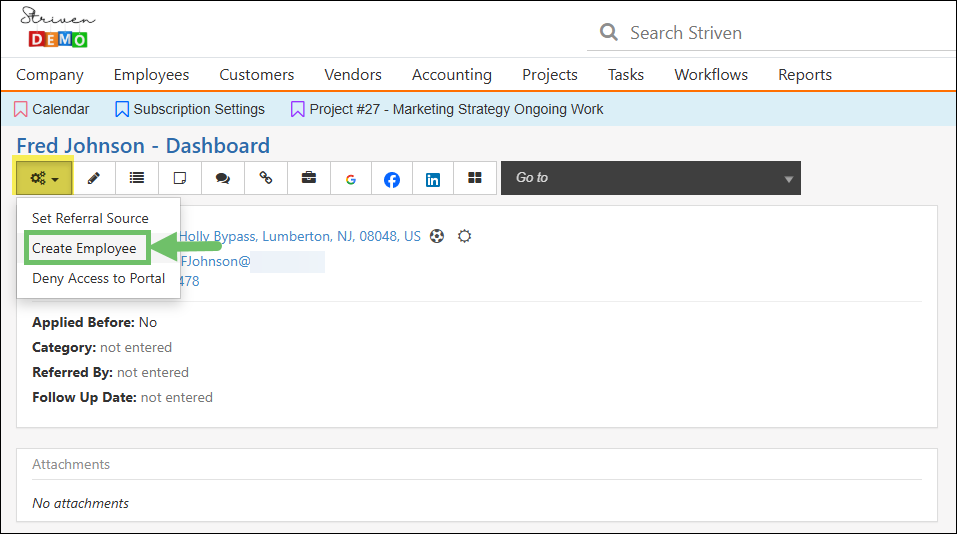
Example of the Create Employee Option from the Candidate Action Menu
Creating an Employee this way will carry over the relevant information from the Candidate record to the new Employee record, such as Full Name, Phone, and Email. If you click the Show More option, the Copy Options section of the page will display notation about the Address copying over and the new Employee record being linked to the Candidate record.
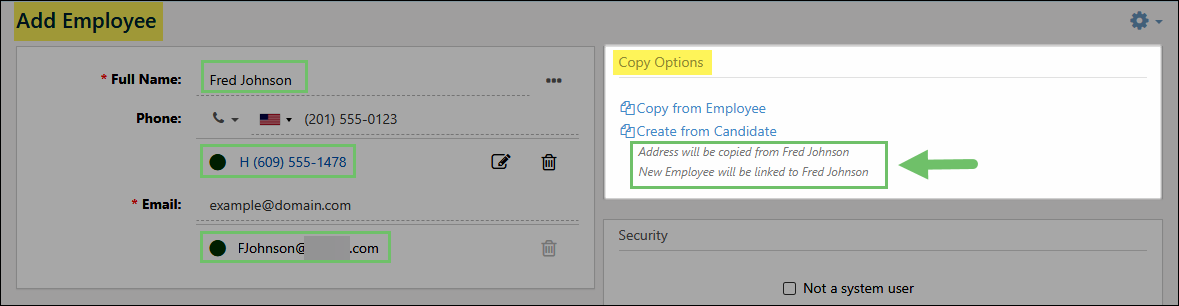
Example of the Add Employee Page When Creating an Employee From a Candidate Record
Appointments
It is possible to create an Employee in your system from an Appointment on your Striven Calendar. This can be accomplished while creating a new Appointment, or from an existing one, in much the same fashion.
When viewing the Add Appointment or Appointment Info pages, you can click on the gray Plus (+) icon next to the Add Attendee line on the right side of the screen.
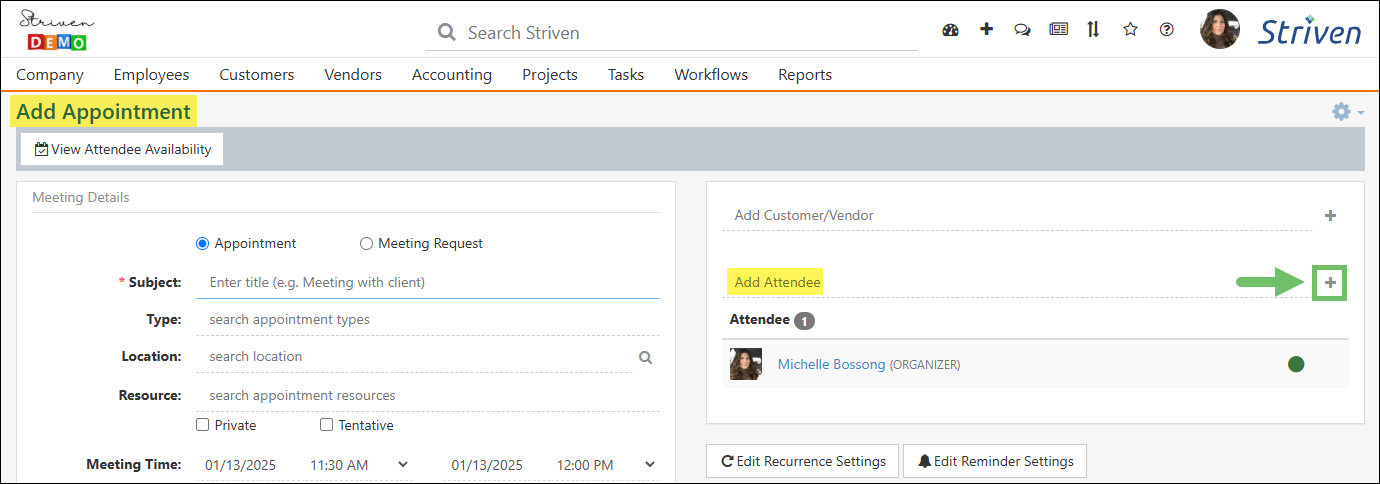
Example of the Add Employee Option on the Add Appointment Page
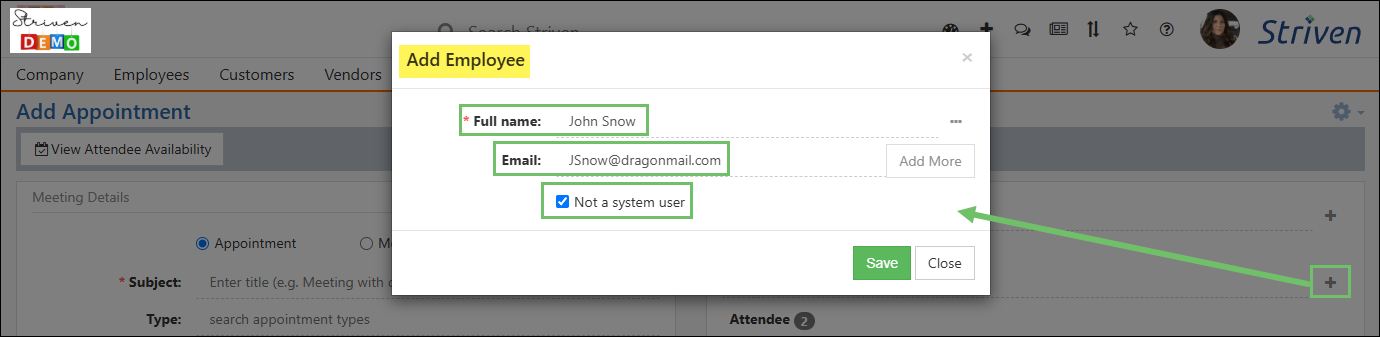
This will trigger an Add Employee popup allowing you to enter the Employee’s Full Name and Email, as well as designate them as a non-system user and save them. Taking this action will not only create the new Employee record, but will also add them to the Attendees of the Appointment.
Example of the Add Employee Popup from the Add Appointment Page
Tasks
Employees can be added from Tasks by hovering your cursor over the Add Assignee line until the gray Plus (+) icon displays for you to click it.
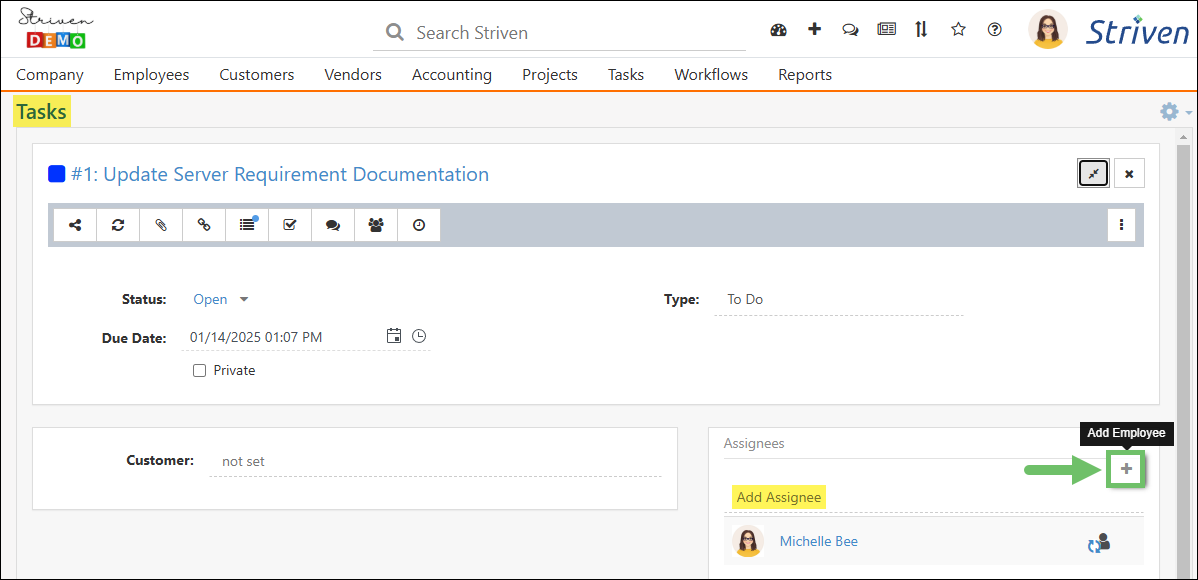
Example of the Add Employee Option on a Task
This will trigger an Add Employee popup allowing you to enter the Employee’s Full Name and Email, as well as designate them as a non-system user and save them. Taking this action will not only create the new Employee record, but will also add them as an Assignee to the Task.
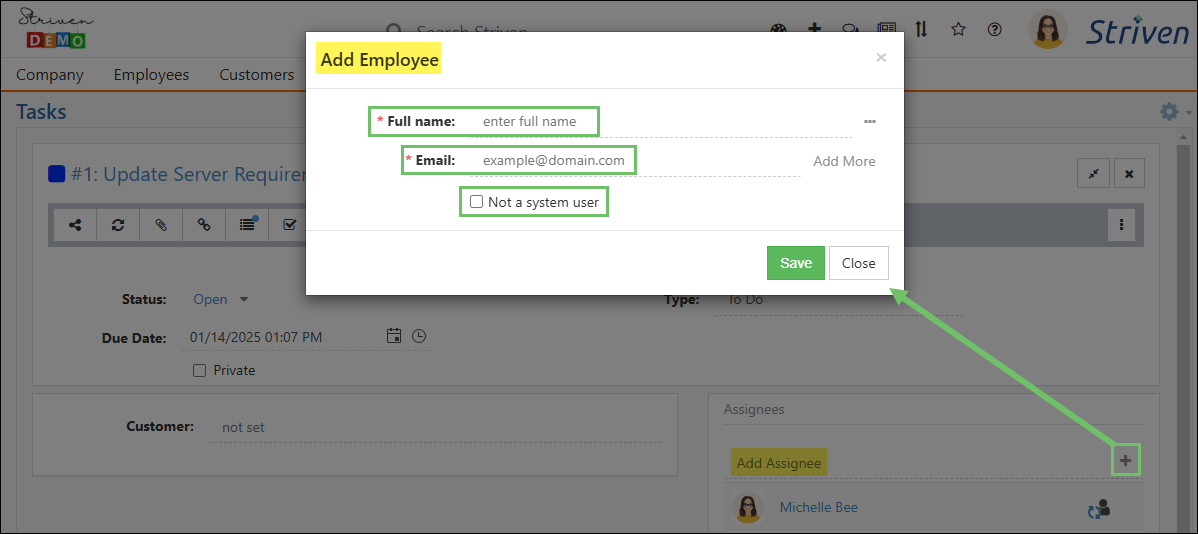
Example of the Add Employee Popup from a Task
Some A/R Transactions (Sales Orders, Sales Receipts, Invoices)
Sales Orders, Sales Receipts, and Invoices all provide an option to add an Employee to Striven. If you hover over the Sales Rep line on the right side of the page, a Plus (+) icon will appear.
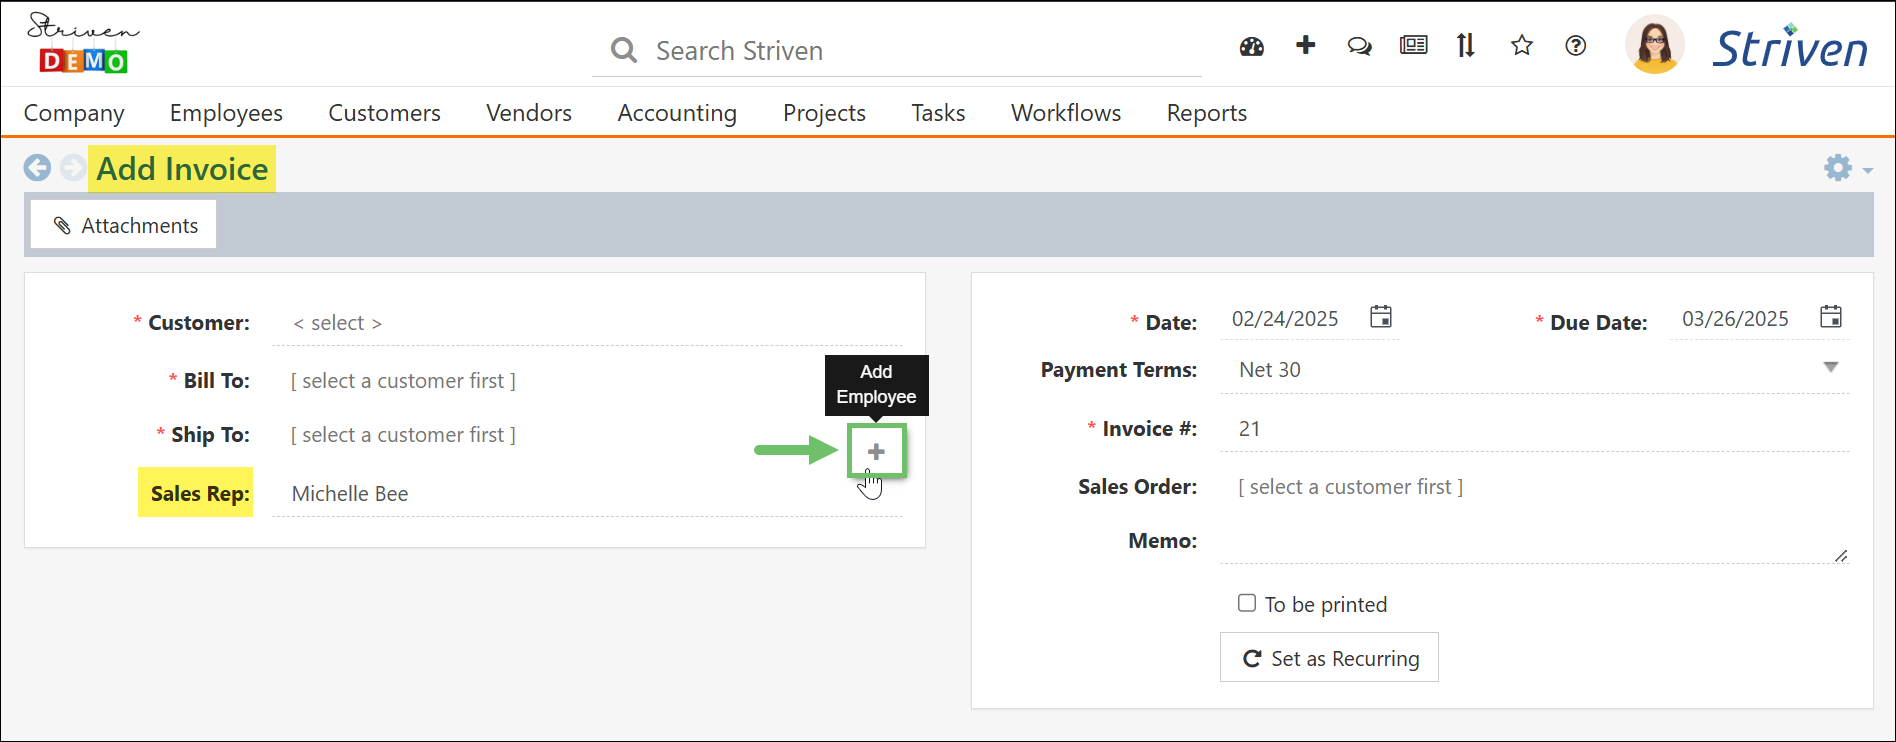
Example of the Add Employee Option on an Invoice
Clicking on that icon will display an Add Employee popup, allowing you to enter the Full Name and Email, as well as select the system user designation for the Employee. Saving this info will create the Employee record and designate the Employee as the Sales Rep for that particular Sales Order, Sales Receipt, or Invoice.
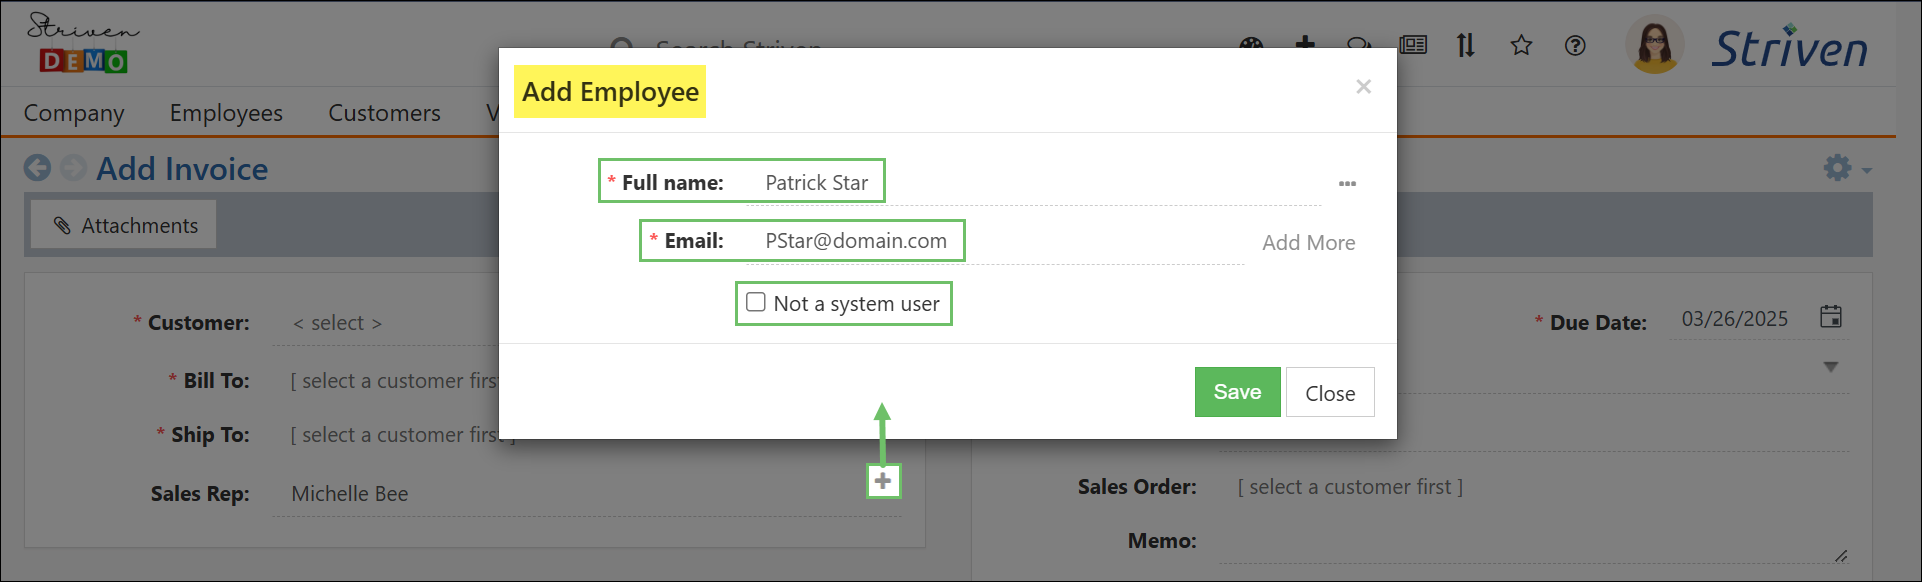
Example of the Add Employee Popup from an Invoice
-
Global Shifts
Shifts determine the scheduled periods of time your Employees are expected to be working. In order to track the time your Employees spend working, you will need to configure the settings for Shifts within your Striven system. Settings for Global Shifts can be found by navigating to:
Company → Settings → Employees → Shifts
- Create New Shift: Triggers the Create New Shift popup wherein you can set the Start Time, End Time, Break Time, Break Deduction Threshold, set as Default, and select the Days for this Shift.
- Break Time:Allowable break time for a Shift.
- Break Deduction Threshold: Minimum number of hours that an Employee must work to be eligible for a break.
- Edit Shift: Triggers the Edit Shift popup wherein you can make changes to the Start Time, End Time, Break Time, Break Deduction Threshold, or change the Default for only that particular day’s Shift settings.
- Default Shift: Designates which Shift is the Default for new Employees.
- Remove Shift: Triggers an alert to confirm you wish to remove the selected Shift.
- Note:If a Shift is in use, you cannot remove it.

Example of Global Shifts
Employee Shift options will be discussed in more detail in the Employee Info section of this guide.
If you would like to see an overview of the Employees who are anticipated to be on shift, you can use the Work Schedule or the Employee Shifts page to view this information.
- Create New Shift: Triggers the Create New Shift popup wherein you can set the Start Time, End Time, Break Time, Break Deduction Threshold, set as Default, and select the Days for this Shift.
-
Work Schedule
The Work Schedule allows you to see a weekly overview of the Employees that will be working each day, and the hours they are scheduled for. Shifts and hours cannot be adjusted from this page, but it provides a summary of the Employees scheduled to work. You may narrow the results shown on this page by selecting specific Employees or Department.
You may view the Work Schedule by navigating Employees → Management → Schedules.
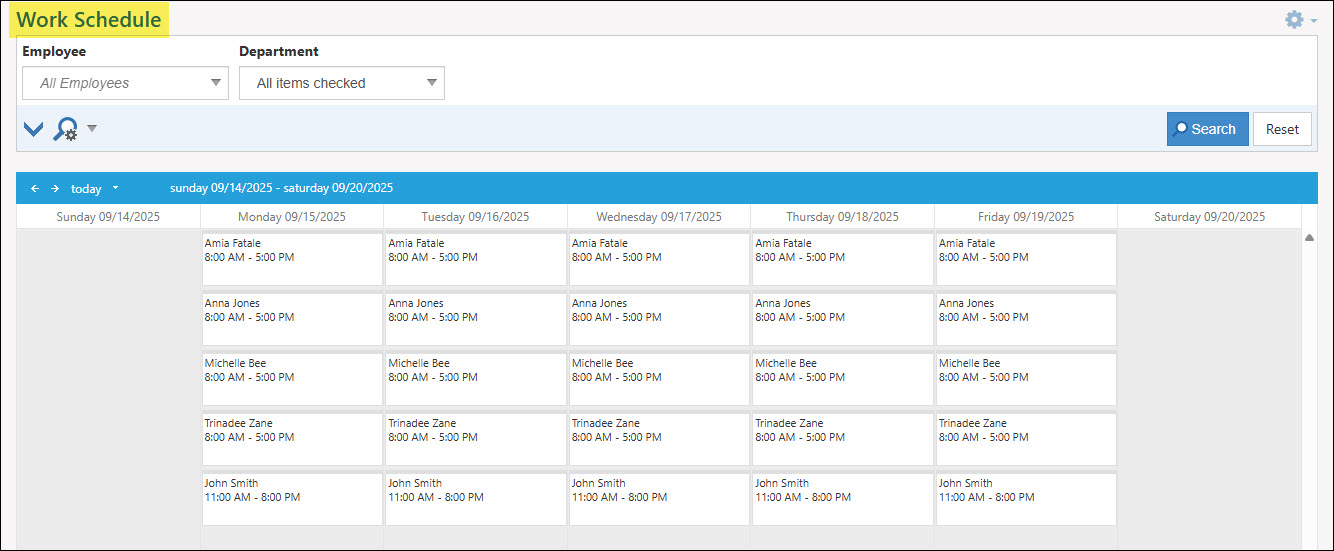
Example of the Work Schedule Page
-
Employee Shifts
The Employee Shifts page allows you to view your Employees and their assigned shifts for the week. You may assign new shifts from this page, as well as adding shift exemptions for certain days. If you would like to edit only one shift for an Employee, you may do so using the Edit option located on each shift.
To view Employee Shifts, navigate Employees → Management → Shifts.
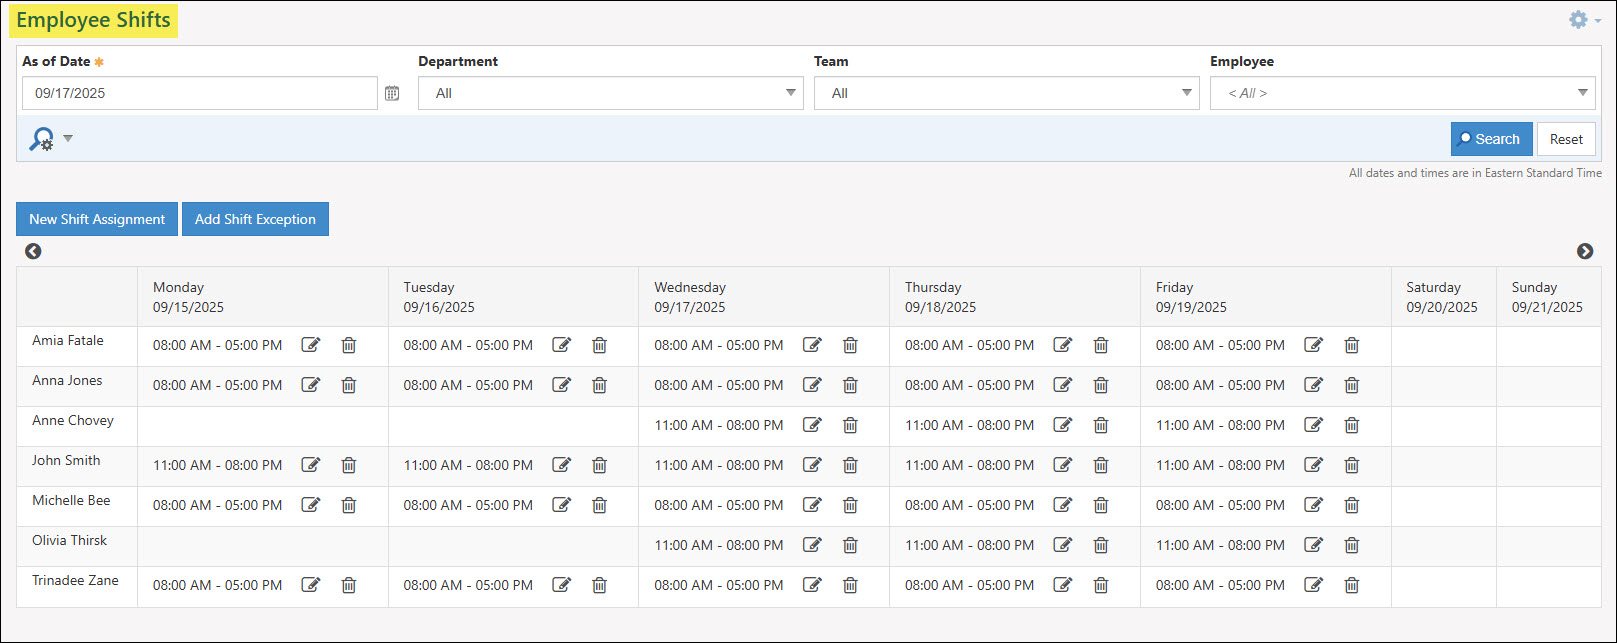
Example of the Employee Shifts Page
-
Job Titles
Job Titles can describe the responsibilities of the position, the level of the job, or both. Job Titles dictate an Employee’s associations to many different functions in Striven including Time Off, Team association, and more. You can add Job Titles from the Job Titles List simply by clicking the Add button. Each Team also has its own Hub which will allow you to add documents, folders, and content pertaining to the Job Title. Below is a screenshot of how the Add Job Title page appears and a description of what you can accomplish here. To view your Job Titles, use the following steps below:
Company → Settings → Employees → Job Titles
- Job Title: The name of the Job Title being added and what will appear in the drop-down when assigning Job Titles to Employees.
- Staffing Level: Notes how many Employees your Company needs under the Job Title. By assigning Job Titles, the desired staffing level will show how over or under the target you are.
- Job Description: Describes the job and can include anything ranging from expectations to responsibilities.
- Time Off Categories: Enables Employees with this Job Title to have the ability to request or submit Time Off for the chosen categories.
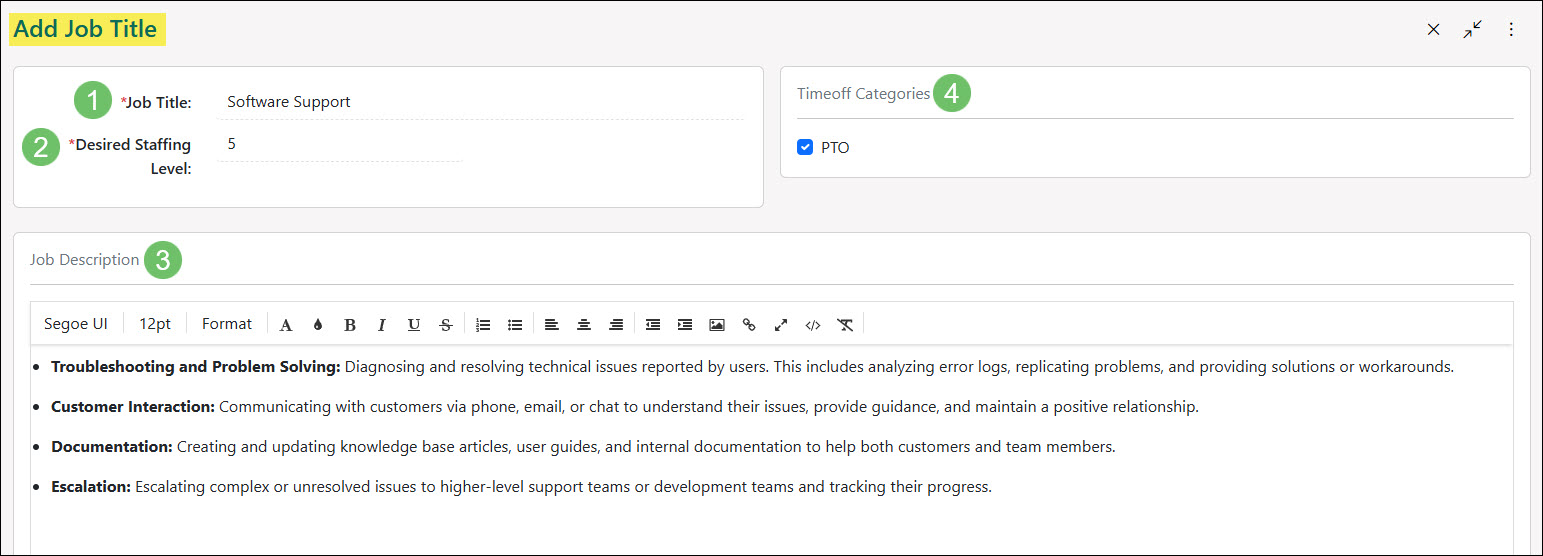
Example of Adding a Job Title
-
Employee Info
Employee records typically include a variety of information related to your Employee, such as their full name and contact details, salary and benefits info, shifts, skills, time off, and more. This information is essential for keeping proper employment records for legal and tax purposes, helping your organization comply with employment laws and regulations. Having accurate data about your Employees is also helpful for safety and effective communication.
Striven’s Employee Info page presents this important information in an organized and efficient way. Comprehensive details on how to locate and access this information within your system are presented below.
-
The Employee Info Page
The Employee Info page provides users with general Employee information and is displayed when an Employee record is viewed in Striven. You can find this feature by clicking on an Employee’s name from the Employees List. This page view lets you manage the basic details about the Employee, as well as other aspects of the Employee’s record, by clicking the appropriate subsection tab. Each of these tabs will be discussed in further detail in later guide sections.
- Employee Name & Name Recording: Displays the Employee’s full name as it is saved in your system, along with the microphone icon to listen to/record the pronunciation of the Employee’s name, when available.
- Employee Navigation Tabs: Allow you to view and edit information about the Employee. Each of these tabs will be explained in further detail below.
- Actions Bar: This bar includes the Employee Actions menu, the Linked To option, the Employee record’s Audit Log, as well as access to the Employee Integrated Links.
- Actions Menu: Allows you to perform the following functions:
- Associate with Candidate: Allows you to associate the Employee with a Candidate to relate information between those entities. This will also show in the Linked To tab as discussed below.
- Time Off Accrual Settings: Initiates a popup in which you can choose how the Employee’s Time Off accrual is set. To learn more about tracking Time Off, please review the Time Off Management Guide.
- Create Tasks: Allows you to create and assign Task Groups to the Employee. To learn more about Task Groups, please review the Task Management Guide.
- Linked To: Initiates a popup showing any entities that are linked to the Employee, such as their Candidate Profile, if applicable.
- Audit Log: Initiates a popup that shows changes made to the Employee information. These details include which system user made the changes and when the edits were made.
- Facebook: Populates Facebook in another tab to search for results based on the Employee’s name.
- Google: Populates Google in another tab to search for results for the Employee’s name.
- LinkedIn: Populates LinkedIn in another tab to search for results based on the Employee’s name.
- Note: There may be additional options here if other Integrated Links have been created for Employee records in your Striven system.
- Actions Menu: Allows you to perform the following functions:
- Employee Profile Image: Displays the Employee’s profile image, or if none has been uploaded, it will display the Employee’s initial(s). This feature provides the option to upload a new profile image or to change the current selection. The profile image will display as the icon for the Employee Actions menu in Striven, as well as in various other areas of the system for easy identification.
- Employee Information: Lists the Employee’s name, Employee Number, Date of Birth, and Social Security Number (SSN). It is important to keep in mind that there are separate permissions regarding the Employee’s Social Security Number; “SSN – Edit” and “SSN – View”.
- Not A System User: Designates whether an Employee is a Non-System User. This enables you to save important Employee-related data in Striven without providing the Employee with sign-in access to the system. If this checkbox is checked, the Employee will not be able to sign in to your system and the User Access section of the page will not display.
- Bio: Initiates a popup in which biographical information can be stored.
- Notes: Initiates a popup in which Employee notes can be recorded.
- Signature: Initiates a popup in which the Employee’s system signature can be configured. This configuration will populate with any use of the User Signature merge field.
- Contact Info: Lists the Employee’s contact information, such as their phone number(s), default email (used to sign in to Striven) and any additional email(s), and address(es).
- User Access: Lists the Employee’s sign in email and User Role. If the Employee has never signed in, there will be a blue Resend Welcome Email. When clicked, this button will resend a Welcome Email so the Employee can activate their account and sign in.
- Medical/Dental Benefits: Lists what medical and/or dental benefits in which the Employee has enrolled. This is a default Custom Field that has been added to Striven for convenience.
- Additional Benefits: Lists additional benefit options. This is also a default Custom Field that has been added to Striven for convenience.
- Employment Info: Provides the option to view or edit the Employee’s Start Date, Manager, Location, Job Title, Department, Teams, Job Type (full-time, part-time, etc.) and whether the Employee is non-exempt or not.
- Save Options: Provides options to Save, Save & Close, Save & Add New, Close, or to Deactivate/Activate an Employee record in Striven.
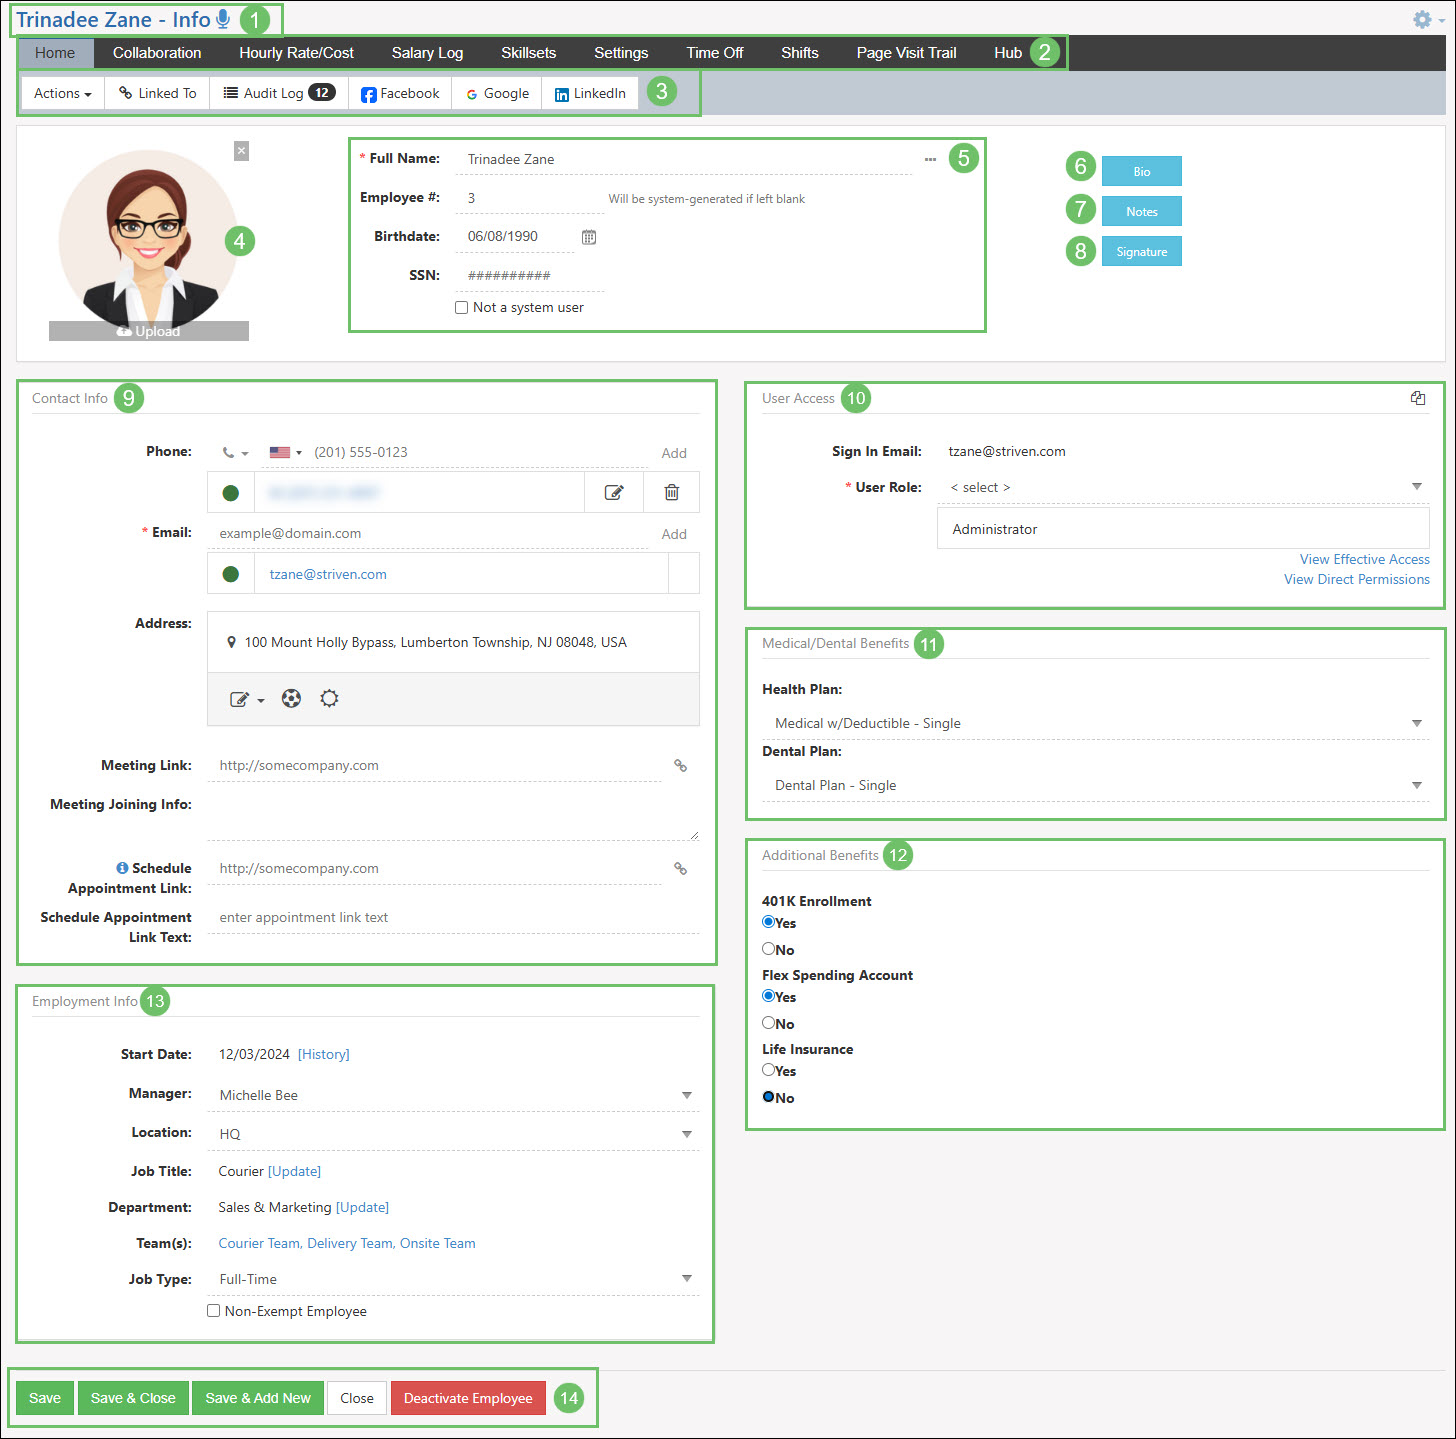
Example of the Home Tab of an Employee Info Page
-
Welcome Emails
Welcome Emails are sent to Employees who are set as system users when entered into your Striven system. This email notification provides a link for the Employee to use in order to activate their account.

Example of a Striven Welcome Email Notification
- Note: This email is also sent whenever a system user’s default email address is changed.
If an Employee has not yet signed into Striven or has not received the Welcome Email, there will be a blue Resend Welcome Email button in the User Access panel of their Employee Info page. Users with the proper Employee access can click this button to resend the Welcome Email to the Employee so they can set up their credentials and sign in to Striven.
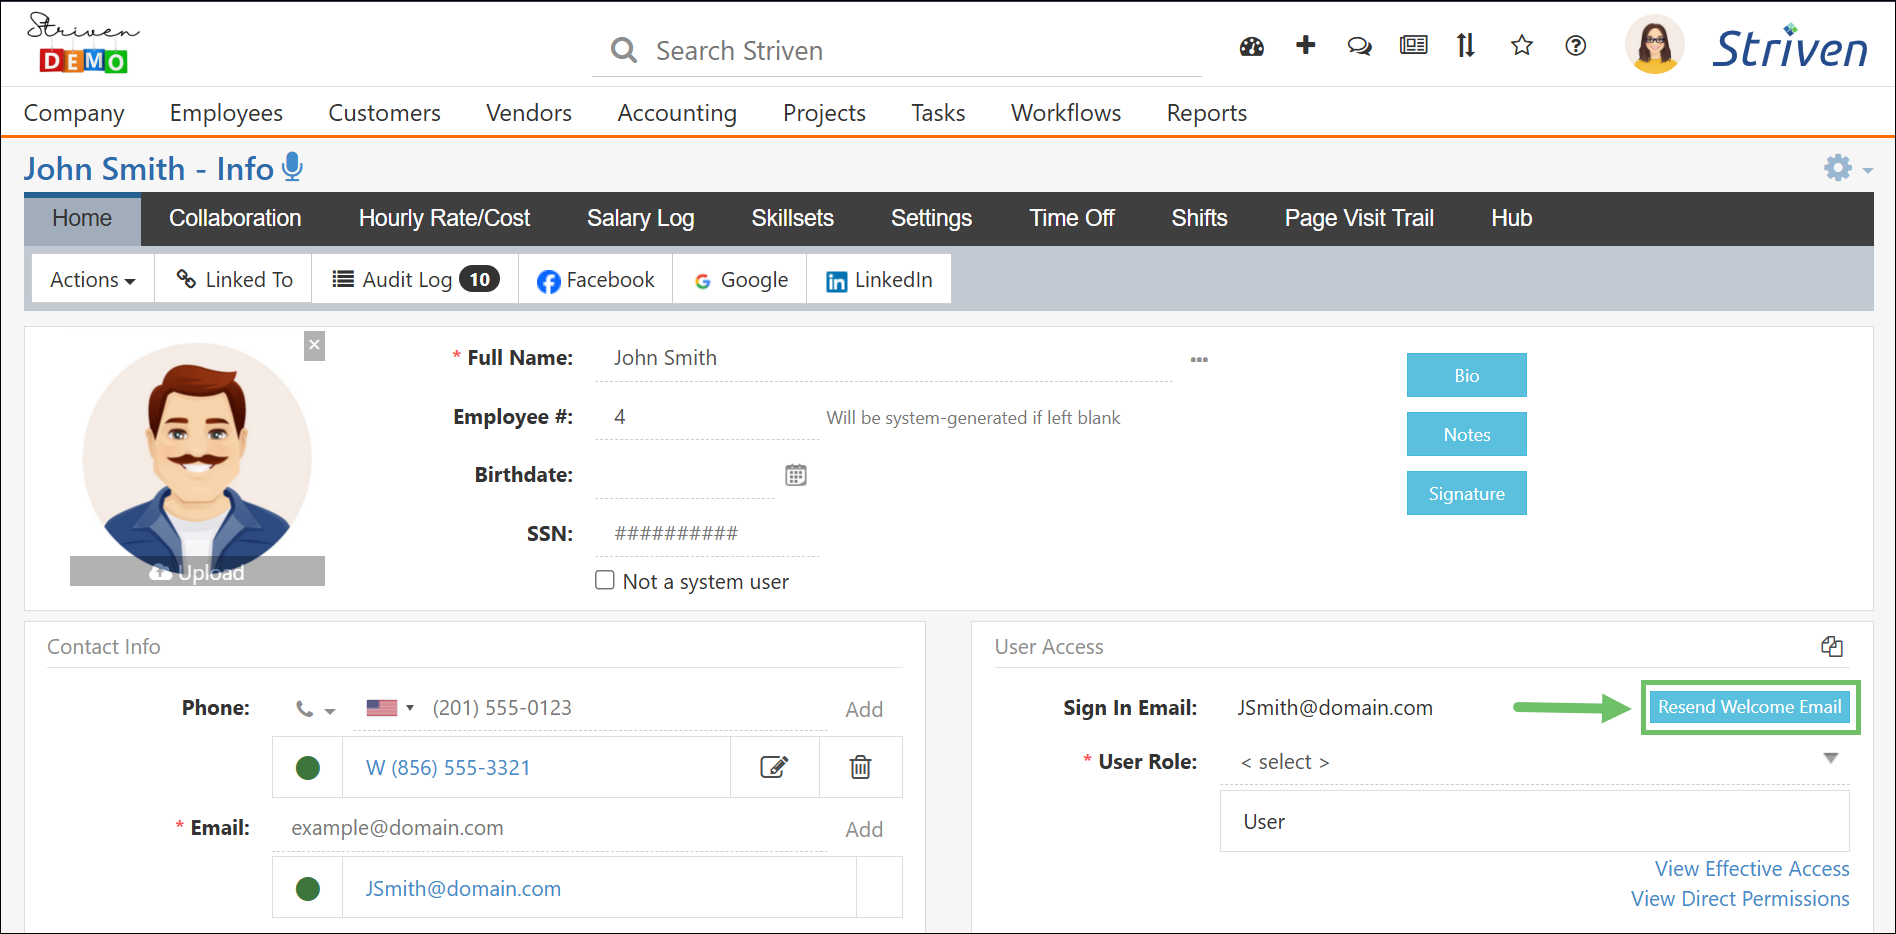
Example of the Resend Welcome Email Button on an Employee Info Page
-
Employee Info Card Integrated Links
Striven has a unique feature allowing Integrated Links to show in the Employee Info Card within your Striven system. This useful feature can provide opportunities like connecting with your Employees through social media platforms to promote company culture or linking to GPS directions to your Employee’s location for meetings.
In order for this feature to be available for display on your Employee Info Cards, you will first need to navigate to:
Company → Settings → Company → Customizations → Integrated Links
From there, you may configure your Employee Integrated Links. After selecting Employees from the list on this page, you can then add the desired Integrated Link. Once you’ve set a Link Name and Link URL, you can add Merge Fields to customize the link and decide what icon to display for the link.
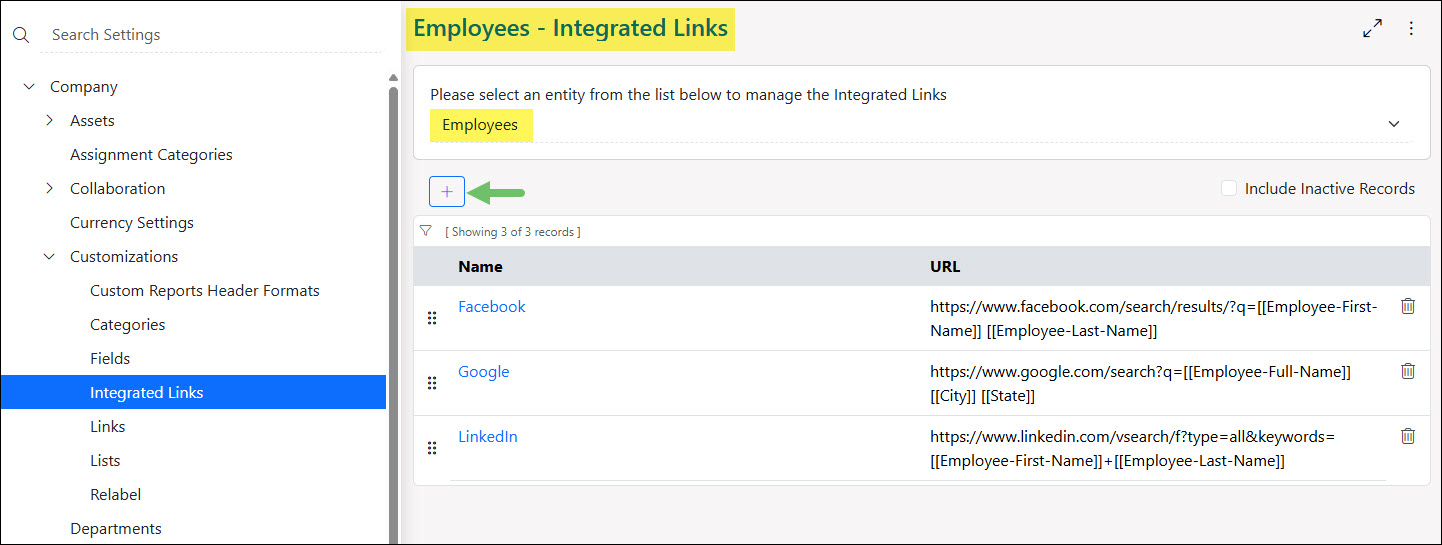
Example of Employee Integrated Links Page
Once added, the Integrated Links will be available in the top right corner of the Employee Info Card next to the Calendar icon, as seen below. When an Employee clicks on one of these links, it will conveniently open the URL in a separate browser tab so as to not interrupt your workflow in any way.

Example of an Employee Info Card with Integrated Links Displayed
Adding Integrated Link options can broaden your contact and connection options with your Employees, helping build better working relationships and communication.
-
Collaboration
The Collaboration tab of the Employee record includes subsections for Surveys, Quizzes, Assessments, Forms, and Surveying Related To. These subsections are related to the Employee when generating individual feedback using the Surveying tools in Striven.
To learn more about these entities, please reference our Surveying & Feedback Management Guide.
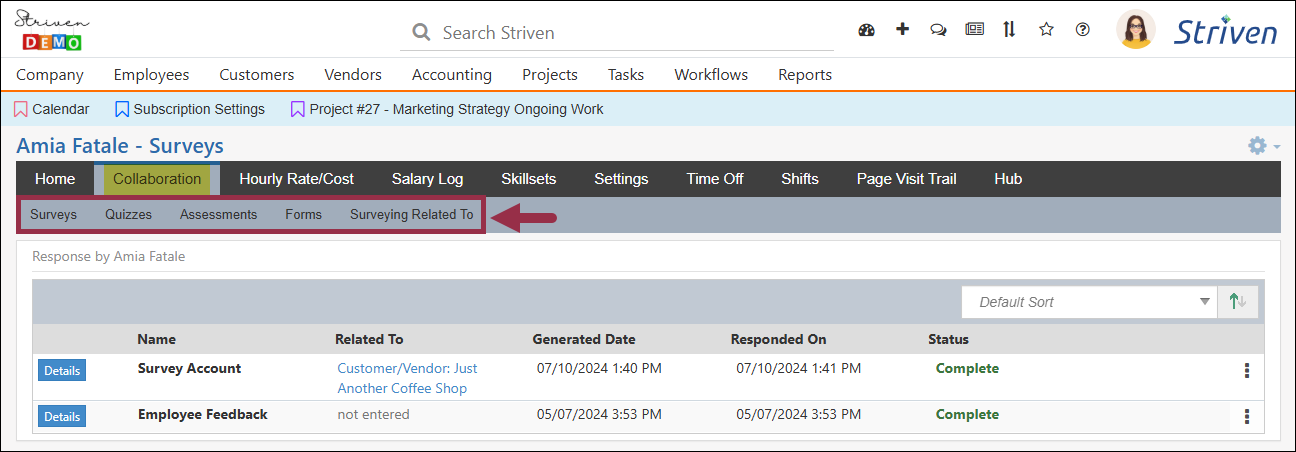
Example of the Collaboration Tab on an Employee Record
-
Hourly Rate/Cost
This tab displays important information about an Employee’s hourly rates and associated costs. The left-side panel, Default Hourly Rate/Cost, shows the Employee’s default hourly rate and the corresponding cost to the company. This is the standard rate that is applied when no specific Item is associated with the Employee’s Time Entry.
The right-side panel, Hourly Rate/Cost by Item, provides a more detailed breakdown of how the Employee’s hourly rate and cost vary depending on the specific Item with which they are working. This allows for greater flexibility in billing and cost tracking, as different Items may have different associated costs.
To add hourly rates and costs, simply click the Add Rate/Cost button and fill out the appropriate fields.

Example of the Hourly Rate/Cost Tab on an Employee Record
-
Salary Log
The Salary Log tab tracks the salary of an Employee. There, you will find options to Add Salary, View Salary Adjustments, View Pay, or view/edit Payroll Settings for the Employee. The page will display a log of all of the Salary updates for the Employee. The details of the logged salaries cannot be edited, but Notes may be added at any time. Alternatively, the salaries can be deactivated if needed.
To change the Employee’s salary information, simply click the Add Salary button and fill out the appropriate fields, including the Effective Date, Next Review Date, and the Employee’s Salary. Clicking on the View Salary Adjustments button will initiate a popup to enable you to view or add Salary Adjustments, and the View Pay button will allow you to view Payroll Dates related to the Employee. The Payroll Settings can be set at the global level for all Employees, or you can use the Payroll Settings button to designate individual Payroll Calculations related to the Employee. Additionally, you can choose to Include Deactivated Salary to display in the log and view the Next Review Date.
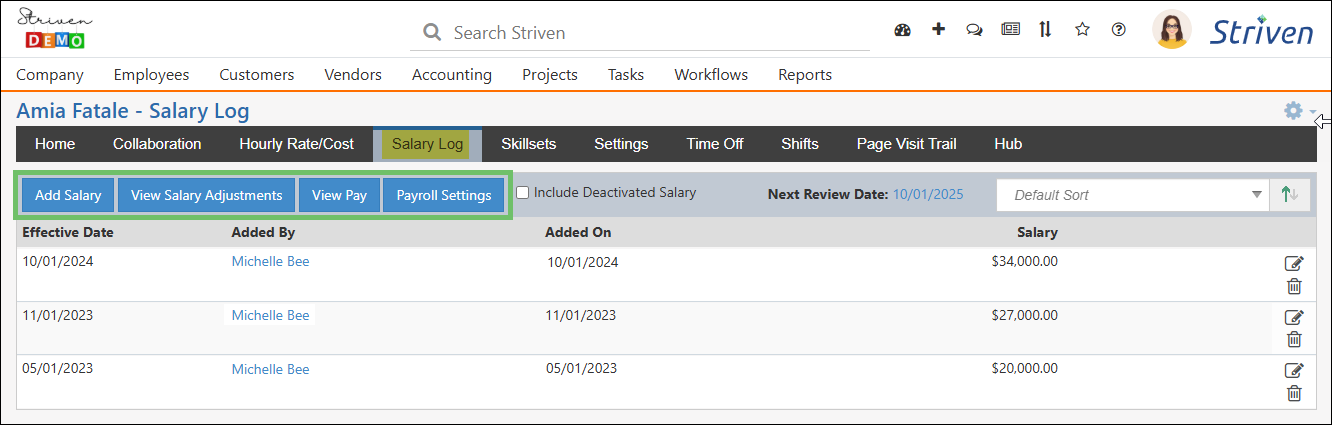
Example of the Salary Log Tab of an Employee Record
- Note: If you would like to designate a particular Employee to receive notifications when Employee salaries are updated, you can assign a recipient on the Employee Settings page.
-
Skillsets
The Skillsets tab allows you to document Skillsets related to an Employee. This includes certifications, degrees, and general skills, along with the level of each skill. To add a Skillset, click the Add button and enter the information. If the Skillset does not already exist in your Striven system, you can click the Plus ( + ) icon to add it to both the Employee record and your global Skillsets settings.
To learn more about managing global Skillsets, please review the Skillsets Management section of the guide below.
- Skill: Lists Skillsets the Employee has gained. Each skill name is a hyperlink to enable users to edit the Skillset information.
- Level: Lists the level of each Skillset that the Employee has been assigned.
- Expiration: If a Skillset has an expiration, it will appear in this column. This also lets Employees know when to renew the Skillset.
- Deactivate: Enables you to deactivate Skillsets. You can find inactive Skillsets by changing the page search filters to show them. Inactive Skillsets can be made active again after searching for them.
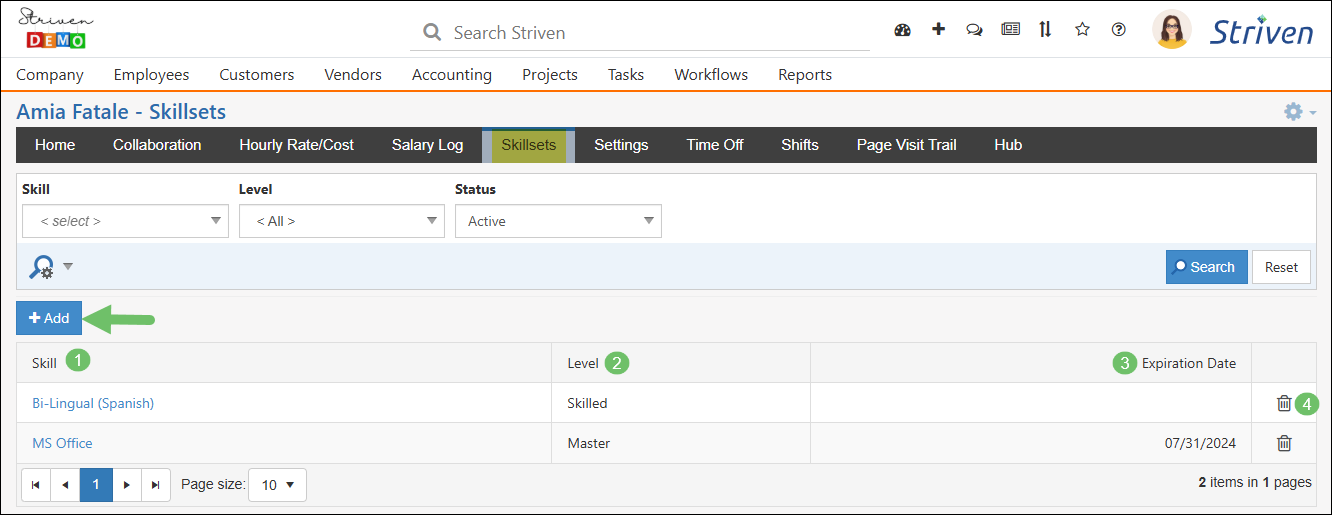
Example of the Skillsets Tab of an Employee Record
-
Settings
The Settings tab is separated into three panels: Quote Approval, Default, and Purchase Order Approval. These settings will allow you to determine whether or not the Employee can approve Sales Orders and Purchase Orders based on set conditions, as well as determine any Default Class or Inventory Location to specifically be related to the Employee.
Entering a dollar amount in the Approval panels enables the Employee to approve Orders up to that amount, and determines if there is a limit to what amount they can approve. There is also the option to select the default Class or Inventory Location to be associated with the Employee’s transactions when they are acting as a Sales Rep.
- Quote Approval Amount: Displays the maximum amount an Employee can approve for Sales Orders.
- Quote Approval Options: There are two options, which are discussed further below:
- No Limit: Indicates that an Employee can approve Sales Orders no matter the dollar amount.
- Negative/0 Line Items: Either allows or denies the Employee’s ability to quote Sales Orders with negative or 0 Line Items within the selected Sales Order.
- Class: Using this drop-down, you may select a Class to be automatically added to any transaction created by the Employee.
- Note: The Class selected in this field will override any Item level Default Class that may be configured. If the Employee uses a Template to create a transaction, any Template level defaults will override the Employee’s Settings.
- Inventory Location: Allows you to select a default Inventory Location for the Employee’s transactions.
- Note: The Inventory Location selected in this field will override Item level defaults that may be configured. If the Employee uses a Template to create a transaction, any Template level defaults will override the Employee’s Settings.
- PO Approval Amount: Notes the maximum amount an Employee can approve for Purchase Orders.
- PO Approval Option: Either allows or denies the Employee’s ability to add blank Line items on Purchase Orders.

Example of the Settings Tab of an Employee Record
-
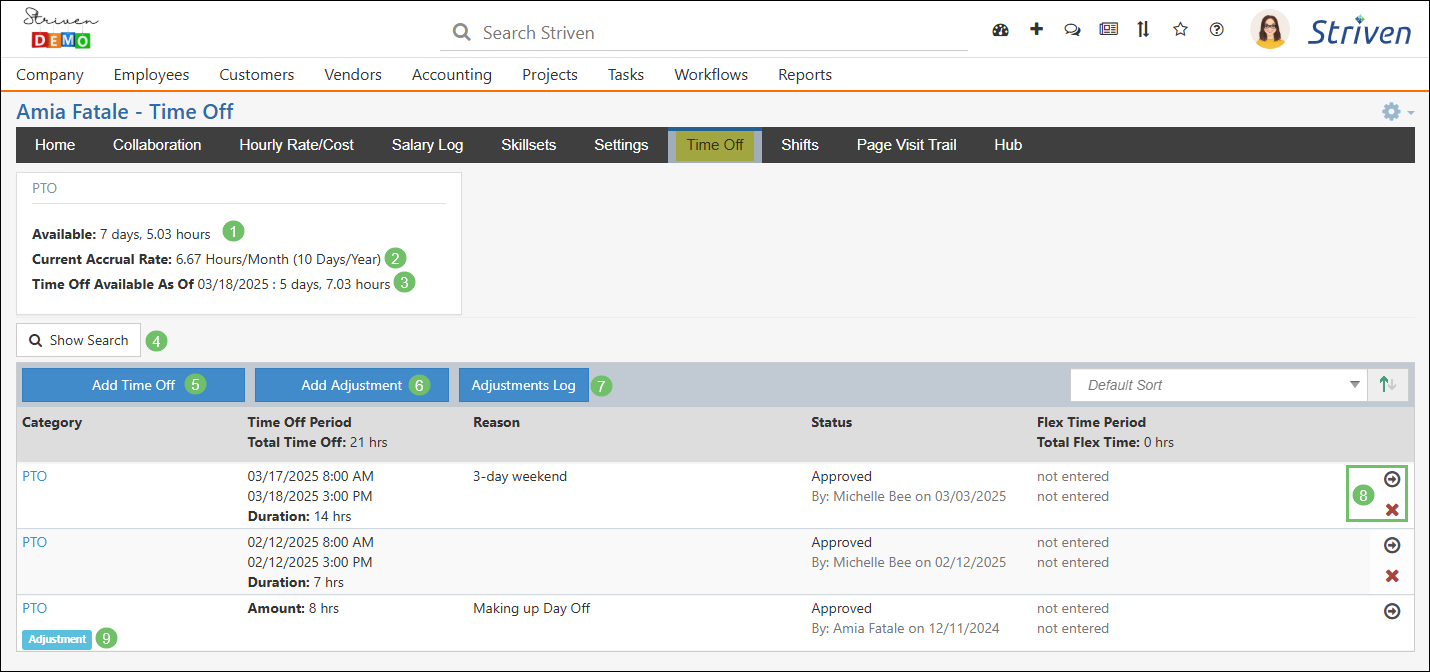
Time Off
The Time Off tab displays an Employee’s Time Off details, including Category, Period, Reason, Status, and Flex Time usage. The page also shows Time Off Adjustment requests that have been submitted for approval and those that have been approved. There are several button options on the page which will be described below.
To learn more information about how to set up Time Off, please reference our Time Off Management Guide.
- Available: Lists how much Time Off is currently available for the Employee.
- Accrual Rate: Lists the accrual rate based on their time with your Company.
- Note: If an Employee has more than one start date, their accrual date can be configured from the Actions menu on the Employee Info page under the Home tab.
- Time Off As Of: Lists how much Time Off is available after the date of the Employee’s latest submitted request. This helps ensure the Employee’s available Time Off is clear when planning future Time Off requests.
- Show/Hide Search: Provides the option to show/hide the page’s search filters.
- Add Time Off: Allows users to submit Time Off requests for the Employee.
- Add Adjustment: Allows users to submit Time Off Adjustments for the Employee.
- Adjustments Log: Opens a new browser tab displaying details related only to the Time Off Adjustments for the Employee.
- Actions: There are two icons here which are described further below:
- The Arrow icon allows you to view the full details of the Time Off request.
- The red X icon allows you to cancel the Employee’s Time Off request.
- Adjustment Label: Identifies that the entry on the list is a Time Off Adjustment and not a Time Off request.
Example of the Time Off Tab of an Employee Record
-
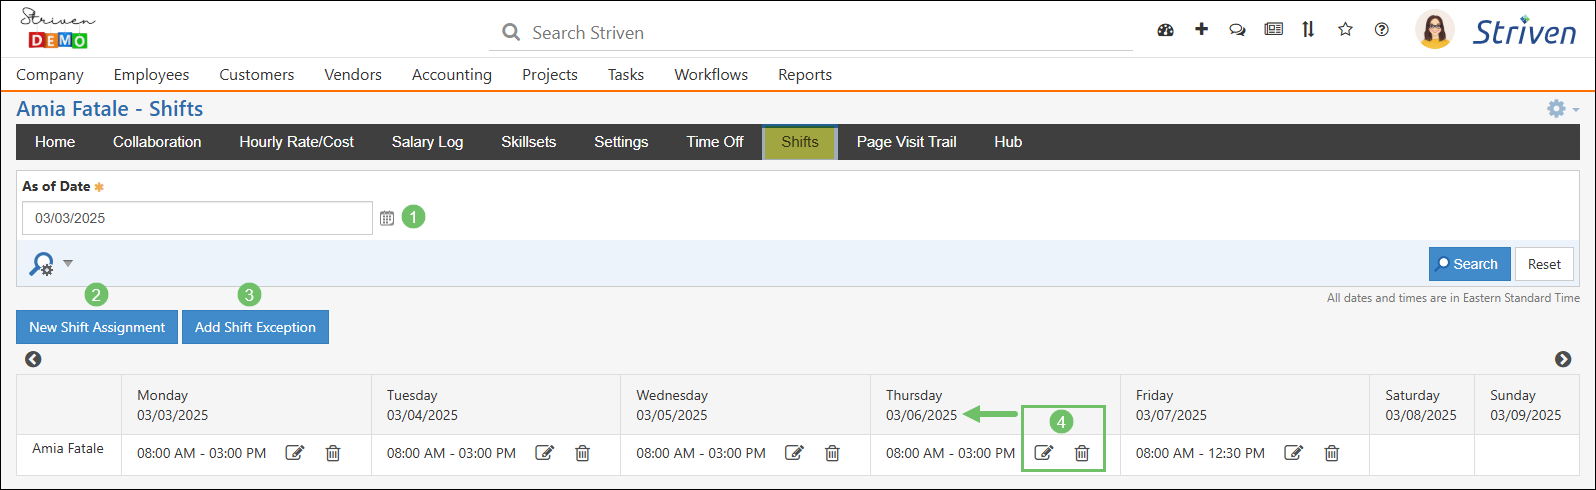
Shifts
The Shifts tab displays what shift(s) the Employee works for your Company. The list will not only show when the Employee works, but also allows you to edit the Shift Assignment using the Edit icon or deactivate their Shift Assignment using the Deactivate icon. You can also add a Shift Exception for the Employee from this page using the Add Shift Exception button.
To learn more information about Shifts, please reference our Time Off Management Guide.
- As of Date: Allows you to view the Employee’s shift as of a certain date. This search filter can be useful if an Employee’s shift is not a set shift and changes periodically.
- New Shift Assignment: Allows you to select a new shift for the Employee. Shifts that have been created within your Striven system will be available to select and apply to the Employee.
- Note: Global Shifts will need to be created to fit your Company’s needs.
- Add Shift Exception: If an Employee ever needs to work outside of their shift, a Shift Exception can be added. This allows you to dictate a singular shift that is outside of the Employee’s normal schedule without having to make changes to the normal settings. This would be useful in cases where an Employee works a double shift or overtime shift.
- Edit Daily Shift: Similar to a Shift Exception, this option allows you to edit a single shift without having to change the normally scheduled shift settings.
- Note: Shift Exceptions and Daily Shift edits will display in blue on the page to indicate there is a diversion from the normal shift.
Example of the Shifts Tab of an Employee Record
-
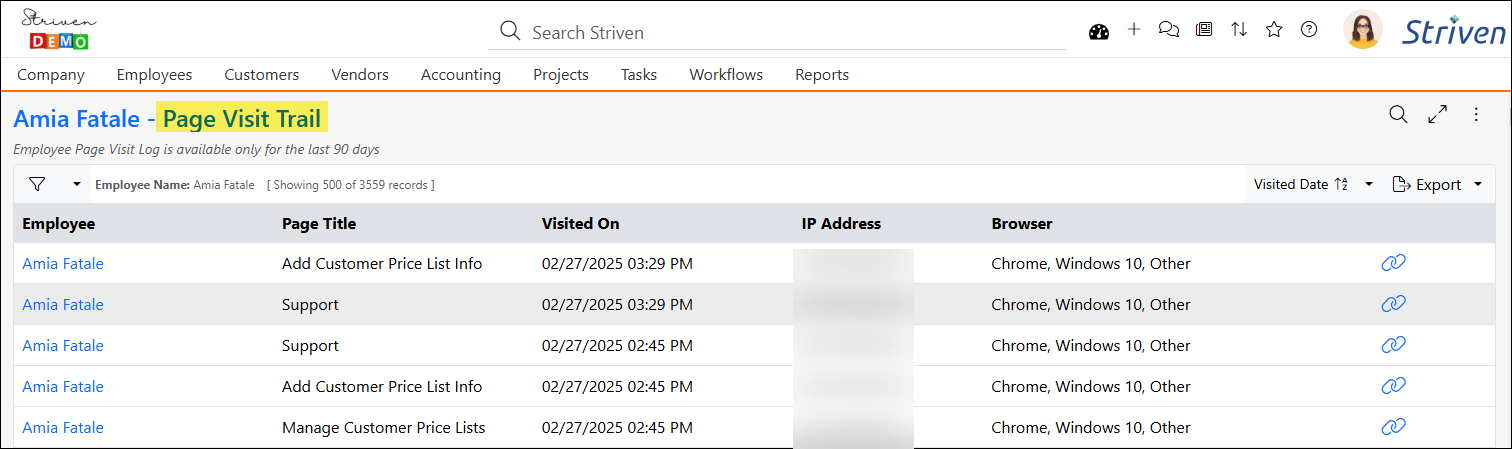
Page Visit Trails
Clicking on the Page Visit Trail tab loads the Employee’s page visit history in your current browser tab. This will show which pages the Employee has viewed and when they viewed them. Information related to the Employee’s activity include the Page Title, Visited On, IP Address, Browser, and a Link to the page in Striven. These results are available only for the last 90 days.
Example of the Page Visit Trail Page of an Employee Record
-
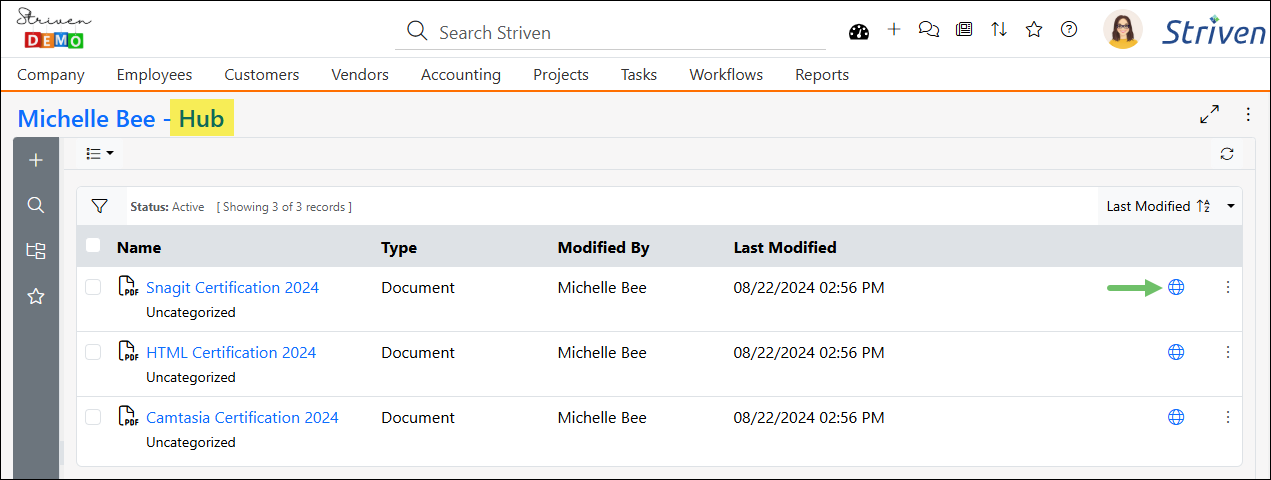
Employee Hub
The Hub tab option opens the Employee Hub in a new browser tab. In Striven, Hub is a digital filing cabinet in which you can store folders, links, posts, and documents which can also be made visible to the Employee in their My Profile – Hub page. Please review our Hub Guide for further details about Hub.
Example of the Employee Hub
-
Employee Lockout
Employee Lockout thresholds have been set within Striven to prevent excessive use, mainly caused by automated refreshing of browser pages, but will sometimes occur due to Employees opening a large number of Striven pages in a short period of time. The Lockout threshold is configured to 360 page visits within 60 minutes. If the threshold is breached, the Employee’s access will be locked. If they attempt to use Striven, they will be directed to a page notifying them of their locked status. This page will include a link to unlock their account, as will the email notification that is sent to them as well.
-
Schedule Appointment Links in Employee Info
The Employee Info Page includes the ability to save a meeting link along with its joining information on Employee Profile Pages. This information will be displayed on the Employee Info Card within Striven.
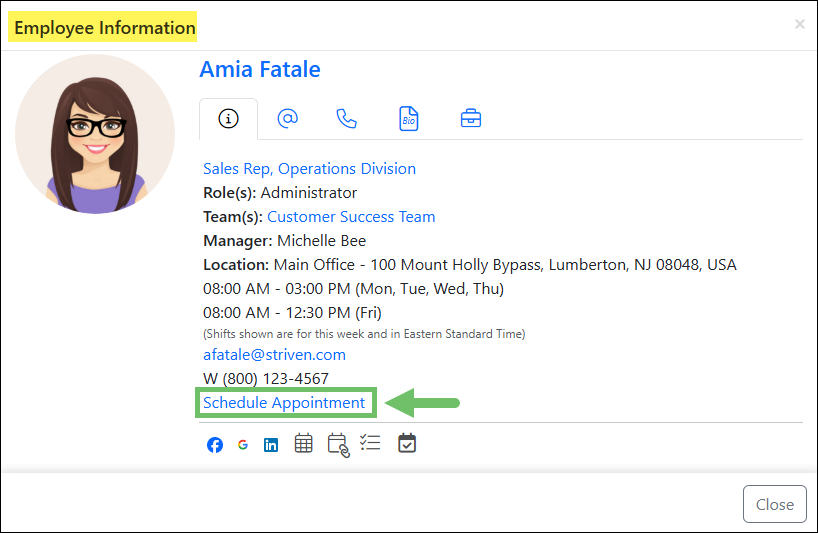
Example of the Schedule Appointment Link on an Employee Info Card
This can be configured by going to your My Profile page from the Employee Actions menu found on the top-right of any Striven page.

Example of My Profile Option on the Employee Actions Menu
Under the Contact Info section of the Employee Profile Page, you can enter a Meeting Link and the related Meeting Joining Info into the appropriate fields. There’s also a link button next to the Meeting Link for quick and easy access to your meeting link.

Example of Employee Profile Page with Meeting Link & Joining Info
This meeting link information will also be used for Merge Fields that are handy for External Appointment Scheduling. Inserting these Merge Fields into your External Appointment Link will personalize the link to the entity you’re sharing it with and provide direct access to the meeting information the recipient will need to meet with you or your Employee.
For more information about External Appointment Scheduling, please review the Appointments section of the Striven Calendar Guide.
-
Schedule Appointment Link in Employee Signature
A useful element of Striven is the ability to include an Employee’s External Appointment Link in the Employee signature within Striven. This provides a hyperlink in the email signature to the Employee’s Calendar for others to schedule an Appointment with them. A helpful feature like this makes it easier for Customers to schedule time to meet with you or your Employees to ensure their questions are answered and make them feel more comfortable and confident doing business with your Company.
To configure the settings for the Schedule Appointment Link for a particular Employee, you’ll need to visit their Employee Profile. These Link settings are located beneath the Meeting Link fields and include fields for the Appointment Link, which is where you’ll enter an External Appointment Link created from your Striven Calendar, and the Schedule Appointment Link text, which is what you want the link to actually say. For example, “Click Here to Meet with Me” or “Let’s Meet!”
- Note: This Schedule Appointment Link information will be required to be entered on the Employee Profile for any and all Employees in your Striven system that you wish to apply the Link to their signatures.

Example of the Schedule Appointment Link Fields on an Employee’s Profile
Globally Applying Links to Employee Signatures
To enable this feature for all Employee Signatures, you will need to navigate to Company → Settings → Employees → Settings. On this page you’ll find the Employee Signature Template, which is where you’ll add the required merge fields to display the Schedule Appointment Link in the signature. This will ensure that all Employees’ signatures have the settings and merge fields to pull this Link information into their email signatures.
Just click on the text editor box where you want the Link to display in the signature, and add the merge field for Schedule-Appointment-Link.
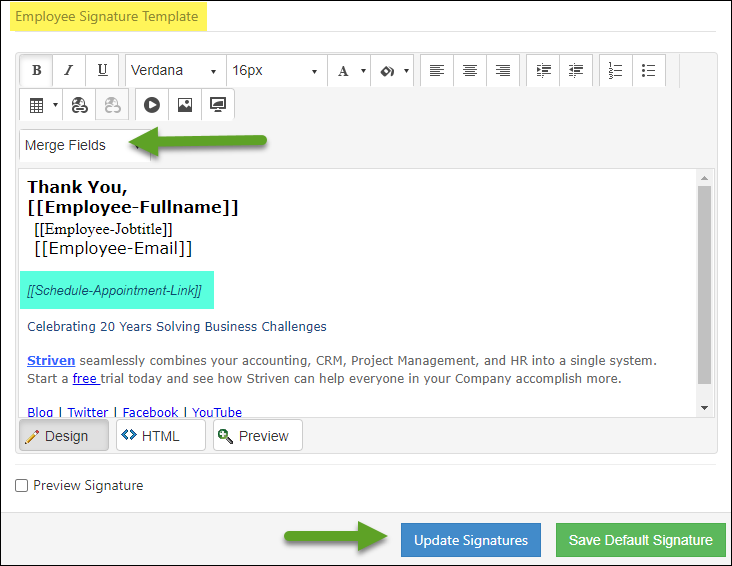
Example of Employee Signature Template with Merge Field for Schedule Appointment Link
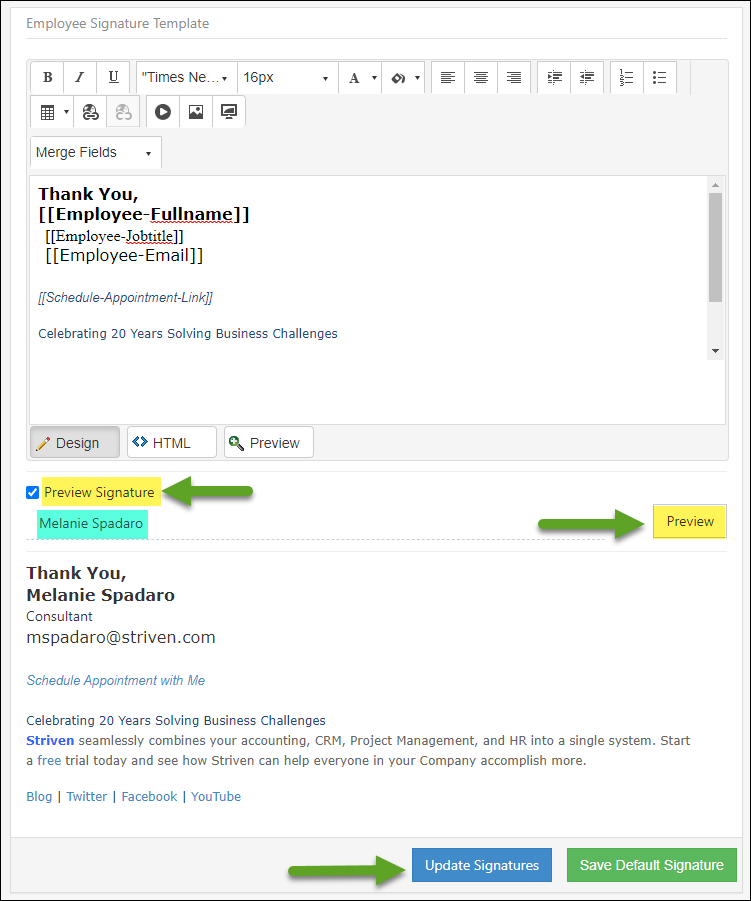
You can then click on the Preview Signature button below, select an Employee, and see how the signature will look when sent in an email from your Striven system. Once you’re satisfied with the result, you can click Update Signatures to apply the changes to all Employees.
Example of Preview for Employee Signature with Schedule Appointment Link Merged In
If this is a change you want to make for particular Employees instead of globally, you can do so from the specified Employee Info page by inserting the [[Schedule-Appointment-Link]] merge field into the text editor box of their signature and clicking Update.
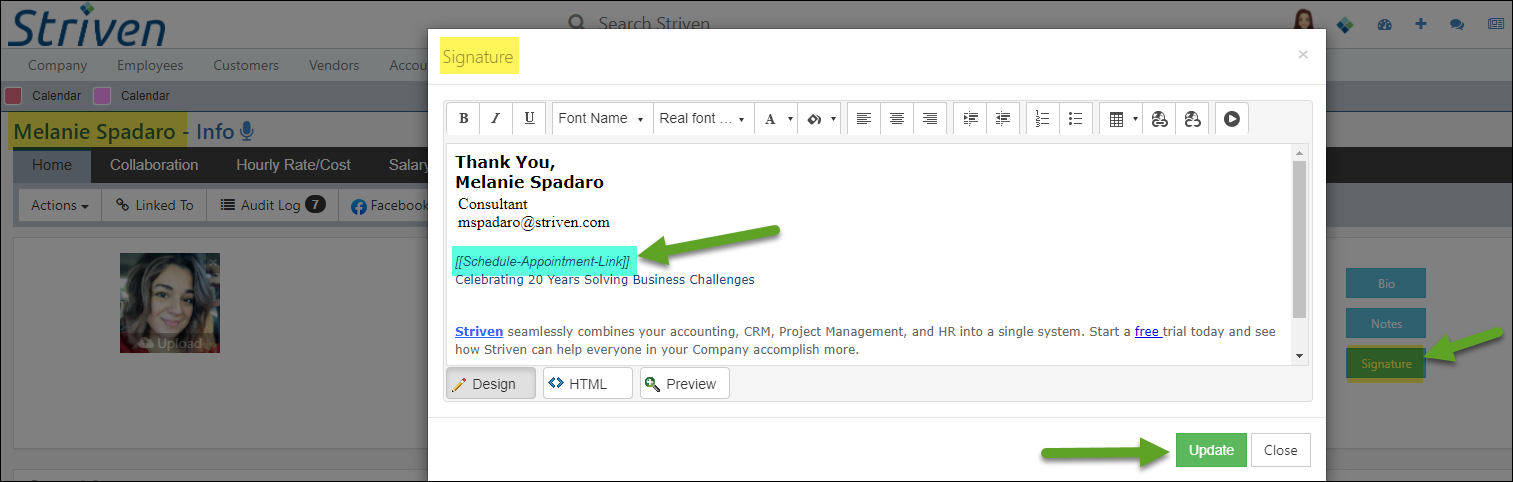
Example of Updating Individual Employee’s Signature with Schedule Appointment Link Merge Field
- Note: This is also a feature the Employees themselves can edit or add to their signature from their My Info page.
Once these settings are in place, the merge field will display the Link within the Employee Signature for Contacts to use.
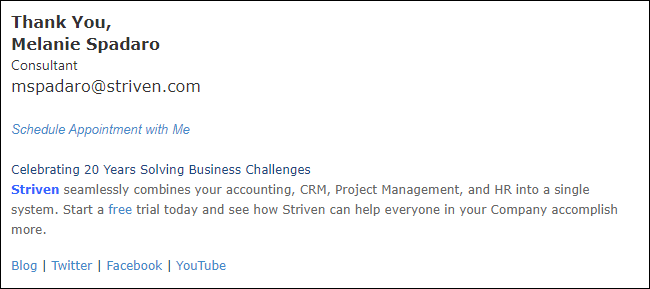
Example of an Employee Email Signature with Schedule Appointment Link
-
Skillsets Management
Skillsets can be useful when deciding whom to delegate Projects or Tasks to because you can see the Employee’s qualifications right on this page. This page allows you to view the skill itself, the level the Employee is at with the skill, and also if there is an expiration date for a specific skill.
-
Skillsets Setup
As discussed above, Skillsets can be assigned to individual Employees to show what skills the Employee has earned. Skillsets can be viewed, added, and managed in your Striven settings. By clicking the Add button on the Skillsets List, a popup will initiate in which you can add a new Skillset. Below is a screenshot displaying how adding a Skillset appears and a description of what you can accomplish there. To view Skillsets Setup, use the following steps listed below:
Company → Settings → Employees → Skillsets → Skillsets Setup
- Add Skillset: Initiates a popup described below in which you can create a new Skillset within your Striven system.
- Edit: To edit a Skillset, click on the Skillset title.
- Deactivate: Allows you to deactivate the Skillset from Striven. The search filters, which can be accessed by clicking the Search icon at the top of the screen, will allow you to search for inactive Skillsets to reactivate as needed.
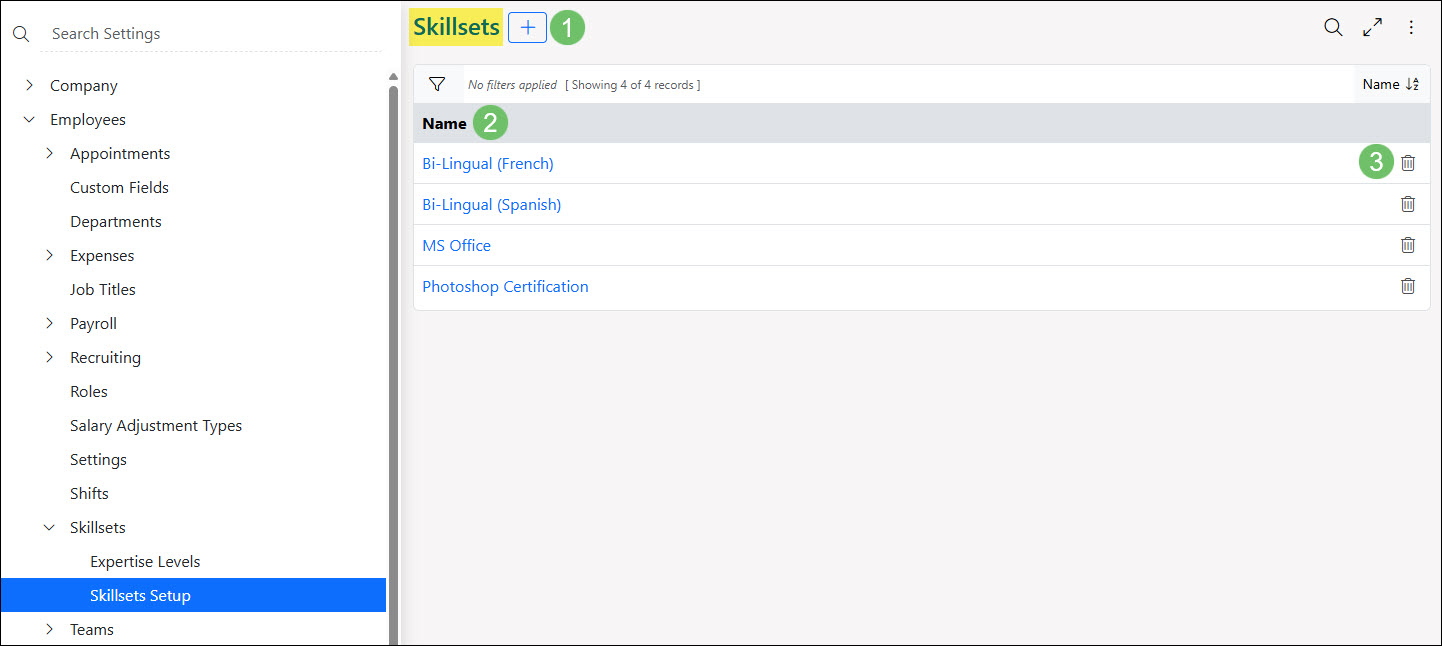
Example of Skillsets Setup Page
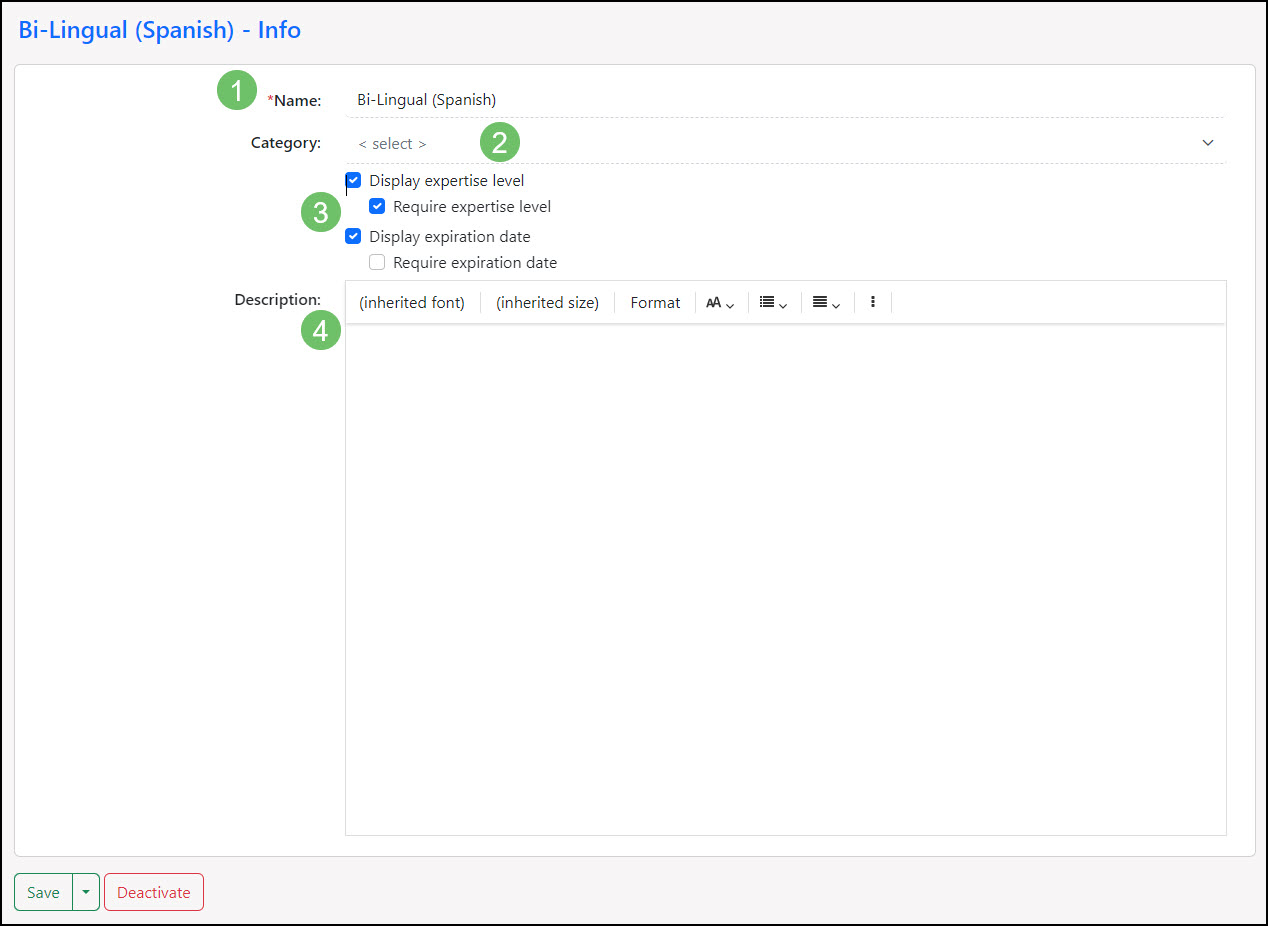
Once you have clicked on Add Skillset, determining important information such as the name and requirements to be configured is needed. Review the screenshot below and actions or options that can be set up.
- Skillset Name: The name of the Skillset can be entered in this field.
- Category: Allows you to assign a category for Skillsets. To manage Skillset Categories, you can use the Company Categories page and choose Skillsets from the drop-down list.
- Additional Options:
- Display expertise level: Displays the expertise level given to the Employee’s Skillset. Choosing this will also give you the option to require the expertise level if desired.
- Display expiration date: Displays the expiration date given to the Employee’s Skillset. Choosing this will also give you the option to require the expertise level.
- Description: Allows you to enter a description for the Skillset, with options to format, insert hyperlinks, and use HTML formatting if desired.
Example of Skillset Info Page
-
Expertise Levels
As discussed above, Skillsets can be assigned to individual Employees to show what skills the Employee has earned and with those Skillsets, you can also assign an Expertise Level. Expertise levels can be viewed, added, and managed in your Striven settings. By clicking the Add button, you can add a new expertise level. Once you add expertise levels they can be assigned to Employee’s Skillset to know how well versed an Employee is at the assigned Skillset. Below is a screenshot illustrating how adding an Expertise Level appears and a description of what you can accomplish here. To view Expertise Levels, use the following steps listed below:
Company → Settings → Employees → Skillsets → Expertise Levels
- Add: Allows you to add a new expertise level.
- Level Name: Clicking the name will allow you to edit the existing expertise level.
- Deactivate: Click the Trashcan icon to deactivate a selected level.
- Rearrange: Provides the ability to click and drag items to different locations within the list.
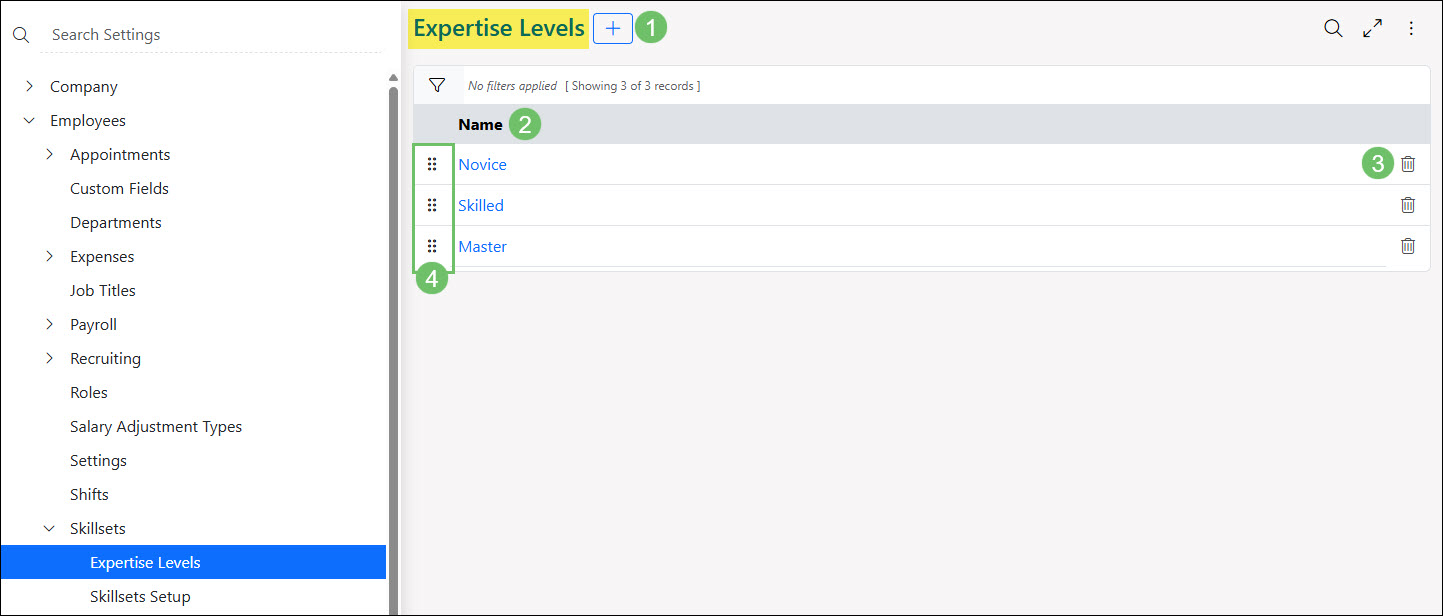
Example of Expertise Levels Page
-
Teams
Apart from managing Employees, you can build Teams within Striven as well. Teams can have a hierarchy, can be assigned Tasks, and can track Employees workload on work calendars. Unlike other entities, Employees can be associated with more than one Team within Striven. This allows for the flexibility to use Teams not only for Customer-facing work, but internal groups as well.
-
Team Types
Team Types can allow you to build Teams to include a structure to suit your Team needs. Determining by the Team Type how many Employees of the selected Job Titles should be included in your Team will help in determining a structure for each Team that will be created of this type. Below is a screenshot displaying how the Team Types page appears and a description of what can be configured here. To view Team Types, use the following steps below:
Company → Settings → Employees → Teams → Team Types
- Team Name: The name of the Team you are viewing or creating.
- Structure: Indicates whether you define a Team structure. This will allow you to add Job Titles and Employees per Job Title that make up the Team.
- Add Job Title: Allows you to add Job Titles to the Team and note how many people should be included that have that Job Title.
- Job Titles: Displays all the Job Titles in the Team and how many people for each Job Title should be assigned to the Team.
- View Associated Teams: Allows you to view Teams of this type that already exist.
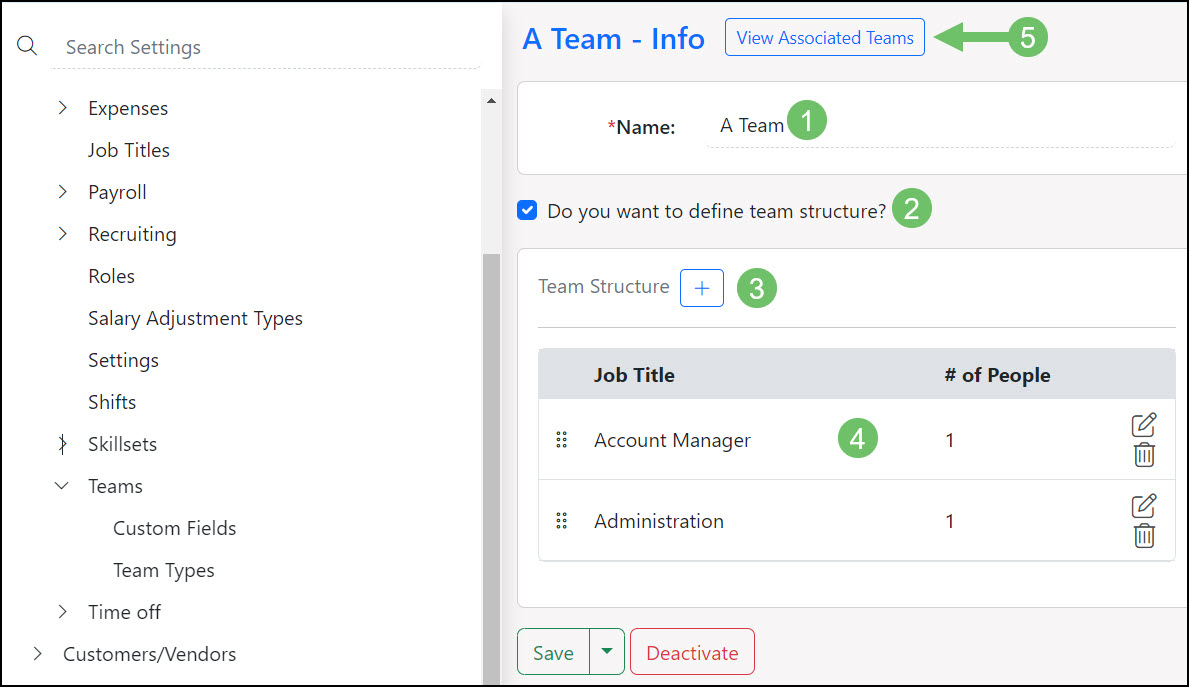
Example of Adding a Team Type
-
Teams Setup
Once you have created Team Types, you are ready to add Teams into Striven, although for convenience the type is not required. You can view existing Teams using the Teams List and there is a button to allow you to add new Teams as well. When adding Teams, you can add members, managers, and more. Below is a screenshot of how the Add Teams page appears and a description of what can be accomplished here. To view the Teams List, use the following steps below:
Employees → Management → Teams
- Upload Photo: Allows you to upload an image for the Team.
- Name: The name of the Team you are choosing to add.
- Type: The Team Type that the Team has been assigned.
- Note: Team Types can define a structure to your Team such as how many of each Job Title should be included in a singular Team.
- Leader: The Employee that you’ve chosen to be the Team leader. Leaders will have the ability to view the Team.
- Task Assignment: Allows or denies the ability for the Team to be available for Task Assignments. This will allow you to search, assign, and reassign Tasks to the Team. To learn more about Task Assignments for Teams, please review our Task Management Guide.
- Job Title: Once an Employee has been added to the Team, they will appear in a bucket with other Employees of the same Job Title.
- Members: The Employees that will be a part of the Team selected. By default, users who are set as members of a Team have the ability to view the Team without editing.
- Manager(s): Displays who manages the Team. Managers of Teams can edit and view the Team.
- Access To: Employees will be given access to the Team information here. Users with access to a Team will have the ability to view the Team without editing.
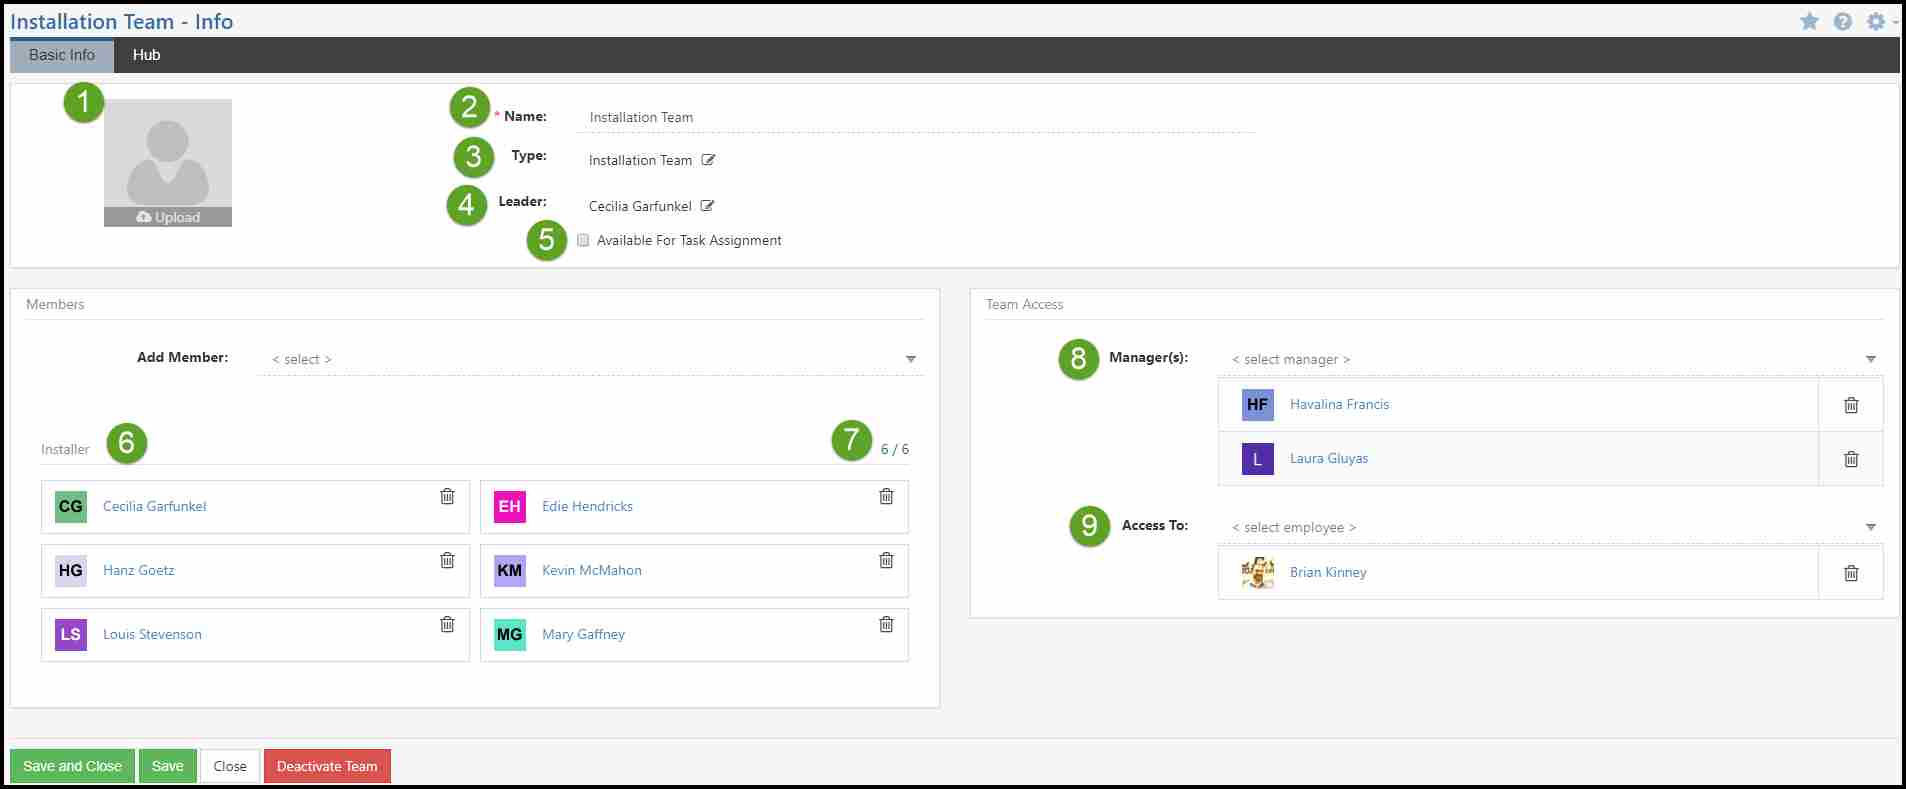
Example of Creating a Team
-
Recap
With this Employee Setup & Info Guide, we’ve discovered how to create and manage Employee information ranging from Contact Info to their Order approval setting. We’ve also discussed ways to manage and assign permissions and User Roles within Striven to ensure security is allocated to Employees correctly. Lastly, we’ve discovered ways to add Teams and Team Types and Portalcontent to ensure Teams are structured to fit your culture. All of this will help you manage Employees better within your Striven system.

Have a Question?
Ask the Striven Community
User-sourced how-to’s, feedback, and more!
FAQs
-
Is my Employee access to Striven unique and secure?
Yes, all Striven accounts are password-protected, and we also utilize two-factor authentication for increased security.