Sales Management
Opportunities
Support Guide
-
Overview
Opportunities in Striven allow you to track potential work opportunities for your Customers. Any potential sale of goods or services can be tracked as an Opportunity to gain important information, such as the expected close-ratio, estimated value, Priority, as well as the Type of Opportunity. Allowing Opportunities to be visible on the Customer/Vendor Portal will enable a collaborative experience with your Contacts as you finalize the sale.
Read this guide if you are trying to:
✔ Create and manage Sales Opportunities.
✔ Set up Opportunity Types, Stages, Labels, Priorities, and more.
✔ Import Opportunities into Striven in bulk.
-
Opportunity Setup
There are a number of things to set up before you begin using Opportunities in Striven. Defaults have been added for convenience which can be edited or configured as needed. Some key configurations are listed in the sections below to describe ideal settings for Opportunities for your Company.
-
Opportunity Types
Opportunities represent potential sales deals and can facilitate all the follow-up to a sale, including communication, scheduling Appointments, and creating an Order for the Customer. One tool to configure when dealing with Opportunities are Opportunity Types. Opportunity Types will enable you to set a notification recipient for each Type so that different people are notified when created depending on the Opportunity Type. For instance, if a Company offers services and installation, but these are handled by two different Employees, Opportunity Types will help with this workflow. Below is a screenshot illustrating an Opportunity Type and what can be configured there.
To view Opportunity Types use the following steps:
Company → Settings → Customers/Vendors → Opportunities → Types
- Type: The name of your Opportunity Type can be entered here. The Opportunity Type name is an easy way to identify the type of work being stored within the Opportunity.
- Notification Recipient(s): To ensure the appropriate people are always notified of the type of Opportunity you are creating, make sure to add them as a notification recipient. The assigned person on the Opportunity will also receive a notification once an Opportunity has been created.
- Notes: Allows you to add any notes or a description of criteria for designating an Opportunity as this type.
- Add Stage/Pick Status Color: Enables you to Add a new Stage for this Opportunity Type, as well as select the designated color for the Stage.
- Stage Selection: Enables you to select available Stages to your Opportunity Type. Stages will be explained in more detail in the section below.
- Stage: Identifies the Stages available for this Opportunity Type and the status color associated with the Stage.
- Probability %: Allows you to set a Probability % for each Stage. With this data saved on the Opportunity Type level, this will automatically update when an Opportunity of this Type has its Stage changed.
- Default Stage: Indicates the Default Stage. This green dot icon is used to identify which Stage is the default setting when creating an Opportunity of this type.
- Visible on Board: Indicates whether this Stage will be visible in the Opportunity Board View. Toggle this on or off to set whether this Stage is visible on the Opportunity Board.
- Delete: Deletes the Stage option from this Opportunity Type.
- Reorder Stages: Allows you to reorganize or reorder the Stages. You can accomplish this by clicking on the double arrows icon and dragging/dropping the Stage to the desired position.
- Custom Fields: Enables you to create Custom Fields for your Opportunity Type. To learn more about Custom Fields and how they can benefit your use of Striven, please review our Custom Fields Guide.
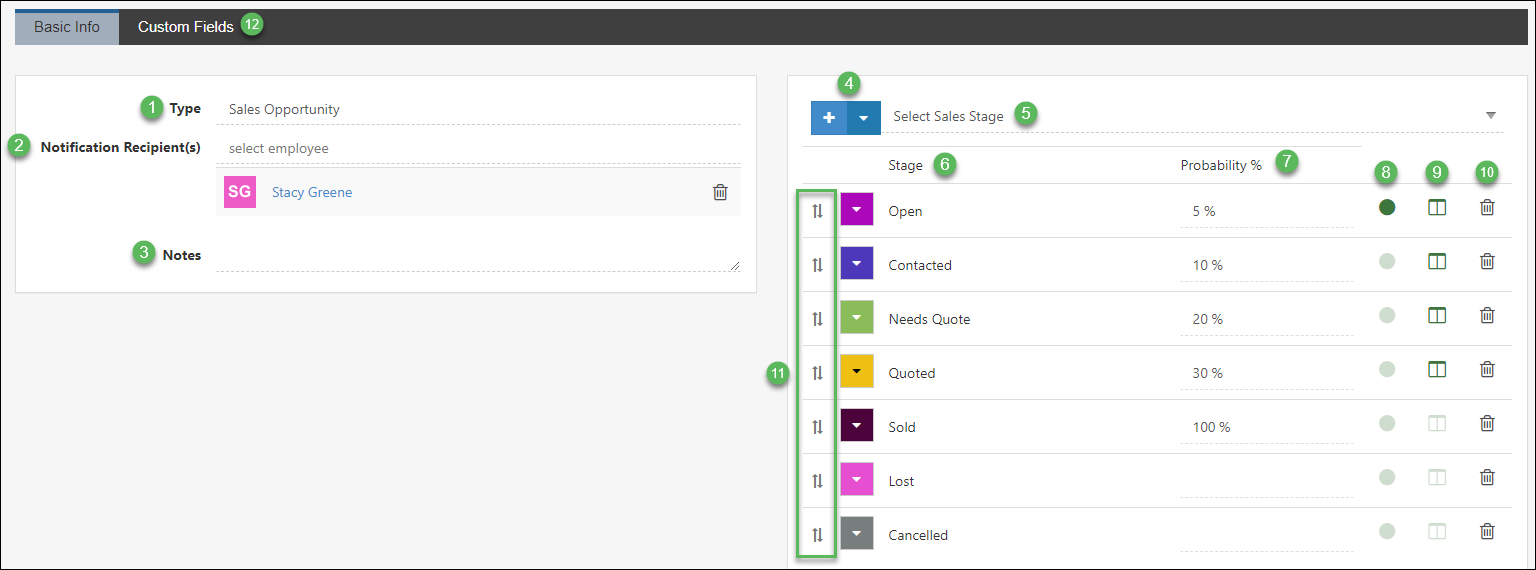
Example of an Opportunity Type

-
Opportunity Stages
Opportunity Stages can be set per Opportunity Type or at a global level to allow for advanced customization and can be configured to auto-calculate the probability percent as the Stage is updated for each Opportunity.
To view Opportunity Stages, use the following steps:
Company → Settings → Customers/Vendors → Opportunities → Stages
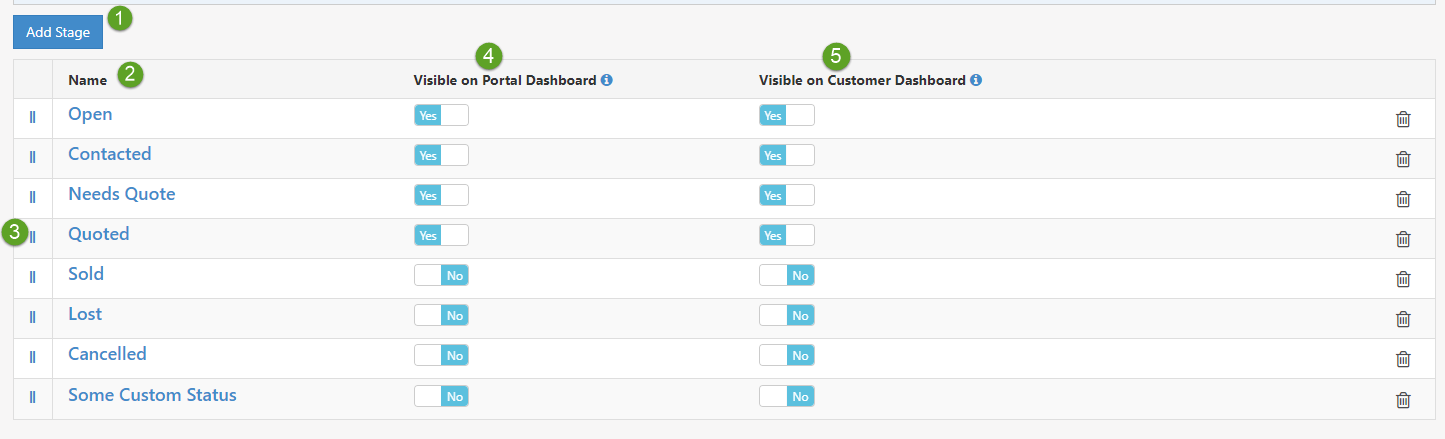
- Add Stage: To create a new Opportunity Stage, click Add Stage. This will open a dialog window in which key information can be entered such as visibility to Customers and more.
- Name: Lists out the names of the Opportunity Stages that have been created. Clicking on the hyperlinked name will allow you to edit the existing Stages as needed.
- Rearrange: Enables you to rearrange the order of the Stages that have been created. This will allow you to choose which order your Stages should appear in the system, for example, in the drop-down menu when selecting the Stage on an Opportunity.
- Visible on Portal Dashboard: Provides the option to make the Stage visible on the Customer Portal. This will allow your Contacts to stay up to date with Opportunities you are currently working on with them. When creating an Opportunity, you will be able to determine if you want the Opportunity to be visible on the Portal. If checked Yes, only Stages marked visible here will be available to view in the Striven Customer Portal.
- Visible on Customer Dashboard: The Customer Dashboard has the option to display a widget for the Customer’s Opportunities. Deciding to not show closed Opportunities, for example, will allow you to show only active and open Opportunities on the Customer Dashboard. To learn more about the Customer Dashboard, review our Customer/Vendor Dashboards Guide. Setting a Stage to Yes for this option will also determine if the Stage will appear when viewing Opportunities in the Board View.
Example of Opportunity Stages
Another feature related to Opportunity Stages when configuring them at the Opportunity Type level is the default probability percentage. This can be set per Opportunity Type and Stage. This percentage will auto-populate whenever the Opportunity changes to a particular Stage based on the percentages set per Stage, as displayed by the blue arrows in the image below:
Example of Opportunity Probability %
-
Opportunity Priorities
Opportunity Priorities allow you to indicate how urgently an Opportunity needs attention. Default Priorities have been created for convenience, such as cold, warm, and hot. These can be edited, added to, or removed as needed within your Striven system. A color can be chosen for each Priority to view at a glance. You may also set a default Priority to be assigned automatically to Opportunities as they are created.
To view and configure Opportunity Priorities, use the following steps:
Company → Settings → Customers/Vendors → Opportunities → Priorities
- Name: The name of the Priority that will be displayed in the drop-down menu when creating or updating an Opportunity.
- Choose Color: Selecting a color to indicate the urgency of the Opportunity will specify to the Employee how quickly they should work on the Opportunity. For example, marking an emergency Priority as red would indicate to the Employee that it is urgent to work on this Opportunity first.
- Is Default: Setting a Priority type as default will automatically assign that type to Opportunities as they are created for convenience.
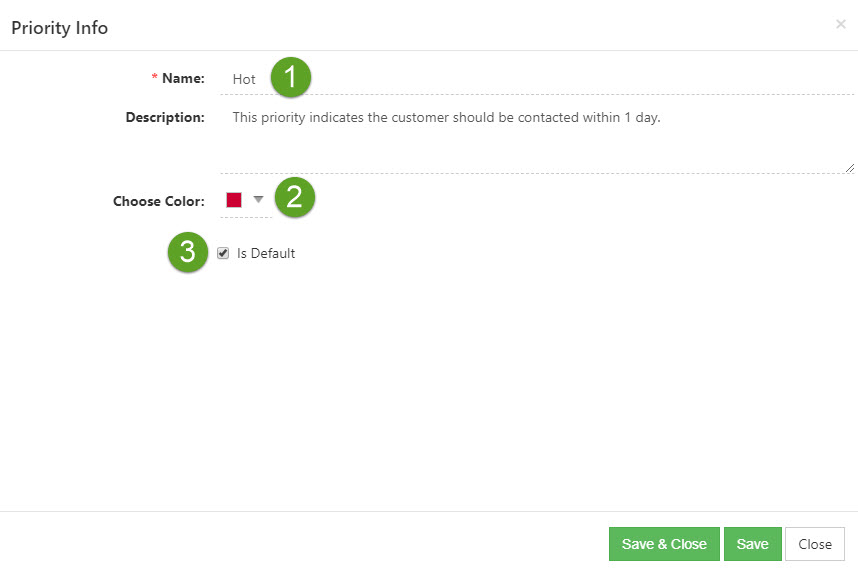
Example of an Opportunity Priority
-
Opportunity Management
Once your Opportunity Types have been created and the notification recipients have been set, you are ready to start managing sales Opportunities. The great thing about Opportunities is that there are many different ways to manage your potential sales. The flexibility of having a List View or a Board View allows you to manage Opportunities your preferred way.
-
Opportunities List
The Opportunities List provides quick access to all Opportunities assigned to you. Managing your Opportunities from the list allows you to quickly filter based on search criteria, follow-up dates, as well as Labels applied.
To view the Opportunities List, navigate to Customers → Sales → Opportunities
The Opportunities List can be displayed with three panels of information.
- Clicking on one of the side buttons on the top left of the Opportunity List will open the left side panel for either the search filters, follow-up dates, or Labels available to relate to an Opportunity in the list.
- The center panel will display the list of Opportunities, either in the Opportunity Board view or the Follow-up view, depending on your preference, which can be selected by clicking on the switch view button noted in the example by the orange arrow (these options will be discussed in more detail below).
- Clicking on one of the Opportunities in the list will open the right-side panel (noted in the above example by the blue arrow), which displays the Opportunity’s details.
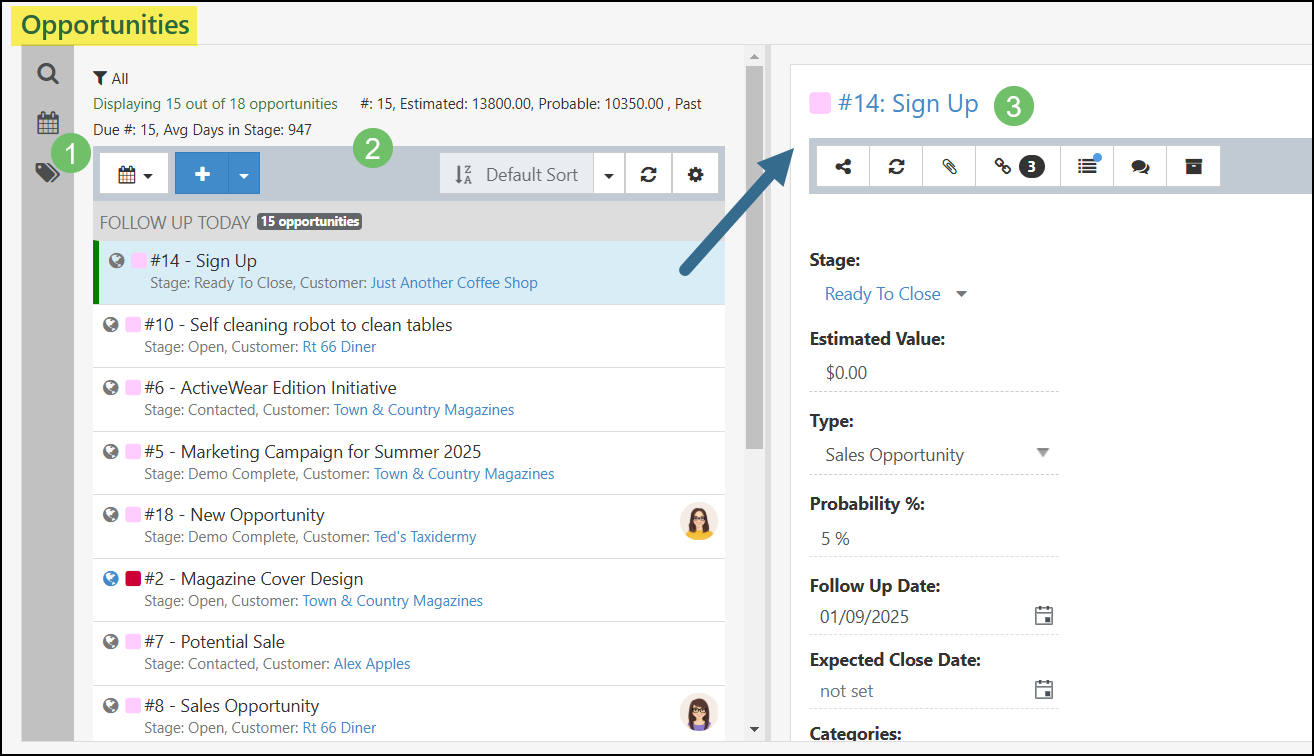
Example of the Opportunities List
In the example below, you can see the information available to be displayed on the Opportunity in the list, depending on the selected options in the list settings.
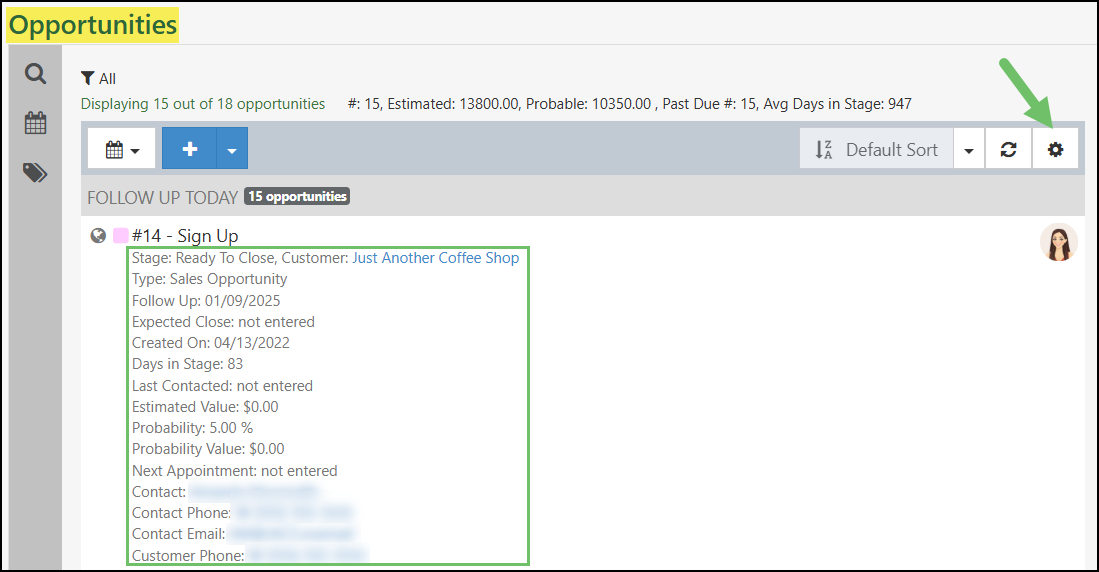
Example of Display Options for Opportunities
-
Opportunity Views
Opportunities can be viewed in either Opportunity Board View or Follow-up View.
The Opportunity Board View option allows you to track your progress with an Opportunity based on the Stages designated in your system settings for that particular Opportunity Type. Opportunities can easily be moved to a different Stage by clicking and dragging the Opportunity to the desired Stage column within this view.
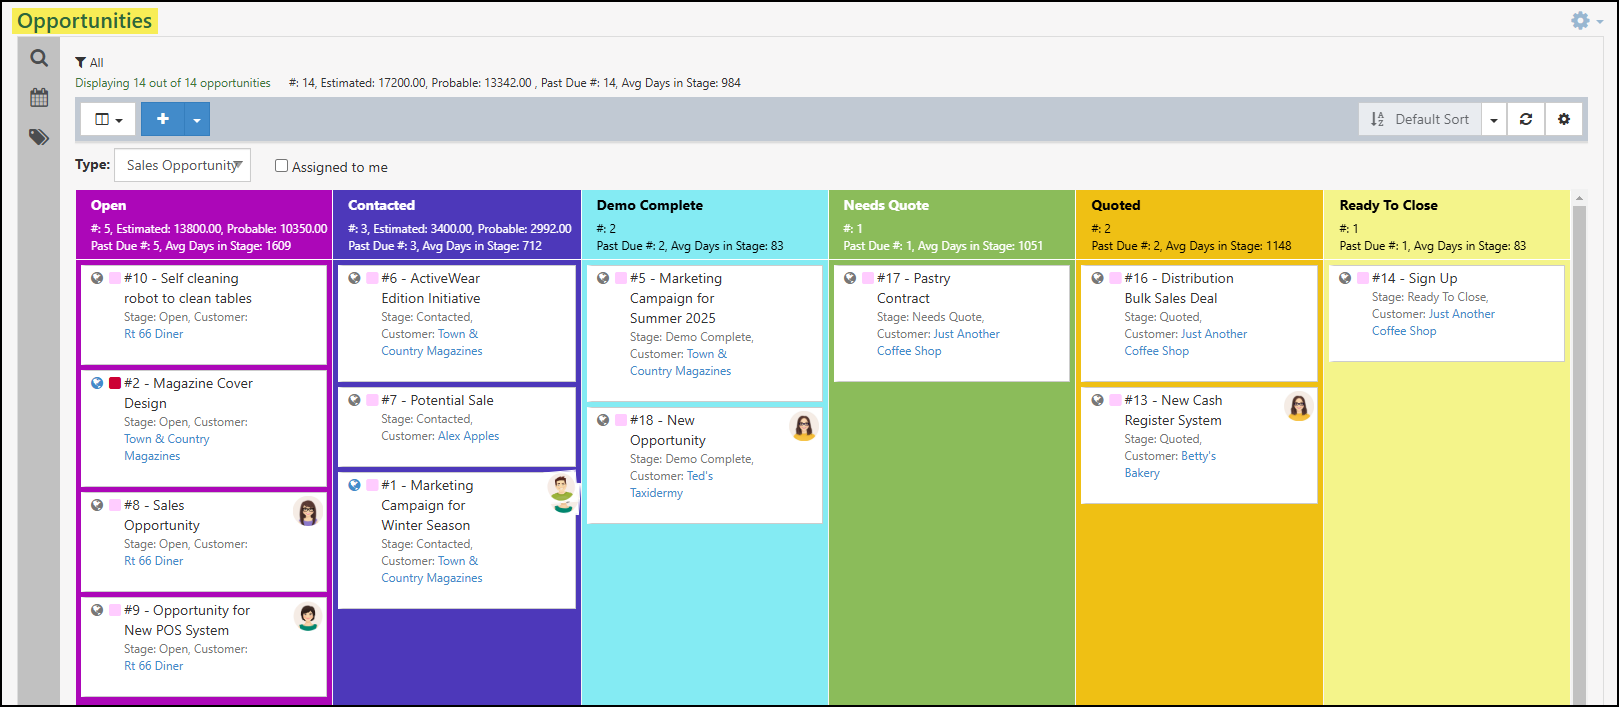
Example of the Opportunity Board View
Beneath the title of each Stage, totals will be displayed the following:
- Number of Opportunities in the stage
- Estimated monetary value of the Opportunities
- Probable monetary value of the Opportunities (calculated as the probability percentage of the total value listed in each Opportunity)
- Number of past due follow ups
- Average days spent in that specific Stage.
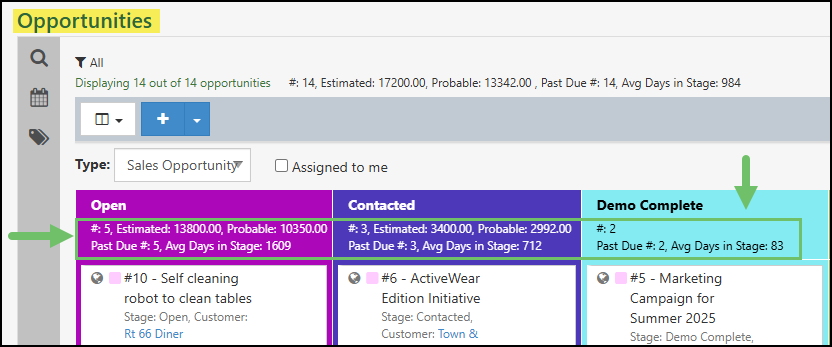
Example of Totals Listed Under Each Opportunity Stage in the Opportunity Board View
At the top of both the Opportunity Board View and the Follow-Up View totals for all Stages will also be displayed.
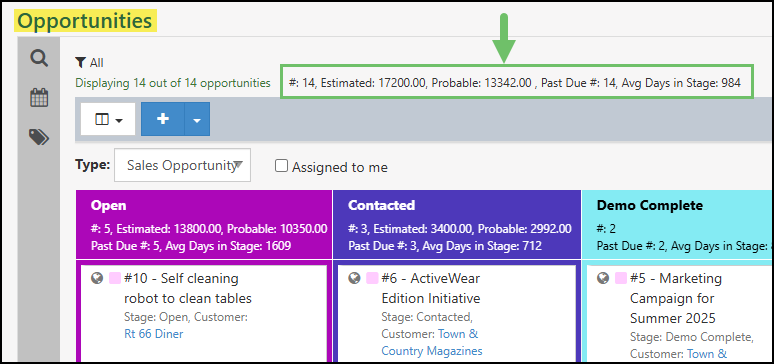
Example of All Stages Totals in the Opportunity Board View
The Follow-up View displays your Opportunities with the current date’s scheduled Follow-Up Date, followed by future scheduled Follow-Up Dates. See the example below for a description of options available with this view.
- Display Settings: Allows you to select the Default Type and the Display Fields that are available in this view. such as Follow-Up Date, Expected Close Date, Date Created, Last Contact Date, Estimated Value, Contact Information, etc.
- Display Options: Can include, but are not limited to, the Opportunity’s Stage, Type, Follow-Up Date, Expected Close Date, Date Created, Last Contact Date, Estimated Value, and relevant Contact Information.
- Opportunity Labels: Labels created specifically for use with Opportunities in Striven can be displayed on each Opportunity to show at a glance the status of or notation for the Opportunity. This is explained in more depth in the next section.
- Assignees: The Profile Image of the Employee assigned to the Opportunity is shown and can assist you in quickly identifying Opportunities by their assignee.
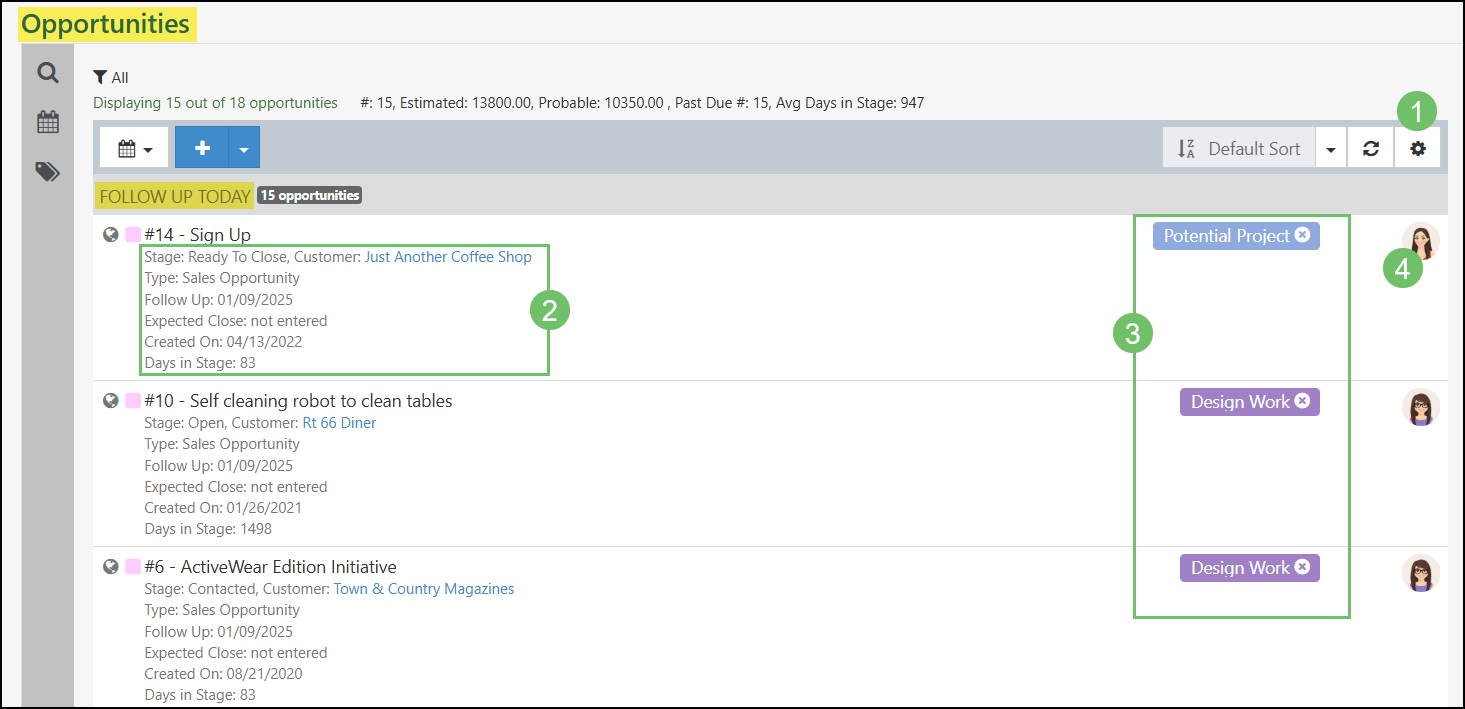
Example of the Opportunity Follow-Up View
-
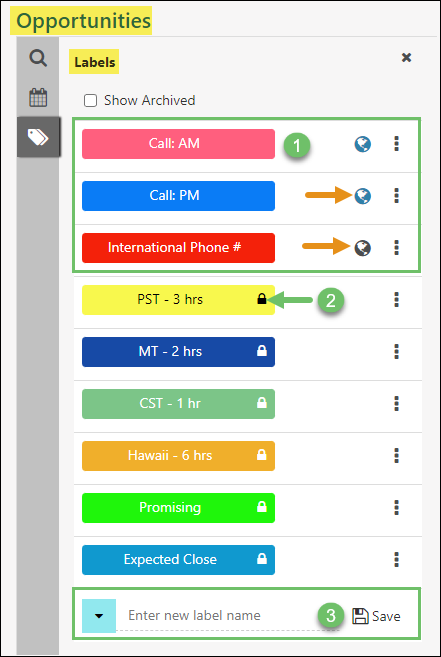
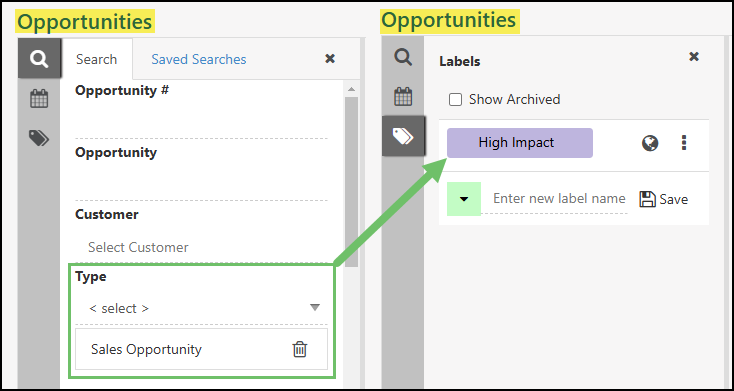
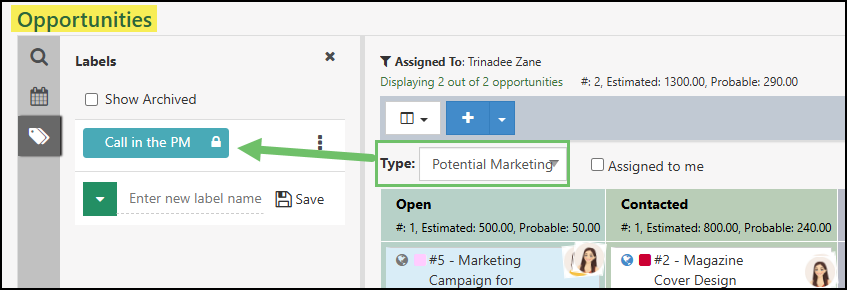
Opportunity Labels
Opportunity Labels can be created and applied to Opportunities to allow for improved organization and Opportunity management.
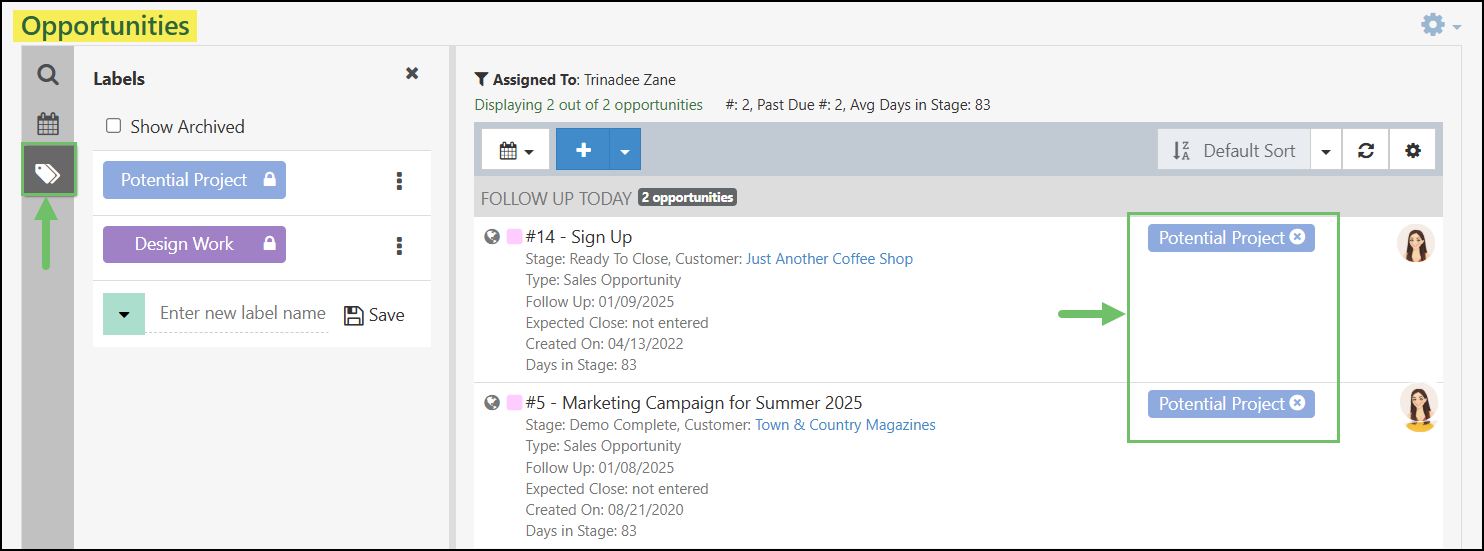
Example of Opportunity Labels
Adding Labels
This example image to the right displays the different options you will see on the Opportunities Labels List. The first 2 options show the 2 kinds of Opportunity Labels, while the 3rd option shows where you can create a new Opportunity Label:
- Public Labels: Available to all Striven users in your system to see and utilize.
- Only Public Labels can be made visible on the Portal. This setting is displayed as a Blue Globe icon for Visible on Portal, or a Gray Globe icon for Not Visible on Portal.
- Note: Only users with the necessary permissions included in their User Role will have the ability to change the Portal Visibility of Opportunity Labels.
- Only Public Labels can be made visible on the Portal. This setting is displayed as a Blue Globe icon for Visible on Portal, or a Gray Globe icon for Not Visible on Portal.
- Private Labels: Only available to the user who created them to view, use, or edit. Private Labels are identified with a lock symbol on the right side of the Label.
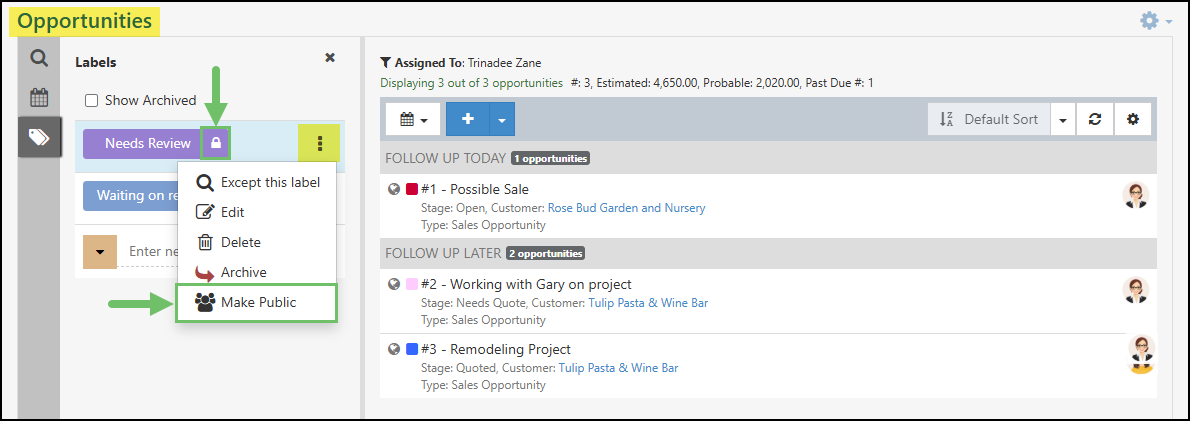
- Note: If you wish to display a Private Label on the Customer/Vendor Portal, you would first need to make the Label Public by using the kebab menu and selecting Make Public. This will switch the Label from Private to Public, and allow it to be made visible on the Portal by clicking on the Gray Globe icon, turning it Blue. This will enable the Customer to view the Label when viewing the Opportunity in the Customer/Vendor Portal.
- Enter New Label Name: Field to enter the name for a new Opportunity Label, select the Label color, and save the Label.
- Note: By default, the new Label will be saved as Private, but you can click the kebab menu to select to make it a Public Label if desired.
Example of Opportunity Label Options
Note: Once a Label has been made Public, it can not be switched back to Private.
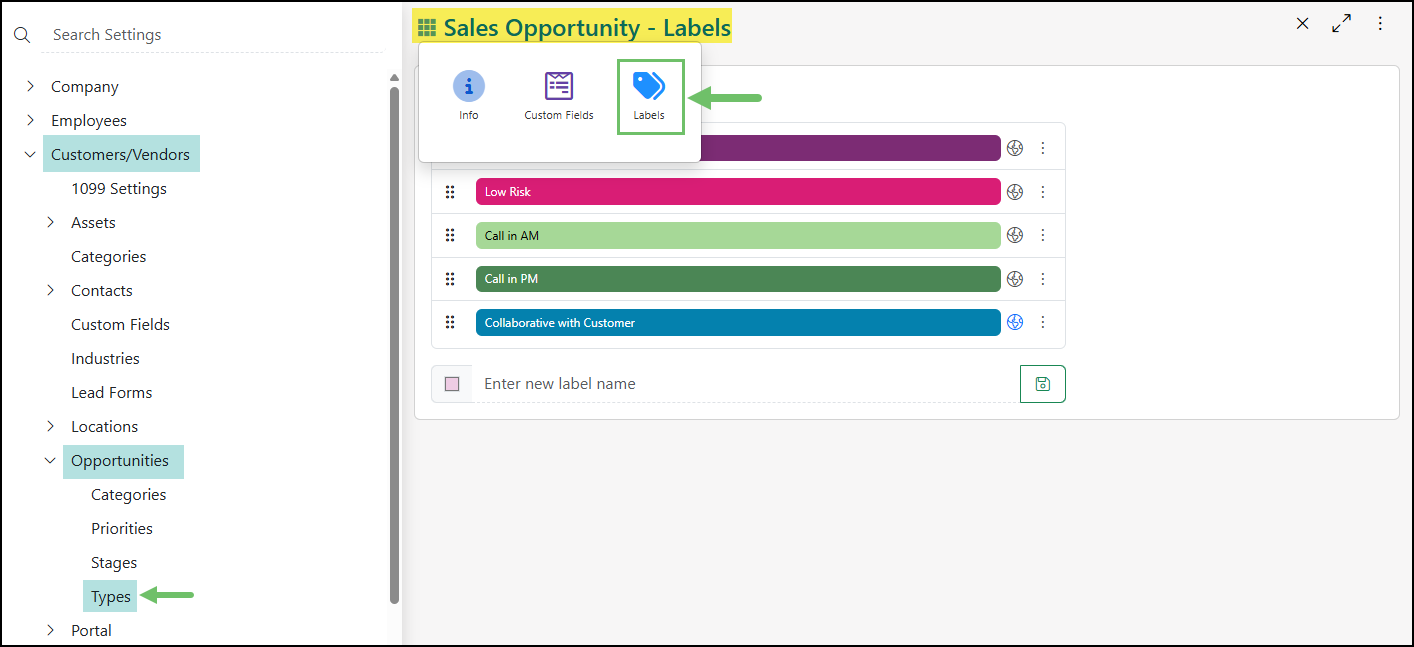
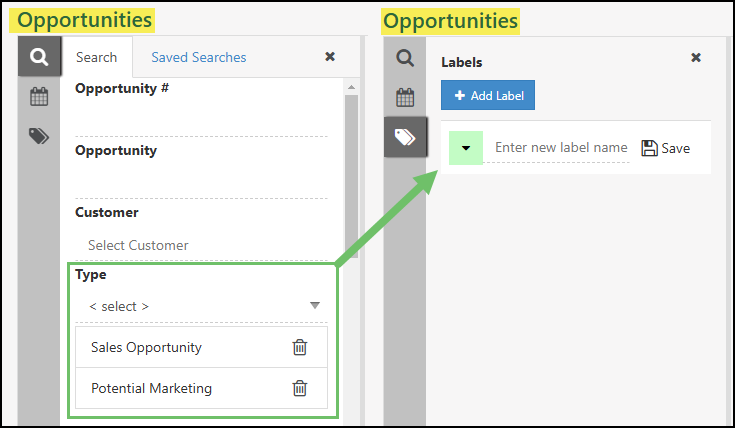
Managing Labels Through the Opportunity Type
Labels can be added and managed through the Opportunity Type settings by navigating to Company → Settings → Customers/Vendors → Opportunities → Types. Once viewing an Opportunity Type, use the waffle menu next to the Opportunity Type name and click on the Labels tab in order to add or manage existing Labels.
Example of the Labels Tab in a Sales Opportunity Type
Below is an example of a list of Labels stored at an Opportunity Type level and how to add and manage Labels through this method.
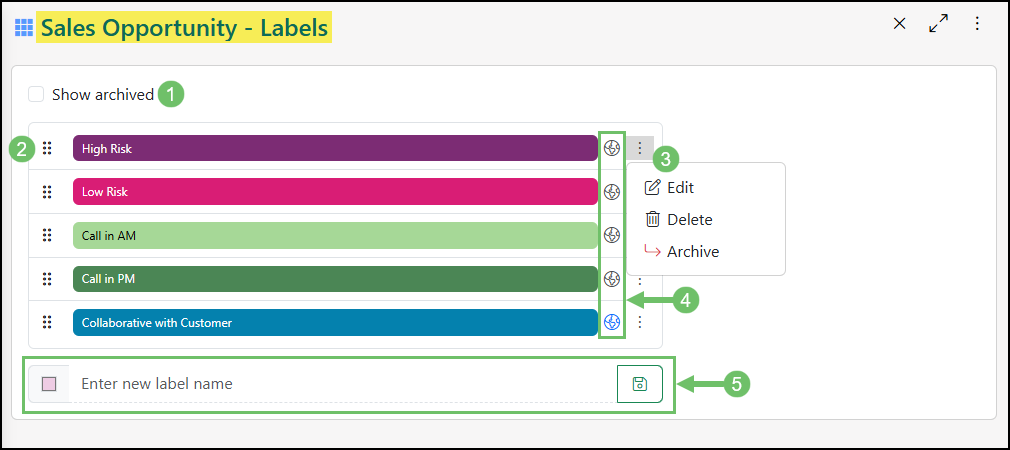
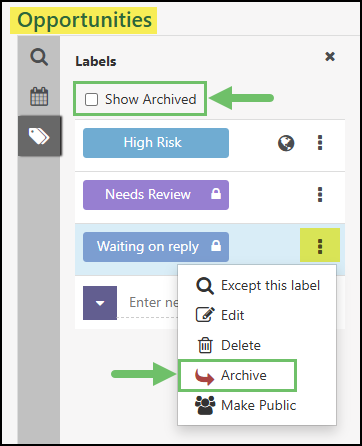
- Show Archived: To view Labels that have previously been archived toggle this option on. Labels can be archived and unarchived through the kebab menu on each Label listed.
- Label Name: Each Label that has been created will be highlighted in the saved Label color and with the Label name displayed. The drag and drop icon located to the left of each Label can be used to rearrange the order in which the Labels will appear when using them on Opportunities.
- Kebab Menu: Options in this menu include the ability to edit the existing Label color or name, delete the Label, or archive or unarchive the Label.
- Make Visible/Not Visible on Portal: To allow Customers to see Labels that have been added to Opportunities in the Customer Portal, click the Globe icon to turn it blue. The Customer will not be able to view the Labels assigned to Opportunities when the Globe icon is toggled to gray.
- Enter New Label Name: Create new Labels by entering the Label Name here. The color box to the left of the Enter New Label Name field can be clicked to adjust the Label color. Clicking the Save icon will create the Label.
Example of a Label List for an Opportunity Type
Managing Labels Through Opportunities List
Creating and managing Labels through the Opportunities List have key differences when viewing Opportunities in the Follow-Up View versus the Board View. To effectively manage Labels for your Opportunities, please review the information provided below.
Labels created from both the Follow-Up View and the Board View will be set as private by default. To change the private status of the Label, click the kebab menu and use the option for Make Public.
Example of a Private Opportunity Label in the Follow-Up View
To turn a private Label to public, users will need the permission “Public Labels: Add/Edit” added to their User Role. For detailed information on User Role management, please refer to our User Role Guide.
Managing Labels Through the Follow-Up View
Public Labels will only be available per Opportunity Type. If your search results for the Follow-Up View include multiple Opportunity Types, a warning will be displayed when attempting to make a private Label public. Users will need to adjust their search to include only one Opportunity Type in order to turn the Label public for the selected Type.

Example of Warning Message When Turning a Label Public
Once the Label has been made public for the Opportunity Type, it will be available when the search results for the Follow-Up Board include only the related Opportunity Type.
Example of Public Label from the Opportunity Follow-Up View
If multiple Types are included in the search results, public Labels will not appear. This is due to public Labels being stored and related per Opportunity Type.
Example of Label Removed Due to Multiple Types Being Searched
Managing Labels Through the Board View
When using the Board View for Opportunities, only one Type can be viewed at a time from the Type drop-down menu.
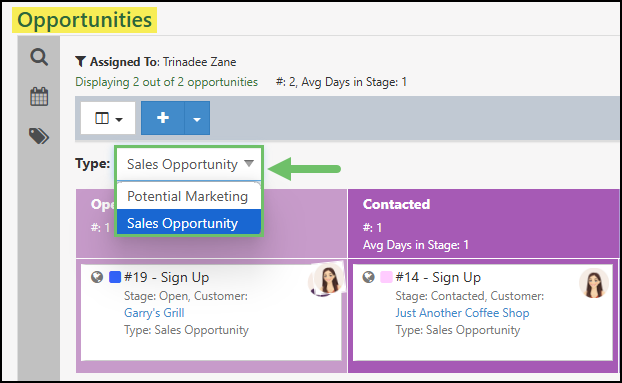
Example of the Type Drop-Down Menu from the Opportunity Board View
When making a private Label public from the Board View, the Label will then only be available for the Type that was selected from the drop-down menu when the action was taken.
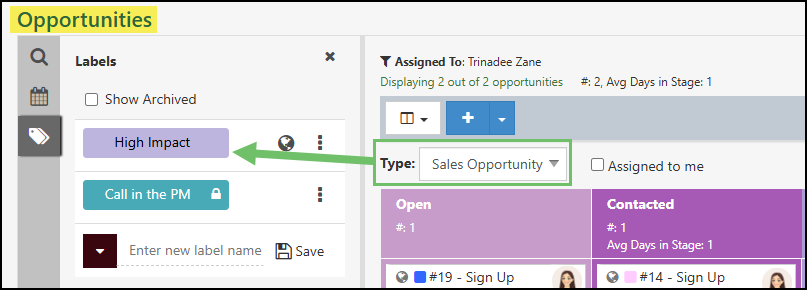
Example of Labels Available Per Type in the Opportunity Board View
Private Labels will be available for all Opportunities regardless of the Type selected in the Type drop-down menu in the Board View.
Example of Private Labels Available for All Types in the Opportunity Board View
Assigning Labels
To assign a Label to an Opportunity, simply drag the Opportunity to the desired Label in the Labels List. The Label will then appear on the Opportunity.
Labels can also be added directly to the Opportunity by clicking the kebab menu that appears when hovering over the Opportunity from both the Follow-Up View and the Board View. Using the Add Label option allows for the available Labels to be listed and selectable to add to the Opportunity.
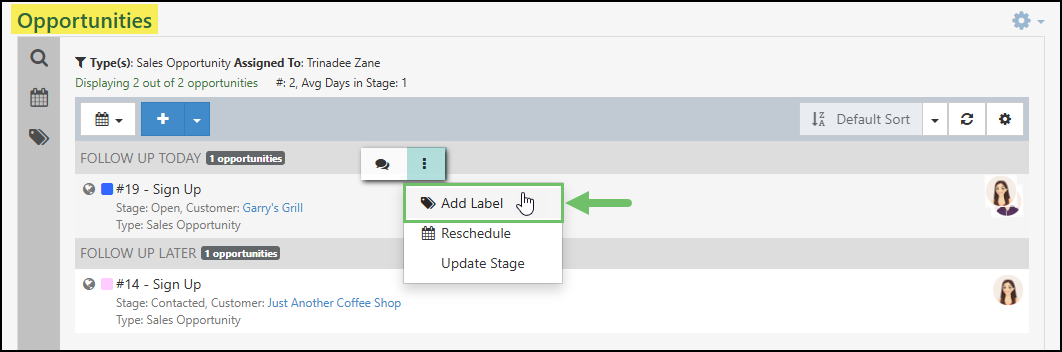
Example of the Add Label Option in the Kebab Menu When Hovering Over an Opportunity
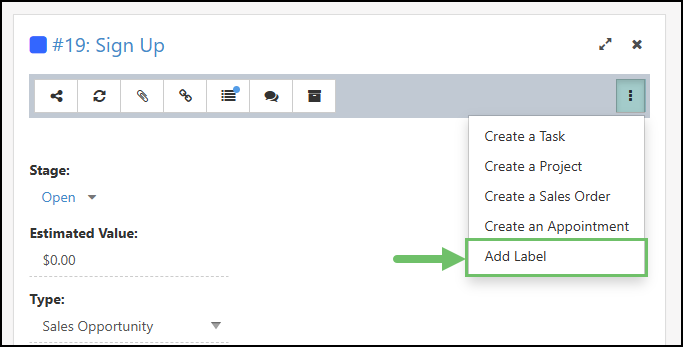
When viewing the Opportunity Info, the kebab menu is available which will have the same option to Add Label. Once selected, a pop-up window will appear with the Labels available for the Opportunity.
Example of the Add Label Option in the Kebab Menu from the Opportunity Info Page
The Opportunity List may also be filtered by Labels by clicking on the appropriate Label in the Labels List. This will display only those Opportunities in the Opportunities List that have that Label assigned to it.
Archiving Labels
Opportunity Labels may be archived if no longer in use, or deleted completely if so desired. To archive an Opportunity Label, click on the kebab menu next to the Label and choose Archive. While the archived Label will no longer show in the Labels List (unless the Show Archived box is toggled on), the Label will still be displayed on Opportunities it was assigned to. Archiving Labels can also be reversed by viewing the archived Labels and selecting Unarchive from the kebab menu on the Label you wish to unarchive. If you no longer have any use for a Label, you may delete the Label which will remove it completely from both the Labels List, and any Opportunities it was assigned to.
Example of Archiving an Opportunity Label
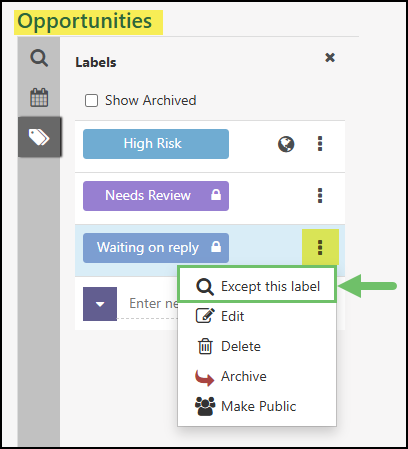
Except This Label
The kebab menu, located next to each Label, provides an option called Except This Label. This functionality allows users to filter and display only the Opportunities that do not have the selected Label. This can be particularly useful in scenarios where, for instance, a user wants to exclude Opportunities that are labeled as Waiting on Reply, effectively filtering them out of the current view. By using this feature, users can refine their Opportunity list and focus on those that require immediate attention or meet specific criteria, improving efficiency and organization.
Labels in the Customer Portal
As noted in the Adding Labels section above, public Labels can be marked as visible to the Customer related to the Opportunity through the Customer Portal. To make a public Label visible to the Customer in the Customer Portal, click the globe icon located next to the Label Name. A blue Globe icon indicates the Label is visible to the Customer through their Opportunities. A gray Globe icon will indicate the Label is only available to view by the users in Striven and not in the Customer Portal.

Example of an Opportunity Label That is Marked Visible in the Customer Portal
It is important to note that the Opportunity will only be visible to the Customer through the Customer Portal if the Visible to Contacts option is checked on from the Opportunity Info page.
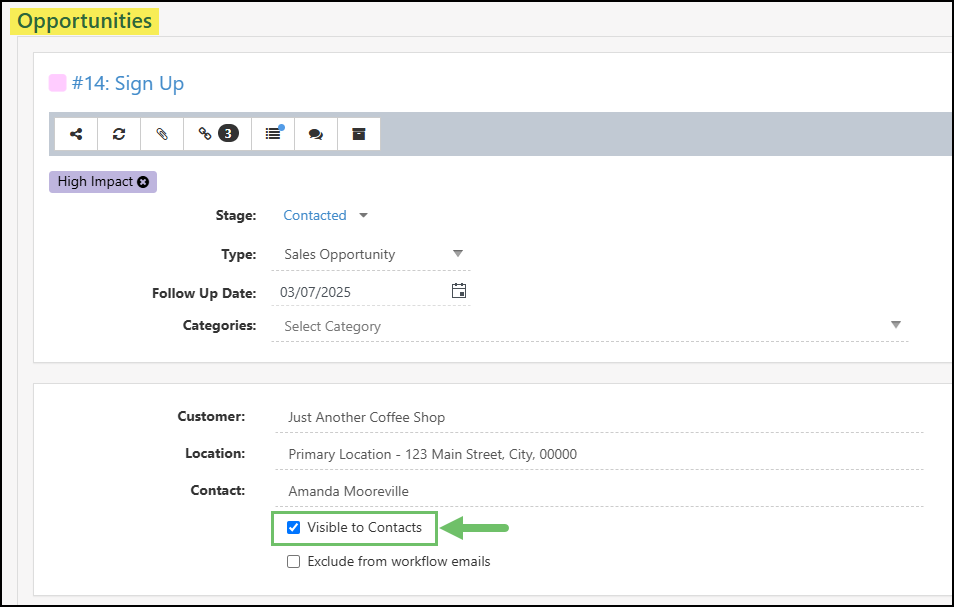
Example of the Visible to Contacts Option in the Opportunity Info Page
When viewing the Opportunity in the Customer Portal, the Label will be both visible from the Opportunities List and the Opportunity Info page.
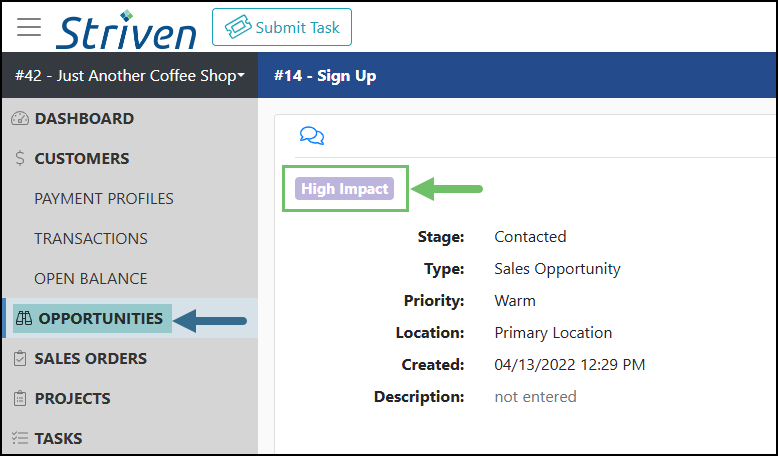
Example of an Opportunity Label Visible in the Customer Portal
- Public Labels: Available to all Striven users in your system to see and utilize.
-
Opportunity Info
There are many functions found within Opportunities that allow for robust management of your Opportunities. Below is a screenshot of an Opportunity followed by a description of what can be accomplished there.
Customers → Sales → Opportunities
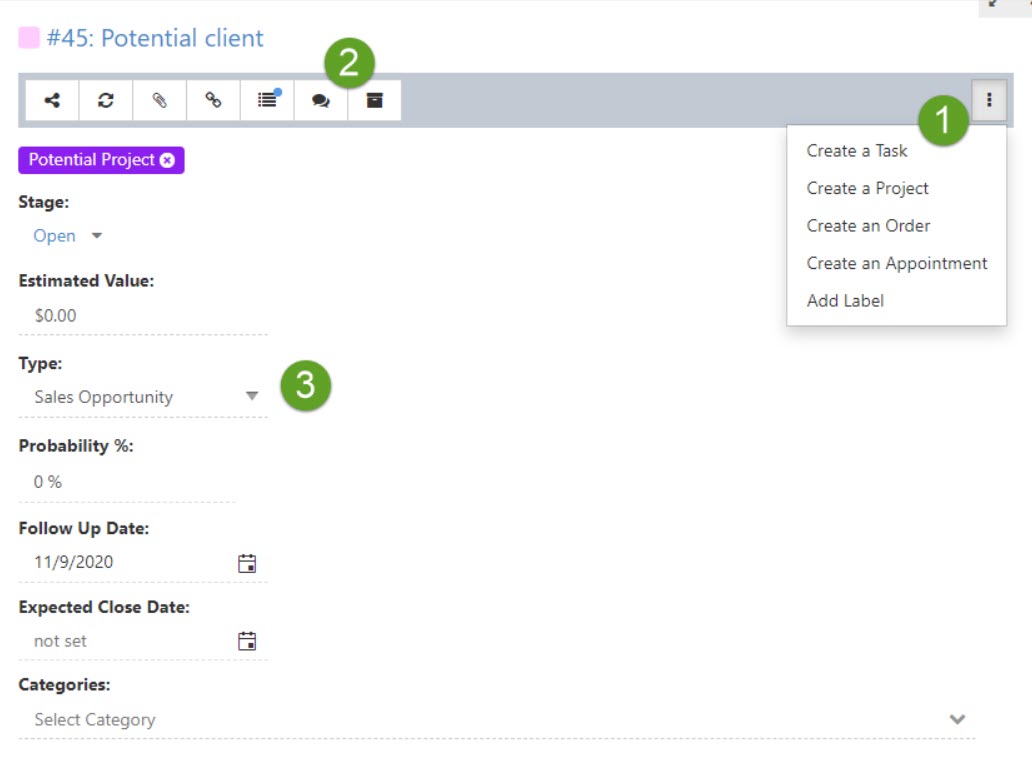
- Actions: Allows you to create other entities that will be linked to the Opportunity. These entities include Tasks, Orders, Projects, and Appointments. You can also add a Label to your Opportunity from this menu.
- Buttons: Each button here has a different function as described below:
- Share: Provides a sharable link to the Opportunity.
- Refresh: Refreshes the Opportunity to update to the latest information.
- Attachments: Allows you to attach documents to the Opportunity. These attachments will be downloadable to the Contact in the Customer Portal if you have selected for the Opportunity to be Visible on Portal.
- Linked To: Links entities created from the Opportunity or if the Opportunity was created from another entity, such as a Task or Order.
- Audit Log: Tracks changes made to the Opportunity. The audit log will display a date and time stamp for each change made.
- Discussions: Here you can send and track Discussions sent to and from the Opportunity. Beginning a Discussion thread from Striven will allow for replies to the Discussion via email to be forwarded and stored in the Discussion thread as replies in your Striven system.
- Hub: Allows you to quickly access the Opportunities Hub where you can easily review any documentation that you have added to the Opportunity.
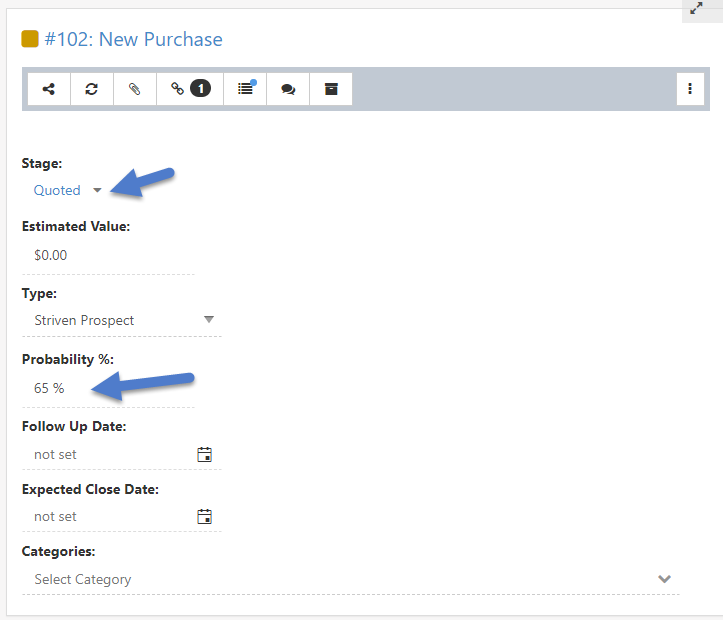
- Sales Info: Allows you to enter information regarding the Opportunity. Important information is included here such as:
- Stage: Includes Open, Contacted, Needs Quote, Quoted, Sold, Lost, and Canceled statuses. Stages are customizable to fit your Company’s needs. It is recommended to review your Opportunity Stages before you begin utilizing Opportunities in Striven.
- Estimated Value: Allows you to enter how much you expect the final sale to be once the Opportunity has been moved forward in the sales process.
- Probability %: The likelihood of the Opportunity becoming a sale.
- Follow Up Date: You can use the Calendar icon to choose when to follow up.
- Expected Close Date: You can use the Calendar icon to select a close date.
- Category: Allows you to categorize your Opportunities. You can select a Category by choosing from the drop-down menu or by using the Quick Add icon when hovering over the field. Learn more about creating Opportunity Categories by reviewing the Category Management Guide.
-
Opportunity Linked To
Opportunities in Striven can be linked to Tasks, Projects, Sales Orders, Appointments, and other Opportunities.
The first option to create this relationship is to create a Task, Project, Sales Order, or an Appointment from the Actions Menu on an Opportunity which will automatically create a relationship between the two. Entities linked to Opportunities using this option will not be able to be deleted and will remain related to one another.
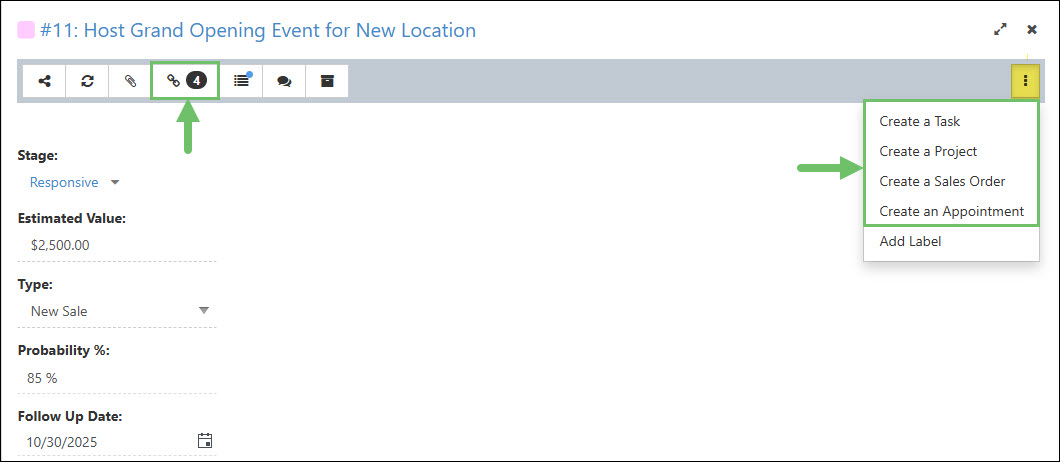
Example of Relating Entities to Opportunities from the Actions Menu
The second option is to manually link a Project, Task, Sales Order, or another Opportunity to the Opportunity by clicking on the Linked To button at the top of the Opportunity and selecting the Add button to choose what entity you would like to manually link to the Opportunity. Entities linked to the Opportunity using this method will allow the user to remove the relationship by using the Delete icon.
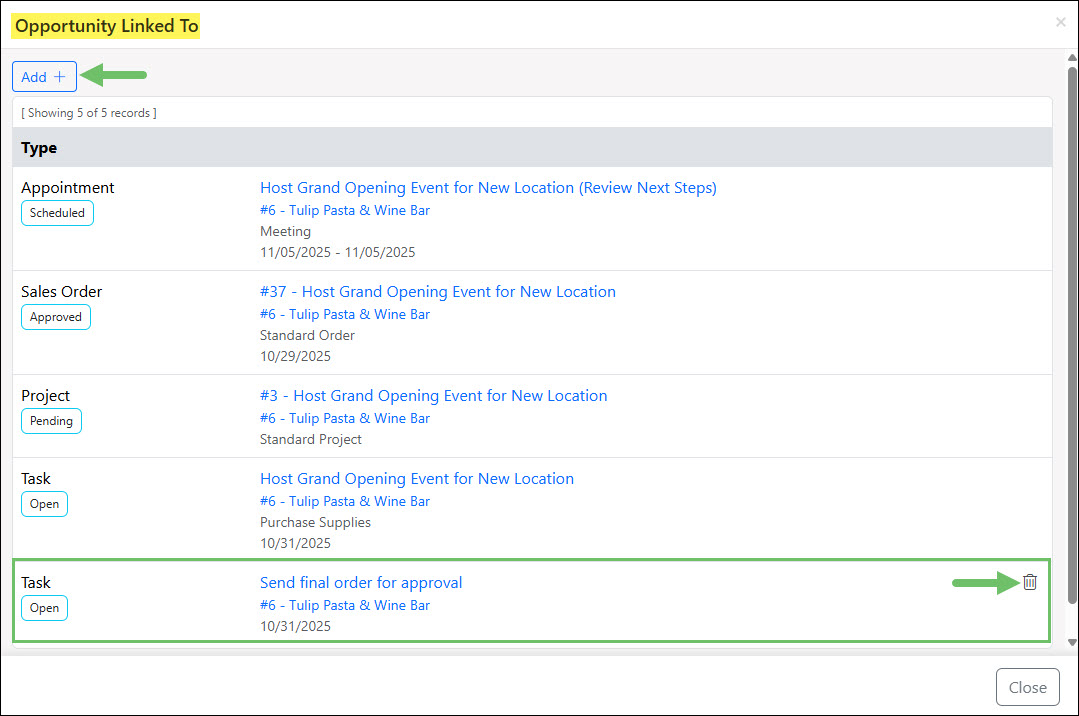
Example of a Manually Related Entity to an Opportunity
Below is a screenshot illustrating how the Opportunity Linked To window appears and a description of what can be accomplished there.
- Add: Allows you to manually add an entity to be linked to the Opportunity. Entities that can be manually linked to an Opportunity include a Project, Task, Sales Order, and another Opportunity.
- Type: Lists the entity that is related to the Opportunity with the current status underneath. Entities that can be linked to an Opportunity include an Appointment, Sales Order, Project, Task, or another Opportunity.
- Linked Entity: Lists the name and number if applicable for the linked entity. Underneath the linked entity will include additional information regarding the entity. Clicking on the hyperlink listed here will open the related entity to view more information.
- Delete: Allows you to remove a relationship between the entity and the Opportunity. The Delete icon will only be listed for entities that were manually related to the Opportunity through the Add button.
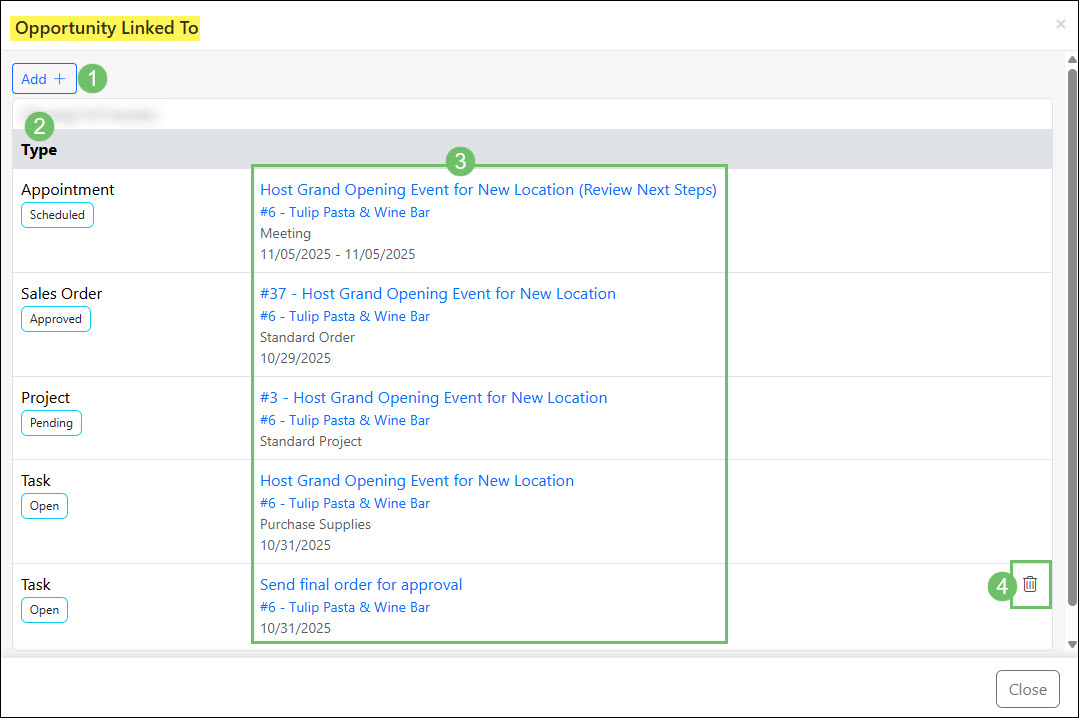
Example of the Information and Actions Available in the Opportunity Linked To Window
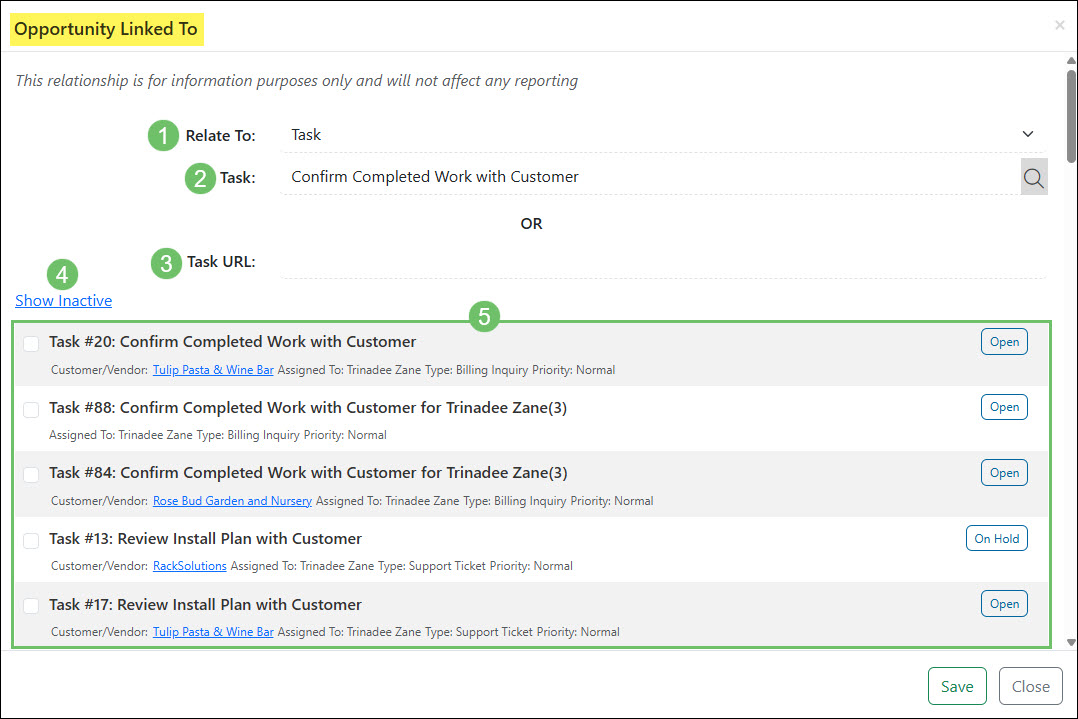
Below is a screenshot illustrating how the Add option in the Opportunity Linked To window appears and a description of what can be accomplished there.
- Relate To: A drop-down menu which lists the entities that can be related to the Opportunity which includes a Project, Task, Sales Order, or another Opportunity.
- Entity: A search field that will search for the entity being related to the Opportunity based on the name or number.
- Entity URL: An additional option to add a related entity is to add in the direct URL without having to use the search option.
- Show Inactive: Will adjust the results to include inactive results to be selectable. By default, only entities in an Active status will be listed.
- Results: Lists the search results based on either the Entity search or the Entity URL search options from above. Results listed can be multi-selected to include as linked to the Opportunity before using the Save button.
Example of the Actions and Information Available in the Add Option for the Opportunity Linked To Window
-
Opportunity Hub
The Hub feature within Striven allows you to organize any documentation, links, or content that is related to a Customer, Order, Opportunity, etc. With the Customer’s Hub, you can store documents related to the Customer as a whole, while using the Opportunity Hub allows you to store documentation that is related to the specific Opportunity. To learn more about the advantages and uses of the Opportunity Hub, review the Hub Guide.
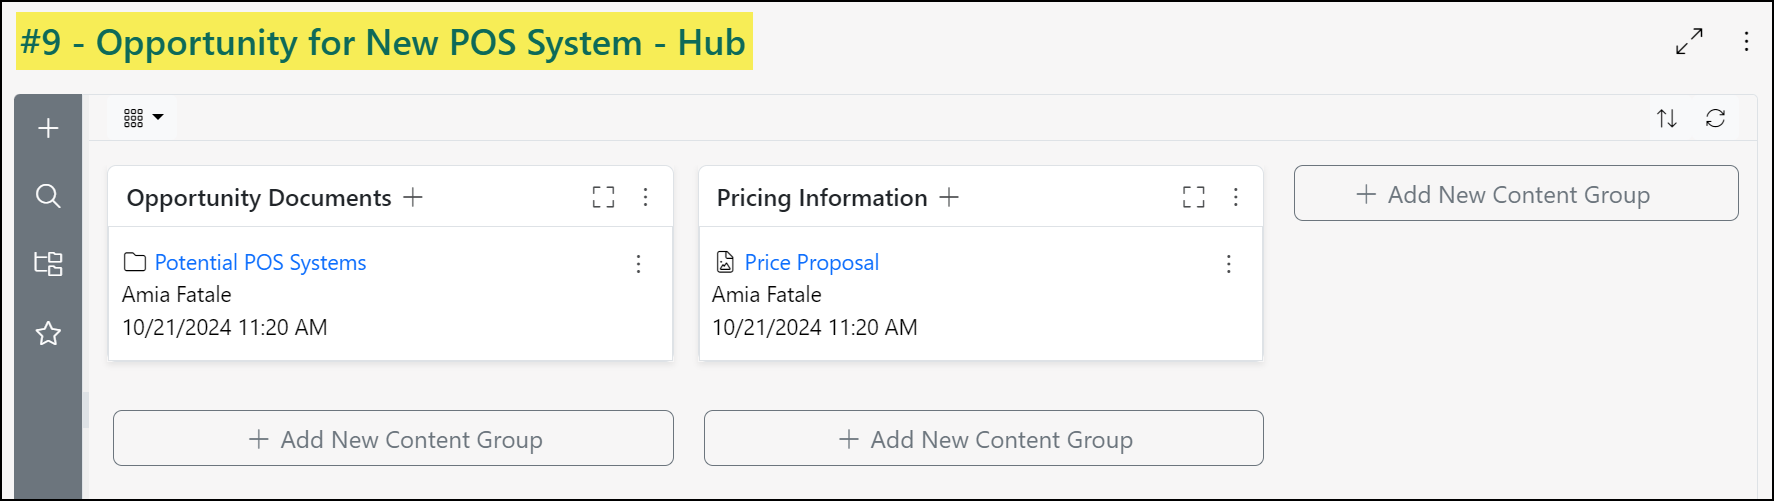
Example of Opportunity Hub
-
Opportunity Assignments
Assignments in Striven allow you to know exactly who is working on an Opportunity at any given time, and multiple assignees can be designated to an Opportunity. Assignments for Opportunities can be designated to Employees or a Pool of Employees. You can determine default Assignments per Opportunity Type by filling in the Notification Recipient per type. To learn more about the creation of Pools in Striven, please review the Task Pools section in our Task Settings Guide.
-
Importing Opportunities
Opportunities can be brought into Striven en masse by utilizing Striven’s Opportunities Import. This can be done for large and small databases to bring in multiple Opportunities at once. To learn more about importing Opportunities into Striven, review our Import Management Guide.
To import Opportunities into Striven, please use the following steps below:
Customers → Sales → Opportunities
From the Opportunity List, you can begin the process of importing Opportunities by clicking on the down arrow next to the plus sign at the top of the Opportunity List, indicated below by the green arrow:

Example of the Import Opportunities Button
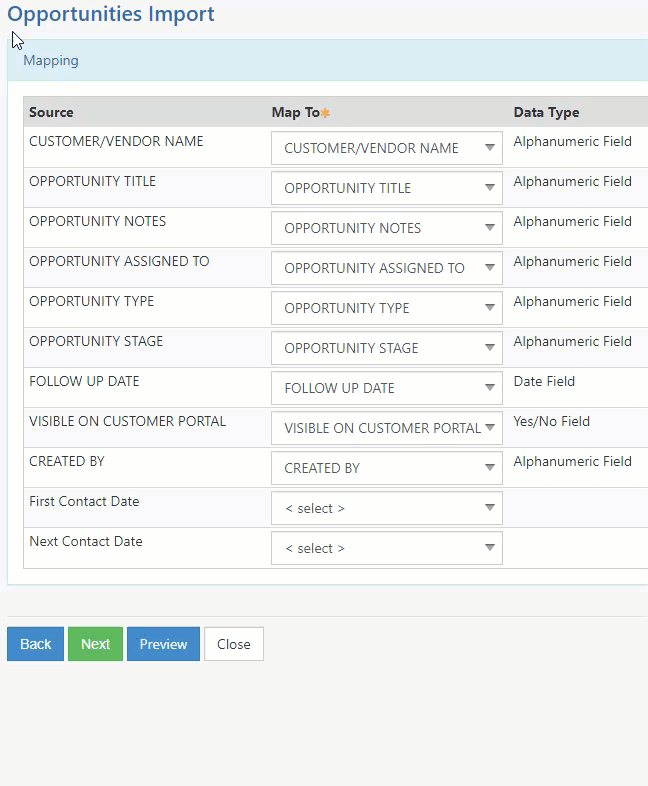
This will reveal the Import Opportunities option, which will take you to the Opportunities Import page when selected. From there, you can Generate Sample File (indicated below by the blue arrow), which provides a spreadsheet with pre-filled column headers (listed on the mapping) to assist with entering the data.
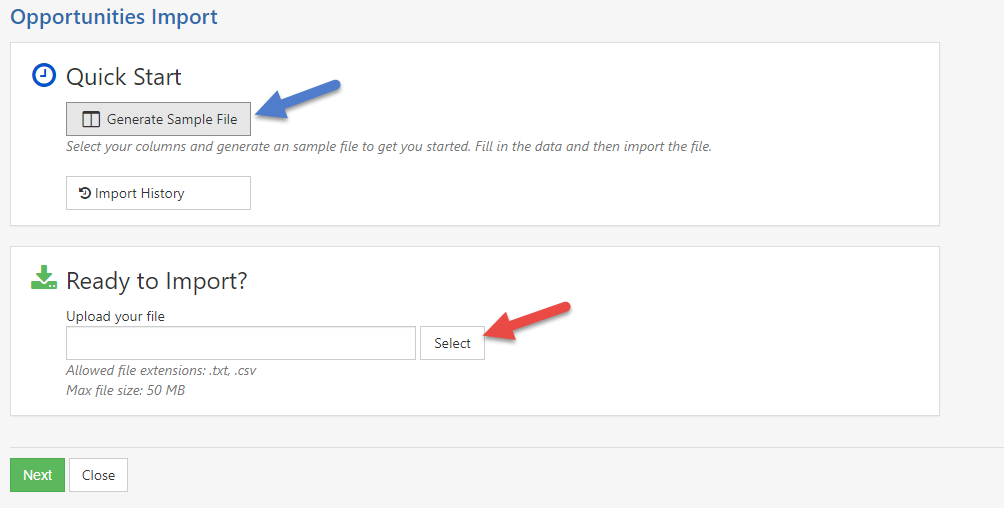
Example of Opportunities Import Page
Once your mapping is complete and your import file is ready, you can click on the Select button (indicated by the red arrow above) to choose the desired import file for upload.
- Note: Import files must be in a .TXT or .CSV format in order to be accepted by Striven.
-
Opportunities Import – Custom Fields
The Opportunity Import provides the option to include Custom Fields. In order to utilize this feature, the Custom Fields will need to be created in your Striven system before they can be populated with data for the import.
On the Import Mapping Page, you will select your field mapping from the drop-down lists. With this release, there will now be a mapping option for [CUSTOM FIELD NAME].
Once selected, this mapping option will trigger another mapping field to display where you will select the Custom Field. Only Custom Fields saved under your Opportunities Custom Field entity will be available for selection from this list for the import.
Example of Importing Opportunity Custom Fields
-
Recap
With this guide, we’ve discussed how to create and manage Opportunities to help achieve your Company’s sales goals. We’ve also explored ways to manage Opportunity Assignments, Labels, and Hub content within Striven. Lastly, we’ve reviewed the steps for importing Opportunities into your Striven system.

Have a Question?
Ask the Striven Community
User-sourced how-to’s, feedback, and more!
FAQs
-
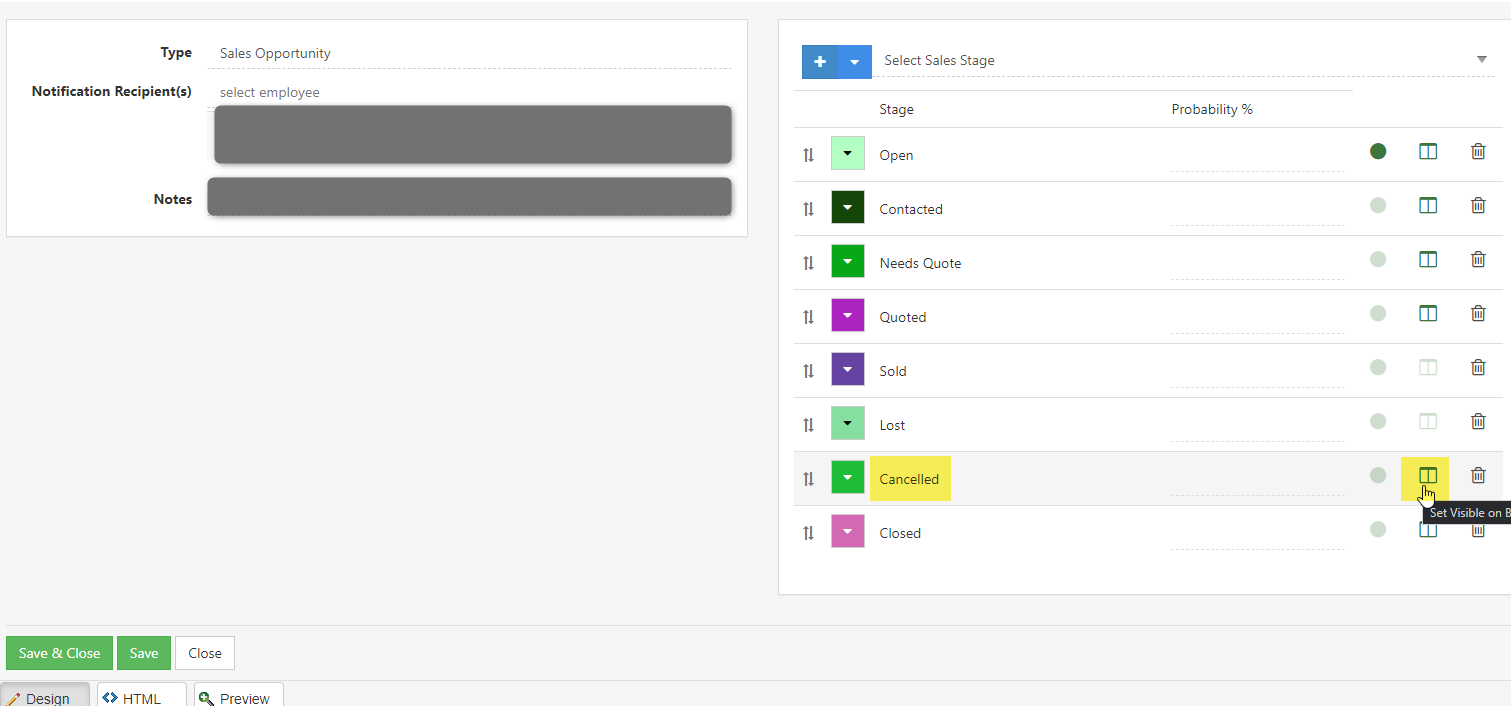
How can I cancel a large amount of Opportunities without changing each one at a time?
If you use Stages on Opportunities you can set a column for a Cancelled status and then when in Opportunity Board View you can click and drag all the Opportunities you want to that Cancelled Stage column to mark them Cancelled. This is a quicker way to get your Opportunities status changed without having to select the Cancelled status for each one individually.
- Side Note: If you don’t already have the Cancelled Stage column set up, here is a quick run through on how to do this.
You will need to navigate to:
Company → Settings → Customers/Vendors → Opportunities → Stages
From there you will add in a Cancelled Stage. After that you will navigate to the Sales Opportunity Type you wish to have the Cancelled Stage display on, and you will need to click the Set Visible on Board view option to make it display on the Opportunity Board view. See image below for an example.