
Financials
Accounting Migration
Support Guide
-
Overview
Deciding to migrate your financials onto Striven is an important step to undertake. This guide will help provide steps with exporting reports of your open financials from your old system. We’ll also learn how to migrate the open finances into Striven including open Invoices, Bills, inventory quantities, Taxes, and account balances. This guide will help set your finances up for success inside of Striven.
Read this guide if you are trying to:
✔ Migrate data from your current Accounting system to Striven.
✔ Set accurate balances for GL Accounts in Striven.
✔ Stop using your current accounting system.
-
Prerequisites
Migrating your accounting data into Striven allows your company to perform day-to-day financial transactions without losing a step. With this guide, we’ll explore steps you can take to extract and import data into Striven to complete a successful Accounting Migration.
Prior to beginning an Accounting Migration, it is important to note that there are certain prerequisites you will need in Striven beforehand. These prerequisites include:
- Chart of Accounts
- Employees
- Customers
- Vendors
- Items
Prior to taking this important step, you should ensure that your Striven system already has the above information from your previous system inside of Striven. If your system does not contain the above information, please view our Import Management Guide.
Migration Practices
-
Migrating Open Balances (Recommended)
The recommended and most used practice when migrating accounting from one system to another is to perform an Opening Balance Migration. This practice is used to bring over only open transactions and General Ledger account balances as of a specified date, also known as a Cutover Date.
This practice allows your business to start with the same Balance Sheet that you had in your old system. You will also have open Invoices and Bills, which can later be paid off or credited as well, letting you function seamlessly inside of Striven going forward. This is sometimes referred to as a Balance Forward migration.
For instance, if you wanted to migrate as of March 1, 2020, then you would migrate any open transactions and ledger balances as of that date to successfully migrate your accounting. Using this method, your Balance Sheet is brought over as of March 1, 2020, and you would start with a blank Income Statement in Striven.
-
Migrating Historical Data
It is advisable to reference the previous accounting system for historical details. For those who wish to enter their historical summary data by fiscal year instead of one Journal Entry with the Opening Balance for each account, the Accounting Migration Tool is the way to go. You can find further information about this feature in the guide below.
Preparing for Migration
-
Exporting the Right Data
Prior to performing an Opening Balance accounting migration, you will first need to export pertinent data from your old system as of the set Cutover Date. All you will need to do is run and export the necessary reports, which are listed below:
- A/R Aging Detail
- Open Customer Balances
- A/P Aging Detail
- Open Vendor Balances
- Inventory Valuation
- Open Inventory Quantities and Value
- Sales Tax Liability Report
- Open Payable Sales Taxes
- Balance Sheet
- Open General Ledger Balances
- Balance Sheet by Class (if using classes)
- Open General Ledger Balances by Class
- A/R Aging Detail
-
A/R Aging Detail
This section will walk you through how to export the A/R Aging Detail Report using Quickbooks Desktop as an example. To export open receivables from Quickbooks, use the following steps below:
- Login to your Quickbooks Desktop account.
- Click Reports.
- Hover over Customers & Receivables.
- Select A/R Aging Detail from the drop-down menu.
- Change the As Of date to the Cutover Date of migration.
- Click Excel.
- Choose Create New Worksheet from the drop-down menu.
- Click Export within the popup window to export to Excel.
-
A/P Aging Detail
This section will walk you through how to export the A/P Aging Detail Report using Quickbooks Desktop as an example. To export open receivables from Quickbooks, use the following steps below:
- Login to your Quickbooks Desktop account.
- Click Reports.
- Hover over Vendors & Payables.
- Select A/P Aging Detail from the drop-down menu.
- Change the As Of date to the Cutover Date of migration.
- Click Excel.
- Choose Create New Worksheet from the drop-down menu.
- Click Export within the popup window to export to Excel.
-
Inventory Valuation
This section will walk you through how to export the Inventory Valuation Report using Quickbooks Desktop as an example. To export open receivables from Quickbooks, use the following steps below:
- Login to your Quickbooks Desktop account.
- Click Reports.
- Hover over Inventory.
- Select Inventory Valuation Summary from the drop-down menu.
- Change the As Of date to the Cutover Date of migration.
- Click Excel.
- Choose Create New Worksheet from the drop-down menu.
- Click Export within the popup window to export to Excel.
-
Tax Liability
This section will walk you through how to export the Sales Tax Liability Report using Quickbooks Desktop as an example. To export open receivables from Quickbooks, use the following steps below:
- Login to your Quickbooks Desktop account.
- Click Reports.
- Hover over Vendors & Payables.
- Select Sales Tax Liability from the drop-down menu.
- Select All for the period and change the To date to the Cutover Date of migration.
- Click Excel.
- Choose Create New Worksheet from the drop-down menu.
- Click Export within the popup window to export to Excel.
-
Balance Sheet
This section will walk you through how to export the Balance Sheet Report using Quickbooks Desktop as an example. To export open receivables from Quickbooks, use the following steps below:
- Login to your Quickbooks Desktop account.
- Click Reports.
- Hover over Company & Financial.
- Select Balance Sheet Standard from the drop-down menu.
- Change the To date to the Cutover Date of migration.
- Click Excel.
- Choose Create New Worksheet from the drop-down menu.
- Click Export within the popup window to export to Excel.
-
Balance Sheet by Class (if using Classes)
This section will walk you through how to export the Balance Sheet by Class Report using Quickbooks Desktop as an example. To export open receivables from Quickbooks, use the following steps below:
- Login to your Quickbooks Desktop account.
- Click Reports.
- Hover over Company & Financial.
- Select Balance Sheet by Class Standard from the drop-down menu.
- Change the To date to the Cutover Date of migration.
- Click Excel.
- Choose Create New Worksheet from the drop-down menu.
- Click Export within the popup window to export to Excel.
Performing an Opening Balance Migration
-
Migrating Information into Striven
Once you have the exports from your old system, you are ready to migrate your financial data into Striven. Each report will be migrated using different methods, and each method will be discussed further in the sections below.
-
Open Invoices
Once you have your A/R Aging Detail, you are ready to begin formatting an Invoice import file from Striven. It is recommended that you use a sample import file to migrate your open receivables into Striven using the Invoice Import. To download a sample Invoice import file, visit the Invoices Import page and choose Generate Sample File as shown in the image below:
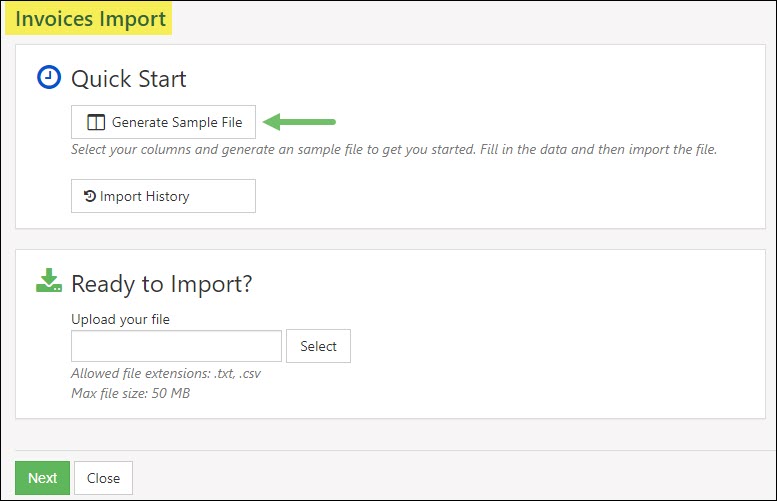
Example of Invoices Import Page

Upon clicking Generate Sample File as shown above, a popup will appear from which you can select the information you would like to include on your import file. Below is an image of all the fields available for selection, and those highlighted in green are recommended or required. Once you are ready, select Download Sample to download a sample import file to use for import.
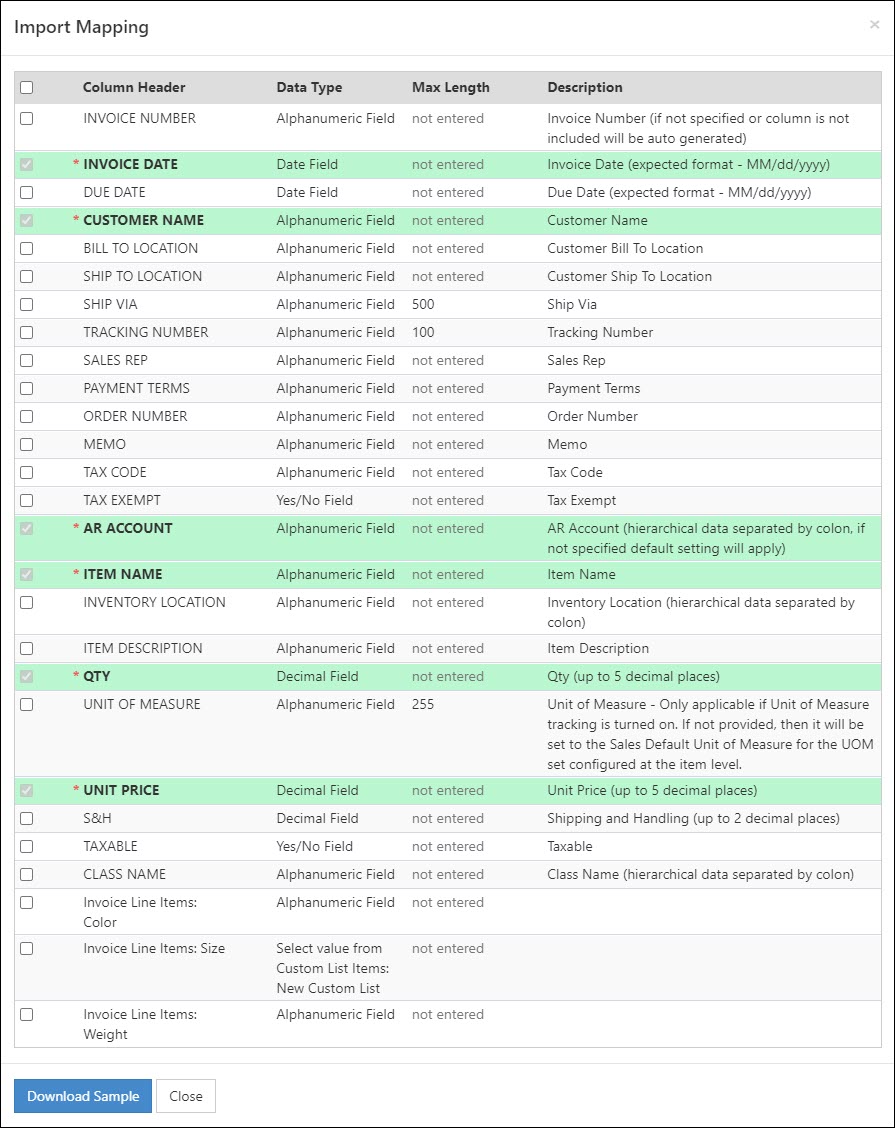
Example of Invoices Import Mapping Selection
To format your import file, simply copy and paste information from your export into the import file underneath the corresponding column header. Please note the following adjustments that should be made for the corresponding column in your spreadsheet:
- Item: Please fill in this column using the Opening Balance Equity Item.
- Quantity: Please fill in this column with a quantity of 1.
- Unit Price: Please enter the Invoice’s open amount.
Once the import file is filled out with the adjustments noted above, save the file and go back to the Invoices Import page within Striven and follow the steps listed below:
- Click the Select button in the Ready to Import section and select the import file.
- Click the Next button below to continue importing.
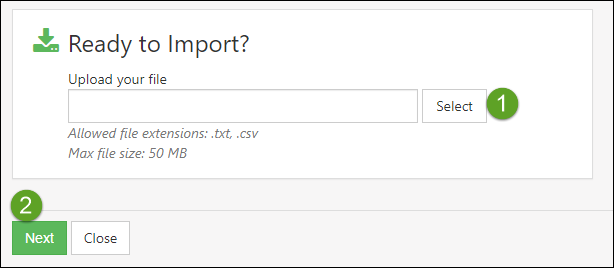
Example of Ready to Import Page
3. Using the drop-down fields in the Mapping page, choose the appropriate Map To for each column header on your import file as shown in the image below:
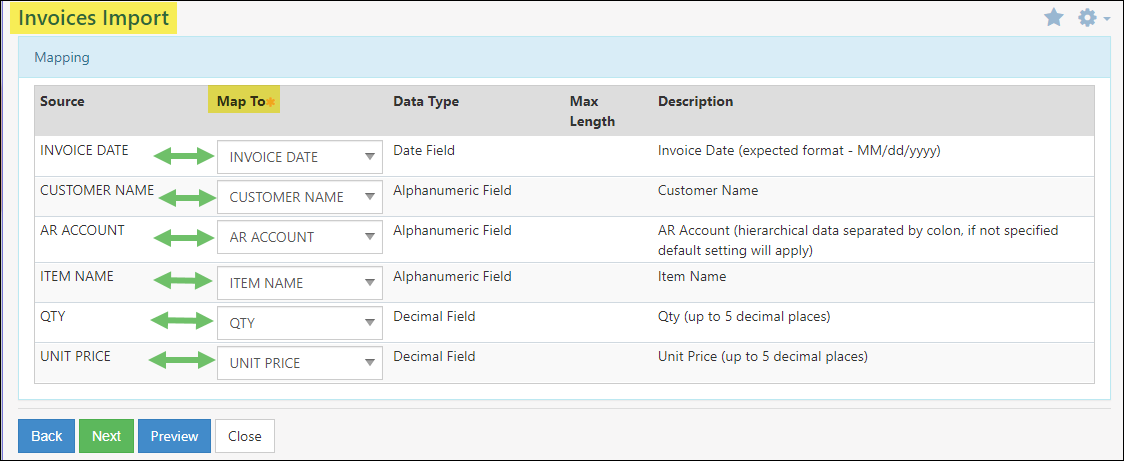
Example of Invoice Import Mapping Page
4. Click Next to finish importing.
-
Open Credit Memos
Once your Invoices have been imported, you can then begin entering the open Credit Memos. Please note that if there are any open Payments, it is recommended they be entered as Credit Memos since Payments are at risk of accidentally being deposited into a bank account.
Credit Memos can be migrated into Striven either by creating new Credit Memos in Striven or by using a Journal Entry Import. The sections below will walk you through how to accomplish either method.
Creating a Credit Memo in Striven for Migration
To create a Credit Memo for migration, please use the following steps:
- Navigate to Customers → Financial → Credit.
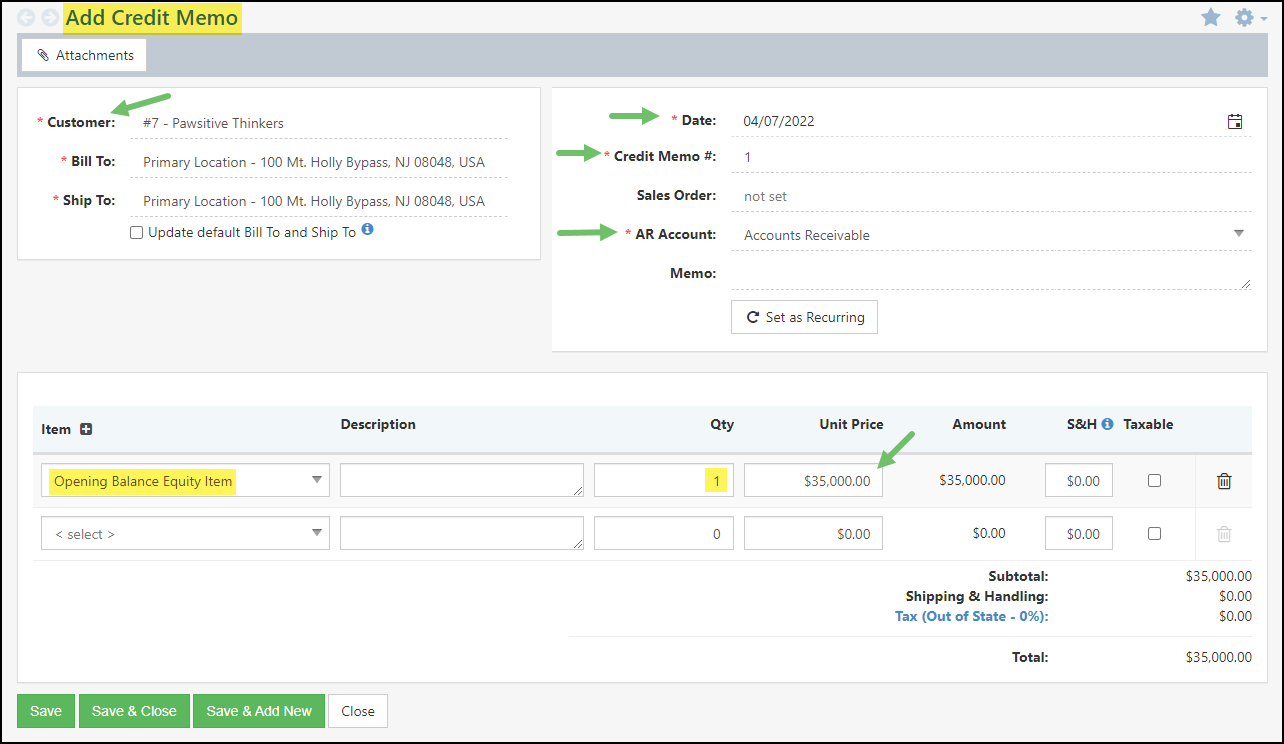
- When on the Add Credit Memo screen, choose the Customer the Credit Memo is for.
- Choose the appropriate date, Credit Memo number, Sales Order, and AR Account according to the A/R Aging Detail report from your old system.
- In the Items field, select the Opening Balance Equity Item.
- Keep the quantity as 1 and change the price to the total Credit Memo amount.
- Click Save to create the Credit Memo.
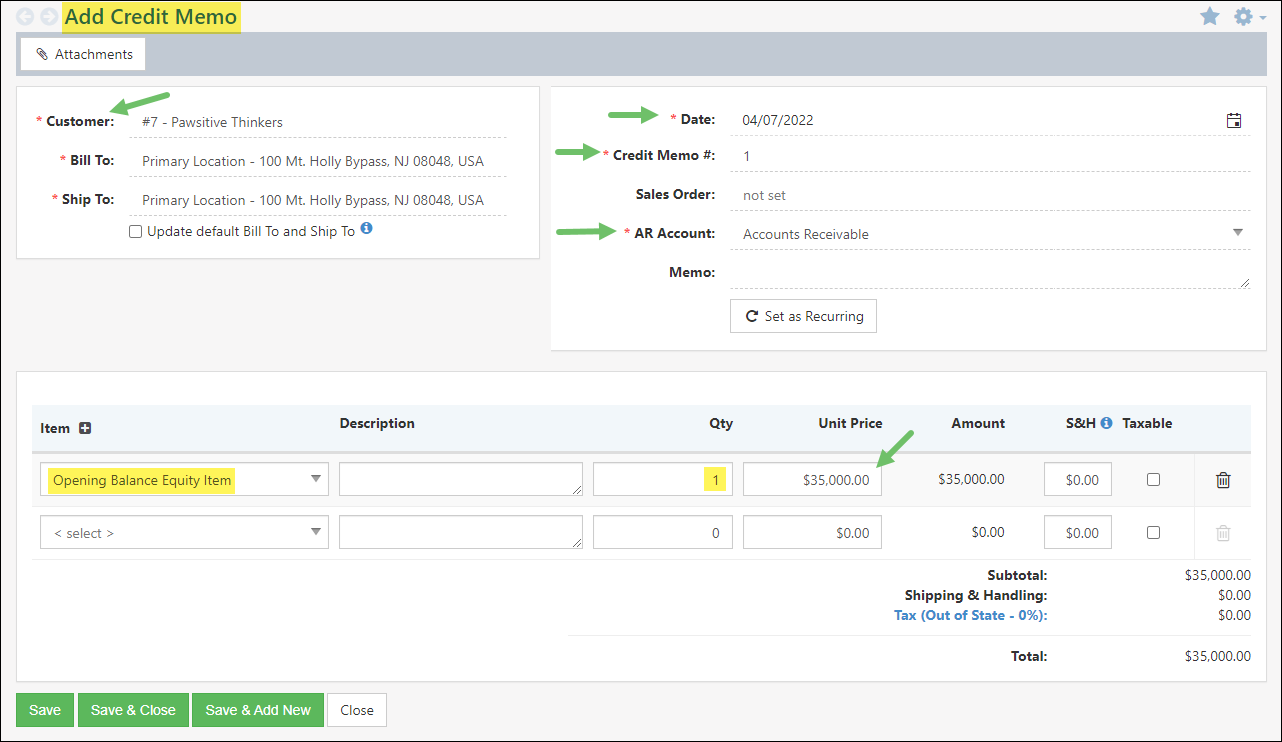
Example of Creating a Credit Memo
Importing Credit Memos in Striven for Migration
To use the Credit Memo Import tool to migrate open Credit Memos, please reference the following steps:
Navigate to Accounting → Transactions.
Next, click on the Import button and choose the Credit Memos option.
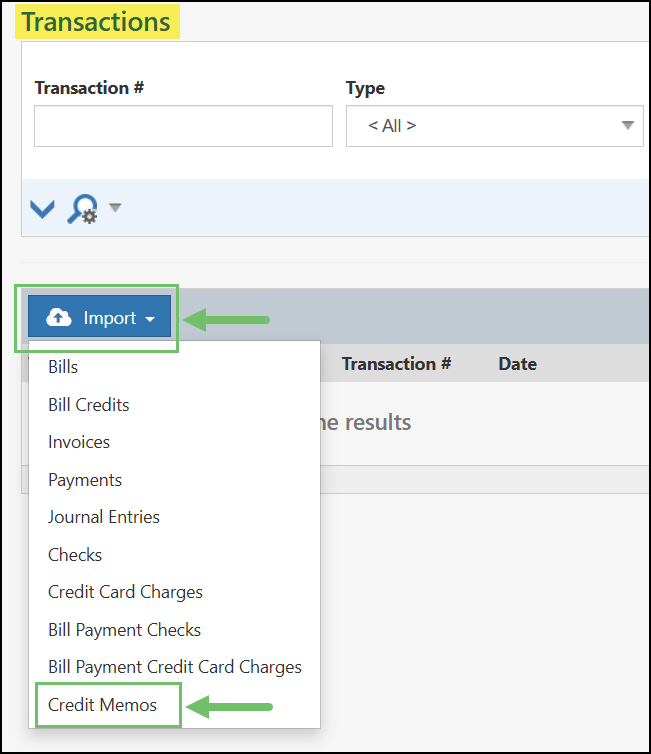
Example of the Import Button on the Transactions List
It is recommended to download a sample import file, and you can do so by clicking the Generate Sample File button as shown in the image below:
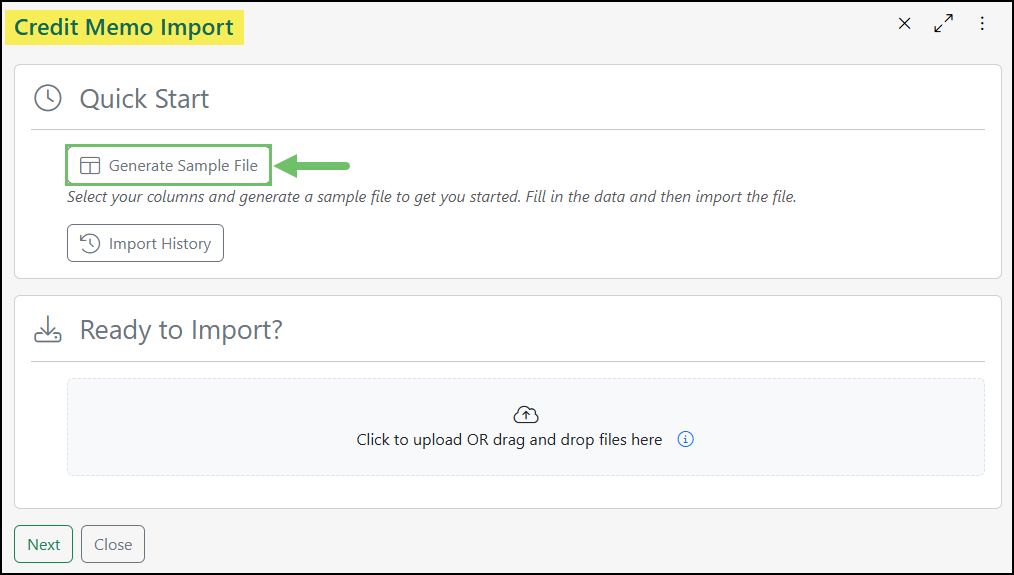
Example of the Credit Memo Import Page
Next, choose what columns you would like to include in your sample file. Recommendations are shown in the image below when using the import to migrate open Credit Memos. Once you have selected the appropriate column headers, click the Download Sample button.

Example of Suggested Columns for Credit Memo Import
To format your import file, simply copy and paste information from your export into the import file underneath the corresponding column header. Please note the following adjustments that should be made for the corresponding column in your spreadsheet:
- Item: Please fill in this column using the Opening Balance Equity Item.
- Quantity: Please fill in this column with a quantity of 1.
- Unit Price: Please enter the Credit Memo’s open amount.
Once you have the sample file formatted, you can select the file on the Credit Memo Import page using the button labeled Click to upload OR drag and drop files here and clicking Next to continue, as shown below:

Example of the Ready to Import Button on the Credit Memos Import Page
After clicking Next, you will be brought to the Mapping page to ensure the headers are being mapped appropriately. If everything looks good, click Next to finish importing.
-
Verifying your Accounts Receivable Account
After you have successfully migrated your Open Invoices and Credit Memos, it is important to verify your Accounts Receivable balance. The easiest way to accomplish this is to compare the Balance Sheet in Striven to the Balance Sheet export taken from your old system as of the Cutover Date. If the total A/R matches, then you can move on to the next migration objective. If the totals do not match, it is important to investigate further.
- Difference in A/R – If you notice a difference in the total accounts receivable in Striven compared to your old system, a great way to verify your data is to run Customer balances. If there are balances that are not matching, then you can investigate those Customers further to help correct any discrepancies by editing Credit Memos or Invoices as needed to make up the difference in A/R until the two systems equate each other.
-
Open Bills
Once you have your A/P Aging Detail, you are ready to begin formatting a Bill Import file from Striven. It is recommended that you use a Sample Bill File to migrate your open payables into Striven using the Bill Import. To download a Sample Bill Import File, visit the Bills Import page and choose Generate Sample File as shown in the image below:
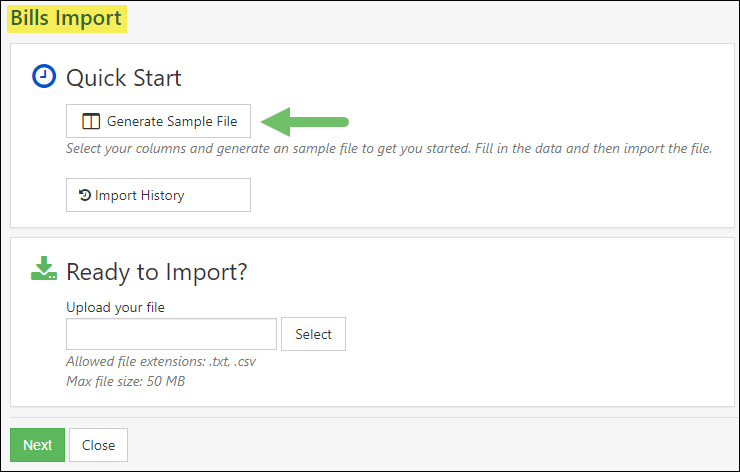
Example of Bills Import Page
Upon clicking Generate Sample File as shown above, a popup will appear in which you can select what information you would like to include on your import file. Below is an image of all the fields available for selection, and those highlighted in green are recommended or required. Once you are ready, select Download Sample to download a sample import file to use for import.
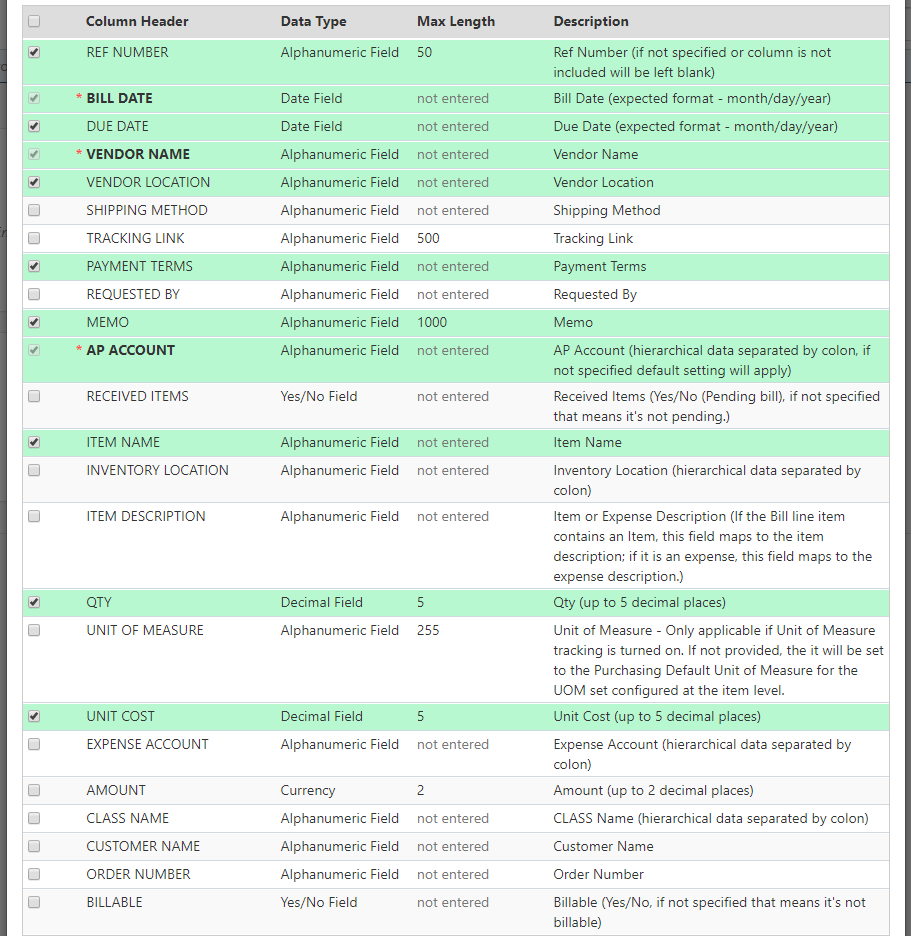
Example of Bills Import Mapping Selection
To format your import file, simply copy and paste information from your export into the import file underneath the corresponding column header. Please note the following adjustments that should be made for the corresponding column in your spreadsheet.
- Item: Please fill in this column using the Opening Balance Equity Item.
- Quantity: Please fill in this column with a quantity of 1.
- Amount: Please enter the Invoice’s open amount.
Once the import file is filled out with the adjustments noted above, save the file and go back to the Bills Import page within Striven and follow the steps listed below:
- Click the Select button in the Ready to Import section.
- Click the Next button below to continue importing.
Example of Ready to Import Page
3. Using the drop-down fields in the Mapping page, choose the appropriate Map To for each column header on your import file as shown in the image below:
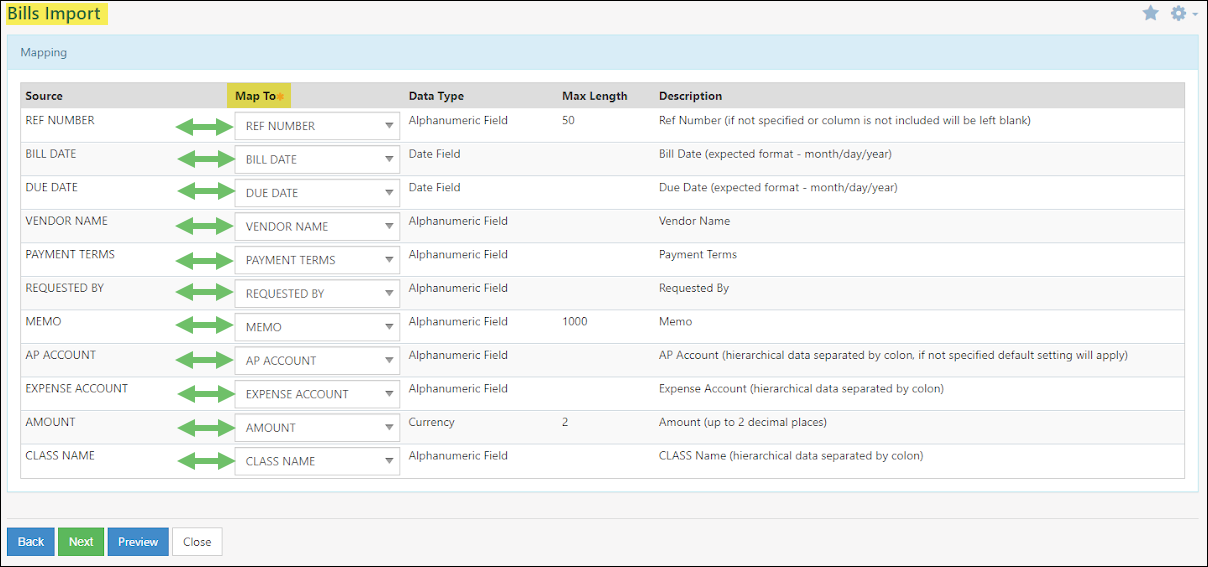
Example of Bills Import Mapping
4. Click Next to finish importing.
-
Open Bill Credits
Once your Bills have been imported you can then begin entering the open Bill Credits. Please note that if there are any open or unapplied Bill Payments it is recommended they be entered as Bill Credits since Payments can only be related to open Bills.
Bill Credits can be migrated into Striven either by creating new Bill Credits in Striven or by using a Journal Entry Import. The sections below will walk you through how to accomplish either method.
Creating a Bill Credit in Striven for Migration
To create a Bill Credit for migration, please use the following steps:
- Navigate to Vendors → Financial → Credit.
- When on the Add Bill Credit Info screen, choose the Vendor the Bill Credit is for.
- Enter the appropriate date and reference number according to the A/P Aging Detail report from your old system.
- In the Items section of the Bill Credit, choose the item Opening Balance Equity Item.
- Keep the quantity as 1 and change the Cost to the total Bill Credit amount.
- Click Save to save the Bill Credit.
Example of Creating a Bill Credit
Importing a Journal Entry Bill Credit in Striven for Migration
To use a Journal Entry Import to migrate open Bill Credits, please reference the following steps:
- Navigate to Accounting → Recurring Transactions → Journal Entries.
- Next, click on the Import Journal Entries button on the Journal Entries List page.
- It is recommended to download a sample import file, and you can do so by clicking the Generate Sample File button as shown below:
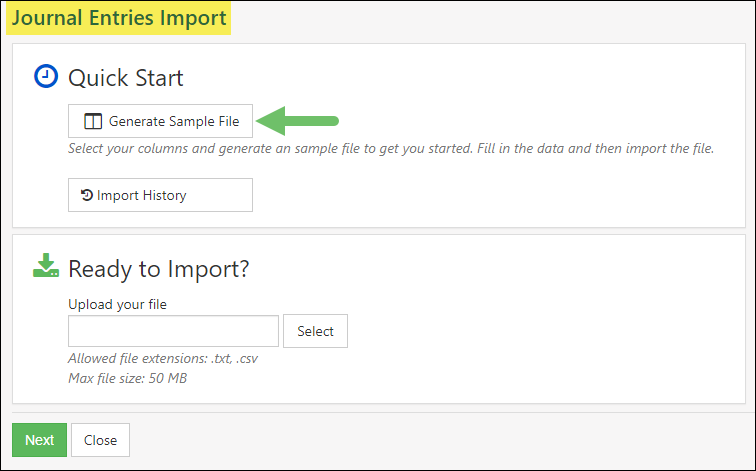
Example of Journal Entries Import Page
4. Next, choose what columns you would like to include in your sample file. Recommendations are shown in the image below when using the import to migrate open Bill Credits.
Example of Journal Entry Import Mapping Selection
5. Next, simply copy and paste the information related to open Bill Credits into the sample file. Each credit will have two lines; one for Accounts Payable and the other for Opening Balance Equity. Since we’re importing the Journal Entries as Bill Credits you’ll want to debit the Accounts Payable for each memo line as the open balance of each credit. Each Opening Balance Equity line will have the same amount, but in the Credit column.
6. Once you have the sample file formatted, select the file on the Journal Entry Import page using the Select button and clicking Next to continue as shown below:
Example of Ready to Import Page
7. After clicking Next, you will be brought to the Mapping page to ensure the headers are being mapped appropriately. If everything looks good, click Next to finish importing.
-
Verifying your Accounts Payable Account
After you have successfully migrated your Open Bills and Bill Credits, it is important to verify your Accounts Payable balance. The easiest way to accomplish this is to compare the Balance Sheet in Striven to the Balance Sheet export taken from your old system as of the Cutover Date. If the total A/P matches, then you can move on to the next migration objective. If the totals do not match it is important to investigate further.
- Difference in A/P – If you notice a difference in the total accounts payable in Striven compared to your old system a great way to verify your data is to run Vendor balances. If there are balances that are not matching then you can investigate those Vendors further to help correct any discrepancies by editing Bills or Bill Credits as needed to make up the difference in A/P until the two systems equate each other.
-
Inventory Quantity and Values
Once you have your Inventory Valuation export you are ready to begin formatting an inventory adjustment import file from Striven.
An Inventory Adjustment is a great way to enter current quantities on hand and values for multiple inventory Items at one time. To perform this function for up to 500 Items at a time you can use Striven’s inventory adjustment import function. It is recommended that you use a sample inventory adjustment file to migrate your on-hand quantities and values into Striven using the Quantity and Value Inventory Adjustment Import. To import use the following steps listed below:
- Navigate to Accounting → Inventory → Adjustments.
- Click the Add button as shown below:
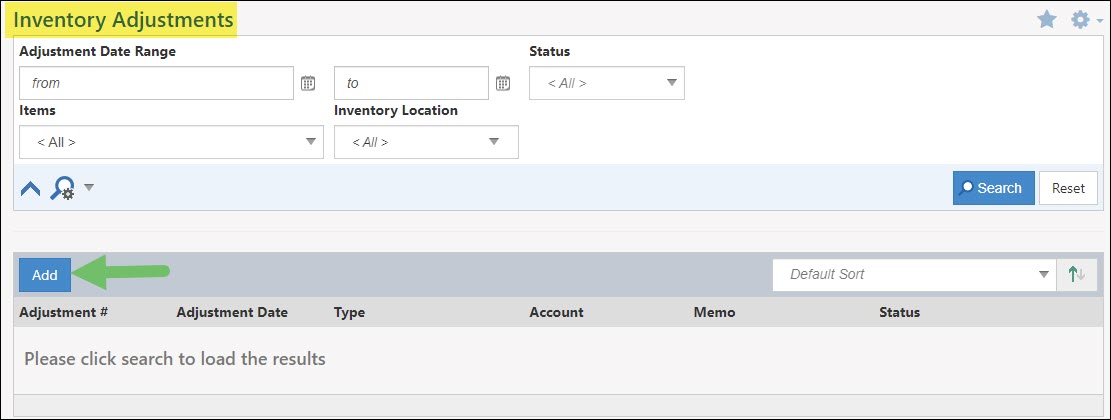
Example of Inventory Adjustments Page
3. Click on the drop-down list for Type and choose Quantity and Value as shown below:
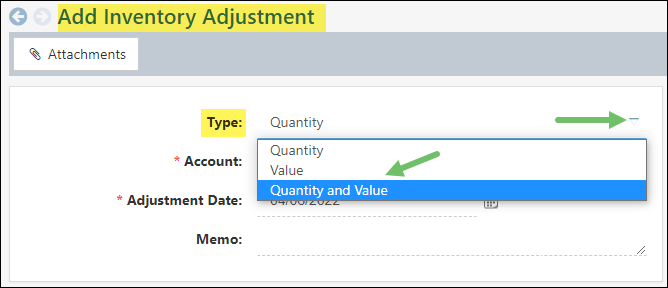
Example of Add Inventory Adjustment Page
4. Select the Import Adjustments button.
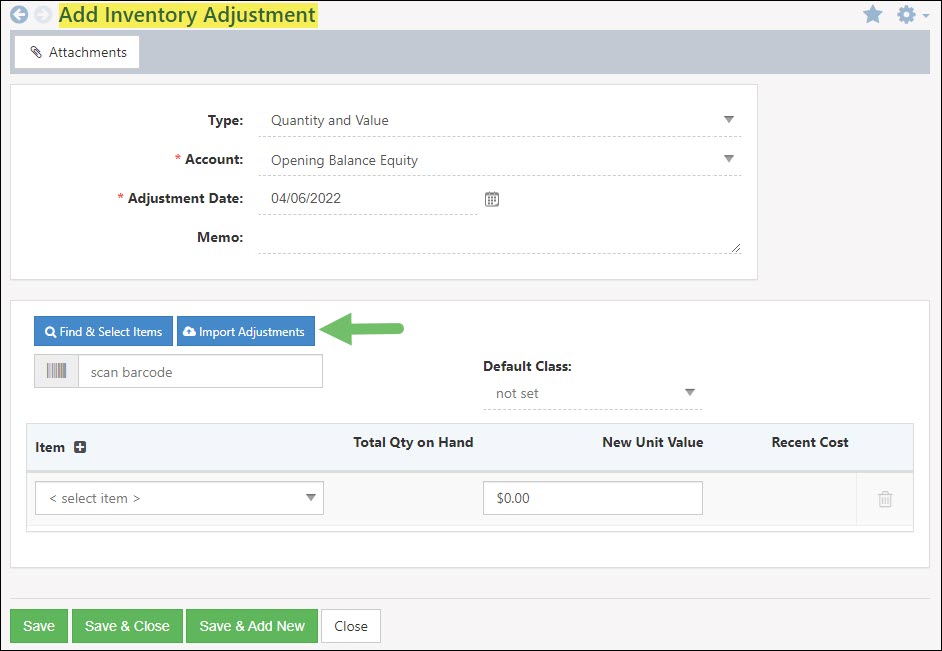
Example of Inventory Adjustments Button
5. When the popup appears click the Download Cloud icon in the top right corner to download a sample import file.
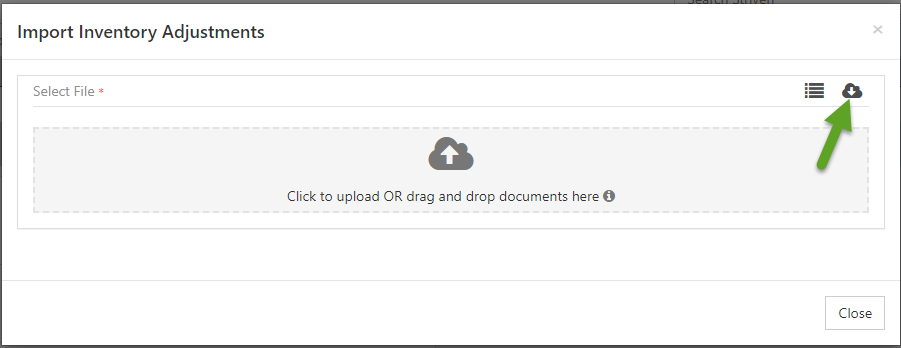
Example of Inventory Adjustments Popup
6. Fill out the spreadsheet with the relevant information needed to import and save your file as a .CSV file.
7. Click the Upload Cloud icon in the middle of the popup or drag and drop the desired import file to import the data.
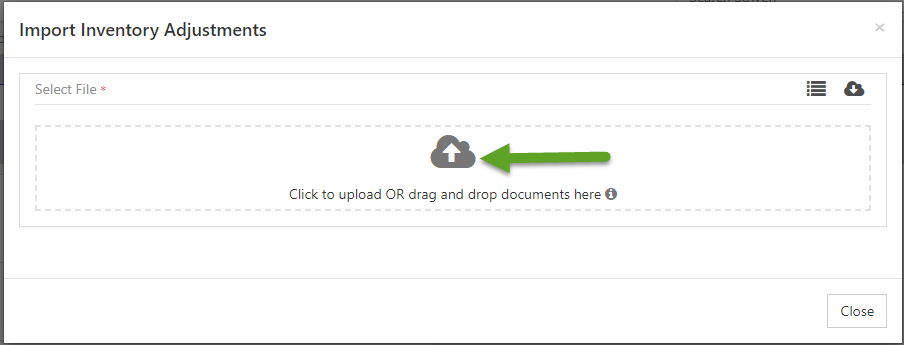
Example of Inventory Adjustments Popup
8. When the import file finishes, your results will be displayed on the Inventory Adjustment page. To finish uploading your data, simply scroll down and click the Save button.
-
Verifying your Inventory Asset Account
After you have successfully imported your Inventory Adjustments it is important to verify your Inventory asset account balance. The easiest way to accomplish this is to compare the Balance Sheet in Striven to the Balance Sheet export taken from your old system as of the Cutover Date. If the total Inventory Asset matches, then you can move on to the next migration objective. If the totals do not match it is important to investigate further.
- Difference in Inventory – If you notice a difference in the total Inventory Asset account total a great way to verify your data is to run an Inventory Valuation report in Striven and compare that to the Inventory Valuation export from your old system. If you notice certain quantities or values are missing you can correct them with another adjustment.
- Please keep in mind that if your export contained any negative quantities or values these were not brought over into Striven and that may equate the difference in the Inventory Asset account.
- Difference in Inventory – If you notice a difference in the total Inventory Asset account total a great way to verify your data is to run an Inventory Valuation report in Striven and compare that to the Inventory Valuation export from your old system. If you notice certain quantities or values are missing you can correct them with another adjustment.
-
Tax Adjustments
Once you have your Tax Liability export you are ready to begin creating Tax Adjustments inside of Striven. Tax Adjustments are a great way to associate how much your company owes to an agency. By saving a Tax Adjustment, a Journal Entry will be created using the information entered there including the date, memo, adjustment account, and more. To create a Tax Adjustment, users can use the following steps:
- Navigate to Accounting → Tax → Adjust.
- This will initiate the popup shown below, which you can adjust tax amounts for the Cutover Date.
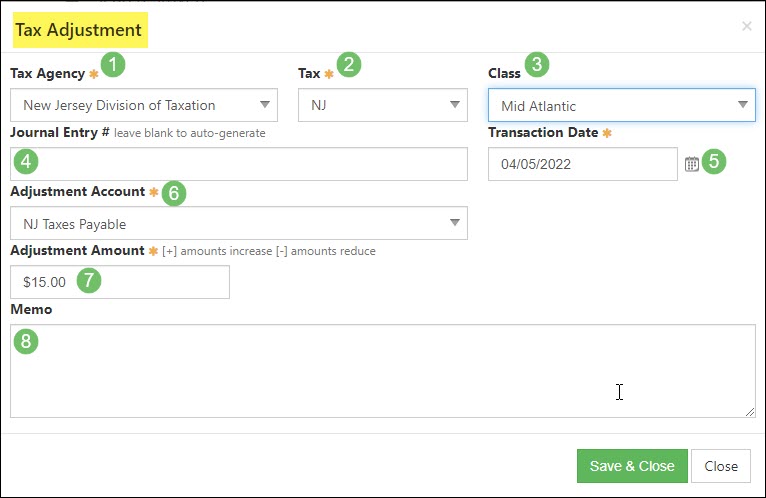
Example of Tax Adjustment Popup
- Tax Agency: In this field, users will choose the Vendor to whom the adjustment is related to, and in most cases, this will be the tax agency itself.
- Example: New Jersey Division of Taxation.
- Tax: This is the tax rate for which the adjustment is related to.
- Class: This is the financial class the adjustment will be posted to. If you are not tracking classes then this option will be hidden.
- Transactions Date: This is the date on which the adjustment will be posted.
- Journal Entry #: Here users can enter a number, which will be the Journal Entry number once the adjustment is saved.
- Adjustment Account: Here users can choose an offsetting account to make a Tax Adjustment. The other account will be listed in your Tax Settings.
- Adjustment Amount: This is the amount of the adjustment being entered for the agency and tax rate.
- Memo: Here users can enter a memo for the adjustment, which will become the Journal Entry memo.
-
Verifying Your Sales Tax Payable Account(s)
After you have successfully created Tax Adjustments, it is important to verify your Sales Tax Payable account balances. The easiest way to accomplish this is to compare the Balance Sheet in Striven to the Balance Sheet export taken from your old system as of the Cutover Date. If the total of each payable account matches, then you can move on to the next migration objective. If the totals do not match, it is important to investigate further.
- Difference in Sales Tax Payables – If you notice a difference in your sales tax payable accounts, a great way to verify your data is to run a Tax Liability report in Striven and compare it to your Sales Tax Payables export from your old system. If there is a difference in one or more agency totals, then you can click on the total and make edits as needed until the difference is made up and the Balance Sheet accounts equate.
-
General Ledger Balances
Once you have the Balance Sheet export you are ready to begin importing General Ledger account balances inside of Striven. Journal Entries are a great way to bring account balances into Striven, and you can use the import function to do so en masse. By creating or importing Journal Entries, each account will have its Ending Balances as of the chosen Cutover Date. The goal of the Journal Entry is that each account has the correct Ending Balance as shown in your old system and is offset using the account Opening Balance Equity. Opening Balance Equity is chosen as an offset because it creates an easy distinction of what was done during the migration. Below we will demonstrate how you can import a Journal Entry to set balances in Striven. When importing, it is recommended that you use a sample import file to migrate your open account balances into Striven using the Journal Entry Import. To download a sample Journal Entry Import file, visit the Journal Entry Import page and choose Generate Sample File as shown in the image below:
Example of Journal Entries Import Page
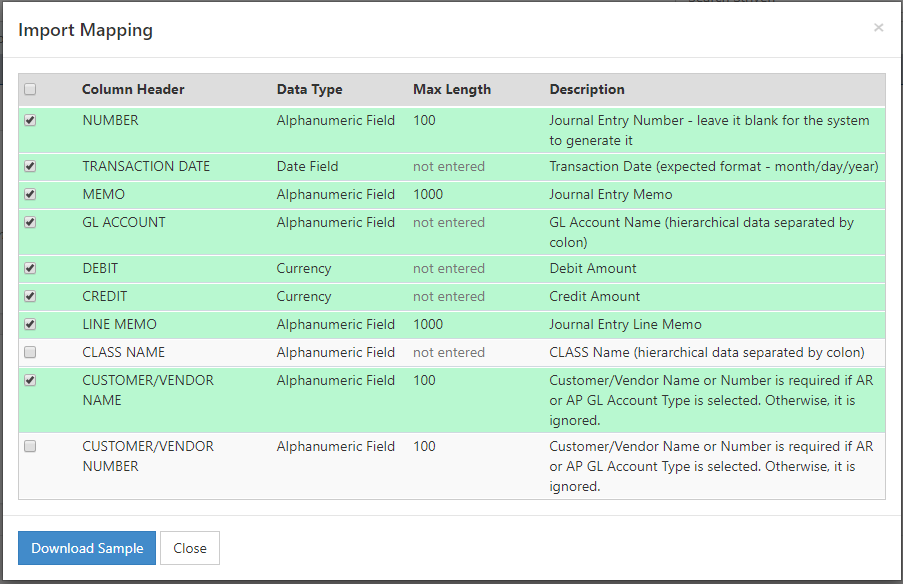
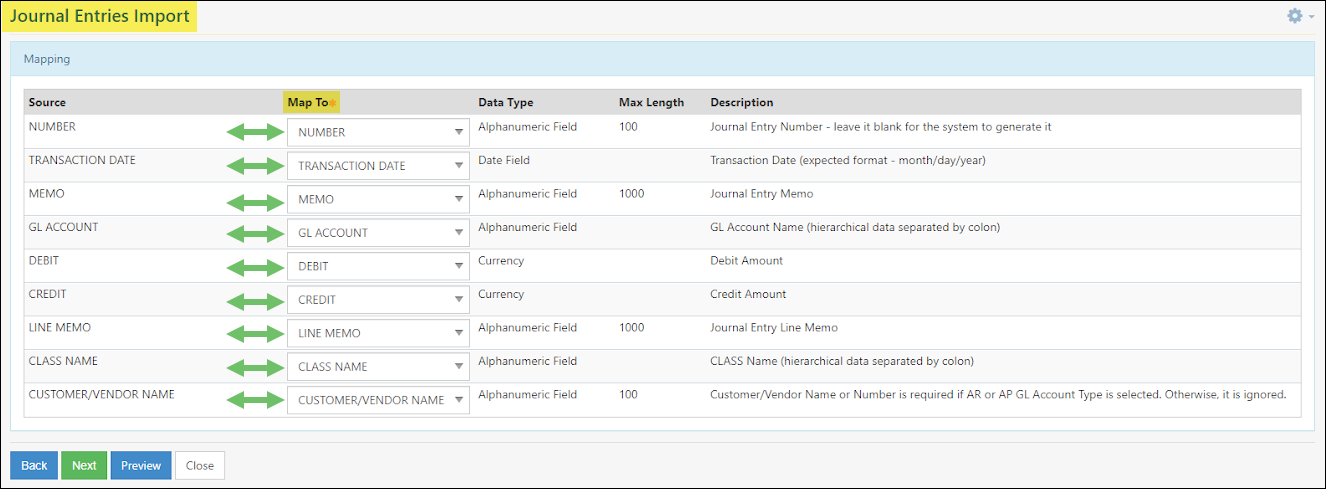
Upon clicking Generate Sample File as shown above, a popup will appear in which you can select what information you would like to include on your import file. Below is an image of all the fields available for selection and those highlighted in green are recommended or required. Once you are ready, select Download Sample to download a sample import file to use for import.
Example of Journal Entry Import Mapping
To format your import file, simply copy and paste information from your Balance Sheet export into the import file underneath the corresponding column header. Depending on each account type and it’s balance, the number will either go under the Debit or Credit column. Once the import file is filled out, save the file and go back to the Journal Entry Import page within Striven and follow the steps listed below:
- Click the Select button in the Ready to Import section.
- Click the Next button below to continue importing.
Example of Ready to Import Page
3. Using the drop-down fields in the Mapping page, choose the appropriate Map To for each column header on your import file as shown in the image below:
Example of GL Journal Entry Import
4. Click Next to finish importing.
-
Bringing Over Your Retained Earnings
In Striven, Retained Earnings is a calculated total that derives from your Profit & Loss Report totals from your previous fiscal year. You can also flag a GL Account on your Chart of Accounts as a Retained Earnings Account. If an account is flagged as Retained Earnings, their postings are calculated as Retained Earnings on the Balance Sheet and Trial Balance. To learn more about how to flag an account as Retained Earnings, reference our Accounting Setup Guide.
To have the total appear on your Balance Sheet in this calculated field, it is recommended that a Journal Entry be created using the flagged account. This Journal Entry should be dated for the last day of your previous fiscal year, for instance 12/31/2021. To achieve this, use the steps listed below:
- Navigate to Accounting → Recurring Transactions → Journal Entries.
- Click Add Journal Entry button.
- Change the date to the last date of your prior fiscal year.
- In the GL Account selection box, choose the account flagged as Retained Earnings.
- Input the amount designated as Retained Earnings into the Credit or Debit field based on whether the amount is positive or negative.
- If Retained Earnings is a positive number, insert the total into the Credit field.
- If Retained Earnings is a negative number, insert the total into the Debit field.
- In the following GL Account selection box, choose the Opening Balance Equity account.
- Input the same amount into the opposite field to balance the Journal Entry.
- Click Save & Close to create the Journal Entry.
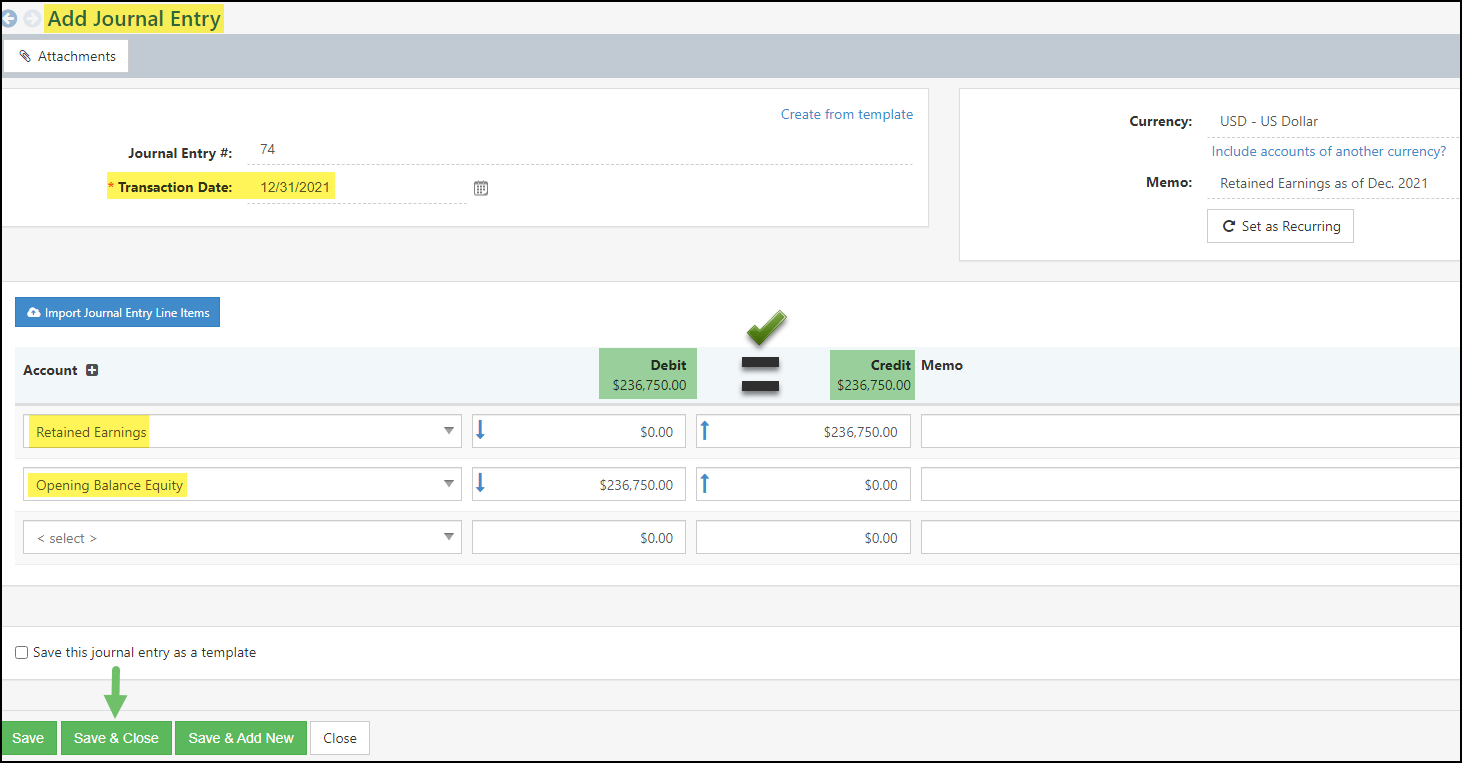
Example of Creating a Retained Earnings Journal Entry
-
Bringing Over Your Net Income
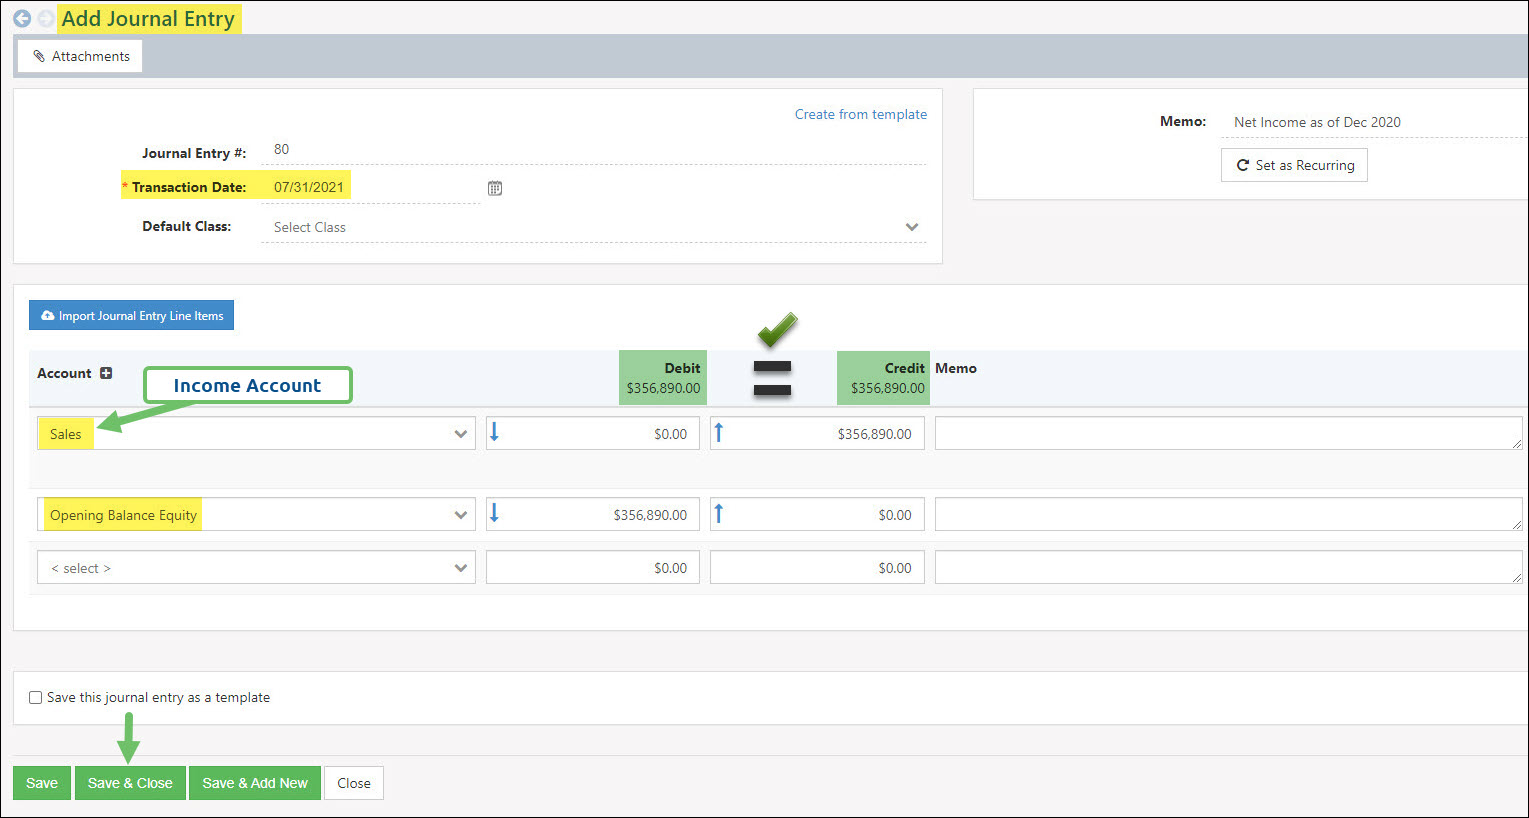
In Striven, Net Income is a calculated total that derives from your Profit & Loss Report totals. To have the total appear on your Balance Sheet in this calculated field, it is recommended that a Journal Entry be created. This Journal Entry should be dated for the last day of the month prior to your cutover date using an Income Account. To achieve this, use the steps listed below:
- Navigate to Accounting → Recurring Transactions → Journal Entries.
- Click Add Journal Entry button.
- Change the date to a month prior to the cutover date.
- In the GL Account selection box, choose the appropriate Income Account.
- Input the amount designated as Net Income into the Credit or Debit field based on whether the amount is positive or negative.
- If Net Income is a positive number, insert the total into the Credit field.
- If Net Income is a negative number, insert the total into the Debit field.
- In the following GL Account selection box, choose the Opening Balance Equity account.
- Input the same amount into the opposite field to balance the Journal Entry.
- Click Save & Close to create the Journal Entry.
-
Verifying Your GL Account Balances
After you have successfully imported Journal Entries into Striven, it is important to verify your General Ledger account balances. The easiest way to accomplish this is to compare the Balance Sheet in Striven to the Balance Sheet export taken from your old system as of the Cutover Date. If the total of each account matches, then you can move on to the next migration objective. If the totals do not match, it is important to investigate further.
- Difference in Account Balances – If you notice a difference in one or more account balances, a great way to correct it is to click on the account total on the Balance Sheet in Striven. This will display the Journal Entry where the balance exists, and by clicking on the Journal Entry number you can view and edit the Journal Entry as needed to make up the difference until all account balances equate.
Performing a Historical Accounting Migration
-
Accounting Migration Tool
Accounting migrations can be hectic and nerve-racking, especially when you are trying to bring over historical accounting data. With this in mind, Striven provides an Accounting Migration Tool for subscribers who want to enter in their historical summary data by fiscal year instead of one Journal Entry with the Opening Balance for each account.
-
User Role Permission
Before using this feature, you will need to ensure that you have the “Accounting – Historical Migration” permission included in your User Role. If not, you can contact your Company’s Striven system administrator to request access.

Example of Permission Required to Access the Accounting Migration Tool
-
Preliminary Steps
After you have confirmed your User Role has access, you can find the Accounting Migration Tool by navigating to:
Company → Settings → Accounting → Settings. From this page, click on the option for Accounting Migration on the right side of the page.

Example of the Accounting Migration Tool Option on the Accounting Settings Page
There are some recommended preliminary steps noted on the screen in the top right corner to follow before creating the Adjustment Journal Entry using the new migration tool. Once the preliminary steps are completed, you will need to run a Trial Balance Report in your legacy accounting system of the oldest period you want to enter the data for into Striven, and then export that data from the legacy system into a .CSV file to use for import instead of manually entering the amounts for each account for the next step of the process.
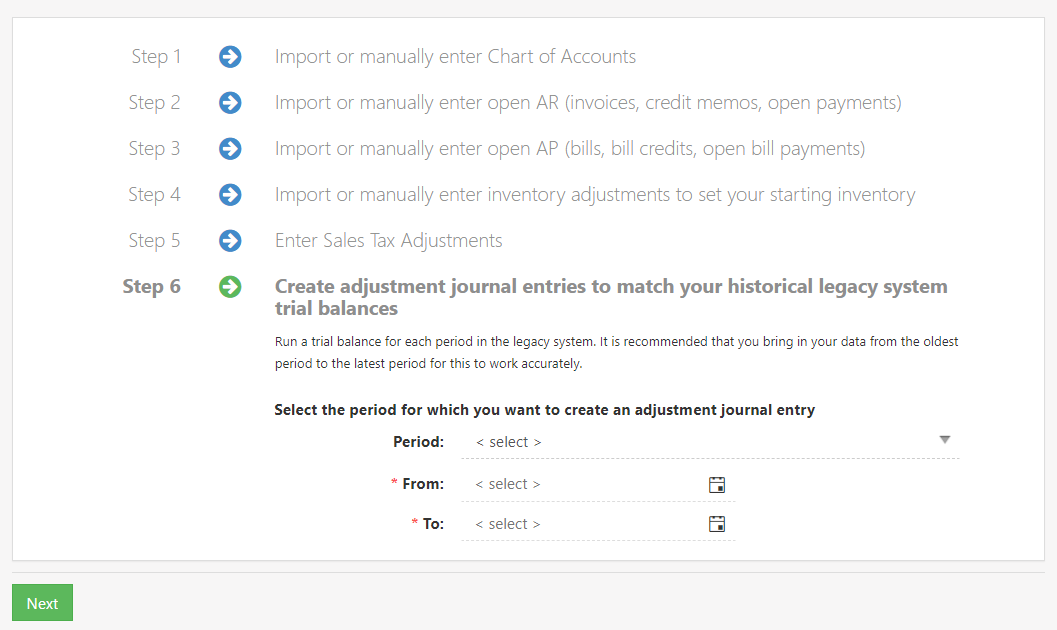
Example of Preliminary Steps for an Accounting Migration
-
Creating the Adjustment Journal Entry
Striven has a built-in import option on the next page for this purpose. But first, you will need to select the date period for the Adjustment Journal Entry and click the Next button. This will load the data entry page where the Import Legacy System Line Items button and the following columns are displayed:
- Account: Lists all the GL Accounts imported into Striven. This includes all Active and Inactive accounts that have any activity during the selected period.
- Striven Trial Balance: Lists the report data coming from the Trial Balance run in Striven for the selected period.
- Legacy System Trial Balance: Data entry fields where you can manually enter the data from your legacy system, or use the Import tool at the top of the page to speed up the process.
- Adjustment Journal Entry: Displays the Adjustment Journal Entry data, which is calculated using the data from Column 2 and Column 3.
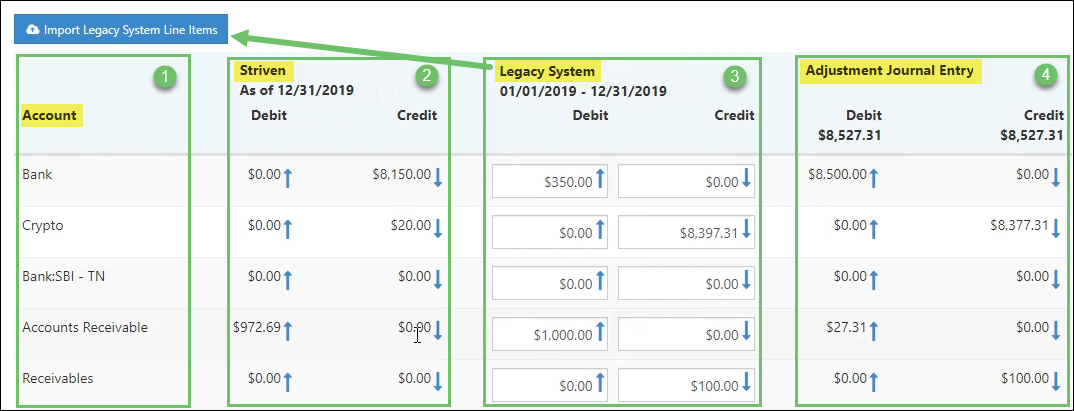
Example of Data Entry Page for an Accounting Migration
The goal with the Accounting Migration is to create the Adjustment Journal Entry so that when added to the current data in Striven, the balance matches the legacy system data. And the best part is that Striven does the calculations for you!

Example of the Debits & Credits of Adjustment Journal Entry Matching
A Customer/Vendor will be required at the bottom of the page before completing the Adjustment Journal Entry. This will be used for AR/AP entries if any. Typically, you will use your own Company for this Historical Summary Journal Entry.
You will also see an option at the bottom of the page to attach files that will be accessible from the Journal Entry being created.
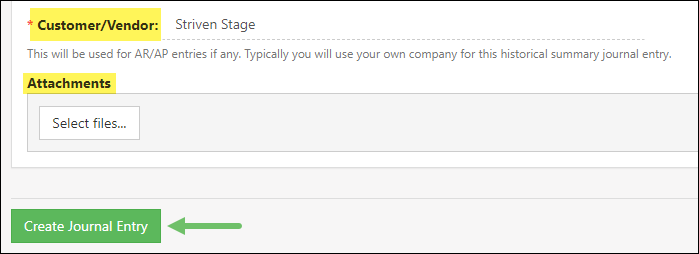
Example of the Customer/Vendor Selection & Attachments Options
Once all the legacy data is entered or imported, and the total debits and credits of the Adjustment Journal Entry column are matching, you can complete the process of creating the Adjustment Journal Entry.
After you click the Create Journal Entry button, a confirmation page will appear with a link to view the Journal Entry you just created and a button to Create Another Entry.
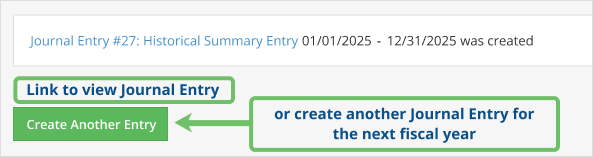
Example of the Adjustment Journal Entry Confirmation Page
When viewing the Journal Entry you just created, the Transaction Date will be set to the period end date, and the memo field will include info about the period and Class, if applicable.

Example of an Adjustment Journal Entry Displaying the Transaction Date & Memo Field
-
Historical Non-Posting Transactions
To reduce the need for intense precision during the import process, Striven has an import feature designed to facilitate the import of historical financial transactions without affecting your General Ledger.
Importing Historical Non-Posting Transactions
Historical Non-Posting Transactions can be created easily with the use of Striven’s Transaction Import pages. In order to perform a transaction import, you will need the related User Role permissions, such as “Invoices – Import” for importing Invoices, “Payments – Import” for importing Payments, etc.
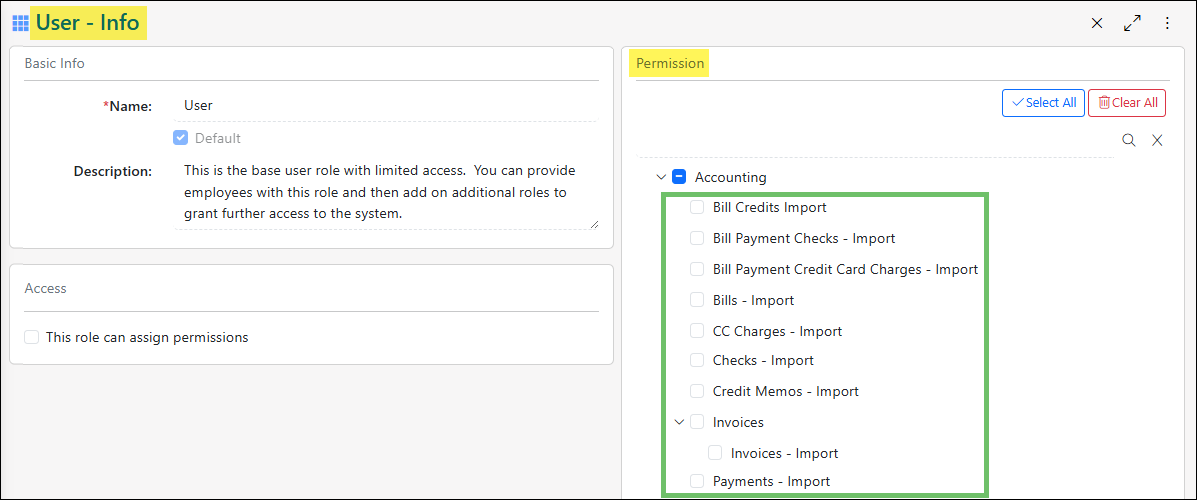
Example of Import Permissions Related to Transactions
Once you have confirmed you have the appropriate access, you can navigate to Accounting > Transactions to open the Transactions List page and click on the Import button to select the transaction import you want to use.
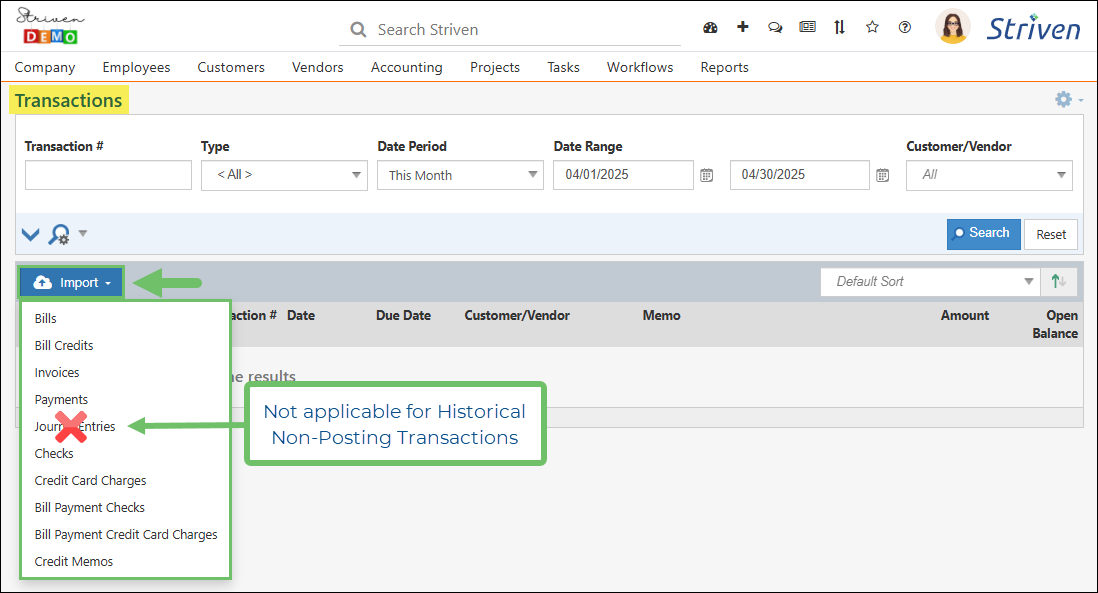
Example of the Import Options Available on the Transactions List Page
All transaction Import pages, with the exception of Journal Entries, have a checkbox option for Import as historical non-posting transactions. Enabling this checkbox will import transactions as non-posting, meaning they will not affect your accounting records and will not appear in financial reports such as Aging, Profit & Loss (P&L), and Balance Sheet.

Example of the Historical Non-Posting Transactions Import Option on the Invoice Import Page
Historical non-posting transactions can only be created through the import process and cannot be added manually within Striven or by way of an API. The Historical Non-Posting filter on the Transactions List is a Read-Only field via API, allowing you to identify historical transactions. It is also important to note that historical non-posting transactions cannot be set as recurring.
For more information related to performing imports in Striven, please refer to our Import Management Guide.
Managing Historical Non-Posting Transactions
To easily identify these historical non-posting transactions, a search filter for Historical Non-Posting is included on the Transaction List page.
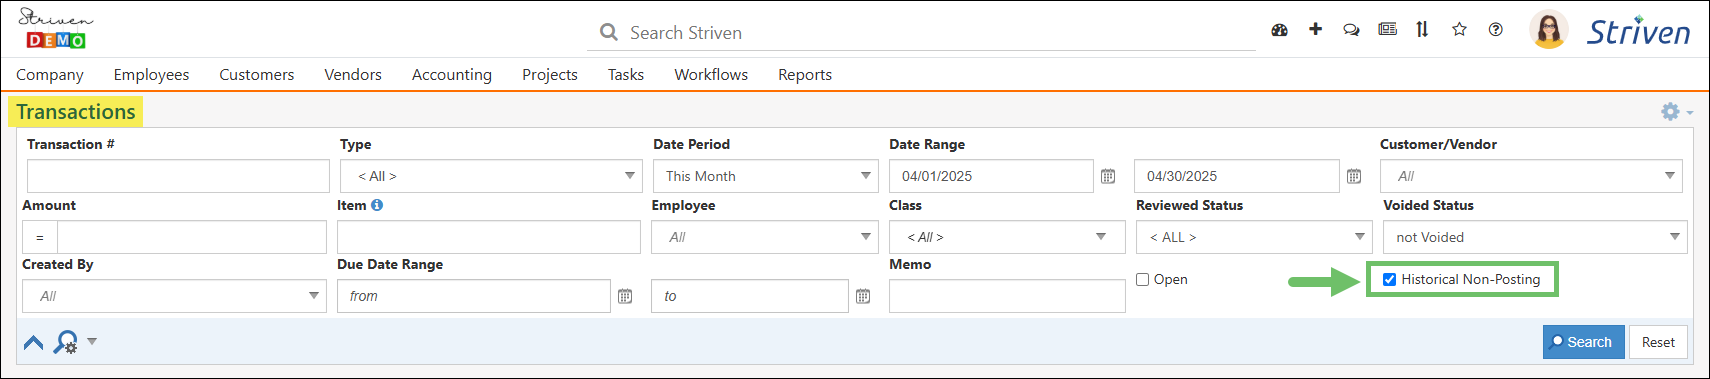
Example of the Historical Non-Posting Filter on the Transactions List Page
Additionally, a blue Historical Non-Posting label will appear in the top-right corner on the Transaction – Info page for a historical non-posting transaction, such as an Invoice.
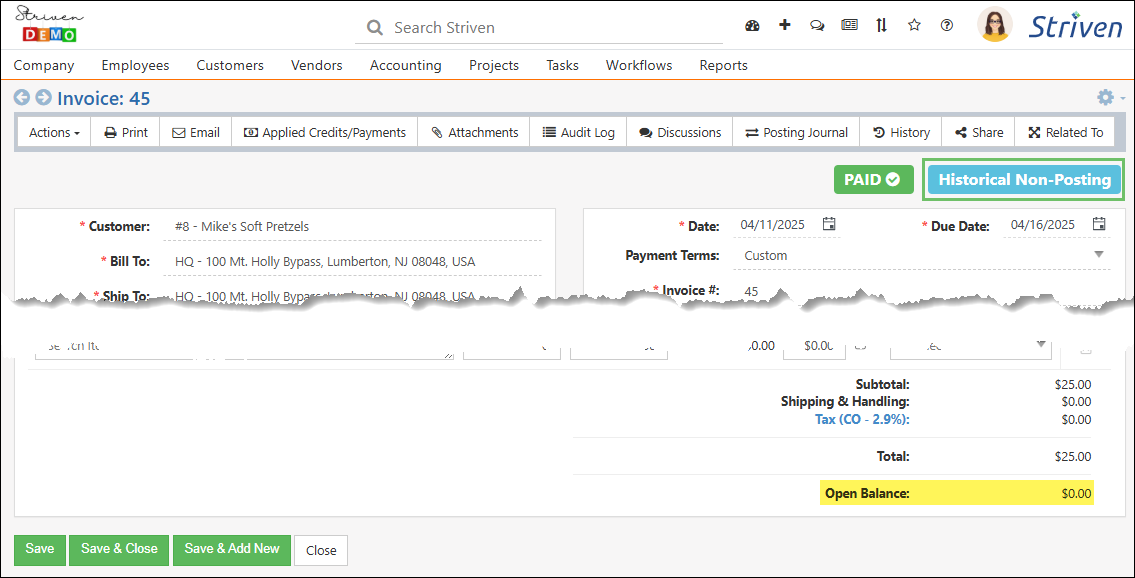
Example of a Historical Non-Posting Invoice
It is important to note that the Open Balance of historical non-posting transactions will always be zero (0), regardless of any Payments or Credits applied. Similarly, the Posting Journal for these transactions will be blank, displaying a message stating, “This is a historical non-posting transaction and does not affect the postings.”

Example of the Posting Journal for a Historical Non-Posting Transaction
Although it is possible to apply historical transactions to other historical transactions, such as applying historical Payments to historical Invoices, the Open Balance of either transaction will not be affected. The main purpose of this application is to create relationships between transactions for record-keeping.
These historical transactions will not be included in standard financial reports or impact inventory. However, a column and filter for Historical Non-Posting transactions are included in the Report Builder for the Transactions, Invoices, and Bills Datasets, with a Yes/No logic for the filter/column.
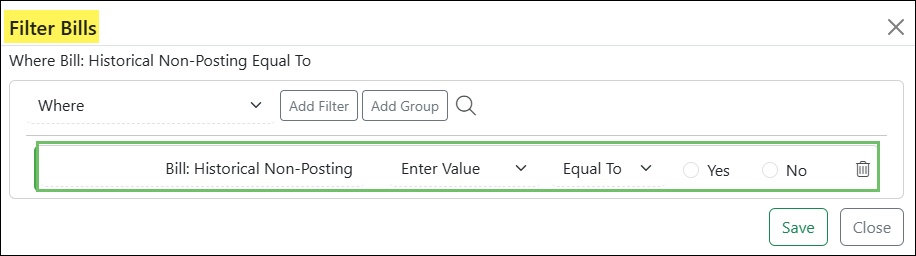
Example of the Historical Non-Posting Filter in the Bills Dataset of the Report Builder
Portal Visibility of Historical Non-Posting Transactions
While these transactions can be viewed in the Customer/Vendor Portal, there is no indication or label to identify that they are historical.
-
Post Migration
Once all the data needed for migration has been entered or imported into Striven you are ready to begin finalizing your accounting migration. There are a few recommended practices to finish the migration with confidence and the sections below will discuss these in more detail.
-
Verifying Balances
Verifying your data should be the first thing you do once everything has been entered into Striven to ensure the accuracy of migration. Even if you’ve verified every step of the way as directed in each section above comparing your Balance Sheets again will help ensure nothing was missed. When comparing each general ledger account total on the Balance Sheet should match exactly between systems including your Accounts Receivable, Accounts Payable, Tax Payables, and Inventory Asset accounts. If you’re reporting on classes, then each account total per class should match exactly across Balance Sheets. If everything matches correctly, you can continue on to setting a Closing Date in your system. If the balances do not match, it is important to correct those discrepancies prior to continuing onward. Tips for troubleshooting are listed below along with recommended practices to troubleshoot and resolve.
-
Setting a Closing Date
Once all the account balances match across Balance Sheets it is important to set a Closing Date in Striven to protect all transactions prior to the Closing Date. To set a Closing Balance in Striven, please follow the steps listed below:
- Navigate to Company → Settings → Accounting → Settings.
- On the top right of the Accounting Settings page, click the Calendar icon next to Closing Date and choose the date of migration.
- Click Save to save your changes.

Example of Accounting Settings Page
-
Managing Permissions
Once the Closing Date has been saved it is important to limit access for users who should not be able to edit transactions created prior to the Closing Date. This helps protect your migration data so that it is not accidentally altered by users. To limit access for this function permission, simply remove the permissions access from each user role who should not have that function available to them. Once the permissions have been narrowed down as needed you’ll have peace of mind knowing that the migration data is only editable by those who need to edit the data.
Reconciliations
-
Reconciling for the First Time
When reconciling your accounts for the first time after a migration it is important to take into consideration when your Cutover Date was. This is important because, depending on your migration date and where it falls on your statement, the way you reconcile could change. Below are recommended practices when reconciling for the first time based on two distinct scenarios.
-
Reconciling Based on an End of Month Migration
If your migration date was the end of the previous month (for instance, September 30th) then this section will help you reconcile your accounts as needed for the month of September. Due to the migration being dated for the end of the month (i.e. September 30th) you should be able to reconcile using the Journal Entry made during migration as your first Reconciliation’s Ending Balance using the steps below:
- Navigate to Accounting → Banking → Reconciliations.
- Next, click the Reconcile button on the Reconciliations List.
- Choose the account you would like to reconcile.
- Enter the Ending Balance and Statement Date as they appear on your statement.
- Enter any Service Charges or Interest in the available fields.
- Click Next to continue reconciling the account.
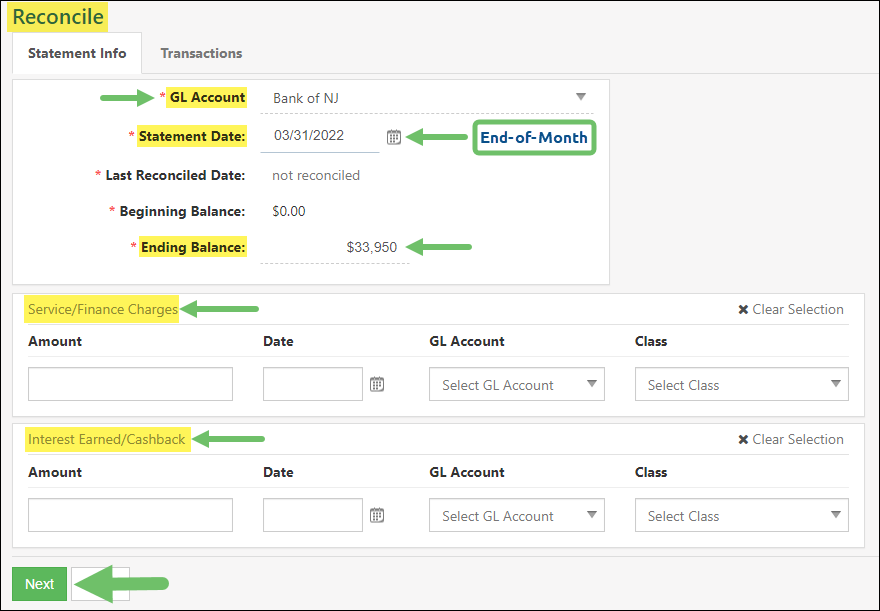
Example of Reconcile Page (for End-of-Month)
7. After clicking Next, you will be brought to a list of transactions for the statement period represented on two sides of the screen.
8. Since you are reconciling the end of the previous month there should only be the Journal Entry for the account.
9. Toggle the box to the right of the transaction you would like to include in your Reconciliation if it appears on your received statement.
- If the Journal Entry you entered makes up your Ending Balance, simply toggle the box, which will highlight the transaction in green and the difference should display as zero.
10. Once the difference is zero, you can click the Reconcile button to finish reconciling for the period.
-
Reconciling Based on a Mid-Month Migration
If your migration date was in the middle of the previous month (for instance September 15th) then this section will help you reconcile your accounts as needed for the month of September. Due to the migration being dated for the middle of the month (i.e. September 15th) it is recommended that you perform a split Reconciliation. This means that the beginning half of the month and up to your migration date you should reconcile in your old system. On the migration date and up to the statement date you should reconcile in Striven. This is due to transactions being in two systems.
The easiest way to think of this is to take your received statement and draw a line under the transactions dated as of your migration date. All transactions on the statement above the line (made prior to the migration date) will be reconciled in your old system. All transactions below the line (dated after the migration date) will be reconciled in Striven. With the Journal Entry created during migration, you should be able to reconcile in Striven by including the Journal Entry created during migration. Including the Journal Entry from migration on your Reconciliation will act as a Beginning Balance in Striven and you should be able to reconcile using the steps below:
- Navigate to Accounting → Banking → Reconciliations.
- Next, click the Reconcile button on the Reconciliations List.
- Choose the account you would like to reconcile.
- Enter the Ending Balance and Statement Date as they appear on your statement.
- Enter any Service Charges or Interest in the available fields.
- Click Next to continue reconciling the account.
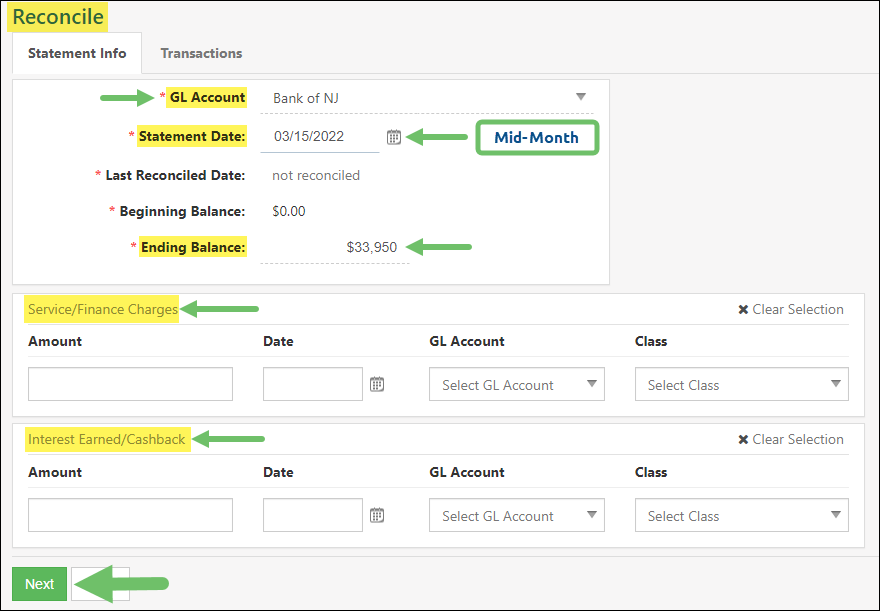
Example of Reconcile Page (for Mid-Month)
7. After clicking Next, you will be brought to a list of transactions for the statement period represented on two sides of the screen.
8. Since you are reconciling the middle of the previous month, the Journal Entry from migration should appear at the top of the Reconciliation. This Journal Entry should equal your Ending Balance as of that date.
9. Toggle the box to the left of the transactions you would like to include in your Reconciliation if it appears on your received statement.
10. The difference once everything on your statement has been cleared in Striven should be zero and you can click the Reconcile button to reconcile your account.
-
Recap
So with this guide, we’ve learned a lot about how to migrate accounting into Striven. From recommended practices, migrating tools, and post-migration tips, this guide should provide more clarity and confidence when migrating financials into Striven.

Have a Question?
Ask the Striven Community
User-sourced how-to’s, feedback, and more!
FAQs
-
Can I add my CPA into the system so they can check on things?
Yes, a CPA can be added into Striven by creating an Employee using your CPA’s information such as name, phone number, and an email that they will use to login. You can also grant them access with their User Role by including permissions that make sense for them to have. Once they receive the Welcome Email, they can log in and perform their functions in Striven on an ongoing basis. To learn more about how to add an Employee to Striven, please reference our Employee Setup & Info Guide.
-
Does it cost anything extra to have my accountant login to the system?
Adding your accountant into your system costs the price of one user, which is based on your subscription plan. This is because as a user they will be logging into the system to monitor and manage finances for your company.
-
Is there a way to import checks into Striven?
Yes, Striven has a checks import function that will allow users to import checks en masse into Striven. To learn more about how checks are utilized in Striven, please reference our Banking Guide.